
Why Disable the Control Center?
The Control Center on the iPad is a convenient feature that allows users to quickly access various settings and shortcuts. With just a swipe up from the bottom of the screen, you can easily adjust the screen brightness, control media playback, toggle Wi-Fi and Bluetooth, and much more. It’s undoubtedly a handy tool for enhancing the user experience and improving efficiency.
However, there are instances when you might want to disable the Control Center on your iPad’s lock screen. One common reason is for privacy concerns. When the Control Center is accessible on the lock screen, anyone can potentially access your device’s settings and perform various actions without entering your passcode or using biometric authentication.
By disabling the Control Center on the lock screen, you can ensure that sensitive features and settings remain protected. This is particularly important if you store sensitive information on your iPad or if you use your device in public places where prying eyes might be tempted to tinker with your settings.
Another reason to disable the Control Center is to prevent accidental activation. If you frequently find yourself inadvertently triggering the Control Center when using your iPad, disabling it on the lock screen can help prevent actions from being unintentionally initiated. This can save you from the frustration of accidental disruptions or changes to your device’s settings.
Furthermore, disabling the Control Center on the lock screen can also help improve the overall security of your iPad. While it may seem like a minor inconvenience, every additional layer of protection counts. By removing the ability to access the Control Center from the lock screen, you add an extra barrier of security that can deter potential unauthorized access to your device and its features.
In the following steps, we will guide you on how to disable the Control Center on your iPad’s lock screen. It’s a simple process that can be easily reversed should you decide to enable it again in the future. So, let’s get started!
Step 1: Unlock Your iPad
To begin the process of disabling the Control Center on your iPad’s lock screen, you must first unlock your device. Make sure your iPad is awake and displaying the lock screen.
If your iPad has Face ID enabled, simply look at the screen to trigger the facial recognition technology and unlock your device. If your device has Touch ID, place your finger on the Home button to unlock it.
If you have a passcode set up, enter the passcode to unlock your iPad. The passcode is a series of numbers or alphanumeric characters that you have set up as a security measure. It ensures that only authorized users can access your device and its features.
Remember to use caution when entering your passcode, especially if you’re in public or around others. Shielding the screen from prying eyes can help protect your passcode from being observed or potentially even guessed.
Once your iPad is unlocked, you’re ready to move on to the next step of the process.
Step 2: Open Settings
After unlocking your iPad, the next step is to open the Settings app. The Settings app is where you can customize various aspects of your iPad, including security, display, connectivity, and much more.
To open the Settings app, locate the app icon on your home screen. The app icon resembles a gear or cogwheel. Tap on the icon to launch the Settings app.
Once you tap on the Settings app icon, the app will open, displaying a list of different settings categories. These categories are organized in sections for easy navigation. You can scroll through the list or use the search bar at the top of the screen to quickly find specific settings.
Take a moment to familiarize yourself with the various sections within the Settings app. This will make it easier for you to locate specific settings in the future.
Now that you have successfully opened the Settings app, you’re ready to proceed to the next step of disabling the Control Center on the lock screen of your iPad.
Step 3: Tap “Face ID & Passcode” or “Touch ID & Passcode”
In order to disable the Control Center on the lock screen of your iPad, you need to access the relevant security settings. Depending on your iPad model and the biometric authentication method you have set up, the specific option you need to tap may vary.
For devices with Face ID, such as the iPad Pro models, tap on “Face ID & Passcode.” For devices with Touch ID, like the iPad Air or iPad Mini, tap on “Touch ID & Passcode.”
These options can be found in the Settings app, within the “Security” or “Touch ID & Passcode” section. When you tap on the respective option, you will be prompted to authenticate your device using either your face or your fingerprint, depending on the authentication method your iPad supports.
If you have Face ID enabled, align your face within the frame displayed on the screen until your iPad recognizes and successfully authenticates your face. If you have Touch ID enabled, place your registered finger on the Home button to authenticate your fingerprint.
It’s important to note that the Face ID or Touch ID authentication is required to access the security settings because they involve sensitive information and controls that could affect the overall security of your iPad.
Once you have successfully authenticated your device, you’re ready to move on to the next step of disabling the Control Center on the lock screen.
Step 4: Authenticate Your Device
After tapping on “Face ID & Passcode” or “Touch ID & Passcode” in the Settings app, you will need to authenticate your device to access the security settings. This step ensures that only authorized users can make changes to the iPad’s biometric authentication and passcode settings.
For devices with Face ID, your iPad will display a frame on the screen asking you to position your face within it. Align your face accordingly, making sure it is well-lit and clearly visible to the front-facing camera. Once your face is successfully recognized, your device will unlock.
If your iPad has Touch ID, place your registered finger on the Home button to authenticate your fingerprint. Make sure that your finger covers the entire Home button for accurate recognition. If your fingerprint is successfully authenticated, your device will unlock.
It is important to note that the authentication process ensures the security and privacy of your device. By verifying your identity through Face ID or Touch ID, it prevents unauthorized access to sensitive information and settings.
If the authentication process fails, make sure that your face or fingerprint is properly aligned and that the sensor is clean and free from any debris. Retrying the authentication process in a well-lit environment with a clean sensor usually leads to successful authentication.
Once your device is successfully authenticated, you can proceed to the next step of disabling the Control Center on the lock screen. The security and convenience features provided by Face ID or Touch ID make it easier for you to access your device while maintaining a secure environment for your personal information.
Step 5: Scroll Down to “Allow Access When Locked”
Now that you have successfully authenticated your device, it’s time to scroll down within the security settings to find the option that controls access to the Control Center on the lock screen.
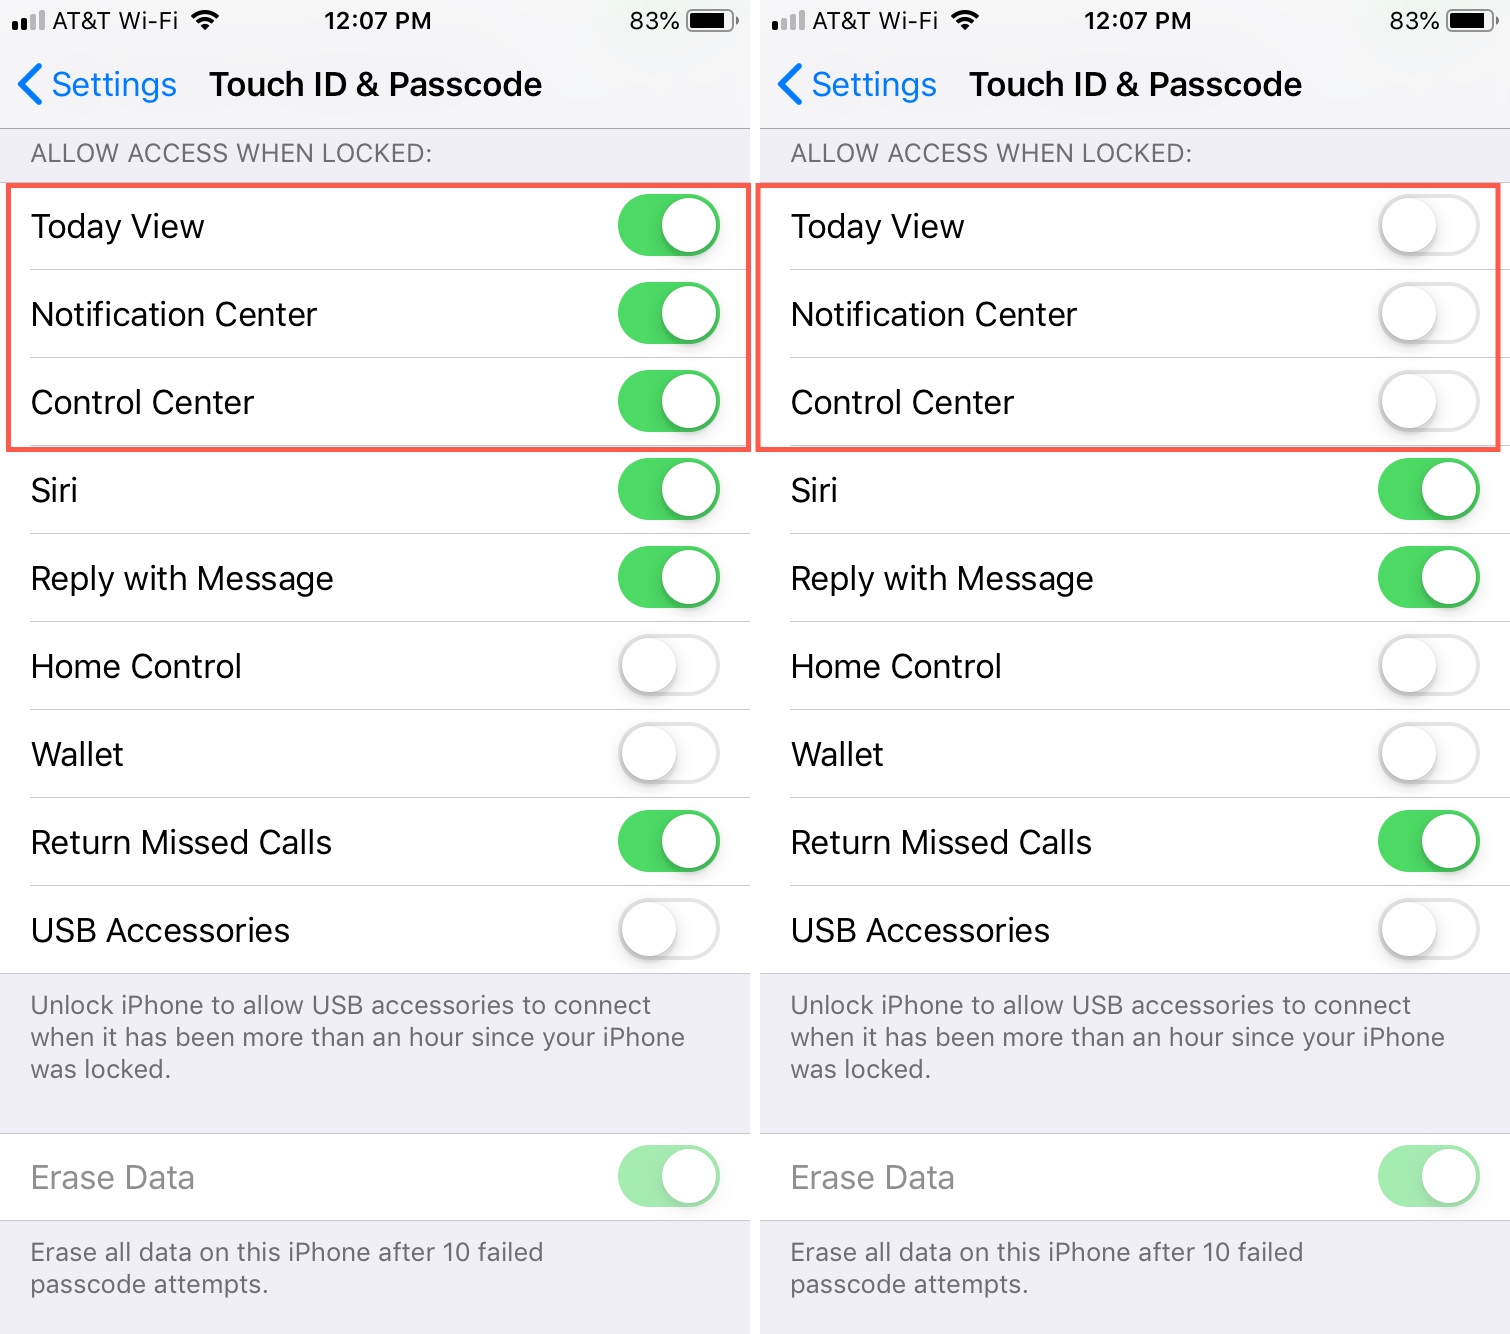
Within the “Face ID & Passcode” or “Touch ID & Passcode” section, scroll down until you see the option labeled “Allow Access When Locked.” This option determines whether the Control Center can be accessed from the lock screen of your iPad.
By default, this option is toggled on, allowing the Control Center to be accessed even when your iPad is locked. To disable the Control Center on the lock screen, you need to toggle off this option.
When this option is enabled, anyone who has physical access to your iPad can access the Control Center without having to enter a passcode or authenticate using Face ID or Touch ID. Disabling this option adds an additional layer of security, ensuring that only authorized users can access the Control Center.
Scrolling down to the “Allow Access When Locked” option is straightforward and intuitive. Once you locate the option, you’re ready to proceed to the next step of disabling the Control Center on the iPad’s lock screen.
Step 6: Toggle Off “Control Center”
After scrolling down to the “Allow Access When Locked” option within the security settings, you will find the toggle for the Control Center. This toggle determines whether or not the Control Center can be accessed from the lock screen of your iPad.
To disable the Control Center on the lock screen, simply tap on the toggle switch next to “Control Center” to turn it off. When the toggle switch is in the off position, the Control Center will no longer be accessible from the lock screen.
By disabling the Control Center on the lock screen, you are adding an extra layer of security to your iPad. This prevents anyone from accessing sensitive settings or performing actions on your device without entering a passcode or using biometric authentication.
It’s important to note that disabling the Control Center on the lock screen does not remove the Control Center functionality altogether. You can still access the Control Center by unlocking your iPad and swiping up from the bottom of the screen.
Disabling the Control Center on the lock screen is especially useful if you often find yourself accidentally triggering it when your iPad is locked. It helps prevent unintentional changes or disruptions to your device’s settings.
Once you have toggled off “Control Center,” you have successfully disabled it on the lock screen of your iPad. This provides an added level of privacy and security to your device.
Step 7: Exit Settings
Congratulations! You have successfully disabled the Control Center on the lock screen of your iPad. The final step is to exit the Settings app and return to your device’s home screen.
To exit the Settings app, simply press the home button on your iPad or use the swipe-up gesture (on devices without a home button) to return to the home screen. This will close the Settings app and take you back to your iPad’s main interface.
Once you have exited the Settings app, take a moment to appreciate the changes you have made. The Control Center will no longer be accessible from the lock screen, providing an additional layer of security and privacy to your device. This ensures that only authorized users can access the Control Center and make changes to your device’s settings.
Remember, you can still access the Control Center by unlocking your iPad and swiping up from the bottom of the screen. Disabling it on the lock screen simply prevents unauthorized access and accidental activation.
If you ever decide to enable the Control Center on the lock screen again, you can follow the same steps in reverse. Simply navigate to the “Allow Access When Locked” option within the security settings and toggle on the “Control Center” option.
By exiting the Settings app, you have completed the process of disabling the Control Center on the lock screen of your iPad. Enjoy the added security and peace of mind knowing that your device’s settings are protected from unauthorized access.