Before Deleting Your Venmo Account
Thinking about deleting your Venmo account? Before taking such a step, it’s essential to consider a few factors. Venmo is a popular payment app that allows you to send and receive money from friends and family with just a few taps on your phone or clicks on your computer. However, if you’ve decided that you no longer want to use Venmo or have concerns about privacy and security, follow these steps to delete your Venmo account on your Mac or PC.
Deleting your Venmo account will permanently remove all your transaction history, friends list, and payment information. Therefore, it’s crucial to review and download any transaction history or information you may need before deleting your account. Keep in mind that once your account is deleted, it cannot be recovered, and any remaining funds will be forfeited.
Additionally, make sure to settle any outstanding balances with your contacts or transfer any remaining funds to your bank account before deactivating your Venmo account. This ensures that you don’t leave any loose ends or inconvenience anyone who may still owe you money or expect a pending payment.
Finally, consider alternative payment options that meet your financial needs. There are several other payment apps available, such as PayPal, Zelle, or Cash App, which offer similar functionalities and may better align with your preferences and requirements. Research these alternatives and choose one that suits you best.
Now that you’re aware of the necessary precautions and considerations, let’s proceed with the step-by-step guide on how to delete your Venmo account from your Mac or PC.
Step 1: Open a Web Browser
To begin the process of deleting your Venmo account, you’ll need to open a web browser on your Mac or PC. You can use popular browsers such as Google Chrome, Mozilla Firefox, Safari, or Microsoft Edge. Launch the browser of your choice from your computer’s applications or taskbar.
If you are already using a web browser, ensure that you are not on any other websites or tabs before proceeding. Open a new window or tab specifically for Venmo account deletion. This will help keep things organized and prevent any confusion.
Once your web browser is open, ensure that you have a stable internet connection. A reliable connection is essential to complete the account deletion process smoothly. Uninterrupted access to the Venmo website will ensure a seamless experience as you navigate through the steps.
If you have multiple web browsers installed on your Mac or PC, choose the one that you are most comfortable with or prefer to use. Each browser may have slight variations in terms of appearance and options, but the overall process will remain the same regardless of the browser you choose.
Now that you have your web browser ready, it’s time to proceed to the next step and access the Venmo website. Keep in mind that throughout the process, you should ensure that you are logged into your Venmo account to successfully delete it.
Step 2: Access the Venmo Website
Once you have your web browser open, it’s time to access the official Venmo website. To do this, you’ll need to enter the URL in the address bar of your browser. The Venmo website can be found at www.venmo.com.
As you type in the URL, double-check for any typos or errors to ensure that you land on the correct website. There may be similar websites that mimic Venmo, so it’s important to be cautious and only visit the official site.
After entering the Venmo website URL, press the Enter key on your keyboard or click on the “Go” button next to the address bar. The browser will then initiate a connection to the Venmo website and start loading the page.
Depending on your internet speed, the loading time may vary. Be patient and allow the page to fully load before proceeding to the next step. You can monitor the loading progress by looking at the browser’s tab or status bar, which usually displays a loading symbol or progress indicator.
Once the Venmo website has fully loaded, you will be greeted with the Venmo homepage. Here, you’ll have access to various features and information related to the Venmo app. Take a moment to familiarize yourself with the layout and design of the website.
Remember, it’s crucial to access the Venmo website through a trusted and secure connection to protect your personal and financial information. Avoid using public Wi-Fi networks or unsecured connections when accessing sensitive websites like Venmo. If possible, opt for a private and secure internet connection to ensure the safety of your data.
With the Venmo website loaded and ready, you’re now prepared to proceed to the next step, logging into your Venmo account.
Step 3: Sign In to Your Venmo Account
After accessing the Venmo website, it’s time to log in to your Venmo account. Logging in is necessary to perform any account-related actions, including the deletion process.
Look for the “Sign In” button on the Venmo homepage. It is typically located in the top-right corner of the page. Click on the “Sign In” button to proceed to the login page.
On the login page, you will be prompted to enter your Venmo credentials. These include your registered email address or phone number associated with your Venmo account, as well as your password.
Enter your email address or phone number in the designated field. Double-check for any typos or errors before proceeding to ensure that the login information is accurate. Venmo offers both email and phone number options, so make sure you enter the correct form of identification.
Next, enter your password in the respective field. Take care to type it correctly, as passwords are case-sensitive. If you have trouble remembering your password, you can click on the “Forgot?” link next to the password field for assistance in recovering or resetting your password.
Once you have entered your login credentials, click on the “Sign In” button to proceed. The system will authenticate your information and verify that your account details are accurate. If successful, you will be logged in to your Venmo account.
Make sure to keep your login information secure and do not share it with anyone. Protecting your Venmo account from unauthorized access is important to safeguard your personal and financial information.
If you encounter any issues while signing in to your Venmo account, refer to Venmo’s support resources or contact their customer support for further assistance.
Now that you have successfully signed in to your Venmo account, it’s time to navigate to the settings page where you can begin the process of deleting your account.
Step 4: Navigate to the Settings Page
Once you are signed in to your Venmo account, the next step is to navigate to the settings page. This is where you will find the options and settings related to your account, including the option to delete it.
To access the settings page, look for your user profile icon or picture. It is usually located in the top-right corner of the screen, near the navigation menu. Click on your profile icon to open a drop-down menu.
In the drop-down menu, you should see a “Settings” option. Click on “Settings” to proceed to the settings page.
On the settings page, you will find various sections and options related to your account settings and preferences. Take a moment to familiarize yourself with the layout and available options.
Scroll through the settings page to find the section labeled “Account.” This section typically contains the options for managing your account, including deleting it.
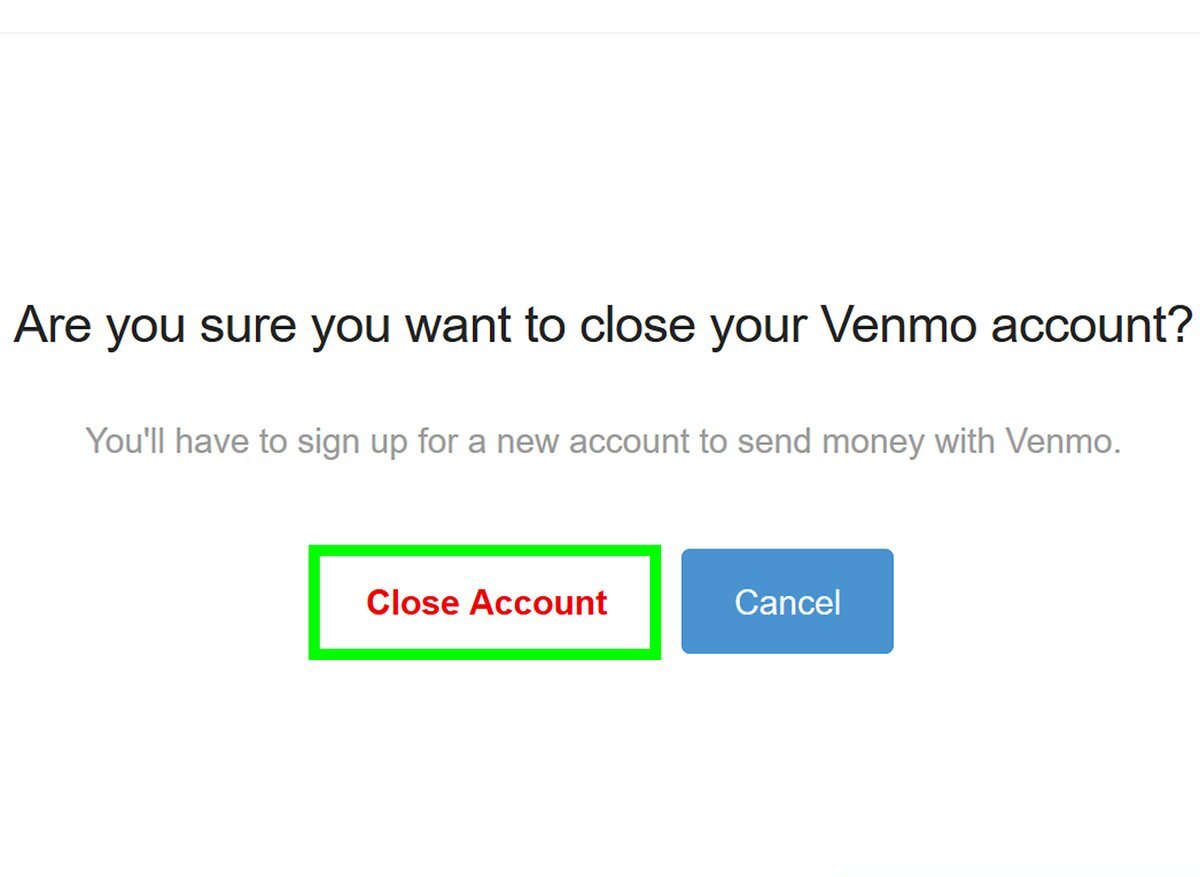
Once you locate the “Account” section, click on it to expand the options within. Look for the option that says “Close My Account” or something similar. This is the option you will need to select to initiate the account deletion process.
Click on the “Close My Account” option to proceed. Note that some additional steps or warnings may appear at this point, informing you about the consequences of deleting your account. Carefully read through any information provided to ensure that you understand the process.
By reaching the settings page and locating the “Close My Account” option, you have successfully navigated to the section where you can begin the process of deleting your Venmo account. The next steps will guide you through the account deactivation process, so stay tuned for the instructions in the following sections.
Step 5: Review Your Transaction History
Before proceeding with the account deletion process, it’s important to review your transaction history on Venmo. This allows you to ensure that you have a record of all your past transactions and can help you keep track of any outstanding payments or unresolved financial matters.
To review your transaction history, navigate to the appropriate section on the Venmo website. Look for the option labeled “Transaction History” or a similar term. This option is typically found in the sidebar or navigation menu of the settings page.
Click on the “Transaction History” option to access your complete history of transactions on Venmo. You will be presented with a chronological list of all the payments made and received through your Venmo account.
Take the time to go through the transaction history and ensure that all the entries are accurate and accounted for. Verify that you have received all payments that were sent to you and that you have made all the payments you intended.
If you come across any discrepancies or unresolved transactions, it is recommended to address them before deleting your Venmo account. Contact the individuals involved or Venmo’s customer support to sort out any outstanding payments or discrepancies.
It is also a good idea to download your transaction history for your records. Venmo typically provides an option to export or download your transaction history in a suitable format, such as a CSV file, which can be opened in spreadsheet software.
By thoroughly reviewing your transaction history and ensuring that all payments are accounted for, you can avoid any surprises or inconveniences after deleting your Venmo account. It’s always better to settle any outstanding matters before proceeding with the account deactivation process.
Once you are satisfied with your transaction history review and have addressed any necessary financial matters, you can proceed to the next step, which involves deactivating your Venmo account.
Step 6: Deactivate Your Venmo Account
Now that you have reviewed your transaction history and resolved any outstanding payments or discrepancies, it’s time to deactivate your Venmo account. Deactivating your account will disable it and remove your profile from the Venmo platform.
To deactivate your Venmo account, go back to the settings page on the Venmo website. Look for the option labeled “Close My Account” or a similar term within the “Account” section.
Click on the “Close My Account” option to initiate the deactivation process. A confirmation prompt may appear, asking you to confirm your decision. Read the prompt carefully to ensure that you understand the implications of deactivating your account.
After confirming your decision, Venmo may ask you to provide additional information or complete certain steps to proceed with the deactivation process. Follow the on-screen instructions and provide the required information, if prompted.
Once you have completed the necessary steps, your Venmo account will be deactivated. This means that you will no longer be able to send or receive payments, access your transaction history, or use any features associated with your Venmo account.
Remember that deactivating your Venmo account is irreversible. Once you deactivate your account, you will not be able to recover your transaction history, friends list, or any other information associated with your account. Additionally, any remaining funds in your Venmo account will be forfeited.
It’s important to carefully consider your decision before deactivating your Venmo account. If you are unsure or have any concerns, it may be helpful to reach out to Venmo’s customer support for further guidance or clarification.
With your Venmo account successfully deactivated, you are one step closer to completely removing your presence from the platform. The next steps will guide you through the account deletion confirmation and final actions to ensure a smooth process.
Step 7: Confirm the Deactivation Process
After deactivating your Venmo account, it’s vital to confirm the deactivation process to ensure that your account has been successfully deactivated and that all associated data has been removed.
Upon completing the deactivation steps, you may receive a confirmation message from Venmo indicating that your account has been deactivated. This confirmation message may be displayed on the website or sent to your registered email address.
Read the confirmation message carefully to ensure that it states that your Venmo account has been deactivated. This confirmation provides you with the assurance that your account is no longer active on the Venmo platform.
In some cases, Venmo may require additional verification or steps to confirm the deactivation. Follow any instructions provided in the confirmation message or on the website to complete the process. This may include confirming through a link sent to your email or entering a verification code.
If you do not receive a confirmation message or encounter any issues with the deactivation process, it’s recommended to contact Venmo’s customer support for further assistance. They will be able to help address any concerns or provide guidance on confirming the status of your deactivated account.
It’s important to note that even after confirming the deactivation of your Venmo account, it may take some time for your account details and data to be completely removed from Venmo’s systems. This process can vary and may take a few days or longer. During this time, avoid attempting to log in or reactivate your account.
By confirming the deactivation process, you can have peace of mind knowing that your Venmo account is no longer active and that your personal and financial information is no longer accessible on the platform. Now, it’s time to complete the remaining steps to ensure a thorough removal of your Venmo account from your Mac or PC.
Step 8: Settle Any Outstanding Balances
Before you completely remove Venmo from your Mac or PC, it’s crucial to settle any outstanding balances or financial obligations. This step ensures that you clear your debt and avoid any potential complications or disputes.
Review your transaction history and take note of any pending payments or outstanding balances. If you owe anyone money or if someone owes you money, make arrangements to settle the balances.
If you owe money to someone, reach out to them and discuss the payment options. Venmo provides various ways to transfer funds, such as bank transfers, debit card payments, or other third-party payment platforms. Agree on the most convenient method with the person you owe, and settle the payment promptly.
If someone owes you money, kindly remind them about the outstanding balance and inquire about their plan to settle it. Venmo allows users to send payment request reminders, which can be a helpful way to prompt the person to fulfill their payment obligation.
Ensure that you communicate openly and honestly with the individuals involved to resolve any outstanding balances cordially. It’s important to maintain good relationships with friends, family, or business associates, even when dealing with financial matters.
By settling any outstanding balances or payments, you can leave Venmo with a clean slate and ensure that you don’t leave any financial loose ends behind. This step demonstrates your responsibility as a user and helps to maintain a positive reputation among peers.
Once you have settled all outstanding balances, you can proceed with the final steps to remove the Venmo app from your Mac or PC and consider alternative payment options.
Step 9: Remove the Venmo App from Your Mac or PC
Now that you have completed the necessary steps to deactivate your Venmo account and settle any outstanding balances, it’s time to remove the Venmo app from your Mac or PC. Removing the app ensures that there are no remnants of Venmo left on your device.
To remove the Venmo app from your Mac, simply locate the Venmo app icon in your Applications folder. Click and hold the icon, then drag it to the Trash bin located in your Dock. Alternatively, you can right-click on the Venmo app icon and select “Move to Trash.”
If you installed Venmo as a PC application, you can remove it by accessing the Control Panel on your Windows PC. Under “Programs” or “Programs and Features,” locate Venmo in the list of installed programs. Click on it, then choose the option to uninstall or remove the app.
After uninstalling the Venmo app, empty the Trash on your Mac or confirm the removal of the app on your PC. This will permanently delete the Venmo app and all associated files from your device.
It’s also a good idea to remove any browser extensions or plugins related to Venmo. These extensions may have been installed to enhance the Venmo experience in your web browser. To remove them, access the settings or extensions menu in your browser and locate any Venmo-related extensions. Click on the option to remove or uninstall them.
By removing the Venmo app and any associated browser extensions or plugins, you ensure that there are no remnants of Venmo on your Mac or PC. This step helps protect your privacy and prevents any accidental usage of the app in the future.
Now that you have successfully removed the Venmo app from your device, it’s important to consider alternative payment options that meet your financial needs.
Step 10: Consider Other Payment Options
Now that you have completed the process of deleting your Venmo account and removed the app from your Mac or PC, it’s important to consider other payment options that may better suit your needs. There are several alternative payment platforms that offer similar functionalities and convenience.
One popular payment option is PayPal, which allows you to send and receive money securely. PayPal offers a variety of features, including easy integration with online shopping platforms and the ability to link your bank account or credit card for seamless transactions.
Zelle is another option to consider, especially if you prefer direct bank transfers. Zelle allows instant transfers between bank accounts and is widely accepted by major banks in the United States. It’s worth checking if your bank is partnered with Zelle for convenient payments.
If you’re looking for a mobile payment app, Cash App is a viable option. With Cash App, you can send and receive money with just a few taps on your smartphone. The app also offers additional features like a Cash Card that can be used to make purchases and withdraw cash from ATMs.
Before choosing an alternative payment option, take some time to evaluate the features, fees, and security measures offered by each platform. Consider your specific requirements, such as international transfers, peer-to-peer payments, or business transactions, to ensure that the chosen platform aligns with your needs.
It’s also worth considering the preferences of your friends, family, or business associates. Using a payment platform that is widely accepted and used by the people you frequently interact with can make transactions smoother and more convenient for everyone involved.
Remember to take adequate security measures when using any payment platform. Set up strong and unique passwords, enable two-factor authentication whenever possible, and be cautious of phishing attempts or fraudulent activities.
By exploring and utilizing other payment options, you can find a platform that meets your specific needs and offers a secure and convenient way to send and receive money.
With alternative payment options in place, you have successfully completed all the necessary steps to delete your Venmo account on your Mac or PC. Congratulations on taking control of your online financial presence and ensuring your privacy and security.