
What is Fusion Drive
Fusion Drive is a storage technology developed by Apple that combines a traditional hard drive with a faster flash storage drive into a single logical volume. It aims to provide users with the best of both worlds – the high capacity of a standard hard drive and the fast performance of solid-state storage.
With Fusion Drive, the frequently accessed files and applications are automatically stored on the flash storage portion, while less frequently used data is stored on the traditional hard drive. This dynamic allocation of data helps to optimize performance and deliver faster read and write speeds.
The fusion of the two drives is transparent to the user, meaning that you don’t have to manually manage the data between the two drives. Your Mac intelligently handles it, ensuring that you have quick access to your most frequently used files and applications.
Fusion Drive offers a cost-effective solution for users who require both high storage capacity and fast performance. It can be found in certain Mac models, such as the iMac and Mac mini, where it’s configured by default. However, it’s important to note that Fusion Drive is not available on all Macs and cannot be added after purchase.
Overall, Fusion Drive provides the best of both worlds by combining the speed of SSD storage with the capacity of traditional hard drives. It’s a convenient option for Mac users who want fast performance without sacrificing storage space.
Reasons for Deleting or Splitting Fusion Drive
While Fusion Drive offers several benefits, there may be situations where you would want to delete or split the Fusion Drive configuration on your Mac. Here are a few reasons why you might consider doing so:
- Desire for Separate Drives: You might have specific requirements that require separate hard drives. For example, if you need to install a different operating system on one drive or want to use one drive exclusively for data backups, splitting the Fusion Drive allows you to have separate volumes.
- Upgrade Options: By deleting or splitting the Fusion Drive, you have the flexibility to upgrade individual components. For instance, if you want to replace the traditional hard drive with a larger capacity model, or upgrade the flash storage to a faster and more spacious SSD, having separate drives simplifies the upgrade process.
- Data Security: Some users may have privacy concerns and prefer to have sensitive data stored separately. Deleting or splitting the Fusion Drive allows you to encrypt and secure specific drives, providing an additional layer of protection.
- Troubleshooting Performance Issues: In some cases, the Fusion Drive setup may cause performance issues. By deleting or splitting the Fusion Drive, you can isolate and identify any issues related to the individual drives, enabling you to troubleshoot and resolve them effectively.
- Change in Storage Needs: As your storage needs evolve, you may find that the Fusion Drive configuration no longer meets your requirements. By deleting or splitting the Fusion Drive, you can reconfigure your storage setup to better suit your needs, whether it’s for increased storage capacity or higher performance.
Keep in mind that deleting or splitting the Fusion Drive requires careful consideration and adequate backup of your data. It’s recommended to proceed with caution and ensure that you have a proper backup before making any changes to your storage configuration.
Now let’s move on to the next steps involved in deleting or splitting your Mac’s Fusion Drive.
Backup Your Data
Before proceeding with any changes to your Fusion Drive configuration, it’s crucial to back up your data to prevent any potential data loss. Here’s how you can ensure that your important files are safely backed up:
- Time Machine Backup: If you have been using Time Machine to back up your Mac, make sure you have a recent backup. Connect an external hard drive and allow Time Machine to complete a full backup of your system. This way, you can easily restore your data if anything goes wrong during the deletion or splitting process.
- Cloud Storage Services: Consider uploading important files and documents to cloud storage services like iCloud, Dropbox, or Google Drive. This provides an extra layer of protection for your data and ensures accessibility from any device in case of any issues with your local backups.
- Manually Transfer Data: If you have a small amount of data that you want to preserve, you can manually transfer it to an external storage device such as a USB drive or an external hard drive. Simply copy the files and folders that are necessary onto the external drive to create a backup.
- Verify Your Backup: Once you’ve created your backup, take a moment to verify that the data is intact and accessible. Open a few files or folders to make sure everything is working correctly. It’s better to be safe than sorry.
Remember, backing up your data is an essential step that should never be skipped. It ensures that your files are protected and can be easily restored if anything unexpected happens during the deletion or splitting process.
Now that you have your data backed up, we can proceed with the next steps to disconnect or remove the physical hard drives.
Disconnect or Remove the Physical Hard Drives
To delete or split your Mac’s Fusion Drive, you will need to disconnect or physically remove the hard drives involved. Here are the steps to follow:
- Shut Down Your Mac: Begin by shutting down your Mac completely. Make sure to save any ongoing work and close all applications before proceeding.
- Disconnect Power and Peripherals: Unplug the power cord from your Mac and disconnect any peripherals, such as external hard drives or monitors, that may be connected to it.
- Open Your Mac: Depending on your Mac model, you will need to open it to access the internal components. Refer to the specific instructions for your Mac model provided by Apple or consult professional assistance if you’re unsure about this step.
- Identify the Drives: Locate the physical hard drives that make up the Fusion Drive. It may be helpful to refer to the documentation for your Mac model or look for tutorials online specific to your Mac’s internals.
- Disconnect the Cables: Carefully disconnect the cables connecting the physical hard drives to the logic board. These cables can be delicate, so handle them gently to avoid any damage.
- Remove the Drives: If you need to remove the drives completely, unscrew any mounting brackets or screws that secure them in place. Then, gently slide the drives out of their respective slots.
It’s important to handle the internal components of your Mac with care to prevent any damage. If you’re uncomfortable performing these steps yourself, consider seeking assistance from a professional technician.
Once you have disconnected or removed the physical hard drives, it’s time to proceed with reinstalling macOS. This will allow you to delete or split the Fusion Drive configuration.
Reinstall macOS
After disconnecting or removing the physical hard drives of your Mac’s Fusion Drive, the next step is to reinstall macOS. Follow these steps to complete the reinstallation:
- Access macOS Recovery Mode: Restart your Mac and hold down the Command (⌘) + R keys simultaneously until you see the Apple logo or a spinning globe. This will boot your Mac into macOS Recovery.
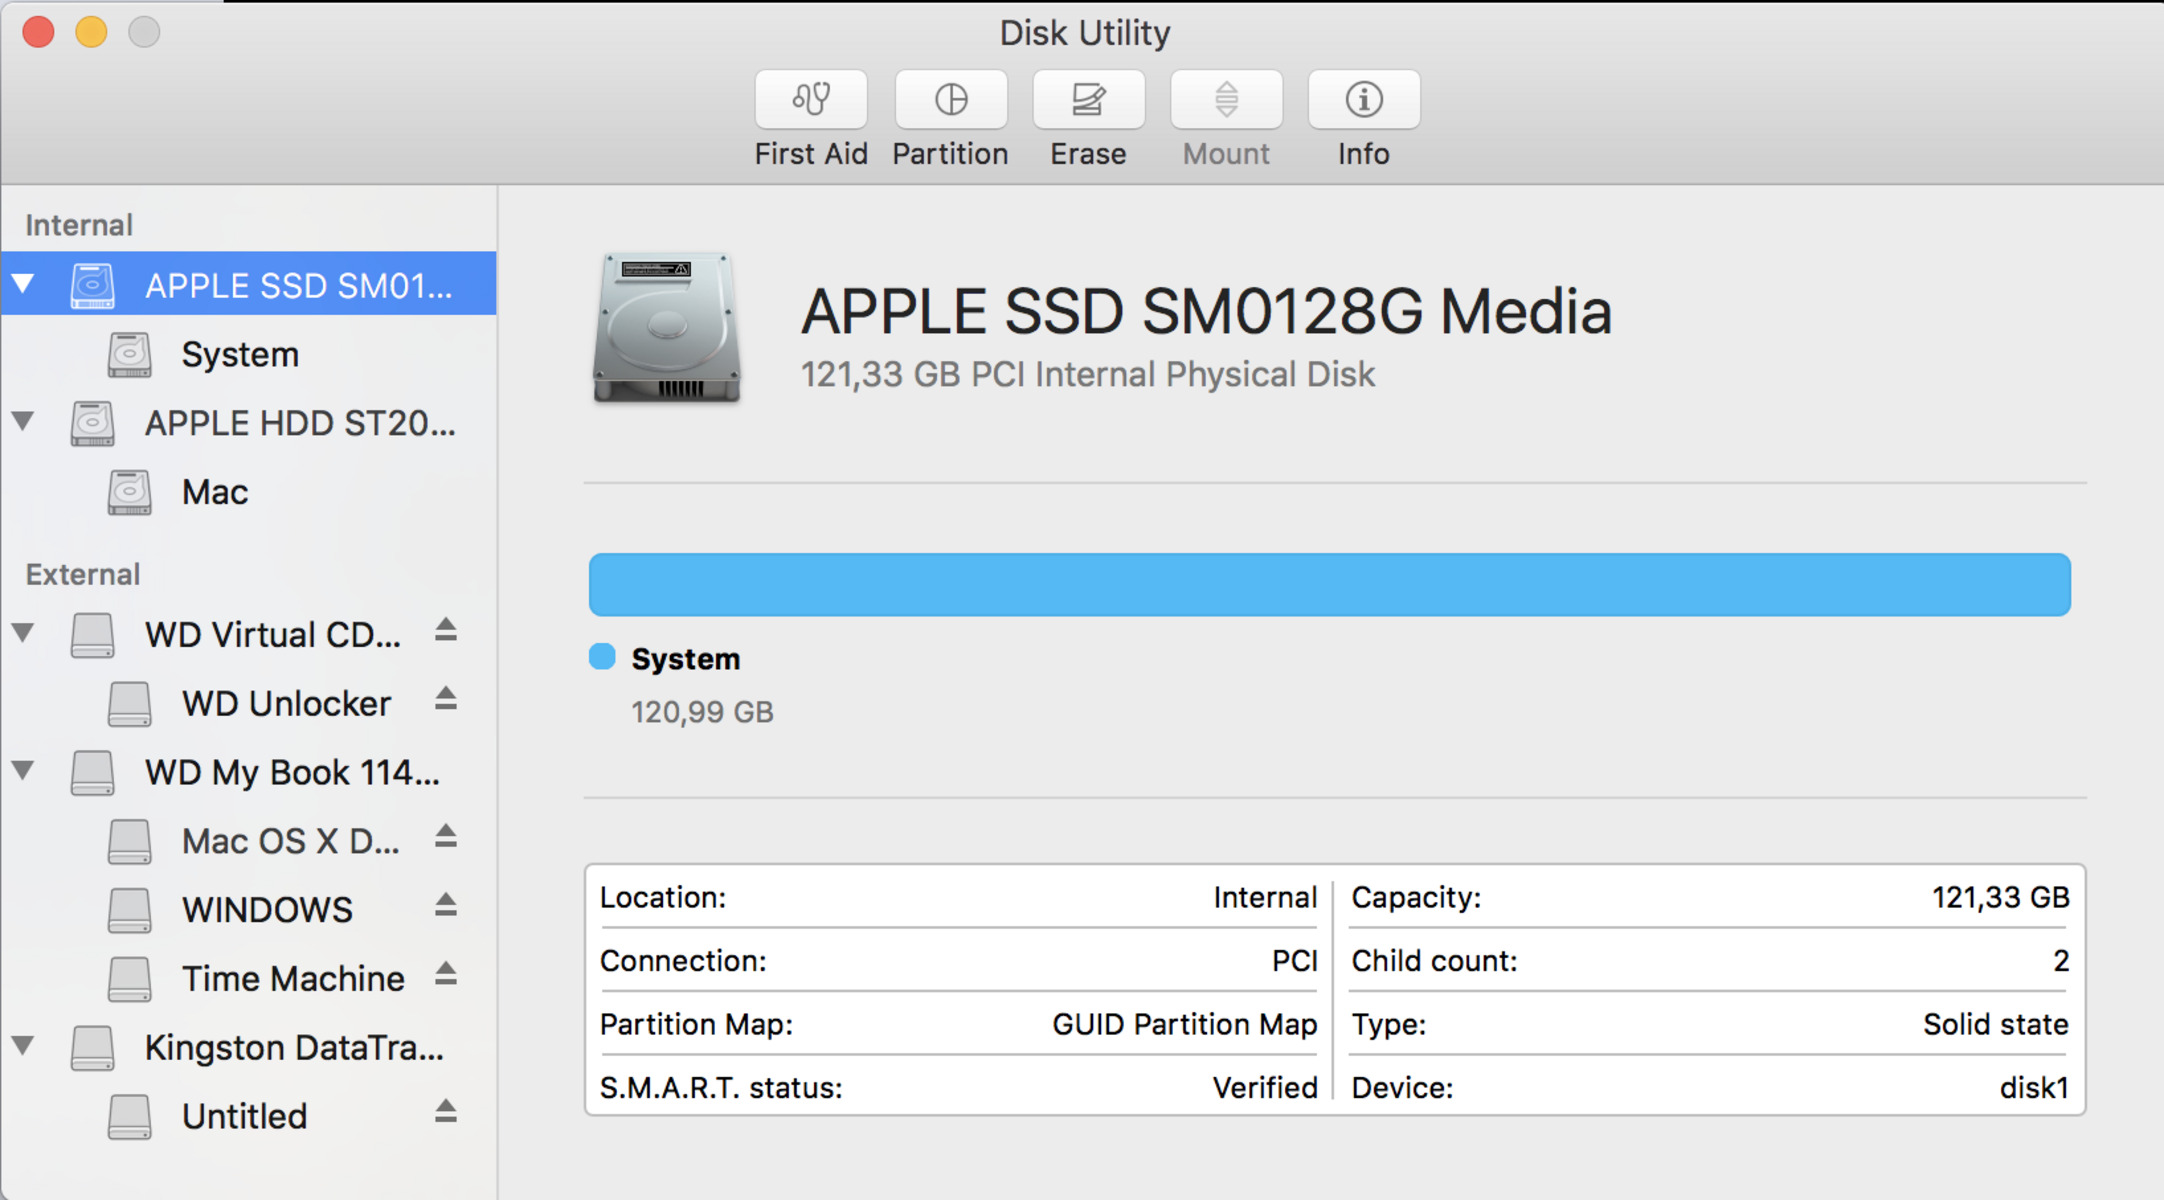
- Select Disk Utility: In the macOS Utilities window, select “Disk Utility” and then click “Continue.” Disk Utility allows you to manage and format your drives.
- Erase the Drives: In Disk Utility, locate the physical drives that were part of the Fusion Drive under the “Internal” section. Select each drive individually and click on the “Erase” button. Follow the prompts to format the drives.
- Quit Disk Utility: After formatting the drives, close Disk Utility to return to the macOS Utilities window.
- Select Reinstall macOS: In the macOS Utilities window, click on “Reinstall macOS” and follow the onscreen instructions to reinstall the operating system. This process may take some time, so be patient.
- Set Up macOS: Once the reinstallation is complete, your Mac will restart, and you will be guided through the initial setup process. Follow the prompts to set up your preferred settings, create a user account, and personalize your Mac.
Reinstalling macOS effectively deletes the Fusion Drive configuration as the drives have been formatted during the process. After the reinstallation, your Mac will be operating with separate drives, allowing you to proceed with either splitting or configuring them as desired.
Now that you’ve successfully reinstalled macOS, let’s move on to the next steps involved in splitting or deleting the Fusion Drive configuration.
Splitting the Fusion Drive
If you want to split your Mac’s Fusion Drive into separate drives, you can follow these steps:
- Access Disk Utility: Once you have reinstalled macOS, open Disk Utility. You can find it by going to “Applications” > “Utilities” or by searching for “Disk Utility” in Spotlight.
- Identify the Drives: In Disk Utility, you should see the individual drives that were part of the Fusion Drive configuration listed separately. They may appear as two separate physical drives or as separate partitions on a single drive.
- Format the Drives: Select each drive individually and click on the “Erase” button. Follow the prompts to format the drives with the desired file system, such as APFS or Mac OS Extended (Journaled).
- Assign Drive Names: After formatting, you can assign names to the drives to easily identify them. Right-click on each drive and select “Rename” to give them meaningful names.
- Verify the Split: Once you have formatted and assigned names to the drives, you can verify that they are separate by checking their individual capacities and the absence of a Fusion Drive configuration in Disk Utility.
- Use Separate Drives: With the Fusion Drive successfully split, you can now use each drive independently. You can choose to install different operating systems on each drive, allocate one as the main system drive and the other for storage, or configure them according to your specific needs.
Splitting the Fusion Drive allows you to have separate drives with different functionalities, providing more flexibility and control over your storage. However, keep in mind that splitting the Fusion Drive will result in a loss of the automatic data management capabilities that Fusion Drive offers.
Now that you have successfully split your Fusion Drive, let’s move on to the next steps involved in reconnecting or adding the physical hard drives.
Deleting the Fusion Drive
If you no longer wish to maintain a Fusion Drive configuration on your Mac and want to delete it completely, follow these steps:
- Access Disk Utility: Open Disk Utility on your Mac. You can find it by going to “Applications” > “Utilities” or by searching for “Disk Utility” in Spotlight.
- Identify the Fusion Drive: In Disk Utility, you should see the Fusion Drive listed as a single device. It will have a capacity that reflects the combined capacity of the underlying physical drives.
- Erase the Fusion Drive: Select the Fusion Drive and click on the “Erase” button. Follow the prompts to format and erase the Fusion Drive. This process will delete all data on the Fusion Drive, so make sure you have a backup of any important files.
- Confirm Deletion: After erasing the Fusion Drive, it will be completely deleted. Verify in Disk Utility that the Fusion Drive is no longer present and only the underlying physical drives or partitions remain.
- Use Separate Drives: With the Fusion Drive deleted, you can now use the individual drives as separate entities. You can format them, assign names, and configure them according to your needs, just like any other separate drives.
Deleting the Fusion Drive removes the logical volume and the automatic data management capabilities that come with Fusion Drive. It effectively separates the physical drives, allowing you to use them independently.
Keep in mind that deleting the Fusion Drive will result in the loss of all data stored on the Fusion Drive. Therefore, it’s crucial to have a complete backup of your important files before proceeding with the deletion.
Now that you have successfully deleted the Fusion Drive, let’s move on to the next steps involved in reconnecting or adding the physical hard drives.
Reconnecting or Adding the Physical Hard Drives
If you had previously disconnected or removed the physical hard drives from your Mac, and now want to reconnect or add them back, follow these steps:
- Shut Down Your Mac: Begin by shutting down your Mac completely to ensure a safe and proper reconnection or addition of the physical hard drives.
- Open Your Mac: If you had previously removed the physical hard drives, follow the necessary steps to open your Mac and gain access to the internal components. Refer to specific instructions for your Mac model provided by Apple or consult professional assistance.
- Identify the Drive Slots and Cables: Locate the appropriate drive slots and cables inside your Mac. Consult the documentation for your Mac model or look for tutorials specific to your Mac’s internals to assist you in identifying the correct slots and cables.
- Reconnect or Insert the Drives: Carefully reconnect the cables from the physical hard drives to the corresponding slots on the logic board. If you had completely removed the drives, gently insert them back into the slots, ensuring they are properly seated.
- Secure the Drives: If necessary, secure the drives in place using mounting brackets or screws as per the original configuration. Ensure that the drives are firmly and securely attached to avoid any movement or damage during operation.
- Close Your Mac: Once the drives are reconnected or added, carefully close your Mac by following the reverse steps of opening it. Ensure that all components are properly aligned and secured.
Once you have reconnected or added the physical hard drives, your Mac will recognize them as separate drives. You can verify their presence and functionality in Disk Utility or by checking your Finder sidebar.
Now that the physical hard drives are reconnected or added, it’s time to proceed with restoring your data from the backup you created earlier.
Restoring Your Data
After reconnecting or adding the physical hard drives to your Mac, you can proceed with restoring your data from the backup you created earlier. Here’s how you can restore your data:
- Access Your Backup: Connect the external hard drive or access the cloud storage service where you stored your backup data.
- Launch Time Machine: If you used Time Machine to create your backup, navigate to the location where your Time Machine backup is stored and open the Time Machine application.
- Select Restore: In Time Machine, navigate to the specific backup date and time you want to restore from. Select the files or folders you wish to restore.
- Choose Restore Location: Specify the location where you want to restore the selected files. Ensure it corresponds to the appropriate drive or partition where you want to restore the data.
- Begin the Restore Process: Start the restore process by clicking on the “Restore” or “Start Restore” button. Time Machine will restore the selected files to the designated location.
- Verify Restored Data: Once the restore process is complete, take some time to verify that your data has been restored successfully. Open the restored files and folders to ensure they are intact and accessible.
If you used alternative methods, such as manually transferring data or using a cloud storage service, follow the appropriate steps provided by the respective method to restore your data. Make sure you select the correct destination drive or partition for the restored files.
By restoring your data, you bring back your important files and folders to the newly configured drives after splitting or deleting the Fusion Drive. Take the time to organize and arrange your data in a way that suits your workflow and preferences.
With your data restored, you can now enjoy the benefits of your reconfigured or separate drives on your Mac.
Let’s wrap up the article with some final thoughts on deleting or splitting your Mac’s Fusion Drive.
Final Thoughts
Deleting or splitting your Mac’s Fusion Drive can offer you more flexibility and control over your storage configuration. Whether you choose to have separate drives or a different storage setup, it’s important to consider your specific needs and requirements.
Before making any changes to your Fusion Drive, always remember to back up your data to prevent any potential data loss. Data security should be a top priority, and having a backup ensures that your important files and documents are protected.
When disconnecting or removing the physical hard drives, exercise caution and follow the appropriate steps to avoid any damage to your Mac or its components. If you’re unsure or uncomfortable performing these steps, it’s advisable to seek assistance from a professional technician.
Reinstalling macOS is a crucial step in the process of deleting or splitting the Fusion Drive. Take your time and follow the instructions carefully to ensure a successful reinstallation.
Whether you choose to split the Fusion Drive into separate drives or delete it altogether, always have a clear understanding of the implications and benefits of each option. Consider your storage needs, desired performance, and future upgrades before finalizing your decision.
Remember to also consider the impact on automatic data management that Fusion Drive provides. By splitting or deleting the Fusion Drive, you may lose the convenience and optimization it offers in terms of data allocation and performance optimization.
Deleting or splitting your Mac’s Fusion Drive requires careful consideration and adequate preparation. Take the necessary precautions, follow the recommended steps, and ensure that you have completed a thorough backup of your data.
By following the appropriate steps and taking your time, you can successfully delete or split the Fusion Drive on your Mac, configure your storage to meet your specific needs, and optimize your workflow and performance.
Now that you have a comprehensive understanding of the process, you can confidently make an informed decision and proceed with deleting or splitting your Mac’s Fusion Drive if it aligns with your requirements.