
Clear Browsing History
One of the main reasons to delete your browsing history on a Chromebook is to maintain your privacy and keep your online activities discreet. Clearing your browsing history removes traces of the websites you have visited, including URLs, cached files, and cookies. Follow these simple steps to clear your browsing history on a Chromebook:
1. Open the Chrome browser on your Chromebook. You can find the Chrome icon in the app launcher or on the shelf.
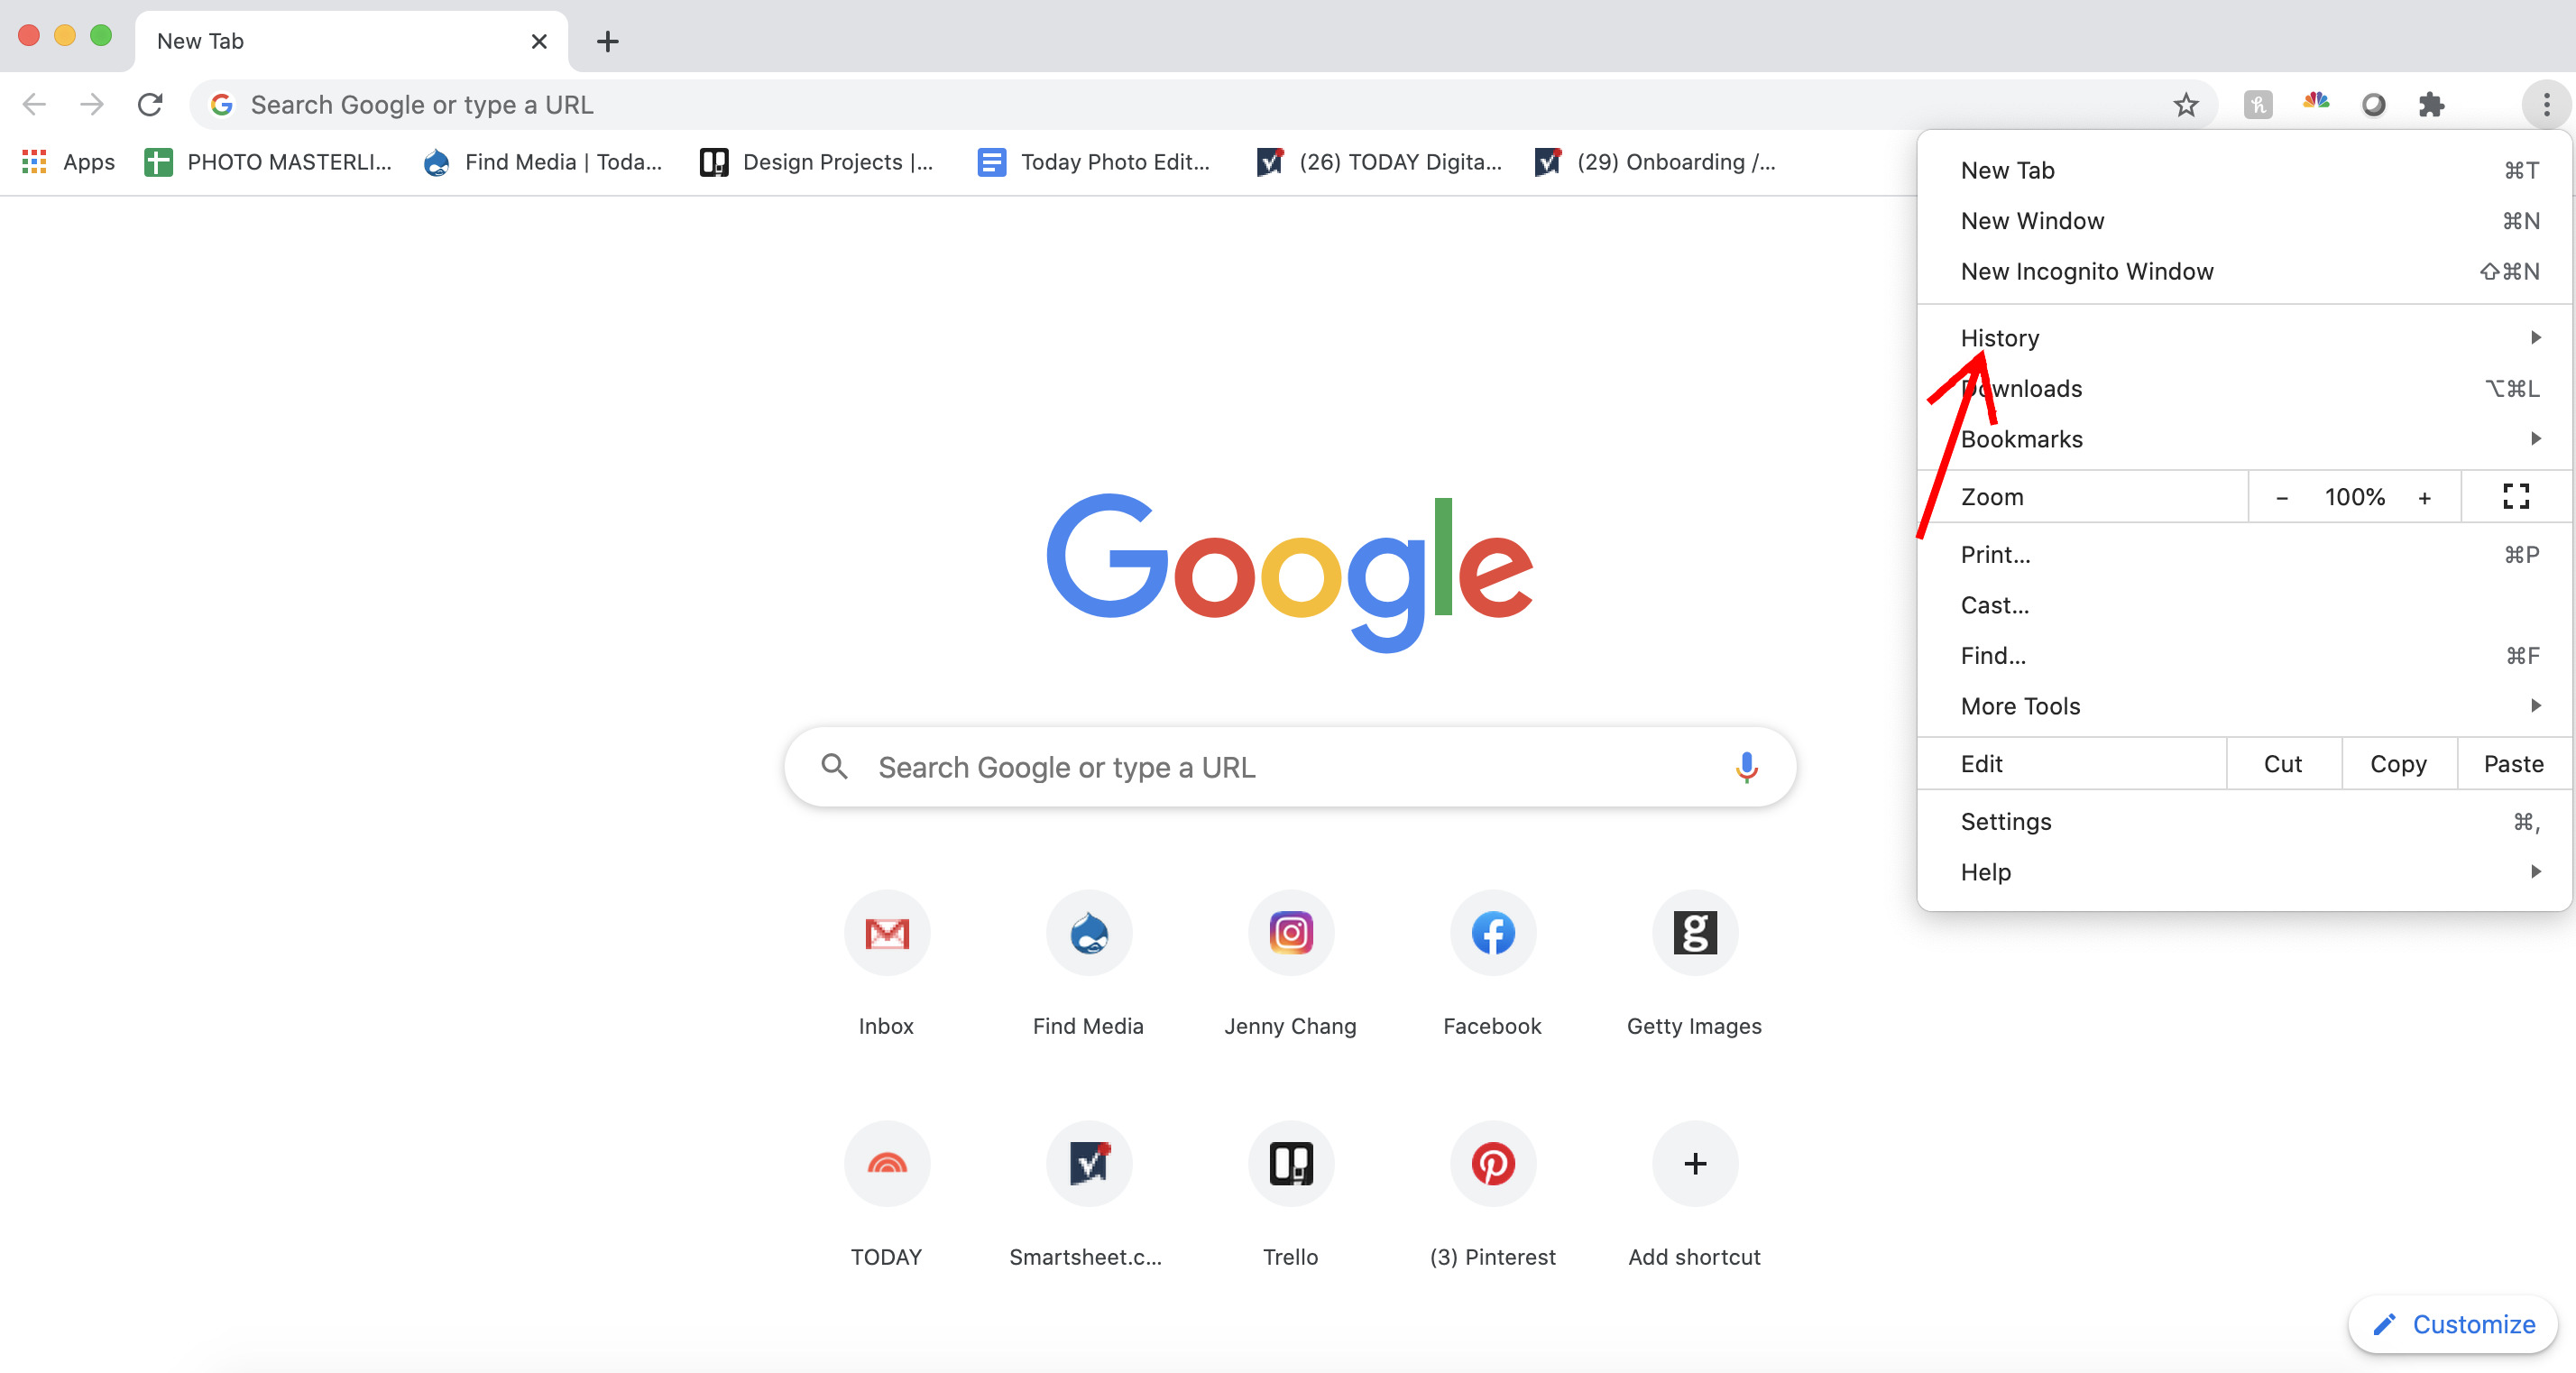
2. Click on the three vertical dots in the top-right corner of the browser window to open the Chrome menu.
3. In the dropdown menu, select “History” to open the browsing history page.
4. On the left-hand side, you will see a list of time intervals: “Last hour,” “Last 24 hours,” “Last 7 days,” and “Last 4 weeks.” Choose the time interval that you want to clear the history for. If you want to remove all browsing history, select “All time.”
5. Once you’ve selected the time interval, the browsing history for that period will appear on the right-hand side. To clear the history, click on the “Clear browsing data” button.
6. In the pop-up window, you can choose additional items to delete, such as cached images and files, cookies and other site data, or passwords. Check the boxes next to the items you want to remove.
7. After selecting the items, click on the “Clear data” button to delete your browsing history.
8. Wait for the browser to finish clearing the selected data. Once completed, your browsing history will be removed from your Chromebook.
By regularly clearing your browsing history, you can ensure that your online activities remain private and your Chromebook runs smoothly. It’s a simple yet effective way to maintain your privacy and keep your device optimized.
Remove Google Account Synced Data
If you use your Chromebook with a Google account, your browsing history and other data may be synced across multiple devices. To remove this synced data from your Google account, follow these steps:
1. Open the Chrome browser on your Chromebook and click on the three vertical dots in the top-right corner to open the Chrome menu.
2. From the dropdown menu, select “Settings” to open the Chrome settings page.
3. Scroll down to the “People” section and click on “Sync.” This will open the sync settings where you can manage the data synced to your Google account.
4. Under the “Sync” section, you will see a list of data types that can be synced, including browsing history, bookmarks, passwords, and more. To remove synced data, click on “Sync and Google services” under the “Sync” section.
5. On the next page, you will see a list of synced data types. Toggle off the switch next to “Sync everything” to prevent future syncing of all data types.
6. If you want to remove specific data types, click on “Manage sync” under the “Sync” section. This will open a new page where you can choose the data types to be removed from your Google account.
7. Uncheck the boxes next to the data types you want to remove, such as browsing history, bookmarks, or passwords.
8. Once you have selected the data types, click on “Done” to save your changes.
By removing synced data from your Google account, you can ensure that your browsing history and other personal information are not shared across devices. This gives you more control over your data and enhances your privacy.
Keep in mind that removing synced data from your Google account will only affect the data stored in your account. It will not affect the data stored locally on your Chromebook. To remove browsing history and other locally stored data, you will need to follow the steps mentioned in the “Clear Browsing History” section.
Delete Specific Sites from Browsing History
If you want to remove specific websites from your browsing history on a Chromebook, you have the flexibility to delete individual entries. Here’s how you can delete specific sites from your browsing history:
1. Open the Chrome browser on your Chromebook and click on the three vertical dots in the top-right corner to open the Chrome menu.
2. From the dropdown menu, select “History” to open the browsing history page.
3. On the left-hand side, you will see a list of time intervals: “Last hour,” “Last 24 hours,” “Last 7 days,” and “Last 4 weeks.” Choose the appropriate time interval to access the browsing history containing the specific site you want to delete.
4. Once you’ve selected the time interval, the browsing history for that period will appear on the right-hand side. Scroll through the list and locate the specific site or sites you want to remove.
5. To delete a single site from your browsing history, hover over the entry and click on the three vertical dots that appear on the right-hand side. From the dropdown menu, select “Remove from history.” The selected site will be deleted from your browsing history.
6. If you want to delete multiple sites at once, simply check the boxes next to each entry you wish to remove. Once you have selected all the desired entries, click on the “Delete” button that appears at the top of the browsing history page.
7. A confirmation popup will appear asking if you’re sure you want to delete the selected history. Click on “Delete” to proceed.
By deleting specific sites from your browsing history, you can easily remove any unwanted or sensitive information while retaining the rest of your browsing history. It’s a convenient way to ensure that your browsing remains tailored to your preferences and privacy needs.
Remember that deleting specific sites from your browsing history will only remove them from your Chromebook. If you have synced your browsing data with a Google account, it may still be accessible from other devices.
Clear Cookies and Cached Files
Cookies and cached files are stored on your Chromebook to enhance your browsing experience. However, over time, these files can accumulate and take up valuable storage space. Clearing cookies and cached files not only frees up storage but also helps protect your privacy. Here’s how you can clear cookies and cached files on your Chromebook:
1. Open the Chrome browser on your Chromebook and click on the three vertical dots in the top-right corner to open the Chrome menu.
2. From the dropdown menu, select “Settings” to open the Chrome settings page.
3. Scroll down to the “Privacy and security” section and click on “Clear browsing data.”
4. A new tab will open with the “Clear browsing data” menu. By default, the “Basic” tab will be selected, which includes options to clear browsing history, cookies, and cached images and files.
5. To clear cookies and cached files, ensure that the checkboxes next to “Cookies and other site data” and “Cached images and files” are checked.
6. If you want to delete cookies and cached files for a specific time range, use the dropdown menu next to the checkboxes to select the desired time interval. If you want to clear all data, choose “All time.”
7. Once you have selected the appropriate options, click on the “Clear data” button to delete the cookies and cached files from your Chromebook.
8. Wait for the process to complete, and your cookies and cached files will be cleared.
Clearing cookies and cached files helps protect your privacy by removing stored information from websites you have visited. Additionally, it can also resolve browsing issues that may arise due to corrupt or outdated cached files.
Keep in mind that clearing cookies and cached files may sign you out of websites that rely on cookie data for authentication. You may need to log in again to some websites after clearing these files.
Clear Download History
When you download files on your Chromebook, a record of each download is kept in your download history. Clearing your download history can help maintain your privacy and free up space on your device. Here’s how you can clear your download history on a Chromebook:
1. Open the Chrome browser on your Chromebook and click on the three vertical dots in the top-right corner to open the Chrome menu.
2. From the dropdown menu, select “History” to open the browsing history page.
3. On the left-hand side, you will see a list of time intervals: “Last hour,” “Last 24 hours,” “Last 7 days,” and “Last 4 weeks.” Choose the appropriate time interval to access the download history you want to clear.
4. Once you’ve selected the time interval, the download history for that period will appear on the right-hand side. Scroll through the list to review the downloaded files.
5. To delete a single download entry, hover over the file and click on the three vertical dots that appear on the right-hand side. From the dropdown menu, select “Remove from history.” The selected download will be deleted from your history.
6. If you want to clear your entire download history, click on the “Clear browsing data” button at the top of the browsing history page.
7. In the pop-up window, make sure the checkbox next to “Download history” is selected. You can also choose to clear other data types, such as browsing history, cookies, and cached files.
8. Once you have selected the desired options, click on the “Clear data” button to delete your download history.
By clearing your download history, you can ensure that no trace of your downloaded files remains on your Chromebook. This can be particularly useful if you want to maintain your privacy or free up storage space on your device.
Remember that clearing your download history only removes the record of the downloaded files, not the files themselves. If you want to delete the downloaded files, you will need to locate them in your file manager and delete them manually.
Delete Autofill Data
Autofill is a convenient feature that automatically fills in forms and passwords for you on websites. While it can save time and effort, you may want to clear your autofill data on a Chromebook to remove any outdated or incorrect information. Here’s how you can delete autofill data:
1. Open the Chrome browser on your Chromebook and click on the three vertical dots in the top-right corner to open the Chrome menu.
2. From the dropdown menu, select “Settings” to open the Chrome settings page.
3. Scroll down to the “Autofill” section and click on “Addresses and more” or “Passwords,” depending on the type of autofill data you want to delete.
4. On the “Addresses and more” page, you will see a list of saved addresses, contact information, and payment methods. To delete a specific entry, hover over it and click on the three vertical dots that appear on the right-hand side. From the dropdown menu, select “Remove” to delete the selected autofill entry.
5. If you want to clear all autofill data, click on the “More actions” button at the top-right corner of the “Addresses and more” page. From the dropdown menu, select “Remove all” to delete all saved autofill entries.
6. On the “Passwords” page, you will find a list of saved usernames and passwords for various websites. To delete a specific password entry, hover over it and click on the three vertical dots that appear on the right-hand side. From the dropdown menu, select “Remove” to delete the selected password.
7. To clear all saved passwords, click on the “More actions” button at the top-right corner of the “Passwords” page. From the dropdown menu, select “Remove all” to delete all saved passwords.
By deleting autofill data, you can ensure that your Chromebook does not fill in outdated or incorrect information automatically. This can be particularly useful when you have multiple addresses or if you frequently change passwords.
Keep in mind that deleting autofill data will not disable the autofill feature. Chrome will still prompt you to save and autofill information when you fill out forms on websites. If you wish to disable autofill completely, you can do so by toggling off the autofill settings in the Chrome browser settings.
Remove Saved Passwords
Saving passwords on your Chromebook can make logging into websites more convenient. However, there may be instances where you want to remove certain saved passwords for security or privacy reasons. Here’s how you can remove saved passwords on a Chromebook:
1. Open the Chrome browser on your Chromebook and click on the three vertical dots in the top-right corner to open the Chrome menu.
2. From the dropdown menu, select “Settings” to open the Chrome settings page.
3. Scroll down to the “Autofill” section and click on “Passwords.” This will open the password manager page where all your saved passwords are stored.
4. On the “Passwords” page, you will see a list of websites for which you have saved passwords. Scroll through the list to find the specific website or websites whose passwords you want to remove.
5. To remove a specific password, hover over the entry and click on the three vertical dots that appear on the right-hand side. From the dropdown menu, select “Remove” to delete the selected password.
6. If you want to remove multiple passwords at once, simply check the boxes next to the entries you wish to remove. Once you have selected all the passwords you want to delete, click on the “Remove” button that appears at the top of the password manager page.
7. A confirmation popup will appear asking if you’re sure you want to remove the selected passwords. Click on “Remove” to proceed.
By removing saved passwords, you can ensure that unauthorized individuals do not have access to your accounts. It is important to regularly review and remove any passwords that are no longer needed or for websites that you no longer use.
Remember that removing saved passwords does not disable the autofill feature or prevent Chrome from asking to save passwords in the future. If you want to disable password saving or autofill completely, you can do so by toggling off the autofill settings in the Chrome browser settings.
Clear Form Data
When you fill out forms on websites, Chrome may remember and store that information to save you time in the future. However, there may be situations where you want to clear form data, such as when you want to remove sensitive information or start fresh. Here’s how you can clear form data on your Chromebook:
1. Open the Chrome browser on your Chromebook and click on the three vertical dots in the top-right corner to open the Chrome menu.
2. From the dropdown menu, select “Settings” to open the Chrome settings page.
3. Scroll down to the “Privacy and security” section and click on “Clear browsing data.”
4. A new tab will open with the “Clear browsing data” menu. By default, the “Basic” tab will be selected, which includes options to clear browsing history, cookies, and cached images and files.
5. To clear form data, click on the “Advanced” tab at the top of the “Clear browsing data” menu.
6. Under the “Advanced” tab, you will see a list of additional options. Check the box next to “Autofill form data” to include form data in the items to be cleared.
7. If you want to clear form data for a specific time range, use the dropdown menu next to the checkboxes to select the desired time interval. If you want to clear all data, choose “All time.”
8. Once you have selected the appropriate options, click on the “Clear data” button to delete your form data.
9. Wait for the process to complete, and your form data will be cleared.
By clearing form data, you can remove any information that you have previously entered into online forms. This can help protect your privacy and ensure that sensitive information is not saved on your Chromebook.
Keep in mind that clearing form data will not disable the autofill feature. Chrome will still prompt you to save and autofill information when you fill out forms on websites. If you wish to disable autofill completely, you can do so by toggling off the autofill settings in the Chrome browser settings.
Delete Site Settings
Over time, you may have granted certain permissions or made site-specific settings adjustments on your Chromebook. However, if you want to reset these settings or revoke permissions from specific websites, you can easily delete site settings. Here’s how you can do it:
1. Open the Chrome browser on your Chromebook and click on the three vertical dots in the top-right corner to open the Chrome menu.
2. From the dropdown menu, select “Settings” to open the Chrome settings page.
3. Scroll down to the “Privacy and security” section and click on “Site settings.”
4. On the “Site settings” page, you will find a list of different permissions and settings that you have set for various websites. These settings include permissions for camera, microphone, notifications, pop-ups, and more.
5. To delete site settings for a specific permission, click on the respective entry. For example, to manage camera settings, click on “Camera” in the list of permissions.
6. On the camera settings page, you will see the list of websites for which you have granted or blocked camera access. To delete a specific site setting, hover over the entry and click on the trash bin icon that appears on the right-hand side.
7. If you want to delete all site settings for a specific permission, click on the “More actions” button at the top-right corner of the respective settings page. From the dropdown menu, select “Remove all sites” to delete all site settings for that particular permission.
8. Repeat this process for other permissions or settings that you want to delete site settings for.
By deleting site settings, you can have more control over the permissions and settings you have granted to different websites. It can help you reset permissions, clear unwanted settings, and improve your browsing experience.
Remember that deleting site settings will reset them to default values. When you visit those websites again, you will need to grant permissions or adjust settings as per your preferences.
Reset Chromebook to Factory Settings
If you want to start fresh with your Chromebook and undo any customization or settings changes you have made, you can perform a factory reset. Resetting your Chromebook to its factory settings will erase all personal data, including files, settings, and apps. Here’s how you can reset your Chromebook:
Note: Performing a factory reset will delete all data. Make sure to back up any important files or data before proceeding.
1. Open the Chrome browser on your Chromebook and click on the clock in the bottom-right corner of the screen.
2. In the quick settings menu that appears, click on the gear icon to open the Settings menu.
3. In the Settings menu, scroll down to the bottom and click on “Advanced” to expand the advanced settings options.
4. Under the “Advanced” section, click on “Reset settings” to open the reset settings page.
5. On the reset settings page, click on the “Powerwash” section.
6. A pop-up window will appear, displaying the details of the reset process. Read the information carefully and click on the “Restart” button to proceed.
7. Your Chromebook will now restart and begin the factory reset process. Follow the on-screen instructions to complete the reset.
8. Once the reset is complete, you will be prompted to set up your Chromebook again, just like when you first purchased it.
By resetting your Chromebook to factory settings, you can restore it to its original state and eliminate any customization or changes made during your usage. This can be useful if you’re experiencing issues or want to sell or give away your Chromebook.
Remember to back up any important data before performing a factory reset, as the process will erase all personal files and settings. After the reset, you will need to reinstall your apps and restore any data from your backup.