
Enabling the Virtual Keyboard on Chromebook
Chromebooks are known for their sleek and compact design, which means they often have physical keyboards with limited keys. However, if you find yourself missing the convenience of a dedicated delete key on your Chromebook, don’t worry! With a few simple steps, you can enable a virtual keyboard that includes a delete key function.
To enable the virtual keyboard on your Chromebook, follow these steps:
- Click on the clock in the bottom-right corner of your screen.
- Select the gear icon to access the Settings menu.
- In the Settings menu, scroll down and click on “Advanced” to expand the options.
- Scroll down further until you find the “Accessibility” section.
- Under the Accessibility section, click on the “Manage accessibility features” link.
- In the Accessibility features menu, toggle on the option for “Enable virtual keyboard.”
Once you have enabled the virtual keyboard, you will notice a small keyboard icon in the lower-right corner of your screen. Clicking on this icon will open the virtual keyboard, which includes a delete key along with other essential keys.
Now you can use the virtual keyboard to type and easily access the delete key when needed. Whether you need to erase a sentence or remove a typo, the virtual keyboard provides a convenient solution.
It’s important to note that the virtual keyboard may not be as responsive as a physical keyboard, so it’s still recommended to utilize the physical keyboard as much as possible. However, having the virtual keyboard with a delete key as a backup option can be incredibly useful in certain situations.
By following these simple steps, you can enable the virtual keyboard on your Chromebook and enjoy the convenience of a delete key, ensuring that your typing experience is more efficient and frustration-free.
Adding a Delete Key Function to the Virtual Keyboard
After enabling the virtual keyboard on your Chromebook, you might notice that the default layout does not include a dedicated delete key. However, you can easily add this functionality to the virtual keyboard by following these steps:
- Click on the keyboard icon located in the lower-right corner of your screen to open the virtual keyboard.
- Next, click on the three dots (…) at the top-right corner of the keyboard window and select “Options.”
- In the Options menu, click on “Add to dictionary” located under the “Custom words” section.
- Now, type “delete” in the text field and click on the “Add” button.
By adding “delete” to the custom words, you have essentially created a virtual delete key on your Chromebook’s virtual keyboard.
To access the delete function, follow these steps:
- Open any text field or document where you want to use the delete key function.
- Click on the keyboard icon again to open the virtual keyboard.
- Type the word “delete” using the virtual keyboard.
Once you have typed the word “delete,” the virtual keyboard will automatically input the delete key function and erase the selected text or the character to the left of the cursor.
Remember, this workaround allows you to use the virtual delete key, but it’s a slightly different approach compared to a physical delete key. However, it serves the same purpose and can be a valuable addition to your Chromebook’s functionality.
With the virtual delete key activated, you no longer need to rely on external keyboards or complicated workarounds to efficiently delete text on your Chromebook.
Whether you’re editing documents, composing emails, or simply making corrections, the virtual delete key function provides a convenient way to streamline your typing experience on a Chromebook.
Customizing the Virtual Keyboard Layout
The virtual keyboard on your Chromebook is not only a convenient tool but also customizable to suit your preferences. By customizing the virtual keyboard layout, you can ensure that it aligns with your typing style and needs. Follow these steps to customize the virtual keyboard layout:
- Open the virtual keyboard by clicking on the keyboard icon in the lower-right corner of your screen.
- Click on the three dots (…) at the top-right corner of the keyboard window and select “Options.”
- In the Options menu, you’ll find various customization options, including changing the keyboard theme, layout, and more.
- To change the keyboard layout, click on “Layouts” in the Options menu.
- You will see a list of available keyboard layouts. Select the one that suits you best.
Chromebook offers several keyboard layouts, such as QWERTY, AZERTY, and more. Choose the layout that matches your familiarity or the one you find most comfortable.
Furthermore, you can also customize the keyboard setup by enabling or disabling specific keys. For instance, if you rarely use certain keys like Caps Lock or Function keys, you can disable them to simplify the virtual keyboard layout.
Remember to experiment with different layouts and settings to find the one that suits your typing style and enhances your productivity. With the ability to customize the virtual keyboard, you can optimize your typing experience on your Chromebook.
Take some time to explore the customization options available and tailor the virtual keyboard layout to your liking. Whether it’s changing the layout, enabling or disabling keys, or adjusting the theme, these customization options allow you to personalize your Chromebook and make it truly yours.
Using Chrome Extensions for a Dedicated Delete Key
If you prefer a more seamless and permanent solution for a dedicated delete key on your Chromebook, you can explore the option of using Chrome extensions. These extensions can provide additional functionalities, including the much-needed delete key. Here’s how you can use Chrome extensions to add a dedicated delete key:
- Open the Chrome browser on your Chromebook and go to the Chrome Web Store.
- In the search bar, type “delete key” or “virtual keyboard” to find suitable Chrome extensions.
- Review the available extensions and read their descriptions and user reviews to ensure they meet your requirements.
- Select the desired extension that offers the delete key functionality and click on “Add to Chrome” to install it.
- After the installation is complete, follow any additional instructions provided by the extension to activate it.
Once the extension is enabled, you should see a dedicated delete key on your virtual keyboard that you can use to conveniently delete text and characters.
It’s worth noting that there are several virtual keyboard extensions available, each with its own set of features and customization options. You can explore different extensions and choose the one that best suits your needs.
Remember to periodically check for updates for your chosen extension. Developers often release updates to enhance the functionality and compatibility of their extensions with the latest Chromebook software versions.
By installing a Chrome extension for a dedicated delete key, you can enjoy a seamless and integrated solution for your typing needs on your Chromebook. With just a few clicks, you can enhance the functionality of your virtual keyboard and ensure smoother editing and typing experiences.
Creating a Keyboard Shortcut for Delete on Chromebook
If you prefer using keyboard shortcuts for quick and efficient navigation on your Chromebook, you can create a custom keyboard shortcut specifically for the delete function. This allows you to conveniently delete text without the need for a physical or virtual delete key. Here’s how you can create a keyboard shortcut for delete on your Chromebook:
- Click on the clock in the bottom-right corner of your screen to access the system tray.
- Select the gear icon to open the Settings menu.
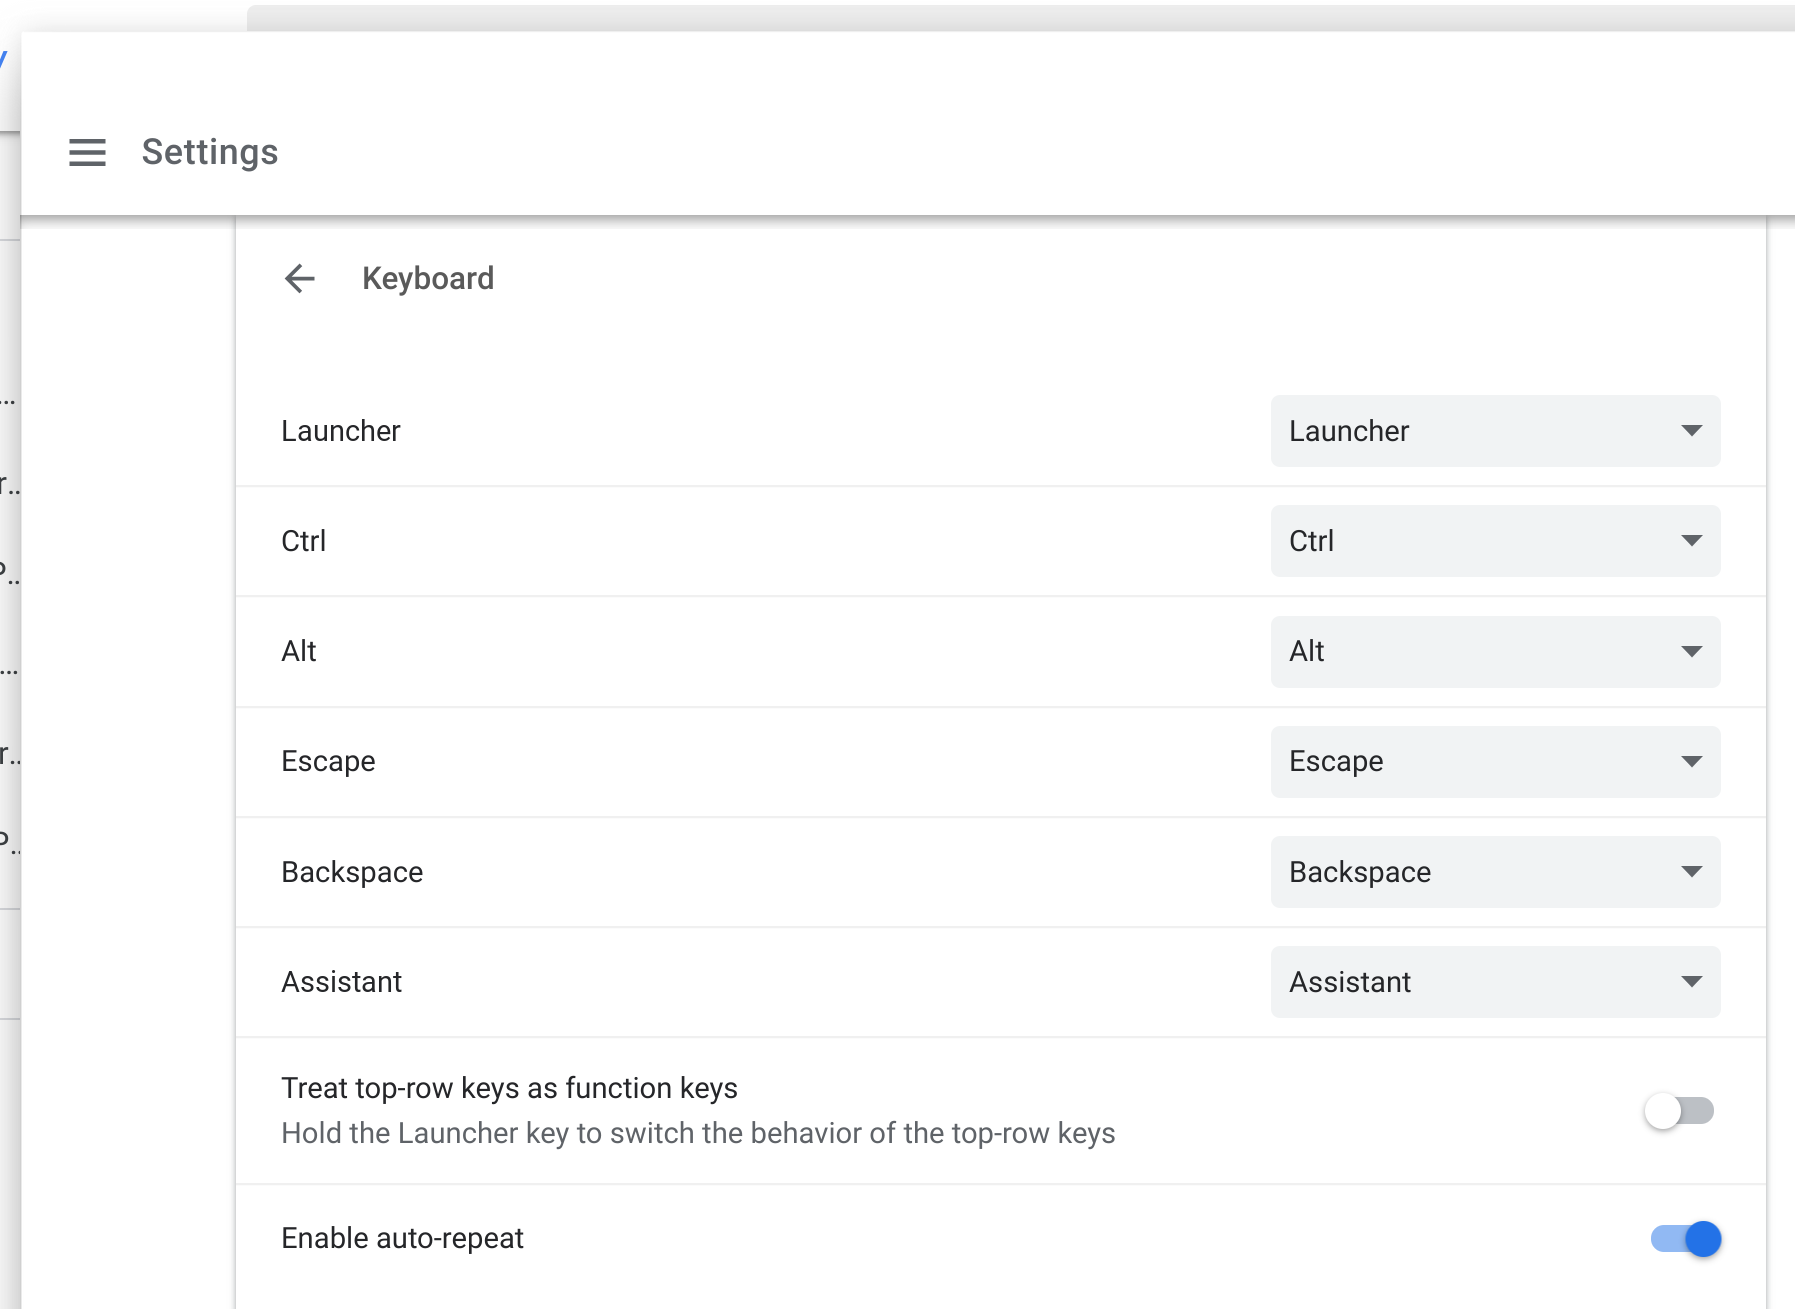
- In the Settings menu, scroll down and click on “Keyboard.”
- Next, click on “Add custom shortcut” located in the “Custom shortcuts” section.
- In the “Name” field, enter a descriptive name for your keyboard shortcut, such as “Delete.”
- In the “Command” field, input the following text:
xdotool key --clearmodifiers "BackSpace" - Click on the “OK” button to save the keyboard shortcut.
- Now, you can assign a specific key combination to your custom shortcut. Click on “Set shortcut” and press the desired key combination on your Chromebook’s keyboard.
- Once the key combination is selected, the custom keyboard shortcut is created.
From now on, whenever you press the assigned key combination, it will function as the delete key, allowing you to erase selected text or characters efficiently.
By creating a keyboard shortcut for delete, you can further streamline your typing and editing processes on your Chromebook. This feature is especially useful for users who prefer to navigate their devices primarily using keyboard shortcuts.
Remember to choose a key combination that is easy to remember and doesn’t conflict with existing keyboard shortcuts. Additionally, note that the custom keyboard shortcut may not function in certain applications or on specific web pages, as compatibility can vary depending on the software you’re using.
With a custom keyboard shortcut for delete, you can save time and effort while editing, composing documents, or handling any text-related tasks on your Chromebook.
Using the Alt Key as a Temporary Delete Key
If you’re looking for a quick and temporary solution to perform delete functions on your Chromebook, you can utilize the Alt key as a substitute. While it may not provide the same dedicated delete key functionality, it can serve as a convenient alternative in a pinch. Here’s how you can use the Alt key as a temporary delete key:
- Place the cursor at the beginning of the text you want to delete or to the left of the character you wish to remove.
- Hold down the Alt key on your Chromebook’s keyboard.
- While holding down the Alt key, press the Backspace key to delete the character to the left of the cursor or the selected text ahead of the cursor.
By using the Alt key in conjunction with the Backspace key, you can effectively simulate the delete key action. This method allows you to quickly erase characters or text without the need for a dedicated delete key or additional software.
However, it’s important to note that this workaround is temporary and requires manual input each time you want to perform a delete action. It may not be as efficient or convenient as having a dedicated delete key on your keyboard or using other methods mentioned earlier.
Nonetheless, if you find yourself without access to a physical or virtual delete button, using the Alt key as a temporary substitute can help you navigate through text and quickly make corrections on your Chromebook.
Remember, this method is not exclusive to the Chromebook system and can typically be used on other devices as well, such as Windows computers.
Keep this alternative method in mind whenever you need to perform a delete operation on your Chromebook without the luxury of a dedicated delete key readily available.
Installing Third-Party Apps for a Delete Key Functionality
If you’re looking for a more robust and comprehensive solution to add a dedicated delete key functionality to your Chromebook, installing third-party apps can help fulfill your needs. These apps offer advanced features and customization options beyond what the default settings provide. Follow these steps to install third-party apps for a delete key functionality:
- Open the Chrome Web Store on your Chromebook.
- In the search bar, enter keywords like “virtual keyboard,” “delete key,” or “keyboard customization” to find relevant apps.
- Review the available apps, read their descriptions, and check user reviews to ensure they fit your requirements and have positive ratings.
- Select the desired app that offers the functionality you need and click on “Add to Chrome” to install it.
- After the installation is complete, follow any additional instructions provided by the app to activate it.
Once the third-party app is installed and activated, it will provide you with a virtual keyboard layout that includes a dedicated delete key. These apps often offer additional customization options, themes, and features to enhance your typing experience on your Chromebook.
Remember to explore the settings and options within the app to tailor it to your preferences. You may find options to customize the layout, change the appearance, or configure other aspects of the virtual keyboard.
One popular third-party app is “Gboard” by Google, which provides an advanced virtual keyboard experience with various features, including a dedicated delete key. However, feel free to explore other apps as well to find one that suits your specific needs.
With third-party apps installed, you can enjoy a more customizable and feature-rich virtual keyboard experience on your Chromebook. These apps expand the functionality of your device and provide a more comprehensive solution for adding a delete key.
Remember to stay vigilant when installing third-party apps and choose reputable sources to ensure the apps you install are safe and reliable.
Utilizing third-party apps for a delete key functionality opens up a wide range of options and possibilities, allowing you to optimize your typing experience on your Chromebook.
Troubleshooting Common Issues with the Delete Key on Chromebook
While Chromebooks are designed to provide a seamless and user-friendly experience, you may encounter some issues related to the delete key functionality. However, there are several troubleshooting steps you can take to address these common issues. Here are some solutions you can try:
1. Verify Virtual Keyboard Settings:
First, ensure that the virtual keyboard is enabled and properly configured on your Chromebook. Go to the Settings menu, click on “Accessibility,” and make sure the “Enable virtual keyboard” option is toggled on.
2. Update Chrome OS:
Outdated software can sometimes lead to functionality issues. Check for any available updates for your Chromebook’s operating system and install them if necessary. Updating the system may resolve any bugs or glitches affecting the delete key functionality.
3. Restart Your Chromebook:
A simple restart can often resolve minor software issues. Turn off your Chromebook, wait for a few moments, and then turn it back on. This will refresh the system and may clear any temporary problems affecting the delete key.
4. Reset Keyboard Preferences:
If you have customized your Chromebook’s keyboard settings, reset them to their default configuration. Go to the Settings menu, click on “Keyboard,” and select the option to reset the keyboard preferences. This action often resolves any conflicts or misconfigurations that may be causing issues with the delete key.
5. Check for Hardware Issues:
If the delete key on your physical keyboard is not functioning correctly, it may indicate a hardware problem. In such cases, consider connecting an external keyboard to your Chromebook or consulting a professional technician to diagnose and repair any hardware issues.
6. Seek Support from Chromebook Community:
If none of the above solutions work, you can reach out to the Chromebook community for further assistance. Online forums, support websites, and community groups are excellent resources where you can seek advice from experienced Chromebook users who may have encountered and resolved similar issues.
Remember, troubleshooting steps may vary depending on your specific Chromebook model and software version. It’s always advisable to consult the official support resources provided by the manufacturer for more detailed instructions or contact their dedicated support team for personalized assistance.
By following these troubleshooting steps and seeking support when needed, you can overcome common issues with the delete key on your Chromebook and ensure a smooth typing experience.