
Enable Hibernate Command in Windows 10
If you’re using Windows 10 and want to enable the hibernate feature on your computer, you’re in luck. Hibernate is a useful power-saving option that allows you to quickly resume your work from where you left off, even after shutting down your system. Enabling the hibernate command is a straightforward process, and it can be done using either the Command Prompt or the Windows Power Options. Here’s how you can enable the hibernate command in Windows 10.
To enable the hibernate command using the Command Prompt, follow these steps:
- Press the Windows key on your keyboard and type “cmd.”
- Right-click on “Command Prompt” and select “Run as administrator.”
- In the Command Prompt window, type “powercfg /hibernate on” without the quotes.
- Press Enter to execute the command.
- Once the command is executed successfully, the hibernate feature will be enabled on your computer. You can now close the Command Prompt window.
Alternatively, you can enable the hibernate command through the Windows Power Options. Here’s how:
- Click on the Start button, then select “Settings” (the gear icon).
- In the Settings window, click on “System.”
- Go to the “Power & sleep” tab in the left-hand sidebar.
- Scroll down and click on “Additional power settings.”
- In the Power Options window, select “Choose what the power buttons do” from the left-hand sidebar.
- Click on “Change settings that are currently unavailable.”
- Scroll down to the “Shutdown settings” section.
- Under the “Hibernate” option, check the box next to “Hibernate.”
- Click on “Save changes” to enable the hibernate command.
Once you’ve enabled the hibernate command using either method, the option to hibernate your computer will be available in the Start menu and the power options menu. This allows you to quickly put your computer into hibernation mode, preserving your current work and applications for the next use.
Now that you know how to enable the hibernate command in Windows 10, you can take advantage of this convenient power-saving feature. Whether you’re stepping away from your computer for a short break or shutting it down for the day, hibernate provides a seamless way to pick up where you left off without any hassle.
Disable Hibernate Command in Windows 10
If you have previously enabled the hibernate feature on your Windows 10 computer and wish to disable it, you can easily do so using the Command Prompt or the Windows Power Options. Disabling the hibernate command can be useful if you want to free up some storage space on your system or if you simply don’t use the hibernate feature. Here are the steps to disable the hibernate command in Windows 10.
To disable the hibernate command using the Command Prompt, follow these steps:
- Press the Windows key on your keyboard and type “cmd.”
- Right-click on “Command Prompt” and select “Run as administrator.”
- In the Command Prompt window, type “powercfg /hibernate off” without the quotes.
- Press Enter to execute the command.
- Once the command is executed successfully, the hibernate feature will be disabled on your computer. You can now close the Command Prompt window.
Alternatively, you can disable the hibernate command through the Windows Power Options. Here’s how:
- Click on the Start button, then select “Settings” (the gear icon).
- In the Settings window, click on “System.”
- Go to the “Power & sleep” tab in the left-hand sidebar.
- Scroll down and click on “Additional power settings.”
- In the Power Options window, select “Choose what the power buttons do” from the left-hand sidebar.
- Click on “Change settings that are currently unavailable.”
- Scroll down to the “Shutdown settings” section.
- Under the “Hibernate” option, uncheck the box next to “Hibernate.”
- Click on “Save changes” to disable the hibernate command.
Once you’ve disabled the hibernate command, the option to hibernate your computer will no longer be available in the Start menu or the power options menu. However, you can still use other power-saving options like sleep or shutdown depending on your preference.
Disabling the hibernate command can be a useful step if you don’t use the hibernate feature or need to free up storage space on your system. By following the steps provided, you can easily disable the hibernate command in Windows 10 and customize your power-saving options to suit your needs.
Delete hiberfil.sys using the Command Prompt
If you want to reclaim disk space on your Windows 10 computer, deleting the hiberfil.sys file can be an effective solution. Hiberfil.sys is a hidden system file that stores the contents of your computer’s memory when it enters hibernate mode. While hibernation can be useful, the hiberfil.sys file can take up a significant amount of storage space. By using the Command Prompt, you can safely delete the hiberfil.sys file and free up valuable disk space. Here’s how:
- Press the Windows key on your keyboard and type “cmd”.
- Right-click on “Command Prompt” and select “Run as administrator”.
- In the Command Prompt window, type “powercfg -h off” without the quotes.
- Press Enter to execute the command.
- Once the command is executed successfully, the hiberfil.sys file will be deleted from your system.
It’s important to note that disabling hibernation using the “powercfg -h off” command will not only delete the hiberfil.sys file but also prevent your computer from entering hibernate mode. If you’d like to keep the hibernate feature but still want to delete the hiberfil.sys file, follow these steps:
- Open Command Prompt as administrator, as mentioned in the previous steps.
- Type “powercfg -h” and press Enter to check the current size of the hiberfil.sys file.
- Type “powercfg -h -size
” without the quotes, and replace with a value in percentage that represents the desired size of the hiberfil.sys file (e.g., if you want it to be 50% of the current size, replace with 50). - Press Enter to execute the command.
- This will resize the hiberfil.sys file to the specified percentage of the original size, effectively reducing its disk space usage.
Deleting the hiberfil.sys file using the Command Prompt is a simple yet effective way to free up disk space on your Windows 10 computer. By following the steps provided, you can safely remove the hiberfil.sys file and optimize your storage capacity.
Delete hiberfil.sys using Disk Cleanup
Another method you can use to easily delete the hiberfil.sys file and reclaim disk space on your Windows 10 computer is by utilizing the Disk Cleanup utility. Disk Cleanup is a built-in Windows tool that allows you to remove unnecessary files from your system, including the hiberfil.sys file. Here’s how you can use Disk Cleanup to delete hiberfil.sys:
- Press the Windows key on your keyboard and type “Disk Cleanup.”
- Select the “Disk Cleanup” app from the search results. Make sure to right-click on it and select “Run as administrator” to ensure proper permissions.
- Once the Disk Cleanup window opens, select the drive where your operating system is installed (usually the C: drive), and click on “OK.”
- In the Disk Cleanup window, click on the “Clean up system files” button. This step might require administrative privileges.
- Select the drive again and click on “OK.”
- Scroll down the list of file types and check the box next to “Hibernation File Cleaner.”
- Click on “OK” to start the cleanup process.
- A confirmation box will appear asking if you want to permanently delete the hibernation file. Click on “Delete Files” to proceed.
The Disk Cleanup utility will then remove the hiberfil.sys file, freeing up disk space on your computer. It’s worth noting that if you have hibernation enabled, this method will only disable hibernation and delete the hiberfil.sys file. If you wish to keep the hibernation feature, be sure to re-enable it after the cleanup process is complete by following the steps outlined in the previous sections.
Using Disk Cleanup to delete the hiberfil.sys file is a convenient and effective option for freeing up disk space on your Windows 10 computer. By following the steps provided, you can easily remove unnecessary system files and optimize your storage capacity.
Change Hibernate File Size in Windows 10
By default, the hiberfil.sys file size in Windows 10 is set to match the amount of physical RAM installed on your computer. However, if you find that the hiberfil.sys file is taking up too much disk space, you can resize it to a smaller size that better suits your needs. Here’s how you can change the hibernate file size in Windows 10:
- Press the Windows key on your keyboard and type “cmd.”
- Right-click on “Command Prompt” and select “Run as administrator.”
- In the Command Prompt window, type “powercfg /h /type
” without the quotes, and replace with one of the following options:
– “Reduced” – This option reduces the hiberfil.sys file size to 25% of the total physical RAM.
– “Full” – This option sets the hiberfil.sys file size to match the total physical RAM.
– “Size” – This option specifies a custom size for the hiberfil.sys file. Replacewith the desired size in bytes. - Press Enter to execute the command.
- Once the command is executed successfully, the hibernation file size will be changed according to the option you selected.
By resizing the hiberfil.sys file, you can effectively reduce its disk space usage and regain storage on your computer. Keep in mind that setting a custom size requires careful consideration of available disk space and your individual needs. It’s recommended to choose a size that provides a balance between space-saving and the ability to hibernate your computer smoothly.
Changing the hibernate file size in Windows 10 gives you control over the disk space allocated for hibernation purposes. By following the steps provided, you can adjust the hiberfil.sys file size to better align with your storage requirements and optimize your computer’s performance.
Stop Hibernate from Creating hiberfil.sys Again
If you have disabled hibernate mode or deleted the hiberfil.sys file but find that it reappears on your Windows 10 computer, there are a few steps you can take to stop hibernate from creating the hiberfil.sys file again. This can be useful if you want to permanently disable hibernation or if you need to free up disk space on your system. Here’s how you can prevent hibernate from creating hiberfil.sys again:
- Press the Windows key on your keyboard and type “cmd.”
- Right-click on “Command Prompt” and select “Run as administrator.”
- In the Command Prompt window, type “powercfg -h off” without the quotes.
- Press Enter to execute the command.
- Once the command is executed successfully, hibernate mode will be completely disabled, and the hiberfil.sys file will not be recreated.
Additionally, you can make changes in the Windows Power Options to ensure that hibernate mode doesn’t recreate the hiberfil.sys file. Here’s how:
- Click on the Start button, then select “Settings” (the gear icon).
- In the Settings window, click on “System.”
- Go to the “Power & sleep” tab in the left-hand sidebar.
- Click on “Additional power settings.”
- In the Power Options window, select “Choose what the power buttons do” from the left-hand sidebar.
- Click on “Change settings that are currently unavailable.”
- Scroll down to the “Shutdown settings” section.
- Under the “Hibernate” option, uncheck the box next to “Hibernate.”
- Click on “Save changes” to apply the settings.
By following these steps, you can ensure that hibernate mode is permanently disabled on your Windows 10 computer, preventing the creation of the hiberfil.sys file. However, it’s important to note that disabling hibernation means that the “Hibernate” option will no longer be available for you to use as a power-saving feature.
Stopping hibernate from creating the hiberfil.sys file again gives you better control over your computer’s storage space and power options. By following the steps provided, you can permanently disable hibernation and ensure that the hiberfil.sys file does not reappear on your system.
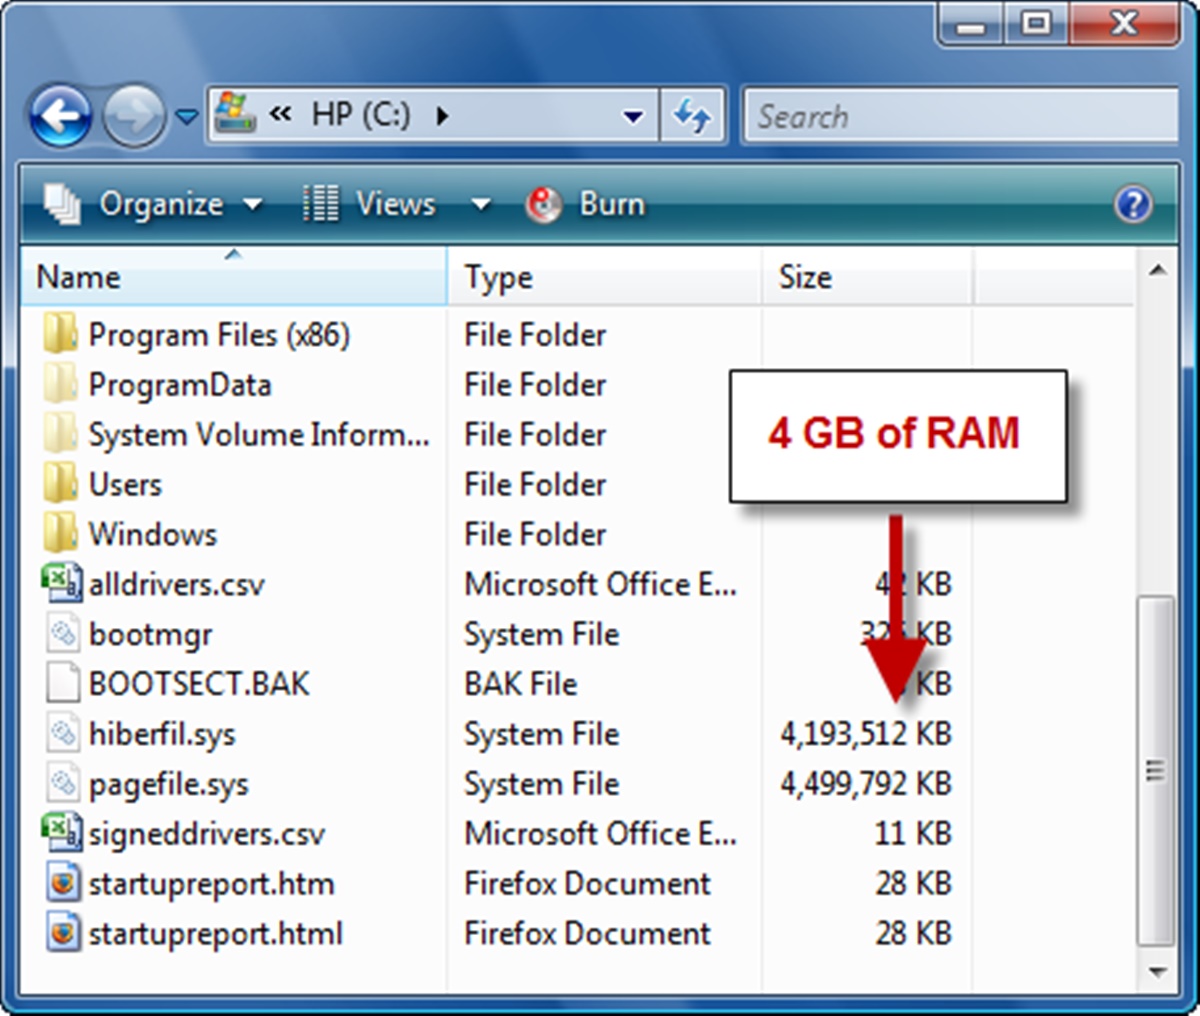
What is hiberfil.sys and Why is it Taking Up Space?When you enable hibernate mode on your Windows 10 computer, a system file called hiberfil.sys is created. The hiberfil.sys file is used to store the current state of your computer’s memory when it enters hibernate mode. This allows you to turn off your system and quickly resume your work from where you left off, without losing any data. While hibernate mode can be convenient, the hiberfil.sys file can take up a significant amount of disk space on your computer. But why does it occupy so much space?
The size of the hiberfil.sys file is determined by the amount of physical RAM installed on your computer. By default, its size is set to match the total amount of RAM. For example, if your computer has 8GB of RAM, the hiberfil.sys file will be approximately 8GB in size. The file size is necessary to ensure that all the contents of your computer’s memory can be saved during hibernation.
The hiberfil.sys file is stored on your system drive (usually C: drive) and is a hidden system file. Due to its large size and location on the primary drive, it can consume a considerable amount of disk space, especially on devices with limited storage capacity such as solid-state drives (SSDs).
It’s important to note that the hiberfil.sys file is only created and utilized when hibernation is enabled on your computer. If you disable hibernation, the file will be automatically deleted, freeing up the disk space it occupied.
While hibernation can be a useful feature for some users, it may not be necessary for everyone. If you rarely use hibernate mode or if you need to reclaim valuable disk space, disabling hibernation or resizing the hiberfil.sys file can be a viable option.
Understanding the role and impact of the hiberfil.sys file on your Windows 10 computer can help you make informed decisions regarding its management. Whether you choose to disable hibernation entirely or adjust the hiberfil.sys file’s size to minimize space usage, it’s important to weigh the benefits against your specific needs and storage constraints.
Is it Safe to Delete hiberfil.sys?
If you’re looking to free up disk space on your computer, you may wonder if it’s safe to delete the hiberfil.sys file. The hiberfil.sys file is created when you enable hibernate mode on your Windows 10 computer and is responsible for storing the contents of your computer’s memory during hibernation. While it is technically possible to delete the hiberfil.sys file, there are some considerations to keep in mind.
If you rarely or never use hibernate mode on your computer, deleting the hiberfil.sys file can free up a significant amount of disk space. However, it’s important to note that deleting this file will disable the hibernate feature, preventing you from using this power-saving option. If you don’t use hibernate mode and prefer to utilize other power options like sleep or shutdown, deleting the hiberfil.sys file can be a safe and effective choice.
It’s worth mentioning that the hiberfil.sys file is a system file and is protected by Windows. In order to delete it, you will need administrative privileges. Using the Command Prompt or Disk Cleanup utility mentioned earlier in this article, you can safely remove the hiberfil.sys file, and Windows will no longer recreate it as long as hibernation remains disabled.
However, if you do use hibernate mode and rely on it for quickly resuming your work, deleting the hiberfil.sys file is not recommended. Without the hiberfil.sys file, your computer will not be able to save the contents of its memory during hibernation, and you may lose unsaved data.
How to Free Up Space on Your Computer
Running out of disk space on your computer can be frustrating, but there are several ways you can free up space and improve its performance. Here are some effective methods to help you reclaim disk space and optimize your computer’s storage:
- Remove unnecessary files: Start by decluttering your computer and deleting files you no longer need. This includes old documents, temporary files, and downloads that have accumulated over time. You can manually go through your folders and delete them or use built-in tools like Disk Cleanup for Windows or the Finder’s “Empty Trash” feature on a Mac.
- Uninstall unused programs: Review the programs installed on your computer and remove any software that you no longer use. Open the control panel on Windows or the applications folder on a Mac to locate the programs you want to uninstall. Removing unnecessary software can free up a significant amount of space on your hard drive.
- Clear browser cache and history: Web browsers store temporary files, cookies, and browsing history, which can consume a substantial amount of disk space over time. Go to your browser’s settings and clear the cache and browsing history to free up space and potentially improve browser performance.
- Move files to an external storage device: If you have large files like videos, photos, or music that you don’t need immediate access to, consider moving them to an external storage device, such as a USB drive or an external hard drive. This helps to create more space on your computer’s internal storage.
- Use cloud storage: Cloud storage services like Google Drive, Dropbox, or OneDrive offer an excellent way to store files without taking up space on your computer. You can upload your files to the cloud and access them whenever needed, freeing up valuable storage on your local hard drive.
- Compress or archive files: If you have files that you rarely access but still want to keep, you can compress them into a smaller format or create archives using compression tools like WinRAR or 7-Zip. Compressing files reduces their size, allowing you to free up space without permanently deleting them.
- Run disk cleanup utilities: Take advantage of built-in disk cleanup utilities like Disk Cleanup on Windows or Optimize Storage on Mac. These tools can identify and remove unnecessary system files, temporary files, and other junk files that take up space on your computer.
- Manage system restore points: System restore points can consume a significant amount of disk space. Adjust the settings to manage the number and frequency of system restore points created or consider disabling them altogether if you have other backup solutions in place.
By implementing these strategies, you can effectively free up valuable disk space on your computer, allowing it to run more smoothly and efficiently. Regularly performing these maintenance tasks will help prevent storage issues and ensure your system remains optimized.