
Why Delete Clips on Twitch?
Twitch is a popular platform for content creators and viewers to share and engage with live-streamed videos. One of the features on Twitch is the ability to create clips, which are short snippets of highlights from a stream that can be shared and replayed. While clips can be a great way to showcase exciting moments, there are several reasons why you might want to delete clips on Twitch.
Firstly, it’s important to maintain the quality and relevance of your content. As a streamer, you want to present your best work to your audience. Deleting clips allows you to curate and control the content that represents you. By removing outdated clips or those that no longer align with your brand or message, you can ensure that viewers are experiencing your most current and authentic content.
Secondly, privacy concerns may arise when clips are created without your knowledge or consent. Twitch’s Terms of Service prohibit the creation of clips from streams that contain sensitive or personal information. If you come across any clips with sensitive material, deleting them is crucial to protect your privacy and the privacy of others involved in the stream.
Another reason to delete clips is to free up space in your Twitch account. As you continue to create new content, your clip collection can quickly accumulate and take up valuable storage space. By regularly deleting older clips that are not generating significant views or engagement, you can ensure that you have ample storage for new and compelling content.
Furthermore, managing your clips can enhance the viewing experience for your audience. Endless scrolling through a long list of clips can be overwhelming and deter viewers from exploring your content. Deleting unnecessary clips helps streamline your profile and makes it easier for viewers to find the most relevant and entertaining content that you have to offer.
Lastly, deleting clips allows you to maintain control over your intellectual property. While clips can be shared and replayed by others, removing them from your channel ensures that you have ownership and control over the distribution of your content. This can be particularly important if you have plans to repurpose or monetize your clips in the future.
Overall, there are multiple reasons why you might want to delete clips on Twitch. Whether it is to curate your content, protect your privacy, free up storage space, enhance the viewer experience, or retain control over your intellectual property, regularly managing and deleting clips can help you maintain a high-quality and streamlined Twitch channel.
How to Delete Clips on Twitch on Desktop:
Deleting clips on Twitch is a straightforward process, and it can be done easily from the desktop version of the platform. Follow the steps below to delete clips on Twitch:
- Open a web browser and go to the Twitch website.
- Log in to your Twitch account.
- Click on your profile picture in the top-right corner of the screen to open the drop-down menu.
- Select “Creator Dashboard” from the menu. This will take you to the Twitch Creator Dashboard.
- In the Creator Dashboard, click on the “Content” tab located on the left-hand side of the screen.
- Under the “Content” tab, select “Clips”. This will take you to the Clips Manager page.
- On the Clips Manager page, you will see a list of all your created clips. Find the clip you want to delete.
- Hover over the clip thumbnail, and a trash can icon will appear in the bottom-right corner of the thumbnail.
- Click on the trash can icon to delete the clip.
- A confirmation pop-up will appear asking you to confirm the deletion. Click “Delete” to permanently remove the clip from your Twitch channel.
That’s it! The selected clip has now been deleted from your Twitch channel. Repeat these steps for any other clips you wish to remove.
Keep in mind that once a clip is deleted, it cannot be recovered. Ensure that you double-check your decision before confirming the deletion.
Additionally, it is worth noting that deleting a clip does not remove it from other users’ collections or playlists. However, it will no longer be associated with your channel.
Now that you know how to delete clips on Twitch from the desktop, you can easily manage your content and keep your channel organized and up-to-date.
How to Delete Clips on Twitch on Mobile:
If you prefer to delete clips on Twitch using your mobile device, you can do so by following these steps:
- Open the Twitch app on your mobile device.
- Log in to your Twitch account if you haven’t already done so.
- Tap on your profile picture, located in the upper-left corner of the screen. This will open the menu.
- From the menu, select “Creator Dashboard”.
- In the Creator Dashboard, tap on the “Content” tab located at the bottom of the screen.
- Under the “Content” tab, select “Clips”. This will take you to the Clips Manager page.
- Scroll through the list of clips or use the search bar to find the clip you want to delete.
- Tap and hold the clip thumbnail until a menu pops up.
- From the pop-up menu, select “Delete Clip”.
- A confirmation dialog will appear. Tap “Delete Clip” again to confirm the deletion.
That’s it! The selected clip has now been deleted from your Twitch channel using your mobile device. Repeat these steps for any other clips you wish to remove.
Remember that once a clip is deleted, it cannot be recovered. Take a moment to review your decision before confirming the deletion.
It’s important to note that deleting a clip on mobile does not remove it from other users’ collections or playlists. However, it will no longer be associated with your channel.
Now that you know how to delete clips on Twitch using your mobile device, you can easily manage your content and keep your channel organized while on the go.
How to Delete Clips from the Twitch Clip Manager:
The Twitch Clip Manager is a handy tool that allows you to efficiently manage and delete clips from your channel. Follow the steps below to delete clips using the Clip Manager:
- Log in to your Twitch account using a web browser.
- Click on your profile picture in the top-right corner of the screen to open the drop-down menu.
- Select “Creator Dashboard” from the menu. This will take you to the Twitch Creator Dashboard.
- In the Creator Dashboard, click on the “Content” tab located on the left-hand side of the screen.
- Under the “Content” tab, select “Clips”. This will open the Clip Manager.
- You will see a list of all your created clips in the Clip Manager. Browse through the list or use the search bar to locate the clip you wish to delete.
- Hover over the clip thumbnail, and a trash can icon will appear in the bottom-right corner of the thumbnail.
- Click on the trash can icon to delete the clip.
- A confirmation pop-up will appear asking you to confirm the deletion. Click “Delete” to permanently remove the clip from your Twitch channel.
That’s it! You have successfully deleted the clip using the Twitch Clip Manager. Repeat these steps for any other clips you want to remove.
Keep in mind that once a clip is deleted, it cannot be recovered. Therefore, ensure that you are certain before confirming the deletion.
Also, note that deleting a clip from the Clip Manager will not remove it from other users’ collections or playlists. However, it will no longer be associated with your channel.
The Twitch Clip Manager provides a convenient way to manage and delete clips from your channel effectively. By regularly reviewing and deleting clips, you can keep your Twitch channel organized and showcase your best content to your viewers.
How to Delete Clips from the Video Producer:
The Video Producer is a feature on Twitch that allows you to manage and organize your videos, including the ability to delete clips. Follow these steps to delete clips using the Video Producer:
- Login to your Twitch account via a web browser.
- Click on your profile picture in the top-right corner of the screen to open the drop-down menu.
- Select “Creator Dashboard” from the menu. This will take you to the Twitch Creator Dashboard.
- In the Creator Dashboard, click on the “Content” tab located on the left-hand side of the screen.
- Under the “Content” tab, select “Video Producer”. This will open the Video Producer page.
- Browse through the list of videos in the Video Producer or use the search bar to find the specific clip you want to delete.
- Hover over the video thumbnail, and a menu icon (three dots) will appear in the top-right corner of the thumbnail.
- Click on the menu icon to open a drop-down menu.
- Select “Delete” from the drop-down menu.
- A confirmation pop-up will appear asking you to confirm the deletion. Click “Delete” to permanently remove the clip from your Twitch channel.
That’s it! The selected clip has now been deleted from your channel using the Video Producer. Repeat these steps for any other clips you wish to remove.
Remember that once a clip is deleted, it cannot be recovered. Therefore, double-check your decision before confirming the deletion.
Deleting a clip from the Video Producer will not remove it from other users’ collections or playlists. However, it will no longer be associated with your channel.
The Video Producer provides a convenient way to manage and delete clips from your Twitch channel. By regularly reviewing and removing unwanted clips, you can keep your channel organized and showcase your best content to your viewers.
How to Delete Multiple Clips at Once:
If you have multiple clips you want to delete, Twitch provides a feature that allows you to delete them in batches. Follow these steps to delete multiple clips at once:
- Log in to your Twitch account using a web browser.
- Click on your profile picture in the top-right corner of the screen to open the drop-down menu.
- Select “Creator Dashboard” from the menu. This will take you to the Twitch Creator Dashboard.
- In the Creator Dashboard, click on the “Content” tab located on the left-hand side of the screen.
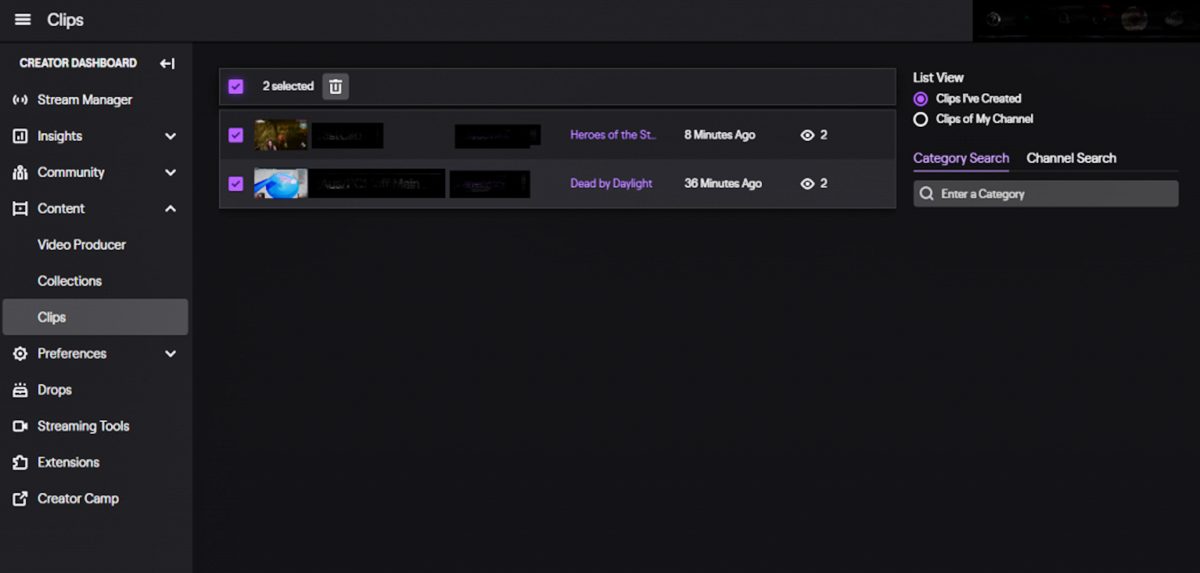
- Under the “Content” tab, select “Clips”. This will open the Clip Manager page.
- On the Clip Manager page, look for the checkbox located on the top-left corner of each clip thumbnail.
- Click on the checkbox for each clip that you want to delete. As you select clips, a toolbar will appear at the bottom of the page with options.
- Click on the “Delete Selected Clips” option in the toolbar.
- A confirmation pop-up will appear asking you to confirm the deletion. Click “Delete” to permanently remove the selected clips from your Twitch channel.
That’s it! The selected clips have now been deleted from your Twitch channel in a single batch. Repeat these steps for any other clips you wish to remove.
Remember that once clips are deleted, they cannot be recovered. Make sure to review your selection before confirming the deletion.
Deleting clips in batches will not remove them from other users’ collections or playlists. However, they will no longer be associated with your channel.
This feature allows you to efficiently manage and remove multiple clips, saving you time and effort in the process. Regularly deleting unwanted clips helps keep your Twitch channel organized and ensures that viewers can access your best content.
How to Permanently Delete Clips on Twitch:
If you want to permanently delete clips from your Twitch channel, follow these steps:
- Login to your Twitch account on a web browser.
- Click on your profile picture in the top-right corner of the screen to open the drop-down menu.
- Select “Creator Dashboard” from the menu. This will take you to the Twitch Creator Dashboard.
- In the Creator Dashboard, click on the “Content” tab located on the left-hand side of the screen.
- Under the “Content” tab, select “Clips”. This will open the Clip Manager page.
- On the Clip Manager page, find the clip you want to permanently delete.
- Hover over the clip thumbnail, and a trash can icon will appear in the bottom-right corner of the thumbnail.
- Hold down the Shift key on your keyboard and click on the trash can icon. This will trigger the clip to be permanently deleted without a confirmation pop-up.
By holding down the Shift key and clicking on the trash can icon, you skip the confirmation step, ensuring that the clip is permanently removed from your Twitch channel without any additional prompts.
Repeat these steps for any other clips you wish to permanently delete.
It’s important to note that once you permanently delete a clip, it cannot be recovered. Therefore, exercise caution and review your selection before proceeding.
Permanently deleting clips removes them from your Twitch channel and ensures that they no longer appear in any collections, playlists, or search results.
By following these steps, you can maintain control over your content and selectively remove clips from your Twitch channel in a permanent manner.
Additional Tips for Deleting Clips on Twitch:
Deleting clips on Twitch is a simple process, but here are some additional tips to consider that can help you effectively manage and delete your clips:
- Regularly review and delete old clips: As your content library grows, it’s important to regularly review and delete older clips that may no longer be relevant or align with your current branding. This helps keep your channel fresh and ensures that viewers are presented with your best content.
- Consider viewer feedback: If you receive feedback from viewers regarding specific clips, take their opinions into account when deciding which clips to delete. Listening to your audience can help you provide a better viewing experience.
- Backup your clips: Before deleting any clips, consider creating backups of those videos that have sentimental value or that you may want to use for future projects. This ensures that you have copies of important content should you want to revisit or repurpose it later.
- Monitor unauthorized clips: Keep an eye out for clips created by other users using your content without permission. If you come across these unauthorized clips, report them to Twitch to protect your intellectual property.
- Stay organized: Use descriptive titles and tags for your clips to make it easier to identify and manage them. This can save you time when searching for clips to delete or edit.
- Communicate with your community: If you decide to delete popular clips, take a moment to inform your community about the reasons behind your decision. Open communication can help maintain trust and understanding among your viewers.
Remember, managing your clips is an ongoing process. Regularly assess your content, delete what is no longer relevant, and foster an engaging environment for your viewers.
By following these additional tips, you can ensure that your Twitch channel remains organized, fresh, and reflective of your brand and content goals.