
What are Clips on Twitch?
Clips are short, user-generated videos on Twitch that capture the most exciting, funny, or memorable moments from livestreams. They allow viewers to quickly share and highlight the highlights of a stream. Clips are a powerful tool for both streamers and viewers, enabling them to easily create and share their favorite moments.
Twitch clips typically last between 5 and 60 seconds and can be created by anyone with a Twitch account. Viewers can capture and save clips during a live stream or from a stream’s VOD (Video on Demand) after the broadcast has ended.
These snippets can be shared on various platforms, including social media channels like Twitter, Facebook, and Reddit, expanding the reach and visibility of the original stream. Clips can attract new viewers, promote streamers, and create a strong sense of community among Twitch users.
For streamers, clips can be a powerful marketing tool. By showcasing the most engaging moments from their streams, they can draw in more viewers and increase their overall exposure on Twitch. Clips allow streamers to highlight their best content and showcase their unique personality, helping them stand out from the crowd.
Twitch clips have become an integral part of the platform’s culture. They are not only a form of entertainment but also a way for viewers to show appreciation for their favorite streamers and share funny or impactful moments with others. Clips often go viral within the Twitch community, generating excitement and buzz around specific streams or streamers.
Overall, clips on Twitch play a crucial role in promoting streamers, engaging viewers, and fostering a sense of community. Whether you’re a streamer looking to grow your audience or a viewer wanting to share your favorite moments, clips offer the perfect solution for capturing and sharing the best of Twitch.
How to Create a Clip on Twitch
Creating a clip on Twitch is a simple and straightforward process that allows you to capture and share the most memorable moments from a livestream. Follow these steps to create your own clip:
- While watching a live stream on Twitch, locate the video player controls. These are typically found at the bottom of the screen.
- Look for the “Clip” button. It is usually represented by a small scissors icon.
- Click on the “Clip” button to start creating your clip.
- A pop-up window will appear, allowing you to edit the duration of your clip. By default, the clip will capture the previous 30 seconds, but you can adjust the start and end time to capture the desired moment.
- Once you’re satisfied with the duration, click on the “Create Clip” button.
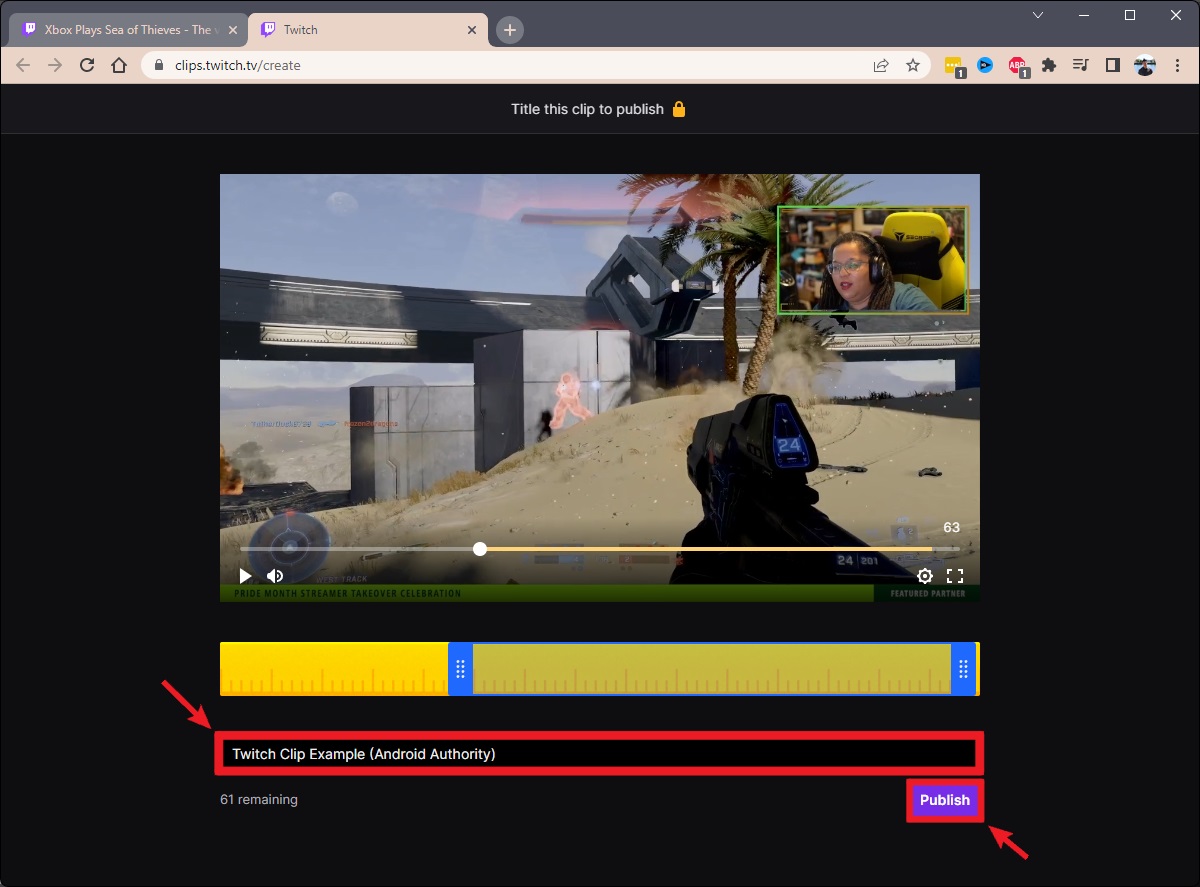
- After creating the clip, you will be redirected to a new page where you can add a title, description, and tags to your clip. This information will make your clip more discoverable by other Twitch users.
- Optional: If you want to share your clip immediately, you can click on the social media icons provided on the clip page to post it directly to platforms like Twitter or Facebook.
That’s it! You have successfully created a clip on Twitch. Your clip will now be saved in your Twitch account, and you can access it at any time.
It’s worth noting that you can also create clips from past broadcasts or VODs (Video on Demand) if you missed a live stream. Simply navigate to the video you want to clip, follow the same steps mentioned above, and create your clip from there.
Creating clips is a fantastic way to capture and share the most exciting and memorable moments from Twitch streams. Whether you’re showcasing your favorite streamer’s highlights or promoting your own content, creating clips is an effective tool for engaging with the Twitch community.
Tips for Creating Engaging Clips on Twitch
Creating engaging clips on Twitch is key to capturing the attention of viewers and maximizing the impact of your content. Here are some tips to help you create clips that stand out:
- Identify the Highlight: Focus on the most exciting, funny, or memorable moments from your stream. Look for moments that evoke strong emotions or make viewers laugh. These are the moments that are most likely to resonate with viewers and encourage them to share the clip.
- Keep it Short and Sweet: Remember that clips have a limited duration, so aim for brevity. Keep your clips between 5 and 60 seconds, capturing the essence of the moment without dragging it out. Shorter clips have a higher chance of holding viewers’ attention and being shared.
- Create a Captivating Title: A compelling and descriptive title can grab the attention of potential viewers and entice them to watch the clip. Use concise and attention-grabbing language, highlighting the most exciting aspect of the clip.
- Add Context: While clips are short snippets, providing some context can enhance the viewer’s understanding and enjoyment. Consider adding a brief description or comment that helps viewers understand the significance of the moment captured in the clip.
- Highlight Your Personality: Clips are a great opportunity to showcase your unique personality as a streamer. Whether it’s your witty commentary, energetic reactions, or signature catchphrases, infuse your clips with elements that highlight what makes you stand out.
- Focus on Quality: Pay attention to the visual and audio quality of your clips. Poor quality footage or audio can detract from the viewer’s experience and make them less likely to engage with the clip. Ensure your clips are clear, visually appealing, and have good sound quality.
- Promote Your Clips: Take advantage of social media platforms and other online communities to promote your clips. Share them on your Twitter, Facebook, or Instagram accounts, and participate in relevant communities like Reddit or Discord to gain more exposure.
- Engage with Viewers: Encourage viewers to interact with your clips by adding call-to-action elements. Ask viewers to like, comment, and share the clip and to tag their friends who might enjoy it. Engaging with viewers can help generate more organic reach and engagement.
- Experiment and Analyze: Don’t be afraid to try different approaches and techniques to see what resonates with your audience. Monitor the analytics provided by Twitch to gain insights into which clips are performing well and adjust your strategy accordingly.
By following these tips, you can create engaging and shareable clips that captivate viewers and help you grow your presence on Twitch.
How to Find and Watch Clips on Twitch
Watching clips on Twitch is a great way to discover and enjoy the most exciting and entertaining moments from your favorite streams. Here’s how you can find and watch clips on Twitch:
- Browsing Twitch Clips: Start by visiting the Twitch website or opening the Twitch app. On the homepage, you’ll find the “Browse” tab. Click on it to access a wide range of content, including top clips from across Twitch.
- Filtering by Category or Game: If you’re interested in specific games or categories, use the filter options provided. Look for the “Categories” or “Games” tab and select the game or category you’re interested in. This filters the clips to show only those related to your chosen game or category.
- Exploring Streamer Clips: If you have a favorite streamer, you can easily access their clips by visiting their Twitch channel. Navigate to the streamer’s profile page and look for the “Clips” tab. Clicking on this tab will display the clips created by that streamer and their community.
- Discovering Clips through Social Media: Many Twitch clips go viral and are shared on social media platforms like Twitter, Facebook, and Reddit. Keep an eye out for links to clips shared by streamers, viewers, or entertainment accounts you follow on these platforms.
- Using Twitch Search: If you have a specific clip or streamer in mind, you can use the search bar on Twitch. Enter relevant keywords, such as the streamer’s name, game title, or specific moments you’re looking for, to locate relevant clips.
- Engaging with Clip Comments: While watching a clip, you can scroll down to view and engage with the comments section. Here, you can interact with other viewers, share your thoughts, and participate in discussions related to the clip.
Once you find a clip you want to watch, simply click on it to start playback. You can control the volume, pause, seek, and share the clip using the controls provided on the video player.
Watching clips on Twitch is an enjoyable way to relive the best moments from your favorite streams and discover new content. With the various search options and browsing features available, you’re sure to find an endless supply of entertaining clips to watch and share.
Understanding Clip Metrics on Twitch
When it comes to evaluating the performance of your clips on Twitch, understanding the various metrics can provide valuable insights into viewer engagement and the impact of your content. Here are some key metrics that you should know:
- Views: The number of views indicates the total number of times your clip has been watched. It provides an overall measure of how many viewers have seen your content. Higher view counts imply that your clip has reached a wider audience.
- Shares: The share metric reflects the number of times your clip has been shared across different platforms and social media channels. Higher shares mean that viewers found your clip engaging and felt compelled to share it with others, expanding its reach beyond Twitch.
- Engagement: Engagement metrics measure the level of interaction and involvement viewers have with your clip. This includes actions such as likes, comments, and shares. Higher engagement numbers indicate that your clip resonated with the audience and encouraged them to take further action.
- Retention: Retention metrics provide insights into how long viewers are watching your clip. It shows the average duration viewers stay engaged with your content before leaving. Higher retention rates indicate that viewers find your clip compelling and are more likely to watch it until the end.
- Click-through Rate (CTR): CTR is a measure of how often viewers click on your clip after seeing it. It calculates the percentage of viewers who clicked on your clip out of the total number of views. A higher CTR suggests that your clip’s title, thumbnail, or description have enticed viewers to watch it.
- Conversion: Conversion metrics assess whether viewers take a desired action after watching your clip. This action could be subscribing to your channel, following you, or visiting your stream. Higher conversion rates imply that your clip has successfully motivated viewers to become more engaged with your content.
Understanding these metrics allows you to assess the performance and impact of your clips. By analyzing these numbers, you can identify trends, evaluate the effectiveness of your content strategy, and make informed decisions to enhance viewer engagement and reach.
Keep in mind that while these metrics provide valuable insights, they are not the sole indicator of success. Ultimately, the true measure of a successful clip lies in its ability to entertain, engage, and connect with viewers on a personal level.
How to Share Clips on Twitch
Sharing clips on Twitch is a fantastic way to showcase your favorite moments, promote streamers, and engage with the Twitch community. Here’s how you can easily share clips on Twitch:
- Access the Clip: Find the clip that you want to share. This can be a clip you created or one that you discovered while browsing Twitch.
- Video Player Options: Look for the sharing options provided on the video player interface. These options are usually located next to the clip title or within a menu.
- Copy the Link: Click on the sharing option that allows you to copy the link to the clip. This will generate a unique URL that you can paste and share with others.
- Share on Social Media: If you want to share the clip directly on social media platforms, click on the corresponding social media icon provided. This allows you to post the clip on platforms like Twitter, Facebook, or Reddit with just a few clicks.
- Send Directly: If you want to share the clip privately with someone, you can send them the link directly via messaging apps or email.
- Add Context: When sharing a clip, consider adding some context or a brief description to give potential viewers an idea of what to expect. This can help pique their interest and encourage them to watch the clip.
- Engage with the Community: When sharing a clip, interact with the community by utilizing relevant hashtags, mentioning the streamer or game, and tagging friends or fellow viewers who might find the clip interesting.
- Encourage Engagement: When sharing a clip, invite viewers to like, comment, and share the clip themselves. Encourage them to join the conversation and share their thoughts on the memorable moment captured in the clip.
- Monitor Performance: Keep track of how your shared clips perform. Track the number of views, shares, and engagement metrics to gauge the impact of your shared clips. This can help identify what content resonates with viewers and allows you to refine your sharing strategy.
Remember, sharing clips not only helps promote specific moments or streamers but also fosters a sense of community and connection among Twitch users. So don’t hesitate to share your favorite clips and encourage others to do the same!
Using Clips to Promote Your Twitch Channel or Stream
Clips can be powerful tools for promoting your Twitch channel or stream, helping you to attract new viewers and expand your audience. Here are some effective strategies to leverage clips for promotional purposes:
- Showcase the Highlights: Create and share clips that highlight the most exciting and entertaining moments from your stream. These clips act as a teaser, giving potential viewers a taste of what they can expect from your content.
- Create Engaging Thumbnails: When creating clips, pay attention to the thumbnail image. Design eye-catching and visually appealing thumbnails that accurately represent the content of the clip. A captivating thumbnail can entice viewers to click and watch.
- Add a Call-to-Action Overlay: Consider adding a call-to-action overlay to your clips. This can include your Twitch channel name, logo, or a prompt encouraging viewers to follow or subscribe to your channel. This helps to make your brand more prominent and encourages viewer engagement.
- Utilize Twitch Extensions: Take advantage of Twitch extensions that allow you to add interactive elements to your clips. These can include overlays, chat integration, or information panels that provide additional context about your stream and channel.
- Share on Social Media: Use social media platforms such as Twitter, Facebook, Instagram, or Reddit to share your clips. Leverage relevant hashtags, mention influencers or relevant communities, and encourage your followers to engage with and share your clips.
- Collaborate with Other Streamers: Collaborating with other streamers by featuring their clips in your stream or sharing their clips on your social media channels can help increase your visibility and reach. In return, they may reciprocate and promote your content to their audience.
- Promote During Stream Breaks: While taking breaks during your stream, play some of your best clips to keep viewers engaged and entertained. These clips can act as filler content and encourage viewers to stay engaged even when you’re not actively streaming.
- Engage with Your Community: Encourage your viewers and followers to create and share their own clips from your streams. Engage with their clips by mentioning and thanking them, further promoting a sense of community and connection.
- Analyze Performance: Monitor the performance of your clips by tracking view counts, engagement metrics, and referral sources. Analyze which clips perform best and identify patterns or themes that resonate with your audience.
- Be Consistent: Consistently create and share clips to maintain visibility and keep your audience engaged. Regularly share your clips on social media, collaborate with other streamers, and encourage community participation to build a strong presence and attract new viewers.
By leveraging the power of clips, you can effectively promote your Twitch channel or stream, reach new viewers, and build a loyal and engaged community.
Best Practices for Using Clips on Twitch
To make the most of your clips on Twitch, it’s important to follow best practices that can enhance their impact and attract a wider audience. Here are some best practices for using clips on Twitch:
- Choose Engaging Moments: Select the most entertaining, exciting, or captivating moments from your streams to create clips. Focus on moments that evoke strong emotions or generate laughter. These moments are more likely to engage viewers and encourage them to share your clips.
- Keep Clips Short: Aim to keep your clips concise and to the point. Attention spans are limited, so shorter clips are more likely to hold viewers’ attention. Keep your clips between 5 and 60 seconds in length, capturing the essence of the moment without unnecessary footage.
- Title and Thumbnail Optimization: Craft compelling titles that accurately represent the content of your clip and grab viewers’ attention. Pair your titles with visually appealing and eye-catching thumbnails that attract viewers to click and watch your clips.
- Tag Appropriately: Add relevant tags to your clips to increase their discoverability. Use keywords that describe the game, streamer, or significant moments in your clips. Proper tagging can make your clips more visible to users browsing specific categories or searching for certain terms.
- Promote Variety: If you’re a streamer, showcase a diverse range of content in your clips. Highlight different games, funny moments, intense gameplay, or unique experiences to attract a wider audience. Variety keeps viewers engaged and interested in your channel.
- Ensure Quality: Pay attention to the quality of your clips. Ensure clear video and audio, avoiding pixelation, lag, or distorted sound. Poor quality clips may deter viewers and reduce the overall impact of your content.
- Use Twitch Extensions: Consider integrating Twitch extensions into your clips to provide additional information, interactive elements, or engage viewers directly. This can enhance the viewing experience and encourage further engagement with your stream and channel.
- Engage With Viewers: Encourage viewers to interact with your clips by asking for likes, comments, and shares. Respond to comments on your clips to foster a sense of community and make viewers feel appreciated and engaged.
- Consistent Sharing: Make a habit of regularly sharing your clips on social media platforms. Develop a content sharing schedule that aligns with your stream schedule. Share your clips when your audience is most active to maximize visibility and engagement.
- Analyze and Optimize: Use clip metrics provided by Twitch to analyze the performance of your clips. Pay attention to view counts, engagement metrics, and referral sources to identify patterns, understand viewer preferences, and optimize your clip creation and sharing strategy.
By following these best practices, you can create and utilize clips effectively on Twitch, expanding your reach, engaging viewers, and building a strong community around your channel and stream.
Community Guidelines for Clips on Twitch
While clips on Twitch are a fantastic way to share and enjoy memorable moments, it’s important to adhere to community guidelines to maintain a positive and respectful environment. Here are some community guidelines to keep in mind when creating and sharing clips on Twitch:
- Respect Streamer’s Content: When creating clips, respect the content and intellectual property of the streamer you are clipping. Do not create clips that violate copyright laws or use content without permission.
- Be Mindful of Context: Take into consideration the context of the clip and ensure that it doesn’t disrupt the streamer’s overall message or intentions. Clips should enhance the viewer experience and promote positive engagement.
- Follow Twitch’s Terms of Service: Clips must comply with Twitch’s Terms of Service and Community Guidelines. This includes avoiding hate speech, harassment, threats, nudity, violence, and any form of inappropriate or illegal content.
- Obtain Consent: If you plan to share clips featuring other individuals, obtain their consent beforehand. Respect their privacy and preferences regarding the use of their likeness or content in your clips.
- Moderate Comments: Monitor and moderate the comments section on your clips to promote a respectful and inclusive environment. Remove or report any comments that are offensive, inappropriate, or violate Twitch’s community guidelines.
- Give Credit to Original Source: If you’re sharing a clip created by someone else, ensure that you give proper credit to the original creator. Mention their Twitch username or provide a link to their channel in the clip description or comments section.
- Promote Positive Engagement: Encourage constructive and positive interactions in the comments section of your clips. Foster a welcoming environment that encourages discussion, feedback, and appreciation for the content being shared.
- Report Violations: If you come across clips that violate Twitch’s community guidelines or terms of service, report them to Twitch for review. This helps maintain a safe and inclusive community for all users.
- Respect Others’ Opinions: Recognize that not everyone will have the same opinions or preferences regarding clips. Respect the diversity of perspectives and engage in constructive dialogue with others who may have differing views.
- Stay Informed: Familiarize yourself with Twitch’s community guidelines and regularly check for updates or changes. Stay informed about the guidelines to ensure your clips align with Twitch’s standards.
By following these community guidelines, you contribute to a positive and supportive environment for all Twitch users. Together, we can create an inclusive and enjoyable space to share and engage with clips on Twitch.
FAQs About Clips on Twitch
Here are some frequently asked questions about clips on Twitch:
- Can anyone create clips on Twitch?
- How long can clips on Twitch be?
- Can I create clips from past broadcasts or VODs?
- Can I edit the duration of my clip?
- Can I add a title or description to my clip?
- How can I share my clips on social media?
- Can I promote my Twitch channel or stream with clips?
- How can I find clips on Twitch?
- Are there any guidelines for creating and sharing clips on Twitch?
- How can I measure the performance of my clips?
Yes, anyone with a Twitch account can create clips. Simply navigate to the video player controls and click on the “Clip” button to start creating your clip.
Clips on Twitch can be between 5 and 60 seconds in length. It’s recommended to keep your clips concise to capture the highlights and maintain viewer engagement.
Absolutely! You can create clips from both live streams and past broadcasts. Navigate to the video you want to clip and follow the same steps to create a clip.
Yes, when creating a clip, you have the option to edit its duration. By default, the clip captures the previous 30 seconds, but you can modify the start and end time to capture the desired moment.
After creating a clip, you can add a title, description, and tags to provide more context and make your clip more discoverable by other Twitch users.
Twitch offers built-in sharing options that allow you to share your clips on social media platforms like Twitter, Facebook, and Reddit. You can click on the respective social media icon provided on the clip page to post it directly to your desired platform.
Absolutely! Clips can be a powerful tool for promoting your Twitch channel or stream. You can create clips that showcase your best moments, share them on social media, collaborate with other streamers, and encourage engagement with your content.
You can find clips on Twitch by browsing the “Browse” tab on the Twitch website or app. You can also filter clips by category or game, explore a specific streamer’s clips, or discover clips shared on social media platforms.
Yes, there are community guidelines that should be followed when creating and sharing clips on Twitch. These guidelines include respecting streamers’ content, avoiding inappropriate or illegal content, obtaining consent when sharing clips featuring others, and promoting positive engagement.
Twitch provides various metrics such as views, engagement, shares, and retention that can help you measure the performance of your clips. You can access these metrics to gain insights into viewer interaction and adjust your clip creation and sharing strategy accordingly.
These FAQs aim to address common questions about clips on Twitch, helping you better understand how to create, share, and engage with this exciting feature of the platform.