
Backup Your Data
Before you begin deleting apps on your Android tablet, it’s always a good idea to back up your important data. This ensures that you don’t lose any valuable information during the app deletion process. Here’s how you can back up your data:
1. Sync with your Google account: By syncing your tablet with your Google account, you can backup contacts, calendars, app data, and other important information. Simply go to Settings, select Accounts, and then tap on your Google account. Make sure the sync option is enabled for the data you want to backup.
2. Use a cloud storage service: There are several cloud storage services like Google Drive, Dropbox, and OneDrive that offer free storage options. Upload your photos, videos, documents, and other files to the cloud before deleting any apps. This way, you can access your files from any device and restore them if needed.
3. Transfer files to your computer: Connect your Android tablet to your computer using a USB cable and transfer your important files to a folder on your computer. This method is especially useful for large files that may take up a lot of cloud storage space.
Remember to double-check that all your important data is safely backed up before proceeding to delete any apps. Once you’re confident that your data is secure, you can move on to the next step of deleting unwanted apps from your Android tablet.
Go to Settings
To delete apps on your Android tablet, you’ll need to navigate to the settings menu. Here’s how you can access the settings:
1. Open the app drawer: Swipe up from the bottom of your tablet’s home screen to open the app drawer. The app drawer typically displays all the installed apps on your device in alphabetical order.
2. Find and tap on the “Settings” app: Look for the gear or cogwheel icon labeled “Settings” among the app icons in the app drawer. Tap on it to open the settings menu.
3. Alternatively, use the quick settings panel: Swipe down from the top of your tablet’s screen to access the quick settings panel. It may also be called the notification shade. Tap on the gear or cogwheel icon to directly open the settings menu.
Once you’re in the settings menu, you’re ready to proceed to the next step of finding the apps section.
Find the Apps Section
After accessing the settings menu on your Android tablet, the next step is to locate the apps section. Follow these steps to find it:
1. Scroll down or search: Depending on the Android version and device manufacturer, the apps section can be located either by scrolling down through the settings menu or by using the search option. If you choose to scroll, look for a category named “Apps,” “Applications,” or “Application Manager.” If you prefer to search, simply enter “apps” or “applications” in the search bar at the top of the settings menu.
2. Tap on the apps section: Once you’ve found the appropriate category or search result, tap on it to access the apps section. This section will display a list of all the installed apps on your Android tablet.
3. Explore options and settings: Within the apps section, you might find additional options and settings related to app management. These might include features like app notifications, permissions, and default app settings. Familiarize yourself with these options for future reference.
Now that you have successfully located the apps section in the settings menu, you’re ready to move on to the next step of selecting the app you want to delete.
Select the App to Delete
Once you have accessed the apps section in the settings menu on your Android tablet, it’s time to select the app that you want to delete. Follow these steps to choose the app:
1. Browse through the list: In the apps section, you will find a comprehensive list of all the installed apps on your tablet. Scroll through the list to find the app you wish to delete. The apps are usually arranged in alphabetical order, making it easier to locate the specific app.
2. Use the search option: If you have a large number of apps installed or you’re having trouble finding the desired app, use the search bar within the apps section. Simply enter the name of the app and it will be highlighted in the list.
3. Tap on the app: Once you have found the app you want to delete, tap on it to open its individual settings page. Here, you will find information about the app, such as its size, version, and the amount of storage it occupies.
4. Explore additional options: On the app settings page, you may find additional options related to the app, such as notifications, permissions, or permissions usage. Take a moment to review these settings if needed.
Now that you have selected the app you wish to delete and are familiar with its settings, you’re ready to move on to the next step of uninstalling the app.
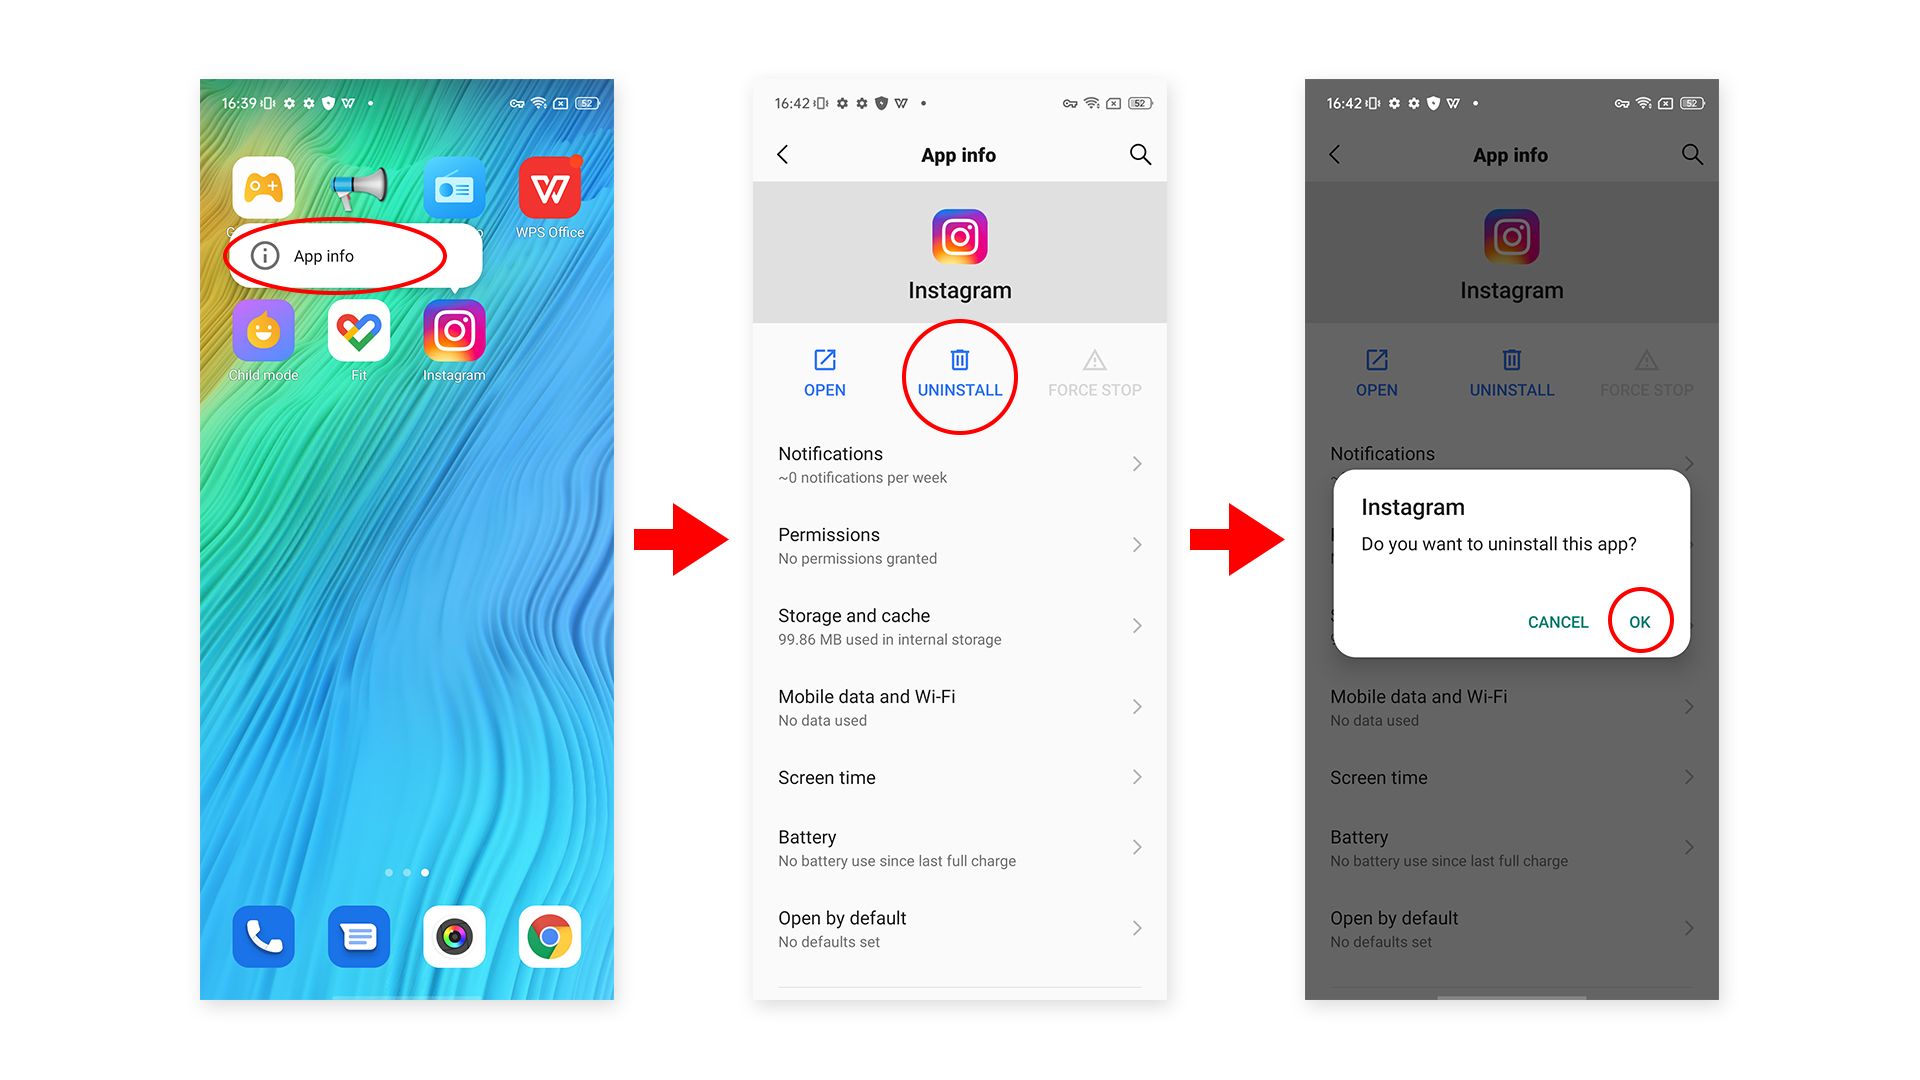
Uninstall the App
Once you have selected the app you want to delete and accessed its individual settings page, you can proceed to uninstall the app from your Android tablet. Follow these steps to uninstall the app:
1. Tap on the “Uninstall” button: On the app settings page, you will typically find an “Uninstall” button. Tap on this button to initiate the uninstallation process.
2. Confirm the uninstallation: A confirmation prompt will appear asking if you want to uninstall the app. Read the prompt carefully to ensure that you are uninstalling the correct app. If you’re sure, tap “OK” or “Uninstall” to confirm.
3. Wait for the app to be uninstalled: The Android system will now proceed to uninstall the app from your tablet. The time required for the uninstallation process may vary depending on the app’s size and complexity. Be patient and wait for the process to complete.
4. Review the uninstallation status: Once the app has been successfully uninstalled, you will see a confirmation message indicating that the app has been removed from your tablet. You may also see an option to “Undo” the uninstallation in case you changed your mind.
It’s important to note that uninstalling an app will remove it from your tablet completely, including any data associated with the app. If you want to retain any app data, consider backing it up before proceeding with the uninstallation.
Now that you have successfully uninstalled the selected app from your Android tablet, you can proceed to delete any remaining app data and clear the app cache if necessary.
Clear App Data and Cache
After uninstalling an app from your Android tablet, it is a good practice to clear the app’s data and cache to free up storage space and ensure a clean removal. Follow these steps to clear app data and cache:
1. Return to the apps section: Navigate back to the apps section in the settings menu of your tablet. You can follow the previous steps mentioned in the “Find the Apps Section” section to access it.
2. Find the app in the list: Scroll through the list or use the search option to locate the app you recently uninstalled. Even though the app is no longer installed, its data and cache may still be present on your device.
3. Tap on the app: Once you have found the app, tap on it to open its individual settings page. Here, you will find various options related to the app.
4. Clear app data: On the app settings page, you will see an option to clear the app’s data. This removes all the data associated with the app, such as user preferences, login credentials, and saved settings. Tap on “Clear Data” or a similar option to proceed.
5. Clear app cache: In addition to clearing app data, it is also beneficial to clear the app’s cache. The cache contains temporary files that the app uses to improve performance. Look for the option to clear the app’s cache and tap on it to start the process.
6. Confirm the clearing: A prompt will appear asking for confirmation to clear the app’s data and cache. Review the prompt and tap on “OK” or a similar option to proceed.
Clearing app data and cache helps ensure that no leftover files or data from the uninstalled app remain on your tablet. It also provides a fresh start for any future installations of the app, should you decide to re-install it later on.
You have now successfully cleared the app’s data and cache. However, if you want to prevent certain apps from consuming resources or appearing on your device, you can consider disabling them.
Disable the App
If there are certain apps on your Android tablet that you no longer use or want to have running in the background, you have the option to disable them. Disabling an app effectively stops it from functioning and prevents it from consuming system resources. Here’s how you can disable an app:
1. Return to the apps section: Navigate back to the apps section in the settings menu of your tablet. This is the same section where you previously uninstalled the app and cleared its data and cache.
2. Find the app to disable: Scroll through the list or use the search option to locate the app you wish to disable. Keep in mind that not all apps can be disabled as some are essential for the proper functioning of your device.
3. Tap on the app: Once you have found the app, tap on it to open its individual settings page. Here, you will find various options and settings related to the app’s functioning on your tablet.
4. Disable the app: Look for an option to disable the app. This may be labeled as “Disable,” “Turn off,” or similar. Tap on this option to disable the app.
5. Confirm the disabling: A confirmation prompt will appear, warning you about the potential consequences of disabling the app. Read the prompt carefully and tap on “OK” or a similar option to confirm the disabling.
Once you disable an app, it will no longer be active on your tablet. The app’s icon will be removed from the home screen and the app itself will be prevented from running in the background. However, please note that disabling an app does not remove it from your device entirely. The app’s data and cache will still remain on your tablet.
If you decide to enable the disabled app in the future, you can follow similar steps in the settings menu to re-enable it.
Now that you have successfully disabled the app, you can choose to further optimize your Android tablet by deleting system apps and removing pre-installed apps that you do not need.
Delete System Apps
On your Android tablet, you may come across system apps that are pre-installed by the manufacturer or the operating system itself. While some of these apps are essential for the functioning of your device, others may not be useful to you. If you want to free up storage space and remove unnecessary system apps, follow these steps:
1. Access the apps section: Open the settings menu on your tablet and navigate to the apps section. You can follow the steps mentioned earlier in the “Find the Apps Section” section to find it.
2. Switch to system apps: Within the apps section, you will typically find a tab or an option to switch to system apps. This allows you to view all the apps that are part of the Android system and are not user-installed.
3. Select the system app to delete: Scroll through the list of system apps and locate the app you want to delete. Keep in mind that deleting certain system apps can potentially affect the functionality or stability of your tablet. Exercise caution and only delete apps that you are confident will not cause any issues.
4. Tap on the app: Once you have found the system app you wish to delete, tap on it to open its individual settings page.
5. Delete the system app: Look for an option to delete the system app. This may be labeled as “Delete,” “Uninstall,” or similar. Tap on this option to initiate the deletion process.
6. Confirm the deletion: A confirmation prompt will appear, informing you about the consequences of deleting a system app. Read the prompt carefully and understand the implications before proceeding. If you are certain, tap on “OK” or a similar option to confirm the deletion.
Deleting a system app removes it from your tablet and frees up storage space. However, exercise caution as deleting critical system apps can potentially disrupt the functionality of your device.
Continue this process for any other system apps you wish to delete. Once you have removed the unnecessary system apps, your Android tablet will have more storage space available for your preferred apps and data.
Now that you have successfully deleted system apps, you can explore options for removing pre-installed apps.
Remove Pre-Installed Apps
Pre-installed apps, also known as bloatware, come pre-loaded on your Android tablet by the manufacturer. These apps may take up valuable storage space and you may find that you have no use for them. While not all pre-installed apps can be removed, some of them can be uninstalled. Here’s how to remove pre-installed apps:
1. Access the apps section: Go to the settings menu on your tablet and navigate to the apps section.
2. Switch to pre-installed apps: Within the apps section, there is usually a tab or an option to switch to pre-installed apps. Tap on this tab to display the list of apps that were pre-loaded on your device.
3. Select the pre-installed app to remove: Scroll through the list of pre-installed apps and locate the app you want to remove. Keep in mind that not all pre-installed apps can be uninstalled. However, those that can be uninstalled will have the “Uninstall” button visible.
4. Tap on the app: Once you have found the app you wish to remove, tap on it to open its individual settings page.
5. Uninstall the pre-installed app: On the app settings page, you will find an “Uninstall” button. Tap on this button to initiate the removal process.
6. Confirm the uninstallation: A confirmation prompt will appear, informing you about the consequences of uninstalling the pre-installed app. Read the prompt carefully and ensure that you are removing the correct app. Tap on “OK” or a similar option to confirm the uninstallation.
If the pre-installed app cannot be uninstalled, you may see a “Disable” button instead. Disabling the app will prevent it from running and occupying resources, but it will still be present on your device. You can always choose to disable the app if you don’t want it to be visible or functional.
By removing pre-installed apps, you can free up storage space and ensure that only the apps you need and use are present on your Android tablet.
If you want additional options for deleting apps on your Android tablet, you can consider using third-party apps for app management.
Use a Third-Party App
If you’re looking for more advanced app management features and greater control over deleting apps on your Android tablet, you can consider using a third-party app. These apps offer additional functionalities and customization options beyond what is provided by the built-in system settings. Here’s how you can use a third-party app for app management:
1. Explore app management apps: Search for app management apps in the Google Play Store. There are several popular options available, such as “App Manager,” “SD Maid,” and “CCleaner.” Read reviews and ratings to choose a reliable and highly rated app management app.
2. Download and install the app: Tap on the preferred app management app to go to its download page in the Play Store. Tap on the “Install” button to download and install the app on your Android tablet.
3. Open the app: Once the app is installed, locate its icon on your home screen or app drawer and tap on it to open the app.
4. Explore app management features: The third-party app will provide various features and tools for managing apps on your tablet. These may include features like batch uninstallation, app backup, app sorting options, and more. Take your time to familiarize yourself with the available features and explore how they can enhance your app management experience.
5. Remove unwanted apps: Using the third-party app, select the apps you want to delete from your tablet. Follow the app’s instructions and prompts to safely and efficiently remove the selected apps. Be cautious while selecting apps to delete, ensuring that you do not mistakenly delete any important apps or system files.
6. Customize app management settings: Depending on the third-party app you choose, there may be additional settings and customizations available. You can adjust these settings to personalize your app management experience based on your preferences.
Using a third-party app for app management can provide a more comprehensive and streamlined approach to deleting apps on your Android tablet. They often offer advanced features and utilities that make the process more efficient and user-friendly.
Now that you are familiar with utilizing third-party apps, you can confidently manage and delete apps on your Android tablet with ease.