
Prerequisites
Before you can delete a Discord server, there are a few prerequisites you need to keep in mind. Here’s what you need to have and do before proceeding with the deletion:
- Administrator Access: To delete a server, you need to have administrator access to that particular server. Only administrators have the necessary permissions to perform this action.
- Considerations: Before deleting a server, it’s essential to consider the consequences. Deleting a server permanently removes all channels, roles, and messages associated with it. Therefore, make sure to inform your members and back up any important data or conversations before proceeding.
- No Active Bans or Verifications: Before deleting a server, ensure that there are no active bans or ongoing verification processes. If there are any, it’s recommended to resolve these issues before proceeding with the deletion.
- Alternative Options: If you no longer want to manage a particular server but still want to stay connected with your community, you can consider transferring the ownership to another trusted member instead of deleting it outright.
By fulfilling these prerequisites, you will have a clear understanding of the implications and process involved in deleting a Discord server. Remember, it’s important to exercise caution and consider all options before making such a significant decision.
Step 1: Open Discord
To begin the process of deleting a Discord server, you first need to open the Discord application on your computer or mobile device. Follow these steps to open Discord:
- Launch Discord: Locate the Discord application on your computer or mobile device and click on the icon to open it. The Discord app icon usually features a white Discord logo on a purple background.
- Sign-in: If you are not already signed in, you will be prompted to enter your Discord credentials. Provide your email/phone number and password to log in to your account.
- Select Server: Once you are logged in, you will see a list of servers on the left side of the Discord window. These servers are arranged in a vertical list format. Select the server you want to delete by clicking on its name.
By following these steps, you will successfully open the Discord application and select the server you wish to delete. Proceed to the next step to continue the server deletion process.
Step 2: Select the Server
After opening the Discord application, the next step is to select the specific server that you want to delete. Here’s how you can do it:
- Find the Server List: On the left side of the Discord window, you will see a vertical list of servers you are a member of. Scroll through the list until you find the server you wish to delete.
- Click on the Server: Once you locate the server you want to delete, click on its name. This action will open the server and display its channels, members, and other settings in the main Discord window.
- Ensure Administrator Access: Before proceeding, ensure that you have administrator access to the server. Only administrators have the necessary permissions to delete a server. If you do not have the required access, reach out to a server administrator and request the necessary permissions.
By following these steps, you will successfully select the server you want to delete. Make sure you have the necessary permissions before proceeding to the next step.
Step 3: Open Server Settings
Once you have selected the Discord server you wish to delete, the next step is to open the server settings. Server settings allow you to access various options and configurations specific to the server. Follow these steps to open the server settings:
- Locate the Server Options: At the top of the Discord window, you will see the server name and an arrow pointing down. Click on the server name or the arrow to access the server options.
- Access Server Settings: In the dropdown menu, you will find various options related to the server. Click on the “Server Settings” option to open the server settings page.
- Navigate the Server Settings: The server settings page allows you to configure multiple aspects of the server, including categories, roles, permissions, and more. Take a moment to familiarize yourself with the options available in the server settings.
By following these steps, you will successfully open the server settings for the selected Discord server. Proceed to the next step to continue the server deletion process.
Step 4: Delete Server
Deleting a Discord server is a permanent action that removes all channels, roles, and messages associated with it. Before proceeding, ensure that you have considered the consequences and have made any necessary backups. Follow these steps to delete a server:
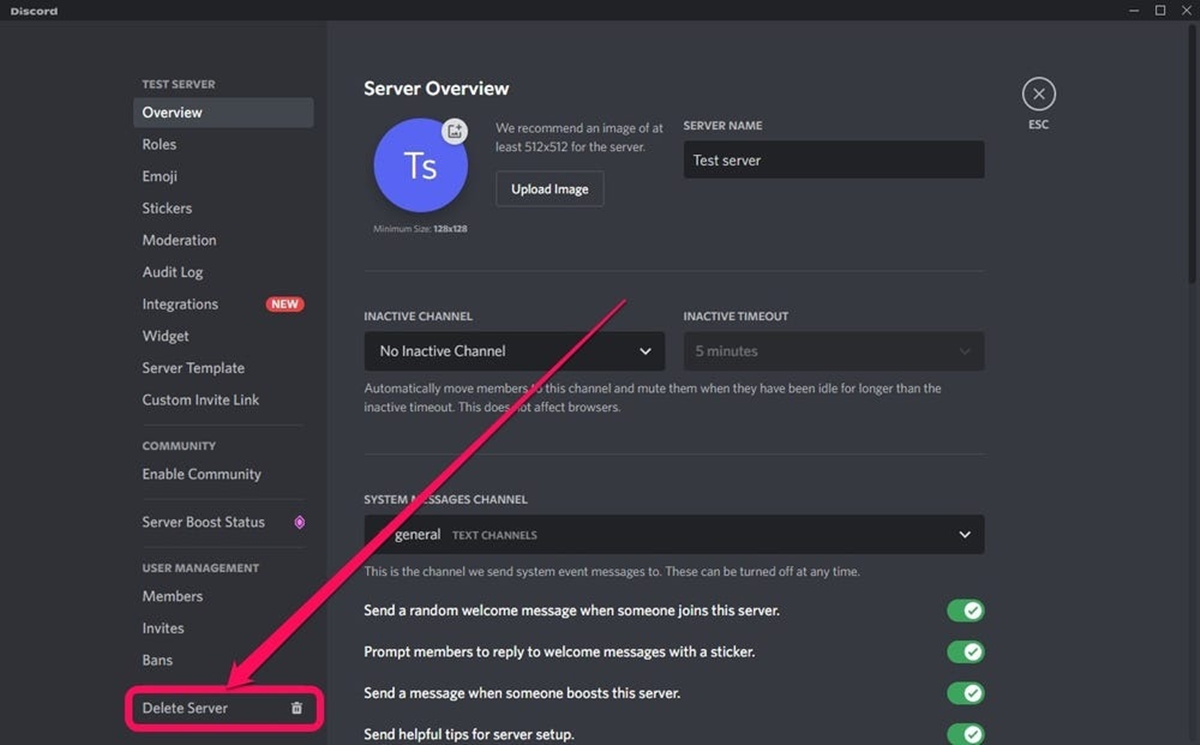
- Access Server Overview: In the server settings page, navigate to the left sidebar and click on the “Overview” tab. This will take you to the server overview section.
- Scroll to the Bottom: Scroll down to the bottom of the server overview page. You will find the “Danger Zone” section, which contains the options to delete the server.
- Delete Server: Within the “Danger Zone” section, click on the “Delete Server” button. A confirmation dialog box will appear to confirm the deletion.
- Confirm Deletion: Read the information in the deletion confirmation dialog box carefully, as it explains the permanent nature of the action. In the input field, type “DELETE” to confirm your intention, and then click on the “Delete Server” button to proceed.
After following these steps and confirming the deletion, the Discord server will be permanently deleted. It’s important to note that this action cannot be undone, so exercise caution when deleting a server.
Step 5: Confirm Deletion
After initiating the server deletion in the previous step, you will be required to confirm the deletion one final time. This step ensures that you understand the irreversible nature of deleting a Discord server. Follow these steps to confirm the deletion:
- Read the Confirmation Message: A confirmation message will appear on your screen, providing a final warning about the consequences of deleting the server. Take a moment to read and understand this message.
- Enter Deletion Confirmation: In the confirmation message, there will be an input field asking for specific text. This step is designed to ensure that you are intentionally deleting the server. Enter the exact phrase specified in the confirmation message.
- Click on Delete: After entering the deletion confirmation text, click on the “Delete Server” button to confirm your action. Once the button is clicked, the deletion process will be initiated, and the server will be permanently deleted.
By following these steps and confirming the deletion, the Discord server will be permanently removed from your account. Ensure that you have considered all the implications and have made any necessary backups before proceeding with the deletion.