
Method 1: Deleting a Contact from the Gmail Website
Deleting a contact from the Gmail website is a simple and straightforward process. Here’s how you can do it:
- Open your web browser and navigate to the Gmail website. Sign in to your Gmail account if you haven’t already.
- Once you’re logged in, locate and click on the “Gmail” dropdown menu in the top-left corner of the screen. Choose “Contacts” from the dropdown menu.
- In the contacts list, find the contact you want to delete. You can either scroll through the list or use the search bar at the top to quickly locate the contact.
- Click on the checkbox next to the contact’s name to select it. You can select multiple contacts if you want to delete them at once.
- After selecting the contact(s), click on the “More” button located above the contacts list. A dropdown menu will appear.
- From the dropdown menu, click on the “Delete” option. A confirmation dialog box will pop up.
- Review the confirmation message and click on the “Delete” button to permanently remove the selected contact(s) from your Gmail account.
It’s important to note that deleting a contact from Gmail will also remove them from any associated Google services, such as Google Hangouts and Google Chat. Additionally, this action cannot be undone, so make sure you double-check your selection before proceeding.
By following these simple steps, you can easily delete unwanted contacts from your Gmail account. Keep reading to learn about other methods for managing your contacts in Gmail.
Method 2: Removing a Contact from the Gmail App
If you prefer to manage your contacts on the go, you can easily remove a contact from the Gmail app on your mobile device. Here’s how:
- Open the Gmail app on your mobile device and sign in to your Gmail account if prompted.
- Once you’re in the app, tap on the menu icon (usually represented by three horizontal lines) in the top-left corner of the screen.
- Scroll down and find the “Contacts” option. Tap on it to access your Gmail contacts.
- In the contacts list, locate the contact that you want to remove. You can use the search bar at the top to quickly find the contact if needed.
- Swipe left on the contact’s name or tap on the three vertical dots next to the contact to reveal more options.
- From the available options, select “Delete” or “Remove” to initiate the removal process.
- Review any confirmation prompts that appear and confirm the removal by tapping on “Delete” or “Remove” once again.
Just like deleting a contact from the Gmail website, removing a contact through the Gmail app will permanently delete them from your Gmail account and associated Google services. Therefore, it’s crucial to ensure that you are removing the correct contact before proceeding.
The Gmail app provides a convenient way to manage your contacts while on the move. By utilizing this method, you can easily remove unwanted contacts from your Gmail account, keeping your contact list organized and up-to-date.
Method 3: Deleting Multiple Contacts from the Gmail Website
If you have multiple contacts that you want to delete in one go, the Gmail website offers a convenient way to do so. Follow these steps to delete multiple contacts:
- Open your web browser and navigate to the Gmail website. Sign in to your Gmail account if you haven’t already.
- Once logged in, click on the “Gmail” dropdown menu in the top-left corner of the screen. Select “Contacts” from the dropdown menu.
- In the contacts list, identify the contacts you want to remove. You can either scroll through the list or use the search bar at the top to quickly locate specific contacts.
- Click on the checkbox next to each contact’s name to select them. You can select multiple contacts by checking the boxes next to each contact you want to delete.
- After selecting the contacts, click on the “More” button located above the contacts list.
- From the dropdown menu, click on the “Delete” option. A confirmation dialog box will appear.
- Carefully review the confirmation message that displays the number of contacts selected for deletion.
- Click on the “Delete” button to permanently remove the selected contacts from your Gmail account.
Deleting multiple contacts at once can save you time and effort, especially if you want to declutter your contact list. It’s advisable to review your selection before confirming the deletion, as this action cannot be undone.
By following these steps, you can efficiently delete multiple contacts from the Gmail website, helping you maintain a clean and organized contact list.
Method 4: Deleting Multiple Contacts from the Gmail App
If you’re using the Gmail app on your mobile device, removing multiple contacts at once is also possible. Here’s how you can delete multiple contacts using the Gmail app:
- Launch the Gmail app on your mobile device and sign in to your account if you haven’t already.
- Once you’re in the app, tap on the menu icon (usually represented by three horizontal lines) in the top-left corner of the screen.
- Scroll down and find the “Contacts” option. Tap on it to access your Gmail contacts.
- In the contacts list, go through the list and tap on the profile pictures or names of the contacts you want to delete. You will notice that each selected contact is highlighted.
- After selecting the desired contacts, tap on the “Delete” or “Remove” button, usually represented by a trash bin icon.
- Review any confirmation prompts that appear and confirm the removal by tapping on “Delete” or “Remove” once again.
Deleting multiple contacts using the Gmail app makes it easy to streamline your contact list from your mobile device. Remember to double-check your selection before confirming the deletion to avoid accidentally removing unintended contacts.
With this method, you can quickly remove multiple contacts from your Gmail account, ensuring your contact list remains organized and clutter-free.
Method 5: Restoring Deleted Contacts in Gmail
Accidentally deleting a contact can be a frustrating experience, but fortunately, Gmail provides a way to restore deleted contacts. Here’s how you can restore deleted contacts in Gmail:
- Open your web browser and navigate to the Gmail website. Sign in to your Gmail account.
- Click on the “Gmail” dropdown menu in the top-left corner of the screen and select “Contacts” from the menu.
- In the contacts list, click on the “More” button above the contacts list.
- From the dropdown menu, click on “Undo changes” to revert the deletion of your contacts.
- Gmail will display a confirmation message with the number of contacts restored. Click on “Undo” to restore the deleted contacts.
It’s important to note that the “Undo changes” option is only available for a limited time after deleting the contacts. If you don’t see this option, it means that the deleted contacts cannot be restored.
In case the “Undo changes” option is no longer available, you may still be able to recover deleted contacts if you have a backup of your contacts. Gmail allows you to import contacts from a previously exported file. To do this, click on the “Import” button in the “Contacts” tab and choose the file containing your backed-up contacts.
By following these steps, you can potentially restore deleted contacts in Gmail, either through the “Undo changes” option or by importing a backup file. Remember to act promptly to increase your chances of successful restoration.
Method 6: Deleting a Contact Group in Gmail
Contact groups in Gmail allow you to organize your contacts into specific categories. If you want to delete a contact group that you no longer need, follow these steps:
- Open your web browser and navigate to the Gmail website. Sign in to your Gmail account.
- Click on the “Gmail” dropdown menu in the top-left corner of the screen and select “Contacts” from the list.
- In the left sidebar, you’ll find a list of contact groups created in your Gmail account. Locate the contact group you want to delete.
- Hover your mouse over the contact group’s name, and you’ll see a dropdown arrow appear next to it.
- Click on the dropdown arrow to reveal additional options. From the options, select “Delete”.
- A confirmation message will appear, asking if you want to delete the contact group. Click on “Delete” to confirm.
By following these steps, you can easily remove a contact group from your Gmail account. Deleting a contact group will not delete the individual contacts within the group; it will only remove the group itself. The contacts will still remain in your main contact list.
This method can be particularly helpful if you have created contact groups for specific projects, events, or purposes that are no longer relevant. Streamlining your contact groups can help you maintain an organized and efficient contact management system within Gmail.
Method 7: Deleting a Contact from Google Contacts
Deleting a contact from Google Contacts is another way to remove unwanted contacts from your Gmail account. Here’s how you can do it:
- Open your web browser and navigate to Google Contacts.
- Sign in to your Google account if you haven’t already.
- In the Google Contacts interface, locate the contact you want to delete.
- Click on the contact’s name to open their contact details.
- On the right side of the contact details screen, you’ll find a menu icon represented by three dots. Click on it to reveal more options.
- From the options, select “Delete”.
- A confirmation dialog box will appear, asking if you want to delete the contact. Review the details and click on “Delete” to confirm.
Deleting a contact from Google Contacts will remove the contact from your Gmail account as well, ensuring that it’s completely eliminated from your contact list.
This method is particularly useful if you prefer using Google Contacts directly, without accessing Gmail. It provides a standalone solution for managing your contacts and allows you to easily remove any unnecessary contacts from your account.
Method 8: Automatically Deleting Unsubscribed Contacts in Gmail
Gmail offers a convenient feature that allows you to automatically delete unsubscribed contacts from your account. By enabling this setting, it helps you maintain a clean and up-to-date contact list. Here’s how you can automatically delete unsubscribed contacts:
- Open your web browser and navigate to the Gmail website. Sign in to your Gmail account.
- Click on the gear icon in the top-right corner of the screen to open the settings menu. From the dropdown options, select “Settings”.
- In the Settings tab, scroll down until you find the “Filters and Blocked Addresses” section.
- Locate the option called “Unsubscribed”. It should be under the “Create a new filter” link.
- Click on the “Create a new filter” link.
- In the new window that opens, enable the checkbox next to “Delete it”. This ensures that any incoming emails from unsubscribed contacts will be automatically deleted.
- Click on the “Create filter” button to save your changes.
By enabling this feature, any contacts who have unsubscribed from your emails will be automatically deleted from your contact list. This helps you keep your contact list free from unnecessary and outdated entries.
It’s important to note that this feature will only delete unsubscribed contacts from your Gmail account, not from any other services or platforms. Additionally, if a contact resubscribes to your emails, they will not be automatically added back to your contact list. You will need to manually add them again.
By utilizing this method, you can keep your contact list relevant, maintaining a better focus on contacts who want to receive your communications.
Method 9: Deleting All Contacts from Gmail
If you wish to start fresh and remove all contacts from your Gmail account, there is a method to delete all contacts in one go. Here’s how you can delete all contacts from Gmail:
- Open your web browser and navigate to the Gmail website. Sign in to your Gmail account.
- Click on the “Gmail” dropdown menu in the top-left corner of the screen and select “Contacts”.
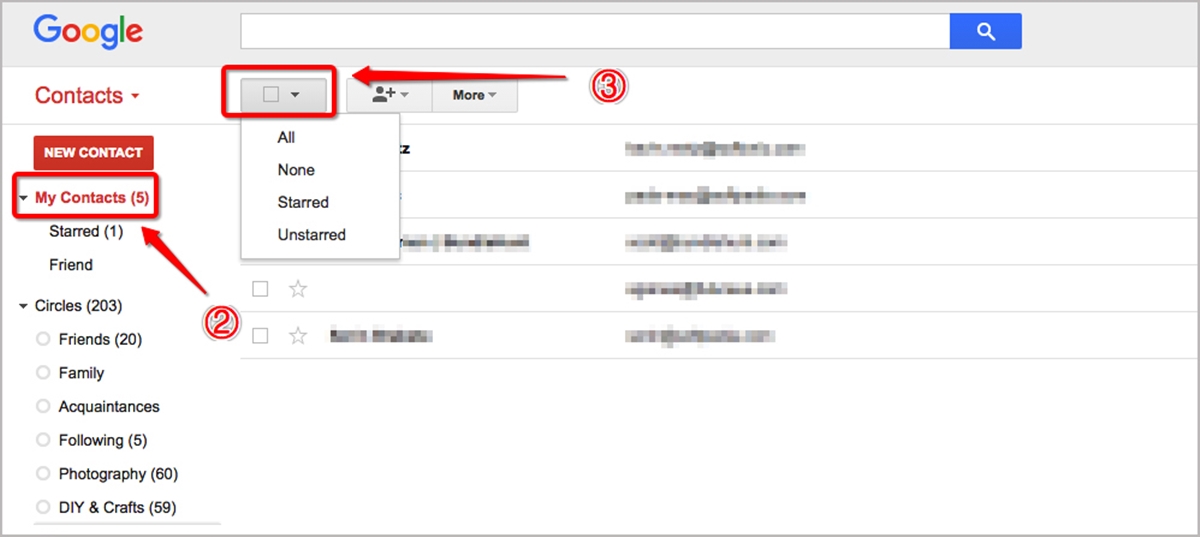
- In the contacts list, locate and click on the checkbox near the top-left corner of the contacts list. This will select all of the contacts displayed on the current page.
- At the top of the page, a message will appear, asking if you want to select all contacts. Click on it to select all contacts in your Gmail account.
- Once all contacts are selected, click on the “More” button located above the contacts list.
- From the dropdown menu, click on the “Delete” option. A confirmation dialog box will appear.
- Review the confirmation message and click on the “Delete” button to permanently remove all contacts from your Gmail account.
It’s crucial to note that deleting all contacts from Gmail cannot be undone, and the action is permanent. Before proceeding, ensure that you have backed up any contacts you want to keep.
This method is beneficial if you want to start over with a clean slate and reorganize your contact list from scratch. It allows you to remove all contacts in one efficient step.
Remember, after deleting all contacts, you can gradually add the desired contacts back to your Gmail account to rebuild your contact list.