
Enable the Music App Toolbar
The Music app toolbar on your iPhone provides quick access to essential functions and controls while listening to your favorite tunes. By customizing the toolbar, you can ensure that the most frequently used features are easily accessible. Here’s how you can enable the toolbar:
1. Open the Music app on your iPhone. Tap on the “Browse” or “Library” tab at the bottom of the screen.
2. Scroll down to the bottom and tap on the “More” button with three dots.
3. From the menu that appears, select “Edit.”
4. You will see a list of available items for the toolbar. Toggle the switch next to “Show Toolbar” to enable it.
5. Once enabled, you can see the toolbar at the bottom of the screen. It will display various icons representing different functions.
Enabling the toolbar allows you to quickly access features like playback controls, shuffle, repeat, and favorite songs. It makes navigating through your music library easier and adds convenience to your music listening experience.
Note: Depending on your iOS version and device, the steps to enable the toolbar may vary slightly. However, you should be able to find the option to enable the toolbar under the “Edit” or “More” menu within the Music app.
Take a moment to enable the Music app toolbar on your iPhone and enjoy easy access to essential music playback controls and functions.
Customize the Toolbar Layout
The Music app toolbar on your iPhone can be customized to suit your preferences, allowing you to rearrange the icons and control buttons to optimize your music listening experience. Here’s how you can customize the toolbar layout:
1. Open the Music app on your iPhone and go to the “Browse” or “Library” tab.
2. Tap on the “More” button (three dots) at the bottom-right corner of the screen.
3. From the menu that appears, select “Edit.”
4. You will now see all the available items for the toolbar. To customize the layout, tap and hold an icon, then drag it to your desired position.
5. Repeat the previous step to rearrange other icons on the toolbar. You can place them in the order you prefer, emphasizing frequently used features.
6. Once you’re satisfied with the new layout, tap “Done” to save the changes.
By customizing the toolbar layout, you can have quick access to the functions and controls that are most important to you. For example, if you find yourself frequently using the shuffle or repeat feature, you can position those icons closer to the center of the toolbar for easy access.
Furthermore, customizing the toolbar layout allows you to tailor it to your specific music listening habits and preferences. Whether you want to prioritize browsing your music library, accessing your playlists, or managing your offline downloads, arranging the icons accordingly can enhance your overall user experience.
Note: The steps to customize the toolbar layout may slightly differ depending on the version of iOS and the device you are using. However, the general process remains the same across most devices.
Take a moment to customize the toolbar layout on your iPhone’s Music app and optimize it to suit your music listening needs.
Rearrange the Toolbar Items
The Music app toolbar on your iPhone allows you to rearrange the items according to your preference, ensuring that the most frequently used functions are easily accessible. Here’s how you can rearrange the toolbar items:
1. Open the Music app on your iPhone and navigate to the “Browse” or “Library” tab.
2. Tap on the “More” button (three dots) located at the bottom-right corner of the screen.
3. From the menu that appears, select “Edit.”
4. You will see a list of available items for the toolbar. To rearrange an item, tap and hold on its icon.
5. Drag the item to its new position on the toolbar. As you move the item, other icons will dynamically adjust their positions to accommodate the change.
6. Repeat the previous two steps to rearrange other items on the toolbar as desired.
7. Once you have rearranged all the items to your satisfaction, tap “Done” to save the changes.
Rearranging the toolbar items allows you to have quick access to the functions that are most important to you. For example, if you often use the “Search” feature or enjoy creating playlists, you can move those icons closer to the center of the toolbar for easy access.
By personalizing the order of the toolbar items, you can enhance your music listening experience and make navigation more intuitive. Take a moment to rearrange the toolbar items on your iPhone’s Music app and tailor it to your specific preferences and needs.
Note: The process of rearranging toolbar items may differ slightly depending on the iOS version and device model you are using. However, the general steps outlined above should be applicable to most devices.
Add or Remove Items from the Toolbar
The Music app toolbar on your iPhone can be customized further by adding or removing items based on your preferences. This allows you to tailor the toolbar to include only the functions and controls that are most relevant to you. Here’s how you can add or remove items from the toolbar:
1. Open the Music app on your iPhone and go to the “Browse” or “Library” tab.
2. Tap on the “More” button (three dots) located at the bottom-right corner of the screen.
3. From the menu that appears, select “Edit.”
4. You will see a list of available items for the toolbar. To add an item, scroll down and toggle the switch next to its name. To remove an item, simply toggle off the switch next to it.
5. As you add or remove items, you will notice the changes being reflected on the toolbar in real-time.
6. Once you have made the desired additions or removals, tap “Done” to save the changes.
By adding or removing items from the toolbar, you can further streamline your music listening experience. Including only the most essential functions and controls minimizes clutter and allows for easier navigation within the Music app.
For example, if you rarely use the “AirPlay” or “Up Next” feature, you can remove them from the toolbar to make room for other items that you find more useful. Similarly, if you frequently use the “Recently Added” or “Downloaded Music” feature, you can add them to the toolbar for quick access.
Note that the specific items available for addition or removal may vary depending on your iOS version and device model. However, most Music app versions provide a range of options to choose from.
Take a moment to customize the toolbar by adding or removing items according to your preferences, and optimize your Music app experience on your iPhone.
Manage the Music App Favorites
The Music app on your iPhone allows you to create a personalized collection of favorite songs, albums, playlists, and artists. Managing your favorites helps you quickly access the music you love and curate a tailored listening experience. Here’s how you can manage your music app favorites:
1. Open the Music app on your iPhone and navigate to the “Library” tab.
2. Tap on the “Favorites” option located at the top of the screen.
3. Here, you will find all your existing favorites organized into different categories such as songs, albums, playlists, and artists.
4. To add a new item to your favorites, simply find the song, album, playlist, or artist you want to add, and tap the heart icon next to it.
5. If you want to remove an item from your favorites, go to the corresponding category (songs, albums, playlists, or artists), find the item you want to remove, and tap the filled heart icon to deselect it.
6. To further manage your favorites, you can also create custom playlists or edit existing ones. Tap on the “Playlists” tab at the top of the screen, then select the playlist you want to edit. From there, you can add or remove songs as desired.
By managing your music app favorites, you can easily access the songs, albums, playlists, or artists you enjoy the most. It allows you to create a personalized music library that reflects your tastes.
Keep in mind that your favorites sync across all of your devices logged into the same Apple ID. So, any changes you make to your favorites on your iPhone will be reflected on your other Apple devices as well.
Take a moment to manage your music app favorites on your iPhone and curate a collection that truly represents your music preferences.
Customize the Now Playing Screen
The Now Playing screen in the Music app on your iPhone provides a convenient way to control your music playback and access additional features while a song is playing. Customizing the Now Playing screen allows you to tailor it to display the information and controls that are most important to you. Here’s how you can customize the Now Playing screen:
1. Open the Music app on your iPhone and start playing a song.
2. While the song is playing, tap on the album artwork thumbnail located at the bottom-center of the screen. This will open the Now Playing screen.
3. Swipe up from the bottom of the Now Playing screen to reveal the extended control panel.
4. At the bottom of the extended control panel, tap on the “More” button (three dots).
5. From the menu that appears, select “Edit.”
6. You will now see a list of available buttons and controls for the Now Playing screen. To customize the screen, toggle the switch next to each item to activate or deactivate it.
7. As you make changes to the items, the Now Playing screen will update in real-time to reflect your preferences.
8. Once you have customized the Now Playing screen according to your liking, tap “Done” to save the changes.
Customizing the Now Playing screen allows you to view and access the controls and information that are most relevant to you during music playback. For example, if you frequently create Genius playlists or prefer to view the lyrics of the songs you’re listening to, you can add those options to the Now Playing screen.
By personalizing the Now Playing screen, you can enhance your music listening experience and ensure that the controls and features you need are easily accessible.
Note: The options available for customization may vary depending on your iOS version and device model. However, most Music app versions offer a variety of options to choose from.
Take a moment to customize the Now Playing screen in the Music app on your iPhone and tailor it to your preferences for a more personalized music playback experience.
Change the Apps in the Music App Library
The Music app on your iPhone allows you to integrate and access various music streaming services and apps within its library, giving you the flexibility to listen to music from different platforms. Changing the apps in the Music app library allows you to add or remove services as per your preference. Here’s how you can do it:
1. Open the Music app on your iPhone and go to the “Library” tab.
2. Tap on the “Edit” button located at the top-right corner of the screen.
3. Scroll down to the “Apps” section in the Library.
4. To add a new app, tap on the “Add” button (“+”) next to the app you want to include.
5. If you want to remove an app from the library, tap on the “Delete” button (minus symbol) next to the app you want to remove.
6. Continue adding or removing apps as desired.
Changing the apps in the Music app library allows you to have a consolidated collection of music from various streaming services and apps, all accessible within the Music app itself. For example, you can add popular music services like Spotify or Apple Music to the library to easily switch between different platforms without having to switch between separate apps.
Please note that the availability of certain apps within the Music app library may vary depending on your iOS version and the apps installed on your device. Additionally, make sure you have logged in to the respective apps before adding them to the Music app library.
Take a moment to customize the apps in the Music app library on your iPhone and streamline your music listening experience by integrating your favorite streaming services and apps directly within the Music app.
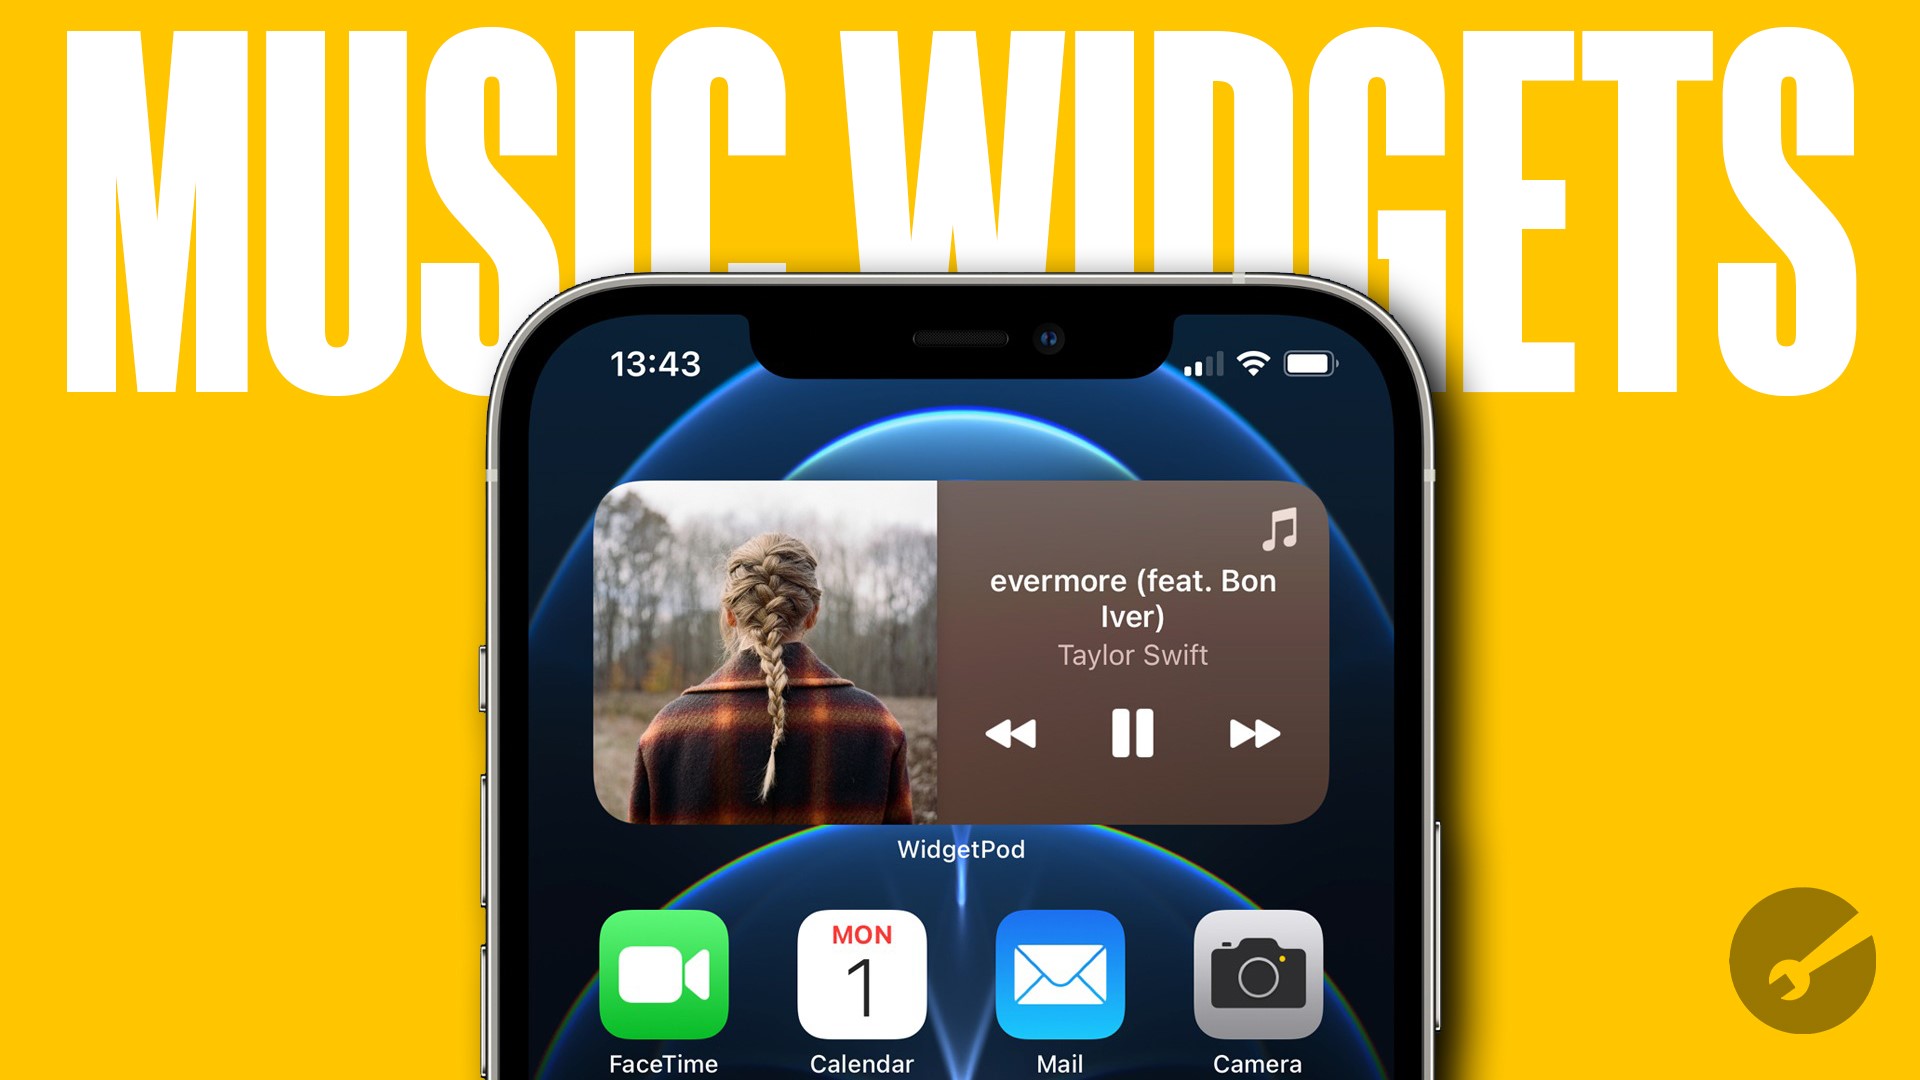
Customize Music App Home Screen Widget
The Music app on your iPhone offers a convenient home screen widget that allows you to control your music playback and access essential features right from your device’s home screen. Customizing the Music app home screen widget enables you to personalize it according to your preferences. Here’s how you can do it:
1. Ensure that your iPhone is updated to the latest iOS version, as widget customization options may vary depending on the operating system.
2. Press and hold an empty area on your iPhone’s home screen until the app icons begin to jiggle, indicating that you are in edit mode.
3. Tap the “+” icon at the top left corner of the screen to open the widget gallery.
4. Scroll down and find the Music app widget in the available widget options.
5. Tap on the “+” button next to the Music app widget to add it to your home screen.
6. Once added, you can further customize the widget by tapping and holding it, then selecting “Edit Widget” from the menu that appears.
7. In the customization menu, you can choose the widget size, adjust the display preferences, and select the specific content you want to see, such as recently played music, favorite playlists, or album artwork.
8. After making your desired changes, tap “Done” to save the customized settings.
Customizing the Music app home screen widget allows you to have quick and convenient access to your music controls and information without having to open the Music app. You can tailor it to display the content that matters most to you, making it easier to control your music playback and stay connected to your favorite tracks.
Note: The customization options for the Music app home screen widget may vary depending on your iOS version and device model.
Take a moment to customize the Music app home screen widget on your iPhone and make it your own, ensuring easy access to your music controls and information right from your device’s home screen.
Adjust Music App Sound Settings
The Music app on your iPhone offers various sound settings that allow you to customize your listening experience. By adjusting these settings, you can enhance the sound quality, balance, and volume levels to suit your preferences. Here’s how you can adjust the music app sound settings:
1. Open the Music app on your iPhone and start playing a song.
2. Tap on the “Now Playing” bar at the bottom of the screen to access the Now Playing screen.
3. On the Now Playing screen, locate the sound settings icon, which looks like a musical note or an equalizer. It is usually located in the bottom-left corner or the control panel area.
4. Tap on the sound settings icon to open the sound settings menu.
5. Within the sound settings menu, you may find options such as “Equalizer,” “Volume Limit,” “Sound Check,” and “Audio Balance.”
6. Tapping on each option will allow you to adjust the corresponding setting:
- The “Equalizer” option lets you choose from preset equalizer settings or create a custom equalizer setting to enhance the sound quality based on your preferences.
- The “Volume Limit” option allows you to set a maximum volume limit to protect your ears and prevent audio from getting too loud.
- The “Sound Check” option adjusts the playback volume of different songs to provide a consistent listening experience.
- The “Audio Balance” option enables you to adjust the stereo balance of your headphones or speakers to ensure a balanced sound between the left and right channels.
7. Choose the specific sound setting you want to adjust and tweak it according to your preferences.
By adjusting the music app sound settings, you can personalize your listening experience and optimize it to your liking. Whether you want a more pronounced bass, a balanced audio output, or a volume limit to protect your hearing, these settings allow you to tailor the sound to your preferences.
Do note that the availability of certain sound settings may vary depending on your iOS version and device model.
Take a moment to explore and adjust the music app sound settings on your iPhone to create a customized audio experience that suits your preferences and enhances your music enjoyment.
Control Music Playback on Lock Screen or Control Center
The Music app on your iPhone provides convenient options for controlling your music playback directly from the lock screen or the Control Center. These controls allow you to play, pause, skip, and adjust the volume of your music without having to unlock your device or open the Music app. Here’s how you can control music playback using the lock screen or Control Center:
Using the Lock Screen:
1. When your iPhone is locked, wake up the screen by pressing the Home button or the Sleep/Wake button.
2. On the lock screen, you will see the Now Playing bar at the top. It displays the song title, artist, and album artwork.
3. To control the music playback, you can use the following options:
- Tap the play/pause button in the center of the screen to start or pause the music.
- Swipe left or right on the Now Playing bar to skip to the previous or next song.
- To adjust the volume, use the volume buttons on the side of your iPhone.
Using the Control Center:
1. Access the Control Center by swiping down from the top-right corner of the screen (on iPhone models with a Home button) or by swiping up from the bottom of the screen (on iPhone models without a Home button).
2. In the Control Center, you will find the music playback controls, including play/pause, previous track, next track, and volume adjustment options.
3. Tap on the respective control button to perform the desired action.
Controlling music playback from the lock screen or Control Center provides quick and easy access to your music controls, allowing you to enjoy your favorite tunes on the go without the need to unlock your device or navigate through the Music app.
Note that the specific design and layout of the lock screen and Control Center may vary slightly depending on your iOS version and device model.
Take advantage of the lock screen and Control Center music controls on your iPhone to effortlessly manage and enjoy your music playback while on the move.
Allow Music App Access in Other Apps
The Music app on your iPhone can seamlessly integrate with other apps, allowing you to enjoy your favorite songs while using different applications. Enabling music app access in other apps ensures that you can control your music playback and access essential music features without having to switch between apps. Here’s how you can allow music app access in other apps:
1. Open the “Settings” app on your iPhone.
2. Scroll down and tap on “Music.”
3. Under the “Allow Access When Locked” section, toggle on the switch next to “Control Center” and “Home Screen.”
4. Enabling these options allows you to control your music playback through the Control Center and the Music widget on the home screen, even when your iPhone is locked.
5. To allow music app access within other apps, go back to the main “Music” settings screen and look for the “Connect to Apps” section.
6. Tap on “Connect to Apps” and you will see a list of installed apps that can integrate with the Music app.
7. Adjust the switches next to each app to grant or revoke access to your music library within those specific apps. For example, you can allow access to your music in social media apps, fitness apps, or video editing apps.
8. Customize the app access settings according to your preferences.
Enabling music app access in other apps gives you the flexibility to enjoy your music without interrupting your workflow or switching between applications. You can play/pause music, change tracks, and control the volume directly from the Control Center or even from within other apps, making it convenient to listen to your favorite songs while performing tasks or engaging with different applications.
Take a few moments to adjust your music app access settings on your iPhone, granting access to other apps to enjoy seamless music integration across your device.
Reset Music App Toolbar Customizations
If you have customized the toolbar in the Music app on your iPhone and would like to revert back to the default settings, you can easily reset the toolbar customizations. Resetting the toolbar will remove any changes you have made and restore the default layout. Here’s how you can reset the music app toolbar customizations:
1. Open the Music app on your iPhone and navigate to the “Browse” or “Library” tab.
2. Scroll down to the bottom and tap on the “More” button with three dots.
3. From the menu that appears, select “Edit.”
4. You will see a list of available items for the toolbar. At the top-right corner of the screen, you will find the “Reset” option.
5. Tap on the “Reset” button and confirm your decision to reset the toolbar customizations.
6. The toolbar will now be reset to the default layout, with the original arrangement of icons and controls.
By resetting the music app toolbar customizations, you can start fresh and return to the original configuration of the toolbar. This can be useful if you want to undo any changes you have made or if you simply prefer the default arrangement of the toolbar items.
Please note that resetting the toolbar customizations will remove any additions or changes you have made, and you will need to customize the toolbar again if you want to personalize it according to your preferences.
Take a moment to reset the music app toolbar customizations on your iPhone’s Music app and restore the default layout if desired.