
Choosing the Right Theme for Your Firefox Browser
When it comes to customizing your Firefox browser, one of the first things to consider is the theme. A theme is like a skin for your browser, changing its appearance and giving it a fresh new look. With hundreds of themes available, there’s something for everyone’s taste.
To find the perfect theme for your Firefox browser, you can start by visiting the official Firefox Add-ons website. Here, you can browse through a wide selection of themes, including popular ones like dark themes, minimalist themes, and nature-inspired themes.
Once you find a theme that catches your eye, simply click on it to see more details. You’ll be able to preview how the theme will look on your browser before installing it. Take your time to explore different themes and choose one that suits your personal style and preferences.
It’s important to note that themes not only change the colors and background of your browser, but they may also come with their own set of icons and buttons. Some themes even offer additional features and customizations, such as tab management or enhanced privacy settings.
After you’ve found your desired theme, click the “Add to Firefox” button to install it. Once installed, Firefox will automatically apply the theme and give your browser a fresh new look.
If you ever want to switch to a different theme or revert to the default Firefox theme, you can easily do so by going to the Firefox menu, selecting “Add-ons”, and then clicking on the “Themes” tab. From here, you can browse through your installed themes and activate the one you prefer.
Choosing the right theme for your Firefox browser is a simple and fun way to personalize your browsing experience. Whether you prefer a sleek and modern interface or a cozy and nostalgic design, there’s a theme out there that will make your browser truly shine.
Customizing the Menu Bar
The menu bar in Firefox provides easy access to various browser functions and options. However, it can be personalized to suit your specific needs and preferences. With a few simple steps, you can customize the menu bar to include or remove items, rearrange them, and even create custom menus.
To begin customizing the menu bar, right-click on any empty space in the menu bar area. This will open a context menu with several options. At the top of the menu, you will see a list of available items that you can add to or remove from the menu bar.
To add an item to the menu bar, simply click on it in the context menu. For example, if you want to add a bookmark button to the menu bar, click on “Bookmarks Toolbar”. The bookmark button will now appear in the menu bar, giving you quick access to your favorite websites.
If you want to remove an item from the menu bar, click on it again in the context menu. For instance, if you no longer need the bookmarks toolbar, click on “Bookmarks Toolbar” to remove it from the menu bar.
In addition to adding and removing items, you can also rearrange them on the menu bar. To do this, click and drag an item to a new position. For instance, if you want your bookmarks to appear before the history button, simply click and drag the bookmarks item to the desired location.
Furthermore, you can create custom menus on the menu bar. This allows you to group related items together for easier access. To create a custom menu, right-click on any empty space in the menu bar area and select “New Menu”. Give the menu a name and then drag and drop items into the menu.
Customizing the menu bar in Firefox gives you the freedom to organize your browser’s functions exactly the way you want. By adding, removing, rearranging, and creating custom menus, you can optimize your browsing experience and have quick access to the features that matter the most to you.
Adding or Removing Items from the Menu Bar
The menu bar in Firefox provides a convenient way to access various browser functions and options. With a few simple steps, you can customize the menu bar by adding or removing items according to your needs and preferences.
To add an item to the menu bar, right-click on any empty space in the menu bar area. This will open a context menu with a list of available items. Simply click on the item you want to add, such as “History” or “Bookmarks Toolbar”, and it will appear on the menu bar.
If you no longer need a specific item on the menu bar, you can easily remove it. Right-click on the item you want to remove and uncheck it from the context menu. The item will be removed from the menu bar instantly.
Keep in mind that some items on the menu bar are essential and cannot be removed, such as the “File” or “Help” menus. However, most other items can be added or removed based on your preferences.
In addition to the standard items, Firefox also allows you to add custom items to the menu bar. For example, if you frequently use a specific extension or bookmark, you can add it to the menu bar for quick access. Simply right-click on any empty space in the menu bar area, select “Customize”, and then drag and drop the desired item to the menu bar.
In case you accidentally remove an important item from the menu bar, don’t worry. You can easily bring it back by going to the Firefox menu, selecting “Customize”, and dragging the item back to the menu bar.
By adding or removing items from the menu bar, you can tailor your browsing experience to suit your preferences. Whether you want a clutter-free menu bar or quick access to specific functions, customizing the items on the menu bar allows you to optimize your workflow and enhance your productivity.
Rearranging Items on the Menu Bar
The menu bar in Firefox can be customized not only by adding or removing items but also by rearranging them to suit your preferred order. By rearranging items on the menu bar, you can optimize your browsing experience and have quick access to the functions that you use most frequently.
To rearrange items on the menu bar, simply click and drag the item to the desired position. For example, if you want your bookmarks to appear before the history button, click on the bookmarks item and drag it to the left of the history button.
If you accidentally move an item to the wrong position, you can easily undo the change by dragging it back to its original position. Alternatively, you can right-click on the menu bar and select “Customize” to access the customization menu. From there, you can drag and drop items to their desired positions.
When rearranging items on the menu bar, consider organizing them based on your usage patterns and the importance of each function. For example, if you frequently use the bookmarks feature, it may be more convenient to have it positioned closer to the left side of the menu bar for easy access.
In addition to rearranging items on the menu bar, you can also group related items together in custom menus. This allows you to create submenus that can help further organize your browsing experience. For instance, you can group various bookmark folders into a submenu for better organization.
Remember that the menu bar in Firefox provides a flexible and customizable interface. You have the freedom to arrange the items in a way that suits your workflow and browsing habits. Experiment with different arrangements until you find the configuration that works best for you.
By rearranging items on the menu bar, you can streamline your navigation and access the functions you need with ease. Take advantage of the customization options in Firefox to create a personalized browsing experience that aligns with your preferences.
Customizing the Navigation Toolbar
The navigation toolbar in Firefox provides quick access to various essential functions like back, forward, reload, and home. However, you can further customize the toolbar to suit your specific browsing needs. With a few simple steps, you can add or remove buttons, rearrange them, and enhance your browsing experience.
To begin customizing the navigation toolbar, right-click on any empty space in the toolbar area. This will open a context menu with options to customize the toolbar. At the top of the menu, you will see a list of available buttons that you can add to or remove from the navigation toolbar.
To add a button to the navigation toolbar, simply click on it in the context menu. For example, if you frequently use the “Bookmark This Page” option, click on “Bookmark This Page” in the menu to add the button to your toolbar.
If there are buttons on the toolbar that you rarely use or don’t need, you can remove them by right-clicking on the button in the toolbar itself and selecting “Remove from Toolbar”. This will remove the button from the navigation toolbar.
In addition to adding or removing buttons, you can also rearrange them on the navigation toolbar. To do this, simply click and drag a button to the desired position. For instance, if you prefer to have the refresh button before the stop button, drag the refresh button to the left of the stop button.
Furthermore, Firefox allows you to create custom shortcuts on the navigation toolbar. These shortcuts can be additional buttons or even shortcut links to your favorite websites. To create a custom shortcut, right-click on any empty space in the toolbar area, select “Customize”, and then drag and drop the desired item to the navigation toolbar.
Customizing the navigation toolbar in Firefox gives you the freedom to organize your essential browser functions exactly the way you want. By adding, removing, and rearranging buttons, you can optimize your browsing experience and have quick access to the features that matter the most to you.
Experiment with different button configurations and find the setup that suits your workflow and browsing habits. With a customized navigation toolbar, you can navigate the web more efficiently and enjoy a personalized browsing experience.
Adding or Removing Buttons on the Navigation Toolbar
The navigation toolbar in Firefox provides quick access to essential browsing functions like back, forward, reload, and home. However, you can further customize the toolbar by adding or removing buttons to suit your specific needs and browsing preferences.
To add a button to the navigation toolbar, right-click on any empty space in the toolbar area. This will open a context menu with a list of available buttons that you can add to the toolbar. Simply click on the button you want to add, such as “Bookmark This Page” or “Print”, and it will be added to the navigation toolbar instantly.
If there are buttons on the toolbar that you rarely use or don’t need, you can remove them to declutter the toolbar. Right-click on the button you wish to remove and select “Remove from Toolbar” from the context menu. The button will be removed from the navigation toolbar.
In addition to the standard buttons, Firefox allows you to add custom buttons to the navigation toolbar. These custom buttons can be added through Firefox extensions or custom scripts. For instance, you can add a button for a specific search engine or a button that performs a specific action when clicked.
To install custom buttons, you can visit the official Firefox Add-ons website and search for button-related extensions. Once installed, these extensions will add new buttons to the navigation toolbar, expanding its functionality and customizability.
If you ever want to restore the default set of buttons on the navigation toolbar, you can easily do so by right-clicking on any empty space in the toolbar area, selecting “Customize”, and then clicking on the “Restore Default Set” button.
By adding or removing buttons on the navigation toolbar, you can personalize your browsing experience and streamline access to the functions you use most frequently. Take advantage of the customization options in Firefox to create a toolbar that aligns with your browsing habits and preferences.
Experiment with different button configurations and find the setup that suits your needs best. By customizing the navigation toolbar, you can optimize your browsing efficiency and enjoy a more seamless and tailored browsing experience.
Rearranging Buttons on the Navigation Toolbar
The navigation toolbar in Firefox provides quick access to essential browsing functions such as back, forward, reload, and home. However, the toolbar can be further customized by rearranging the buttons to suit your specific browsing preferences. By rearranging the buttons on the navigation toolbar, you can optimize your workflow and have quick access to the functions you use most frequently.
To rearrange buttons on the navigation toolbar, simply click and drag a button to the desired position. For instance, if you prefer to have the refresh button before the stop button, click on the refresh button and drag it to the left of the stop button. The buttons will automatically adjust their positions accordingly.
If you accidentally move a button to the wrong position, you can easily undo the change by dragging it back to its original position. Alternatively, you can right-click on the navigation toolbar, select “Customize”, and then drag and drop buttons to their desired positions.
When rearranging buttons on the navigation toolbar, consider organizing them based on your usage patterns and the importance of each function. For example, if you frequently use the bookmarking feature, you may find it more convenient to have the bookmark button positioned closer to the left side of the navigation toolbar for easy access.
In addition to rearranging buttons, you can also customize the toolbar by adding or removing buttons based on your needs. Right-click on any empty space on the navigation toolbar and select the “Customize” option to access the customization menu. From there, you can add new buttons from the available options or remove unnecessary buttons to further tailor your toolbar.
Remember that the navigation toolbar in Firefox is flexible and allows for a personalized browsing experience. Take some time to experiment with different button arrangements until you find the setup that suits your workflow and browsing habits.
By rearranging buttons on the navigation toolbar, you can streamline your navigation and make it more efficient. Create a toolbar layout that works seamlessly for you and enhances your productivity while browsing the web.
Customizing the Bookmarks Toolbar
The bookmarks toolbar in Firefox provides a convenient way to access your favorite websites with just a click. However, you can customize the bookmarks toolbar to make it even more tailored to your browsing needs. With a few simple steps, you can add or remove bookmarks, rearrange them, and optimize your bookmarking experience.
To begin customizing the bookmarks toolbar, right-click on any empty space in the toolbar area. This will open a context menu with options to customize the toolbar. At the top of the menu, you will see a list of available bookmarks that you can add to or remove from the toolbar.
To add a bookmark to the toolbar, simply click on the desired bookmark in the context menu. For example, if you frequently visit a specific website, click on the bookmark for that website to add it to the bookmarks toolbar.
If there are bookmarks on the toolbar that you no longer need, you can remove them by right-clicking on the bookmark and selecting “Remove”. The bookmark will be removed from the toolbar instantly.
In addition to adding or removing bookmarks, you can also rearrange them on the toolbar. To do this, simply click and drag a bookmark to the desired position. For instance, if you want your most frequently visited website to appear at the beginning of the bookmarks toolbar, drag that bookmark to the leftmost position.
Furthermore, Firefox allows you to create folders on the bookmarks toolbar to further organize your bookmarks. Right-click on the toolbar, select “New Folder”, and give the folder a name. You can then drag and drop bookmarks into the folder for better organization.
By customizing the bookmarks toolbar, you can optimize your bookmarking experience and have quick access to the websites that matter most to you. Personalize it with your favorite bookmarks and organize them in a way that makes sense to you.
Remember to regularly review and update your bookmarks toolbar to ensure it stays relevant to your browsing habits. Remove bookmarks that are no longer needed and add new ones as your interests and needs change.
Take advantage of the customization options in Firefox to create a personalized bookmarks toolbar that enhances your browsing efficiency and allows you to navigate the web more seamlessly.
Adding or Removing Bookmarks on the Bookmarks Toolbar
The bookmarks toolbar in Firefox allows quick and easy access to your favorite websites. Whether you want to add new bookmarks or remove existing ones, customizing the bookmarks toolbar is a straightforward process that can be done in a few simple steps.
To add a bookmark to the bookmarks toolbar, begin by visiting the webpage you wish to bookmark. Once you’re on the desired page, click on the star icon in the Firefox address bar. A popup window will appear, giving you options to customize the bookmark. From here, you can choose the folder in which to save the bookmark, as well as whether to add it to the bookmarks toolbar. Simply select the toolbar as the destination folder, and the bookmark will be added to the toolbar immediately.
If you have a bookmark on the toolbar that you no longer need, you can easily remove it. Right-click on the bookmark and select “Delete” from the context menu. The bookmark will be removed from the toolbar, freeing up space for other bookmarks.
It’s worth noting that bookmarks on the toolbar are usually displayed as icons, making it convenient to fit more bookmarks in a limited space. However, if you prefer displaying the bookmarks’ names as well, you can right-click on the toolbar, select “Bookmarks Toolbar” > “Show Text” to toggle the text visibility.
In addition to manually adding individual bookmarks to the toolbar, Firefox also offers an automatic bookmarking feature. You can automatically add bookmarks to the toolbar by simply dragging the favicon (the small icon next to the address) of a webpage to the toolbar. This saves you the step of manually adding bookmarks one by one.
By adding or removing bookmarks on the bookmarks toolbar, you can easily customize and personalize your browsing experience. Keep your most frequently visited websites readily accessible and organized on the toolbar for quick and convenient navigation.
Regularly review your bookmarks toolbar to ensure that it remains up to date and relevant to your browsing habits. Remove bookmarks that are no longer needed and add new ones that align with your interests and needs.
Customizing the bookmarks toolbar in Firefox allows you to have a streamlined and personalized browsing experience. Take advantage of this feature to optimize your workflow and have quick access to the websites that matter most to you.
Rearranging Bookmarks on the Bookmarks Toolbar
The bookmarks toolbar in Firefox provides a convenient way to access your favorite websites with just a single click. To make your browsing experience even more streamlined, you can rearrange the bookmarks on the toolbar to suit your preferences. By rearranging bookmarks, you can organize them in a way that best reflects your browsing habits.
To rearrange bookmarks on the toolbar, simply click and drag a bookmark to the desired position. For example, if you want to move a frequently visited website to the beginning of the toolbar, click on the bookmark and drag it to the leftmost position. The bookmark will automatically adjust its position as you move it.
If you have a long list of bookmarks on the toolbar and want to group related ones together, you can create folders and organize your bookmarks accordingly. Right-click on an empty space on the toolbar, select “New Folder,” and give it a name. You can then click and drag bookmarks into the folder for better organization.
Remember that the bookmarks toolbar has a limited amount of space, so consider prioritizing your most frequently visited websites or most essential bookmarks. By having quick access to the bookmarks you use most, you can save time and streamline your browsing experience.
In addition to manual rearrangement, Firefox also includes an “Organize Bookmarks” feature. To access this feature, click on the “Bookmarks” menu in the Firefox menu bar and select “Show All Bookmarks” or use the keyboard shortcut “Ctrl+Shift+B”. In the Library window that opens, you can drag and drop bookmarks to rearrange them, create folders, and manage your bookmark collection more extensively.
Regularly reviewing and rearranging bookmarks is essential to ensure that your bookmarks toolbar remains organized and aligned with your browsing habits. Remove bookmarks that are no longer relevant or frequently used to keep your toolbar clutter-free and optimized.
Experiment with different bookmark arrangements and folder structures to find a setup that works best for you. By customizing and adapting your bookmarks toolbar, you can create a personalized browsing experience that enhances your productivity and makes accessing your favorite websites a breeze.
Hiding or Showing Menu Bars and Toolbars
In Firefox, you have the flexibility to hide or show menu bars and toolbars based on your preferences and needs. This customization feature allows you to declutter the browser interface and create a more streamlined browsing experience. Whether you want to maximize screen space or bring back a hidden toolbar, Firefox makes it easy to toggle the visibility of these elements.
To hide or show a menu bar or toolbar, right-click on any empty space in the toolbar area. In the context menu that appears, you will see a list of available toolbars, each with a checkmark indicating its visibility. To hide a toolbar, simply click on its name to remove the checkmark and hide the toolbar. Likewise, to show a hidden toolbar, click on its name to add the checkmark and make the toolbar visible again.
It’s important to note that certain toolbars, such as the navigation toolbar or bookmarks toolbar, may have additional options or customization settings. To access these settings, right-click on the toolbar and select “Customize”. In the customization menu, you can add or remove specific buttons, rearrange items, and further personalize the toolbar to suit your preferences.
In addition to hiding or showing complete toolbars, Firefox also provides built-in functionality to customize the appearance and layout. This includes options to enable or disable specific buttons within a toolbar, adjust button sizes, and even change button order. By customizing the toolbars to cater to your specific needs, you can create a browsing environment that enhances your efficiency and comfort.
Furthermore, Firefox offers keyboard shortcuts to quickly hide or show toolbars in case you prefer a keyboard-centric browsing experience. Pressing “Alt” on your keyboard will bring up the traditional menu bar, and from there, you can navigate to the “View” menu, select “Toolbars,” and choose which toolbars to hide or show.
Regularly reviewing and adjusting the visibility of menu bars and toolbars allows you to adapt your browsing environment to your ever-changing needs. Whether you want a clean and minimalist interface or require quick access to specific functions, toggling the visibility of these elements empowers you to create a personalized browsing experience.
Experiment with hiding or showing different toolbars and find the configuration that suits your browsing habits and preferences. By taking advantage of Firefox’s customization options, you can create a visually appealing and efficient browsing environment tailored to your needs.
Creating Custom Toolbars
In Firefox, you have the ability to create custom toolbars, which can provide even more flexibility and optimization options for your browsing experience. Custom toolbars allow you to group related functions, bookmarks, and extensions together, giving you quick access to the tools you use most frequently.
To create a custom toolbar, right-click on any empty space in the toolbar area and select “New Toolbar”. A prompt will appear asking you to name your new toolbar. Give it a meaningful name that represents the purpose or category of the items you plan to add to it.
Once you’ve named your custom toolbar, it will appear as a new, empty toolbar in the toolbar area. To populate it with items, you can simply drag and drop various elements onto the toolbar. These elements can include bookmarks, buttons, or even entire folders from your bookmarks library.
Custom toolbars can be populated with a range of items, including frequently visited websites, specific bookmark folders, extensions, or even custom search engines. This allows you to create a highly personalized browsing experience tailored to your unique needs and preferences.
To add bookmarks to a custom toolbar, simply open your bookmarks library, locate the desired bookmark or folder, and drag it onto the custom toolbar. The bookmark or folder will then appear as a clickable item on your custom toolbar.
In addition to bookmarks, you can also add buttons from extensions or even create custom toolbar buttons using CSS code. By utilizing extensions and custom coding, you can extend the functionality of your custom toolbar even further and add specialized tools or functions specific to your needs.
Furthermore, you can customize the appearance and layout of your custom toolbar. Right-click on the toolbar, select “Customize”, and from there, you can drag and drop items to rearrange them and adjust the order to your liking.
Creating custom toolbars allows you to have a more efficient workflow by grouping related functions and bookmarks together. It saves you time and effort by providing quick access to the tools and websites you use most frequently, right at your fingertips.
Regularly review and update your custom toolbars to ensure that they remain functional and organized. Add new bookmarks or buttons as needed and remove ones that are no longer relevant or useful.
By creating custom toolbars in Firefox, you can enhance your browsing experience by having a personalized and optimized set of tools and bookmarks readily available. Experiment with different configurations and make the most of this customization feature to create a browser environment that reflects your unique browsing style.
Adding or Removing Items on a Custom Toolbar
Custom toolbars in Firefox allow you to have a personalized browsing experience by grouping together the tools, bookmarks, and functions that you use most frequently. One of the key advantages of custom toolbars is the ability to easily add or remove items according to your needs and preferences.
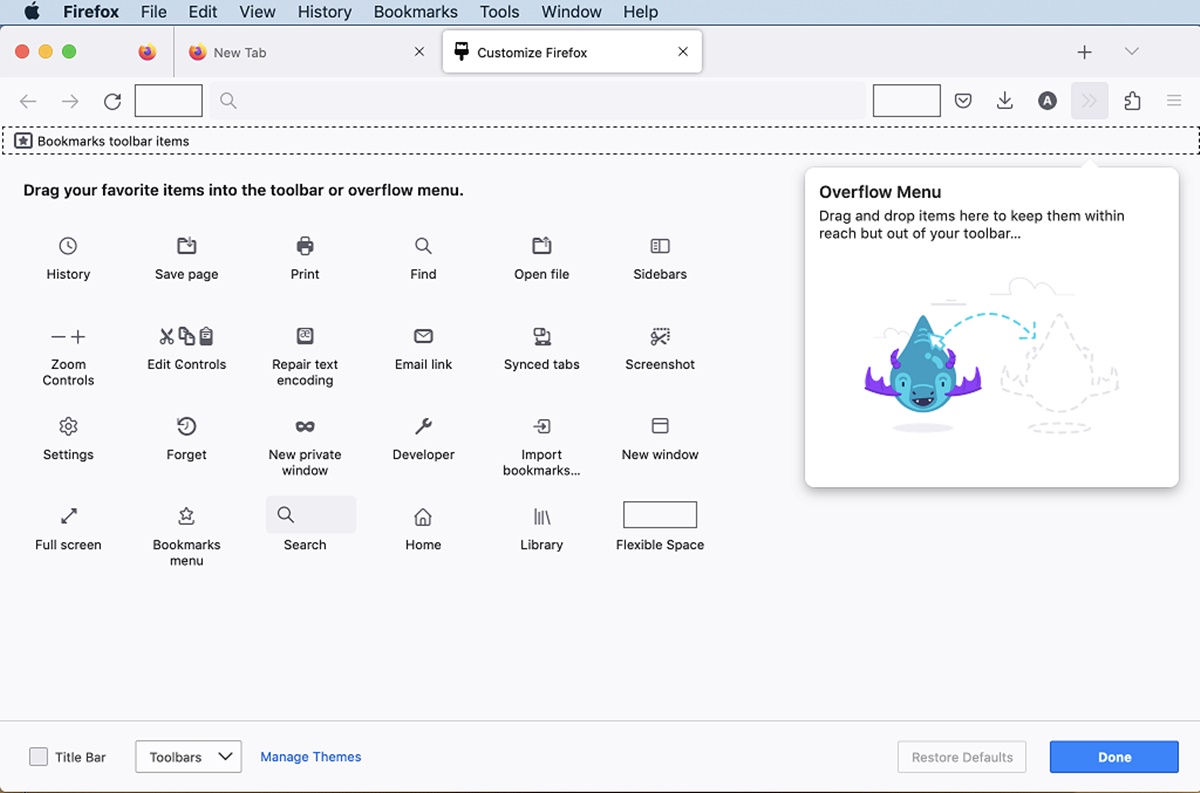
To add an item to a custom toolbar, you can start by opening the Firefox customization menu. Right-click on any empty space in the toolbar area and select “Customize”. The customization menu will appear, displaying a range of available items that you can add to your custom toolbar.
To add an item, simply drag and drop it from the customization menu onto your custom toolbar. The item could be a bookmark, an extension button, or even a custom button that you have created using CSS code. When you release the mouse button, the item will be added to your custom toolbar, making it easily accessible whenever you need it.
If you want to remove an item from your custom toolbar, return to the customization menu by right-clicking on the toolbar area and selecting “Customize”. Then, locate the item you wish to remove on your custom toolbar. Click and drag the item from the toolbar back into the customization menu. Once you release the mouse button, the item will be removed from your custom toolbar.
Removing an item from a custom toolbar doesn’t delete it from your browser entirely. It simply removes it from the toolbar, making it hidden until you decide to add it back in the future.
By adding or removing items on a custom toolbar, you have the ability to tailor your browsing experience to suit your specific needs. With this level of customization, you can have quick access to the tools and bookmarks that are most relevant to you, enhancing your productivity and efficiency while browsing the web.
Regularly review your custom toolbar to ensure that it remains up to date and organized. Add new items that align with your evolving browsing habits, and remove items that are no longer useful or relevant to your needs.
Experiment with different combinations of items on your custom toolbar to find the setup that works best for you. Think about the functions and bookmarks that you use most frequently and prioritize them accordingly.
By adding or removing items on a custom toolbar in Firefox, you can create a customized browsing experience that aligns with your preferences and optimizes your workflow.
Rearranging Items on a Custom Toolbar
A custom toolbar in Firefox allows you to have quick access to your most frequently used tools, bookmarks, and functions. One of the benefits of custom toolbars is the ability to rearrange the items to suit your specific needs and preferences. By rearranging items on a custom toolbar, you can optimize your browsing experience and have the most important tools at your fingertips.
To rearrange items on a custom toolbar, begin by opening the Firefox customization menu. Right-click on any empty space in the toolbar area and select “Customize”. The customization menu will appear, displaying the items currently on your custom toolbar.
To rearrange an item, click and drag it to the desired position on the toolbar. You can move the item left or right, up or down, depending on where you want it to be located. As you drag the item, you will notice that other items on the toolbar will adjust accordingly to make space for the moved item.
Experiment with different placements of your items to find a configuration that best suits your workflow and browsing habits. You may want to place frequently used items closer to the left side of the toolbar for easy access, or group related items together for better organization.
In addition to rearranging items on a custom toolbar, you can also adjust the size of buttons or remove unwanted labels to further customize the appearance and layout. To do this, return to the customization menu and look for the options available for each item. You can often find options to resize buttons, select different icons, or toggle labels on or off.
Remember that the layout and arrangement of items on a custom toolbar should align with your browsing needs. Regularly review and adjust the order and placement of items to match any changes in your workflow or browsing habits.
If you want to restore the default order of items on your custom toolbar, simply open the customization menu and click on the “Restore Default Set” button. This will reset the toolbar to its original layout, allowing you to start fresh or revert to a previous configuration.
By rearranging items on a custom toolbar in Firefox, you can create a personalized browsing experience that optimizes your efficiency and productivity. Take advantage of this customization feature to have quick access to the tools and bookmarks that matter most to you.
Using Keyboard Shortcuts for Menu Bars and Toolbars
Keyboard shortcuts are a powerful way to navigate through menu bars and toolbars in Firefox quickly. By memorizing and utilizing these shortcuts, you can streamline your browsing experience and access various functions and features without relying solely on mouse clicks.
Firefox provides a set of predefined keyboard shortcuts for common actions. Here are some of the most commonly used shortcuts:
- Alt: Pressing the Alt key on your keyboard activates the traditional menu bar, allowing you to navigate through the menus using the arrow keys.
- F10: Pressing the F10 key activates the main menu bar and allows you to navigate through the menus using the arrow keys.
- Ctrl + /: Pressing Ctrl and the forward slash key simultaneously activates the search bar, where you can search for specific terms or URLs within the current page.
- Ctrl + D: Pressing Ctrl and the D key together bookmarks the current page, adding it to your bookmark collection for quick access.
- Ctrl + B: Pressing Ctrl and the B key together shows and hides the bookmarks toolbar, allowing you to toggle its visibility on and off.
- F5 (or Ctrl + R): Pressing F5 or Ctrl and the R key together refreshes the current page, reloading it from the server and updating the content.
In addition to these predefined shortcuts, you can also customize your own keyboard shortcuts in Firefox to access specific commands or functions. To do this, go to the Firefox menu, select “Settings,” then “Preferences,” and click on the “Shortcuts” tab. From there, you can assign keyboard shortcuts to various commands or create custom shortcuts to suit your needs.
Using keyboard shortcuts for menu bars and toolbars offers a more efficient way to navigate through Firefox, especially for frequent tasks. By reducing reliance on mouse clicks and using keyboard shortcuts, you can save time and enhance your productivity while browsing.
Take some time to familiarize yourself with the available keyboard shortcuts in Firefox, and consider customizing your own shortcuts to further optimize your workflow. With practice, using keyboard shortcuts will become second nature, allowing you to navigate through menu bars and toolbars with ease and efficiency.
Resetting Menu Bars and Toolbars to Default Settings
If you have made extensive changes to your menu bars and toolbars in Firefox and want to start fresh, you can easily reset them to their default settings. This is useful if you want to undo all customizations and revert back to the original layout and configuration.
To reset the menu bars and toolbars in Firefox, follow these steps:
- Click on the Firefox menu in the top-right corner of the browser window.
- Select “Customize” from the drop-down menu. This will open the customization menu.
- In the customization menu, look for the “Restore Default Set” button in the lower-right corner and click on it.
- A confirmation dialog box will appear, asking if you want to restore the default settings. Click on the “Restore Defaults” button to proceed.
By clicking the “Restore Defaults” button, all your previously added buttons, rearrangements, and customizations will be reset to the default settings. The menu bars and toolbars will return to their original layout and configuration as they were when you first installed Firefox.
It’s important to note that resetting the menu bars and toolbars does not affect other settings or preferences in Firefox, such as bookmarks, extensions, or browser history. It only applies to the visual customization of the menu bars and toolbars.
Resetting the menu bars and toolbars can be beneficial if you want to declutter your interface, start fresh with a clean layout, or undo any unintended changes. It provides an easy and straightforward way to restore the default settings and configurations.
After resetting the menu bars and toolbars, you can proceed to customize them again according to your preferences. Take some time to consider which buttons, functions, or bookmarks you want to add or rearrange to optimize your browsing experience.
Experiment with different configurations, but remember that if you decide to customize them again, you can always reset back to the default settings at any time using the steps outlined above.
By understanding how to reset the menu bars and toolbars in Firefox, you can maintain control over the customization of your browser interface and ensure that it aligns with your preferences and needs.