
Benefits of Creating a List in Google Maps
Creating a list in Google Maps is a powerful feature that can greatly enhance your navigation and travel experiences. Whether you’re planning a trip, organizing your favorite places, or collaborating with others, here are some key benefits of using Google Maps lists.
1. Stay organized: Google Maps lists allow you to categorize and group your favorite places, making it easy to find and access them whenever you need. You can create lists for different types of locations such as restaurants, landmarks, hiking trails, or even places you want to visit in the future.
2. Effortless trip planning: Planning a trip becomes a breeze with Google Maps lists. You can create a list of all the places you want to visit, add notes or descriptions to each location, and easily share it with your travel companions. This ensures that everyone is on the same page and saves you from the hassle of individually searching for each place.
3. Seamless navigation: Once you’ve created a list in Google Maps, you can easily navigate to any location on the list with just a few taps. This is especially useful when you’re exploring a new city or area and want to make sure you don’t miss any must-visit places.
4. Discover new places: Google Maps allows you to follow and discover lists created by others, including travel bloggers, local experts, or even your friends. By following these lists, you can gain insights into hidden gems, popular attractions, and recommendations from people who have already explored those areas.
5. Collaboration made easy: If you’re planning a group outing or a road trip with friends, the collaborative feature of Google Maps lists is incredibly handy. You can share your list with others and allow them to add, remove, or edit places on the list. This ensures that everyone’s preferences are taken into account, making the planning process smooth and inclusive.
6. Access across devices: Your Google Maps lists are synced across devices, so you can access them from your smartphone, tablet, or computer. This means you can start planning a trip on your desktop and continue on your mobile device while on the go, without missing a beat.
7. Personalized recommendations: As you use Google Maps and create lists, the app learns your preferences and can provide personalized recommendations based on your previous choices. This helps you discover new places that align with your interests and makes your future exploration even more tailored to your preferences.
Step 1: Open the Google Maps app
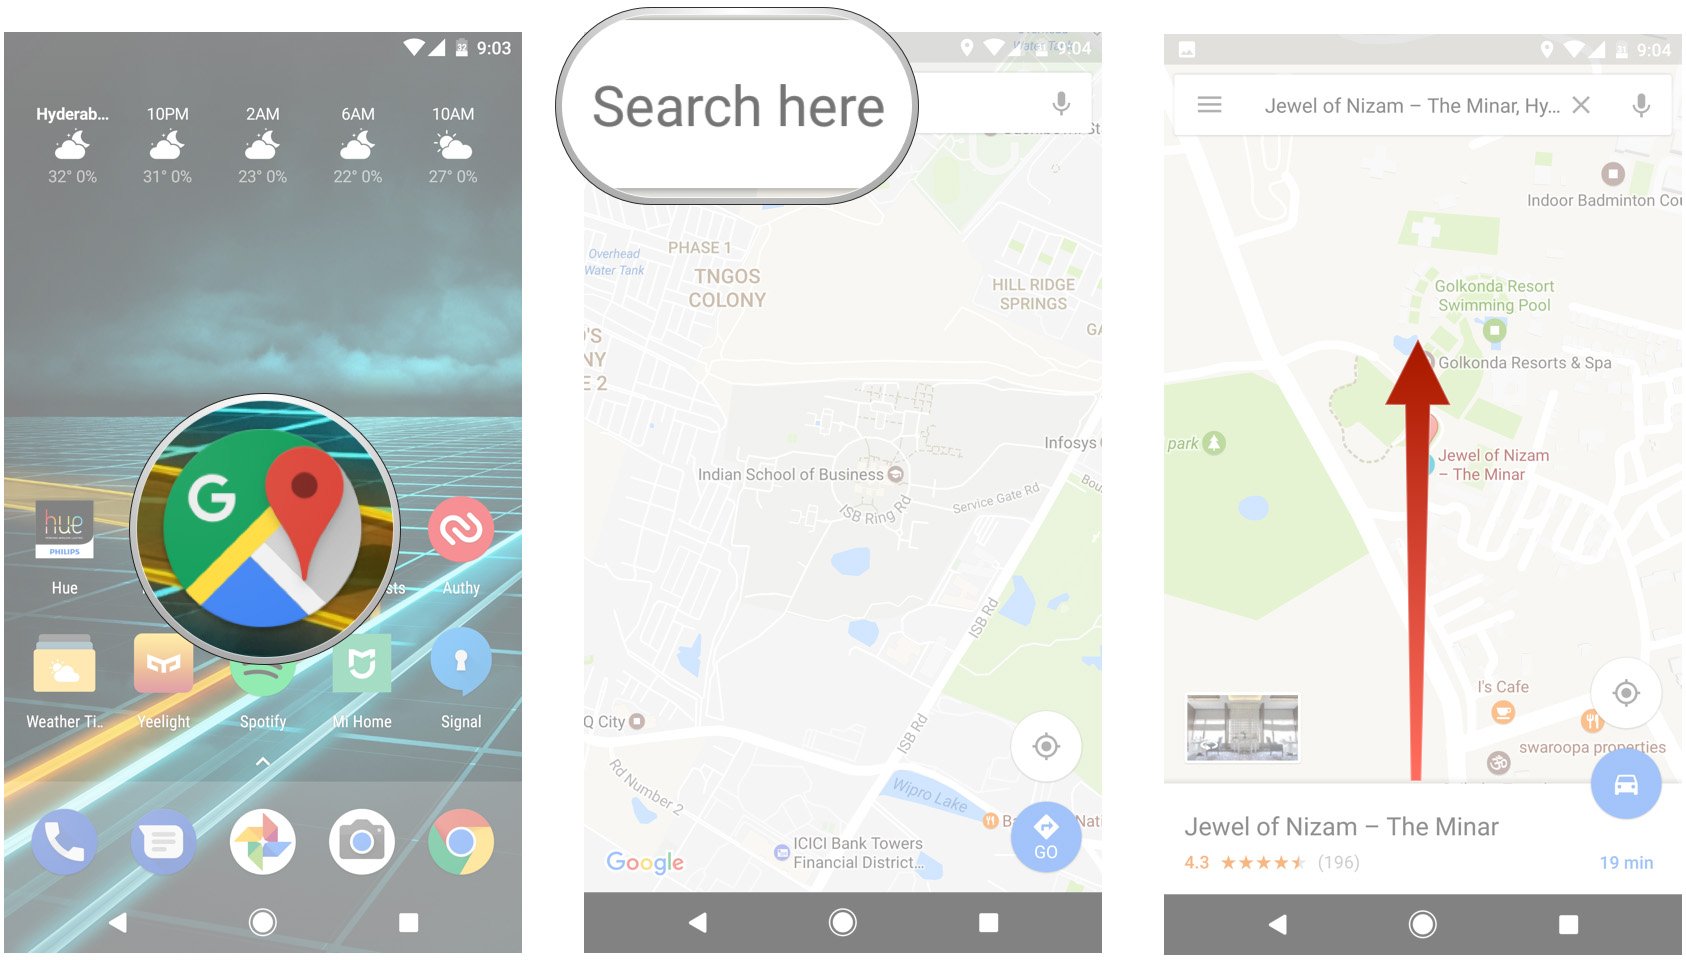
The first step to creating a list in Google Maps is to open the Google Maps app on your smartphone or tablet. The app is available for both Android and iOS devices and can be downloaded for free from the respective app stores.
If you already have the Google Maps app installed on your device, simply locate the app icon on your home screen or app drawer and tap on it to launch the app. If you don’t have the app installed, go to the app store on your device, search for “Google Maps”, and install it.
Once you’ve opened the Google Maps app, you’ll be greeted with the familiar map interface, displaying your current location or the last location you viewed. The app provides a wealth of features and functionality to help you navigate and explore the world around you.
It’s worth noting that in order to create and save lists in Google Maps, you’ll need to sign in to your Google account. This allows the app to sync your data across devices and gives you access to additional features like collaborative list sharing and personalized recommendations.
If you’re not already signed in, you can do so by tapping on the account icon or menu button (usually located in the top-right or top-left corner of the screen) and selecting the “Sign in” option. Enter your Google account credentials and follow the on-screen prompts to complete the sign-in process.
Once signed in, you’re ready to start creating your first list in Google Maps. Proceed to the next step to learn how to navigate to the “Your Places” section where you can manage and organize your lists.
Step 2: Sign in to your Google account
In order to fully utilize the features and benefits of creating lists in Google Maps, it’s important to sign in to your Google account. Signing in allows you to access your saved lists across multiple devices, collaborate with others, and receive personalized recommendations based on your preferences.
To sign in to your Google account, follow these steps:
- Open the Google Maps app on your device.
- Tap on the account icon or menu button located in the top-right or top-left corner of the screen.
- A dropdown menu will appear. If you see your email address or account name displayed, it means you’re already signed in. Skip to the next step. If not, continue to the next step.
- Select the “Sign in” option from the dropdown menu.
- Enter your Google account email address or phone number and tap “Next”.
- Enter your password and tap “Next” to proceed.
- If you have two-factor authentication enabled, you may be prompted to verify your identity with a code sent to your phone or email. Follow the instructions provided to complete the sign-in process.
- Once signed in, you’ll see your email address or account name displayed in the account icon or menu button.
Signing in to your Google account ensures that your lists are securely saved and accessible across all your devices. You’ll be able to create, edit, and manage your lists from your smartphone, tablet, or computer with ease.
Remember to sign out of your Google account if you’re using a shared or public device to maintain the security and privacy of your personal information.
Now that you’re signed in, let’s move on to the next step and learn how to navigate to the “Your Places” section in the Google Maps app.
Step 3: Navigate to the “Your Places” section
Once you have signed in to your Google account in the Google Maps app, you need to navigate to the “Your Places” section to access your saved lists and create new ones. The “Your Places” section is where you can manage and organize all your saved locations, including your lists.
To navigate to the “Your Places” section, follow these steps:
- Open the Google Maps app on your device.
- Tap on the account icon or menu button located in the top-right or top-left corner of the screen.
- In the dropdown menu, select the “Your Places” option.
- You will be taken to the “Your Places” screen, which displays various tabs, including “Saved”, “Reservations”, “Want to go”, and “Lists”.
- To access your lists, tap on the “Lists” tab.
On the “Lists” tab, you will see all the lists you have created, as well as any lists that have been shared with you. Each list will be displayed with its name and a preview of the locations it contains. You can scroll through your lists to find the one you want to edit or create a new list by following the next steps.
If you haven’t created any lists yet, the “Lists” tab will be empty. Don’t worry, we’ll guide you through the process of creating a new list in the upcoming steps.
Navigating to the “Your Places” section allows you to easily access and manage your lists. It serves as your central hub for organizing your favorite places and planning your trips. Let’s proceed to the next step and learn how to create a list in Google Maps.
Step 4: Choose “Lists” from the options
After navigating to the “Your Places” section in the Google Maps app, the next step is to choose the “Lists” option. This will allow you to view, create, and manage your lists within the app.
To choose “Lists” from the options, follow these steps:
- Open the Google Maps app on your device.
- Tap on the account icon or menu button located in the top-right or top-left corner of the screen.
- In the dropdown menu, select the “Your Places” option.
- You will be taken to the “Your Places” screen, which displays various tabs.
- Tap on the “Lists” tab to access your lists.
By selecting the “Lists” option, you will be presented with all the lists you have created, as well as any lists that have been shared with you. This is where you can view the names and contents of your lists, make changes, and create new lists.
If you haven’t created any lists yet, the “Lists” tab will be empty. You can proceed to the next step to learn how to create your first list in Google Maps.
Browsing the “Lists” section provides a convenient way to organize your favorite places, plan trips, and collaborate with others. It helps you keep everything in one place and easily accessible whenever you need it.
Now that you have selected “Lists” from the options, let’s move on to the next step and learn how to create a new list in Google Maps.
Step 5: Click on the “Create List” button
Once you have accessed the “Lists” tab in the “Your Places” section of the Google Maps app, the next step is to click on the “Create List” button. This will allow you to start creating a new list in Google Maps.
To click on the “Create List” button, follow these steps:
- Open the Google Maps app on your device.
- Tap on the account icon or menu button located in the top-right or top-left corner of the screen.
- In the dropdown menu, select the “Your Places” option.
- You will be taken to the “Your Places” screen, which displays various tabs.
- Tap on the “Lists” tab to access your lists.
- On the “Lists” tab, look for the “Create List” button.
- When you find the “Create List” button, tap on it.
Clicking on the “Create List” button will prompt you to enter details for your new list, such as the name and description. You can also optionally choose to add a cover photo to personalize your list.
By clicking on the “Create List” button, you are taking the first step in creating a list that will help you organize your favorite places, plan trips, or collaborate with others.
Now that you have clicked on the “Create List” button, let’s move on to the next step and learn how to give your list a name and description.
Step 6: Give your list a name and description
After clicking on the “Create List” button in the Google Maps app, you will be prompted to give your list a name and description. This step allows you to provide important details that will help you and others understand the purpose and content of your list.
To give your list a name and description, follow these steps:
- Open the Google Maps app on your device.
- Tap on the account icon or menu button located in the top-right or top-left corner of the screen.
- In the dropdown menu, select the “Your Places” option.
- You will be taken to the “Your Places” screen, which displays various tabs.
- Tap on the “Lists” tab to access your lists.
- On the “Lists” tab, tap on the “Create List” button.
- In the list creation window, enter a name for your list in the designated field.
- Below the name field, enter a description for your list (optional but recommended).
- You can also choose to add a cover photo to personalize your list (optional).
When giving your list a name, it’s helpful to be descriptive and concise. A clear and meaningful name will make it easier for you to identify the list and for others to understand its purpose.
The description field allows you to provide more information about the list, such as its theme, specific locations included, or any additional details you want to share. This can be particularly useful for collaborative lists or lists that you intend to share with others.
Adding a cover photo is another way to personalize your list and make it visually appealing. You can use a photo from your device’s gallery or select one from the Google Maps image library.
Now that you have given your list a name and description, let’s proceed to the next step and learn how to add places to your newly created list.
Step 7: Add places to your list
After giving your list a name and description, the next step in creating a list in Google Maps is to add places to it. This step allows you to curate a collection of locations that are meaningful to you, whether it’s your favorite restaurants, must-visit landmarks, or places you want to explore in the future.
To add places to your list, follow these steps:
- Open the Google Maps app on your device.
- Tap on the account icon or menu button located in the top-right or top-left corner of the screen.
- In the dropdown menu, select the “Your Places” option.
- You will be taken to the “Your Places” screen, which displays various tabs.
- Tap on the “Lists” tab to access your lists.
- Select the list to which you want to add places.
- Tap on the “+” button or the “Add a place” option within the list.
- Search for the place you want to add by typing its name, address, or even a keyword.
- Choose the specific place from the search results that match your intended location.
- Repeat the process to add more places to your list.
As you add places to your list, you can also customize each location by adding notes, ratings, and other details that are relevant to you. This allows you to create a personalized reference for each place and make your list more informative.
Remember, your list can include any type of place or location that you find interesting or want to keep track of. From restaurants and cafes to parks and museums, the possibilities are endless.
By adding places to your list, you’re creating a curated collection of locations that you can easily access and reference whenever you need to. Let’s move on to the next step and learn how to customize your list with details and notes.
Step 8: Customize your list with details and notes
Once you have added places to your list in Google Maps, you have the option to customize your list by adding details and notes to each location. This step allows you to provide additional information about the places in your list, such as specific recommendations, opening hours, or any other relevant details you want to remember.
To customize your list with details and notes, follow these steps:
- Open the Google Maps app on your device.
- Tap on the account icon or menu button located in the top-right or top-left corner of the screen.
- In the dropdown menu, select the “Your Places” option.
- You will be taken to the “Your Places” screen, which displays various tabs.
- Tap on the “Lists” tab to access your lists.
- Select the list that you want to customize.
- Tap on the place you want to add details and notes to.
- Within the place details screen, tap on the “Add notes” or “Add details” option.
- Enter the relevant information or notes about the place.
- Tap “Save” or “Done” to finalize the changes.
- Repeat the process for other places in your list.
By customizing your list with details and notes, you can create a personalized reference for each place that goes beyond the basic information provided by Google Maps. This can be especially useful for adding your own recommendations, special instructions, or reminders for each location.
In addition to adding details and notes, you can also rate and review places in your list to share your experiences and opinions. This helps you keep track of your own impressions and share valuable insights with others who have access to your list.
Customizing your list with details and notes adds a personal touch and enhances the usefulness of your list, making it more tailored to your specific needs and preferences. Let’s continue to the next step and learn how to share your list with others.
Step 9: Share your list with others
Sharing your list with others in Google Maps can be a great way to collaborate, gather recommendations, or simply share your favorite places with friends and family. You have the option to share your list publicly or privately, depending on your preferences.
To share your list with others, follow these steps:
- Open the Google Maps app on your device.
- Tap on the account icon or menu button located in the top-right or top-left corner of the screen.
- In the dropdown menu, select the “Your Places” option.
- You will be taken to the “Your Places” screen, which displays various tabs.
- Tap on the “Lists” tab to access your lists.
- Select the list that you want to share.
- In the list details screen, tap on the “Share” button.
- Select how you want to share your list: through a messaging app, social media, or by copying the link.
- If you choose to share through a messaging app or social media, select the desired platform and follow the prompts to share the list.
- If you choose to copy the link, you can paste it anywhere you want, such as in an email or a text message.
When you share your list, others will be able to view the places in your list, including their names, addresses, and any additional details or notes you have added. However, they won’t be able to edit the list unless you have specifically enabled collaboration for that list.
It’s important to note that when you share a list publicly, anyone with access to the link can view your list. If you prefer to keep your list private, make sure to only share it with specific individuals using messaging apps or social media platforms.
Sharing your list with others allows you to engage and collaborate with others who have similar interests or who can contribute valuable recommendations. It enhances the social aspect of Google Maps and can lead to discovering new places and experiences.
Now that you know how to share your list, let’s move on to the next step and learn how to edit and manage your list.
Step 10: Edit and manage your list
Once you have created a list in Google Maps, it’s important to know how to edit and manage it. This allows you to make changes, add or remove places, update details, and keep your list organized and up to date.
To edit and manage your list, follow these steps:
- Open the Google Maps app on your device.
- Tap on the account icon or menu button located in the top-right or top-left corner of the screen.
- In the dropdown menu, select the “Your Places” option.
- You will be taken to the “Your Places” screen, which displays various tabs.
- Tap on the “Lists” tab to access your lists.
- Select the list that you want to edit and manage.
- In the list details screen, you will find various options to manage your list.
- To edit the list name, description, or cover photo, tap on the “Edit” button.
- To add or remove places, tap on the “Add a place” or “Remove” button.
- To update details or notes for a specific place, tap on the place and make the necessary changes.
- You can also rearrange the order of places by tapping and holding on a place, then dragging it to a new position in the list.
- Tap “Save” or “Done” to apply your changes.
Managing your list allows you to keep it organized, add new places, remove outdated locations, and update information as needed. It gives you full control over the content and ensures that your list reflects your current preferences and interests.
Keep in mind that the changes you make to your list will be synchronized across all your devices as long as you’re signed in to your Google account. This allows you to seamlessly manage your list from your smartphone, tablet, or computer.
Now that you know how to edit and manage your list, let’s move on to the next step and learn how to collaborate with others on a list.
Step 11: Collaborate with others on a list
Collaborating with others on a list in Google Maps allows you to work together, share recommendations, and plan trips collectively. With the collaborative feature, multiple people can make edits, add or remove places, and contribute their own suggestions to a shared list.
To collaborate with others on a list, follow these steps:
- Open the Google Maps app on your device.
- Tap on the account icon or menu button located in the top-right or top-left corner of the screen.
- In the dropdown menu, select the “Your Places” option.
- You will be taken to the “Your Places” screen, which displays various tabs.
- Tap on the “Lists” tab to access your lists.
- Select the list that you want to collaborate on.
- In the list details screen, tap on the “Collaborate” button.
- Enter the email addresses or usernames of the people you want to collaborate with.
- Select their level of access: “Can edit” or “Can view”.
- Tap “Send” to invite them to collaborate on the list.
When you invite someone to collaborate on a list, they will receive an email or notification with an invitation to join. Depending on the access level you granted, they can then contribute to the list by making changes, adding places, and editing details.
Collaborating with others is particularly useful when planning trips with friends or coordinating recommendations with a group. It eliminates the need for back-and-forth communication and streamlines the process of creating a shared list that everyone can contribute to.
Remember to communicate effectively with your collaborators, establish guidelines or preferences, and be respectful of each other’s contributions. This will ensure a smooth and productive collaboration experience.
Now that you know how to collaborate with others on a list, let’s move on to the next step and learn how to follow and discover lists created by others.
Step 12: Follow and discover lists created by others
One of the great features of Google Maps is the ability to follow and discover lists created by others. This allows you to explore new places, get recommendations from experts, and find hidden gems that you may not have discovered on your own. By following lists, you can have a curated collection of locations that align with your interests.
To follow and discover lists created by others, follow these steps:
- Open the Google Maps app on your device.
- Tap on the Explore tab at the bottom of the screen (it looks like a square icon).
- Scroll through the recommendations and categories until you find the option for “Lists”.
- Tap on “Lists” to access the collection of lists curated by Google and others.
- Browse through the featured lists or use the search bar to find specific lists.
- To follow a list, tap on it to open the details screen, then tap on the “Follow” button.
- The list will now be added to your “Following” section in the Lists tab.
By following lists created by others, you can gain valuable insights, discover new places, and enhance your exploration in any given area. You can follow lists curated by travel bloggers, locals, or even your friends, and have a customized collection of recommendations at your fingertips.
In addition to following lists created by others, you can also contribute to the Google Maps community by creating your own public list and sharing it with others. This way, you can share your own expertise and experiences with fellow travelers and enthusiasts.
Now that you know how to follow and discover lists created by others, let’s move on to the next step and learn how to access your list on different devices.
Step 13: Access your list on different devices
One of the key advantages of using Google Maps to create lists is the ability to access your lists across multiple devices. This means that you can view and manage your lists seamlessly, whether you’re on your smartphone, tablet, or computer. It allows for flexibility and convenience, ensuring that your lists are always accessible when you need them.
To access your list on different devices, follow these steps:
- Ensure that you are signed in to your Google account on all devices you wish to access your lists.
- Open the Google Maps app or go to the Google Maps website on each device.
- Tap on the account icon or menu button and select “Your Places”.
- Choose the “Lists” tab to see all your lists.
- You will find your lists synchronized across all devices, allowing you to view, edit, and manage them seamlessly.
With the synchronization feature, any changes you make to your lists on one device will automatically update on all your other devices. This ensures that your lists are always up-to-date, regardless of which device you are using at the moment. Whether you add new places, make edits, or collaborate with others, the changes will be reflected universally.
Accessing your lists across different devices also means that you can plan and organize your trips from the comfort and convenience of a larger screen, such as a computer or tablet, while having the option to access and navigate with ease using your smartphone on the go.
This flexibility in accessing your lists enhances the overall user experience and ensures that you have your curated collection of places with you at all times.
Now that you know how to access your list on different devices, you have the ease and convenience of managing your lists wherever you are. It’s time to start creating and organizing your lists in Google Maps to enhance your navigation and travel experiences.
Tips for Creating Effective Lists in Google Maps
Creating lists in Google Maps is a powerful tool for organizing your favorite places, planning trips, and collaborating with others. To make the most out of this feature, here are some tips for creating effective lists in Google Maps:
1. Be specific and descriptive: When naming your list, be clear and descriptive. Use specific keywords to indicate the type of places included, such as “Top Cafes in [City]” or “Hiking Trails in [Region]”. This helps others understand the focus of your list and makes it easier for them to find the information they need.
2. Add relevant details: Take advantage of the description field to provide additional information about your list. This could include details about the theme or purpose of the list, any special considerations, or personal experiences. Adding details gives context to your list and sets it apart from others.
3. Organize with categories or sections: If your list includes a wide range of places, consider organizing them into categories or sections. For example, you could create subheadings like “Food & Drinks,” “Outdoor Activities,” or “Historical Landmarks”. This makes it easier for others to navigate and find specific types of places within your list.
4. Add personalized notes: Utilize the notes feature to add your own recommendations, tips, or memorable experiences for each place. This adds a personal touch to your list and provides valuable insights for others who follow or collaborate with you.
5. Include relevant images: Enhance the visual appeal of your list by adding photos of some of the places. This helps others get a better sense of what to expect and can pique their interest in exploring those locations. Look for high-quality, representative images to make your list more captivating.
6. Regularly update and maintain your list: As you explore and discover new places, make it a habit to update your list. Add new places that you come across and remove any outdated or closed establishments. Keeping your list up to date ensures that the information you share remains accurate and helpful.
7. Share and collaborate: Don’t hesitate to share your lists with others and invite them to collaborate. Whether it’s with friends, family, or fellow travelers, sharing lists allows for a collective sharing of knowledge, recommendations, and experiences. It’s a great way to discover new places and engage with others who have similar interests.
8. Explore and follow lists curated by others: Take advantage of the “Lists” feature in Google Maps to explore and follow lists created by other users. This allows you to discover new places, get insider tips, and broaden your horizons. Following lists created by experts, locals, or travel enthusiasts can lead you to hidden gems and unique experiences.
9. Use reviews and ratings: Contribute to the Google Maps community by leaving reviews and ratings for the places in your list. This not only helps others make informed decisions but also adds credibility to your list and builds trust with your audience.
10. Keep privacy settings in mind: Be mindful of the privacy settings when creating lists. If you want to keep your list private, ensure that you share it only with specific individuals through messaging apps or social media platforms. Publicly sharing your list can inspire and help others, but it’s important to respect your own preferences for privacy.
By following these tips, you can create compelling, informative, and engaging lists in Google Maps that are not only useful to you but also to others who come across them. Create your lists, start exploring, and share your knowledge and experiences with the community!