
Gathering the Necessary Equipment
In order to successfully copy a CD, you’ll need to gather a few essential pieces of equipment. Here is a list of items you’ll need before starting the copying process:
1. Source CD: This is the CD that you want to copy. Make sure it is in good condition and free from scratches or other damages that could affect the quality of the copy.
2. Blank CD: You will need a blank CD-R or CD-RW disc to make the copy. Check the specifications of your CD/DVD recorder to ensure compatibility with the type of blank CDs you have.
3. Computer or CD/DVD Recorder: You’ll need either a computer with a CD/DVD burner or a standalone CD/DVD recorder to complete the copying process. Ensure that your computer or recorder is in good working condition.
4. Cleaning Supplies: Before copying the CD, it is crucial to clean the source CD to remove any dust, fingerprints, or smudges that may interfere with the reading and copying process. Use a lint-free cloth or a CD cleaning kit for this purpose.
5. Copying Software: Depending on the method you choose to copy the CD, you may need specific copying software. Some CD/DVD burners come with built-in software, while computers may require third-party software. Ensure that you have the appropriate copying software installed and updated.
6. USB External CD/DVD Drive (Optional): If you are using a laptop or a computer without an internal CD/DVD drive, you’ll need to have a USB external CD/DVD drive to read the source CD and write the copy onto the blank CD.
By gathering these necessary equipment items, you will be well-prepared to start the process of copying a CD. It’s essential to have everything ready and in good condition to ensure a successful and high-quality copy. Once you have all the equipment at hand, you can move on to the next steps of the copying process.
Choosing the Right Type of CD to Copy
When it comes to copying a CD, it’s important to consider the type of CD you want to copy and select the appropriate blank CD for the copying process. Here are a few factors to keep in mind when choosing the right type of CD to copy:
1. CD-R or CD-RW: The two main types of blank CDs available are CD-R (Compact Disc-Recordable) and CD-RW (Compact Disc-Rewritable). CD-R discs are write-once discs, meaning that once data is written onto them, it cannot be erased or overwritten. CD-RW discs, on the other hand, can be erased and rewritten multiple times. Consider the purpose of the copied CD and choose accordingly.
2. Storage Capacity: CDs come in different storage capacities, typically ranging from 650MB to 800MB. Determine the size of the source CD and ensure that the blank CD has sufficient storage capacity to accommodate the data. It’s always better to choose a blank CD with a higher storage capacity to ensure that the copied data fits comfortably.
3. Speed Rating: The speed rating of a CD refers to how fast data can be written or read from the disc. Common speed ratings include 1x, 4x, 8x, and so on. Higher speed ratings generally mean faster recording times, but it’s crucial to check the specifications of your CD/DVD recorder to ensure compatibility with the selected blank CD’s speed rating.
4. Compatibility: Some CD/DVD players may have limited compatibility with certain types of CDs. Take into account the devices that you plan to use to play the copied CD. If you are unsure about compatibility, it’s best to stick with a CD-R disc, as they tend to have broader compatibility with various CD players.
5. Brand and Quality: Choosing a reputable brand of blank CD is essential to ensure the longevity and playback compatibility of the copied CD. Opt for well-known brands that have a track record of producing high-quality discs.
By considering these factors, you can choose the right type of CD to copy that meets your specific requirements. Always ensure that the selected blank CD is compatible with your CD/DVD recorder and offers enough storage capacity for the data you intend to copy. Taking the time to choose the appropriate blank CD will contribute to a successful and reliable copying process.
Cleaning the CD
Before copying a CD, it is crucial to clean the surface of the source CD thoroughly. Dust, fingerprints, and smudges can hinder the reading and copying process, leading to errors or a poor-quality copy. Here are some steps to follow when cleaning a CD:
1. Gather the necessary supplies: To clean the CD, you’ll need a lint-free cloth or a CD cleaning kit. Avoid using rough or abrasive materials, as they can scratch the CD surface.
2. Hold the CD by the edges: Avoid touching the shiny side of the CD, as this is the part that contains the data. Hold it by the edges to prevent transferring any oils or contaminants from your fingers onto the surface.
3. Wipe the CD surface: Using the lint-free cloth, gently wipe the surface of the CD in a straight line from the center to the outer edges. Avoid circular motions, as they can cause scratches. Repeat this process, if necessary, until the CD appears clean and free from smudges.
4. Dealing with stubborn stains: If there are stubborn stains or fingerprints that won’t come off with a dry cloth, you can dampen the cloth slightly with water or a gentle CD cleaning solution. Again, be gentle when wiping the CD surface and avoid excessive moisture.
5. Allow the CD to dry: After cleaning, let the CD air dry for a few minutes to ensure that it is completely dry before proceeding with the copying process. This will prevent any moisture from interfering with the CD drive’s operation.
6. Inspect the CD for any remaining debris: Before inserting the cleaned CD into the CD/DVD drive, inspect it carefully to ensure that there are no remaining dust particles or other debris on the surface. If needed, give it another gentle wipe with the lint-free cloth to remove any lingering contaminants.
Properly cleaning the source CD before copying is an essential step to ensure a smooth and error-free copying process. It helps to maintain the integrity of the data and improves the chances of creating a high-quality copy. By following these steps, you can prepare the CD surface for copying and increase the chances of a successful outcome.
Preparing the Computer or CD/DVD Recorder
Before you begin the process of copying a CD, it’s important to properly prepare your computer or CD/DVD recorder. Taking the time to set up and ensure everything is in order will help facilitate a smooth and successful copying process. Here are the steps to follow:
1. Check the hardware connections: Verify that all the necessary cables are properly connected between your computer or CD/DVD recorder and any external devices. Make sure the power cords are securely plugged in and that the connections are tight.
2. Ensure sufficient power supply: Ensure that your computer or CD/DVD recorder is connected to a stable power source. Insufficient power or fluctuations in the power supply can lead to errors during the copying process or potentially damage the hardware.
3. Check the CD/DVD drive: Make sure that the CD/DVD drive you plan to use for copying is in proper working order. Insert a different CD to confirm that the drive can read discs without issues. If there are any problems, troubleshoot or seek professional assistance before attempting the copying process.
4. Clear up disk space: Ensure that you have sufficient free disk space on your computer’s hard drive if you are copying the CD directly to your computer. If your computer has limited storage space, consider using an external hard drive or selecting a different location for the copied files.
5. Disable unnecessary programs: Before starting the copying process, it’s a good idea to close any unnecessary programs running in the background. This helps allocate computer resources for the copying software and reduces the chances of conflicts or interruptions during the process.
6. Check for software updates: Ensure that the operating system, drivers, and any relevant copying software are up to date. This helps ensure compatibility and may offer performance improvements or bug fixes that can enhance the copying process.
7. Gather any necessary drivers or software: If you are using a CD/DVD recorder that requires specific drivers or software, ensure that you have them installed and ready to use before proceeding. Check the manufacturer’s website for any updates or additional software that may be needed for optimal performance.
By carefully preparing your computer or CD/DVD recorder, you can minimize potential issues and set the stage for a smooth, hassle-free copying process. Following these steps ensures that your hardware and software are ready to perform the copying tasks efficiently, increasing the likelihood of a successful outcome.
Selecting the Copying Software
Choosing the right copying software is essential for a successful CD copying process. The software you select will determine the features available, ease of use, and overall performance. Here are some factors to consider when selecting the appropriate copying software:
1. Compatibility: Ensure that the software you choose is compatible with your computer’s operating system and CD/DVD recorder. Check the system requirements provided by the software manufacturer to ensure a seamless installation and usage experience.
2. User Interface: Look for software that has an intuitive and user-friendly interface. This will make it easier for you to navigate through the copying process and access the necessary features without confusion or frustration.
3. Copying Features: Evaluate the features offered by the copying software. Consider whether you only need basic copying capabilities or if you require additional features, such as audio conversion, disc image creation, or disc verification. Choose software that aligns with your specific requirements.
4. Speed and Performance: Look for software that offers efficient copying speeds. This will help save time during the copying process, especially when dealing with larger amounts of data. Additionally, consider the software’s stability and performance to ensure smooth operation without frequent crashes or errors.
5. Support and Updates: Check for software that offers reliable customer support channels, such as email or live chat, in case you encounter any issues during the copying process. Additionally, make sure the software provider offers regular updates to address any bug fixes and enhance performance.
6. User Reviews and Ratings: Research online and read user reviews to get an idea of other users’ experiences with the software. Pay attention to both positive and negative feedback to help you make an informed decision based on real-world experiences.
7. Cost and Licensing: Evaluate the cost of the software and the licensing terms. Determine whether it offers a trial version or a money-back guarantee to give you the opportunity to test the software before committing to a full purchase.
Considering these factors will help you select the appropriate copying software that meets your specific needs and ensures a smooth and successful CD copying process. Take the time to research and compare different options to make an informed decision and maximize your chances of creating high-quality copies.
Inserting the Source CD
Once you have gathered the necessary equipment and prepared your computer or CD/DVD recorder, you’re ready to insert the source CD – the CD you want to copy. Here are the steps to follow when inserting the source CD:
1. Power on your computer or CD/DVD recorder: Ensure that your computer or CD/DVD recorder is turned on and ready to use. Make sure it is connected to a reliable power source.
2. Locate the CD/DVD drive: Identify the CD/DVD drive on your computer or CD/DVD recorder. The drive is typically labeled as “CD/DVD” or has a distinctive disc tray icon on the front of the device.
3. Eject the disc tray: Press the button on the CD/DVD drive or use the software’s eject option to open the disc tray. The tray will slide out, providing access to insert the source CD.
4. Handle the CD with care: Hold the source CD by its edges to avoid touching the shiny surface. Touching the surface of the CD can leave fingerprints or smudges, potentially affecting the quality of the copy.
5. Inspect the CD for any damage: Before inserting the source CD into the CD/DVD drive, examine it for scratches, cracks, or other visible damage. It’s essential to use a CD in good condition to ensure accurate reading and efficient copying.
6. Insert the source CD: Carefully slide the source CD onto the disc tray, ensuring that the label side is facing up. Gently push the disc tray back into the CD/DVD drive until it clicks securely into place.
7. Close the disc tray: Once the source CD is inserted, gently push the disc tray back into the CD/DVD drive until it fully closes. The CD/DVD drive should initialize and prepare to read the source CD.
8. Wait for the CD to be recognized: Give the system a few moments to recognize the inserted source CD. Depending on your computer’s settings, automatic software may launch, or you may need to manually select the copying software you installed.
By following these steps, you can safely and correctly insert the source CD into your computer or CD/DVD recorder. Taking care to handle the CD properly and ensuring the CD is in good condition will help facilitate a smooth and successful copying process.
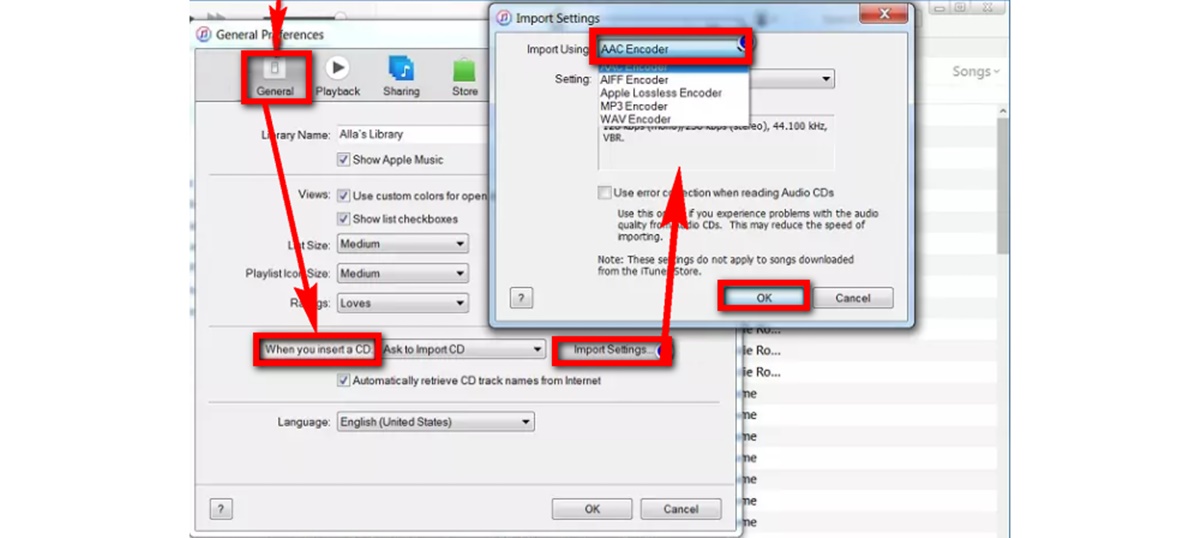
Selecting the Copying Settings
Once you have inserted the source CD, the next step in the CD copying process is to select the appropriate copying settings. These settings determine how the CD will be copied and what options are available during the process. Here are some important considerations when selecting the copying settings:
1. Copying Method: Decide on the copying method you want to use. There are generally two options available: “Clone” or “Create Image.” The clone method creates an exact replica of the source CD, including all files and folders. The image method creates a disc image file that can be mounted later to create multiple copies or to save the image for future use.
2. File Format: If you choose to create an image of the source CD, you’ll need to select the file format for the image file. Common formats include ISO, BIN, and IMG. ISO is the most widely supported format and suitable for compatibility with various software and operating systems.
3. Copying Speed: Most copying software allows you to select the copying speed. Consider the capabilities of your CD/DVD drive and the quality of the blank CD you are using. Higher speeds may result in faster copying, but they can also increase the risk of errors. It’s recommended to opt for a moderate speed that ensures accurate copying without sacrificing quality.
4. Verify Copy: Some software offers the option to verify the copied data against the source CD. Enabling this feature will ensure that the copied CD matches the original and reduce the chances of errors or data loss. It’s advisable to enable the verify option, especially if you are creating important copies.
5. Additional Copy Settings: Depending on the software you are using, there may be additional settings available. For example, you may have the option to set the number of copies you want to create, adjust the writing method (Track-At-Once or Disc-At-Once), or choose the write mode (DAO or TAO). Review these settings and choose the options that align with your specific needs and preferences.
6. Destination Location: If you are creating an image file or choosing to save the copied CD to your computer instead of directly burning it to a physical CD, you’ll need to specify the destination location for the copied data. Ensure that you have sufficient disk space on your computer or the selected storage device.
7. Start the Copying Process: Once you have selected the desired copying settings, initiate the copying process by clicking on the “Start” or “Copy” button provided by the software. The copying software will now begin reading the source CD and creating the copy as per your specified settings.
By carefully selecting the appropriate copying settings, you can ensure that the copied CD meets your requirements and preferences. Consider factors such as the copying method, file format, copying speed, and additional settings provided by the software. Taking the time to choose the right settings will enhance the copying process and result in a high-quality copy of the source CD.
Initiating the Copying Process
Once you have selected the appropriate copying settings, it’s time to initiate the actual copying process. This step will start the software’s reading of the source CD and the creation of the copy. Here’s what you need to do to initiate the copying process:
1. Verify the selected settings: Before proceeding, double-check the copying settings you have chosen. Ensure that the copying method, file format, copying speed, and any additional settings are accurately set according to your preferences and requirements.
2. Confirm any prompts or warnings: Depending on the software you are using, there may be additional prompts or warnings that appear before initiating the copying process. Read and review any messages carefully to ensure you understand any potential implications or necessary actions.
3. Start the copying process: Once you have verified the settings and addressed any prompts or warnings, click on the “Copy,” “Start,” or similar button provided by the software. This will initiate the reading of the source CD and the creation of the copy.
4. Monitor the progress: During the copying process, keep an eye on the progress indicators provided by the software. It will typically display the current status, such as the percentage of completion or the estimated time remaining. This allows you to track the progress and ensure that the copying is proceeding as expected.
5. Avoid interrupting the process: Once the copying process is initiated, it’s crucial that you avoid interrupting or interfering with it. Do not eject the source CD or the blank CD, close the software, or shut down the computer or CD/DVD recorder until the process is complete. Interruptions can lead to errors and may result in an incomplete or corrupted copy.
6. Wait for the copying process to complete: The time it takes to complete the copying process depends on various factors, such as the speed of your CD/DVD drive, the size of the source CD, and the selected copying speed. Be patient and allow the software to finish the copying process without interruptions.
7. Verify the completion of the copy: Once the copying process is complete, the software will usually provide a notification or display a message indicating the successful creation of the copy. Take a moment to verify that the copy has been created and that it matches the source CD in terms of data and quality.
By following these steps, you can successfully initiate and monitor the copying process. Pay close attention to the selected settings, monitor the progress, and avoid any interruptions until the process is complete. This will help ensure a smooth and successful copying experience, resulting in a high-quality copy of the source CD.
Verifying the Copied CD
After the copying process is complete, it is essential to verify the copied CD to ensure that it is accurate and free of errors. Verifying the copied CD helps confirm that the data has been successfully transferred from the source CD to the blank CD without any corruption or loss. Here are the steps to follow when verifying the copied CD:
1. Eject the copied CD: If the software does not automatically eject the copied CD, gently press the button on the CD/DVD drive or use the software’s eject option to open the disc tray. This will allow you to access and inspect the copied CD.
2. Inspect the copied CD’s physical condition: Carefully examine the surface of the copied CD for any visible scratches, smudges, or imperfections. Ensure that the CD is in good condition and that the reflective layer is intact.
3. Play or access the copied CD: Insert the copied CD into a CD/DVD player or your computer’s CD/DVD drive and play or access the content. Check that the copied CD behaves as expected and that all files and folders are present and accessible.
4. Listen for audio quality: If the copied CD contains audio tracks, listen to the tracks to determine if the audio quality is clear and without any distortion or skipping. Pay attention to any noticeable differences compared to the source CD.
5. Compare files and folders: If possible, open the source CD and the copied CD side by side on your computer and visually compare the files and folders. Ensure that all content has been accurately replicated from the source CD to the copied CD.
6. Check file integrity: Use file verification tools, such as checksum or hash algorithms, to compare the integrity of the files on the source CD with those on the copied CD. This can help identify any potential errors or differences between the two.
7. Repeat the verification process if necessary: If you notice any issues or discrepancies during the verification process, repeat the copying process with a new blank CD. Ensure that all settings and conditions are optimal to improve the chances of a successful and error-free copy.
By following these steps, you can verify the copied CD to ensure that it is an accurate reproduction of the source CD. Checking the physical condition, playing or accessing the CD, comparing files and folders, and using file verification tools will provide a comprehensive assessment of the copied CD’s quality and integrity.
Safely Ejecting the Copied CD
Once you have successfully verified the copied CD and ensured its accuracy, the final step in the CD copying process is to safely eject the copied CD from the CD/DVD drive. Safely ejecting the CD helps prevent any potential damage to the CD and ensures the proper completion of the copying process. Here’s what you need to do when ejecting the copied CD:
1. Close any applications: If you have any CD/DVD burning software or applications open that were used during the copying process, close them before ejecting the CD. This ensures that all pending tasks related to the CD copying are completed.
2. Save and close any open files: If you have accessed or copied any files directly from the copied CD, make sure to save and close them before ejecting the CD. This prevents any data loss or corruption that may occur if files are left open or unsaved.
3. Check CD activity light: Many CD/DVD drives have an activity light that indicates whether the CD is being accessed or read. Ensure that the activity light is not lit or flashing, indicating that the CD drive has finished any ongoing processes related to the copied CD.
4. Eject the CD: Press the button on the CD/DVD drive or use the software’s eject option to open the disc tray. Wait for the tray to fully extend out, and then gently remove the copied CD from the tray, handling it by the edges to avoid touching the surface.
5. Inspect the copied CD: Examine the surface of the copied CD one final time to ensure there are no visible scratches, smudges, or other imperfections that could affect its future use or playback. Keeping the CD clean and free from damage preserves its longevity.
6. Store or label the CD: Decide how you will store or label the copied CD for future reference. Consider using a protective CD case or sleeve to prevent scratches and ensure that it is easily identifiable in your CD collection.
7. Close the disc tray: After safely removing the copied CD, gently push the disc tray back into the CD/DVD drive until it fully closes. This prevents dust and debris from entering the drive and ensures that the CD/DVD drive is ready for future use.
By following these steps, you can safely eject the copied CD from the CD/DVD drive, preserving its condition and ensuring the successful completion of the CD copying process. Safely handling the CD and closing the disc tray properly will prevent any potential damage to the CD or the CD/DVD drive itself.