
Choosing the Right Speaker Wire
When it comes to connecting speakers using speaker wire, choosing the right wire is crucial for achieving optimal audio quality. The type and gauge of speaker wire you select can have a significant impact on the overall performance of your audio system. Here are some factors to consider when choosing the right speaker wire:
- Wire Gauge: The gauge of the wire refers to its thickness. The lower the gauge number, the thicker the wire. Thicker wires have a lower resistance to electrical current, allowing for better signal transfer and lower loss. For shorter speaker wire runs, a 16 or 18 gauge wire is typically sufficient. If you are using longer wire runs, it is recommended to use a thicker gauge wire, such as 14 or 12 gauge, to minimize signal degradation.
- Wire Material: Speaker wires are typically made of copper or copper-clad aluminum (CCA). Copper is the preferred choice due to its superior conductivity and lower resistance. It provides better signal transmission and less loss compared to CCA wires. Avoid using aluminum wires, as they have higher resistance and can negatively impact audio quality.
- Length: Consider the distance between your amplifier or receiver and the speakers. Longer wire runs may require thicker gauge wire to ensure minimal signal loss. It is crucial to measure the exact length needed to avoid unnecessary wastage and maintain audio integrity.
- Brand and Quality: Opt for reputable brands and high-quality speaker wire options. Well-known brands often adhere to strict manufacturing standards, ensuring better durability and consistent performance. At the same time, opting for higher-quality wire can help to minimize signal loss and interference, resulting in clearer and more accurate sound reproduction.
When choosing speaker wire, it is essential to strike a balance between performance and cost. While it may be tempting to go for the cheapest option, investing in quality wire can significantly improve the sound quality and longevity of your audio system.
Gathering the Necessary Tools and Materials
Before you begin connecting speakers using speaker wire, you’ll need to gather a few essential tools and materials. Having everything on hand will make the process smoother and more efficient. Here’s a list of what you’ll need:
- Speaker Wire: Determine the length and gauge of speaker wire needed based on your specific setup. Make sure you have enough wire to reach from the amplifier or receiver to each speaker.
- Wire Cutters or Strippers: These tools will allow you to cut the speaker wire to the desired length and remove the outer insulation to expose the bare wire ends.
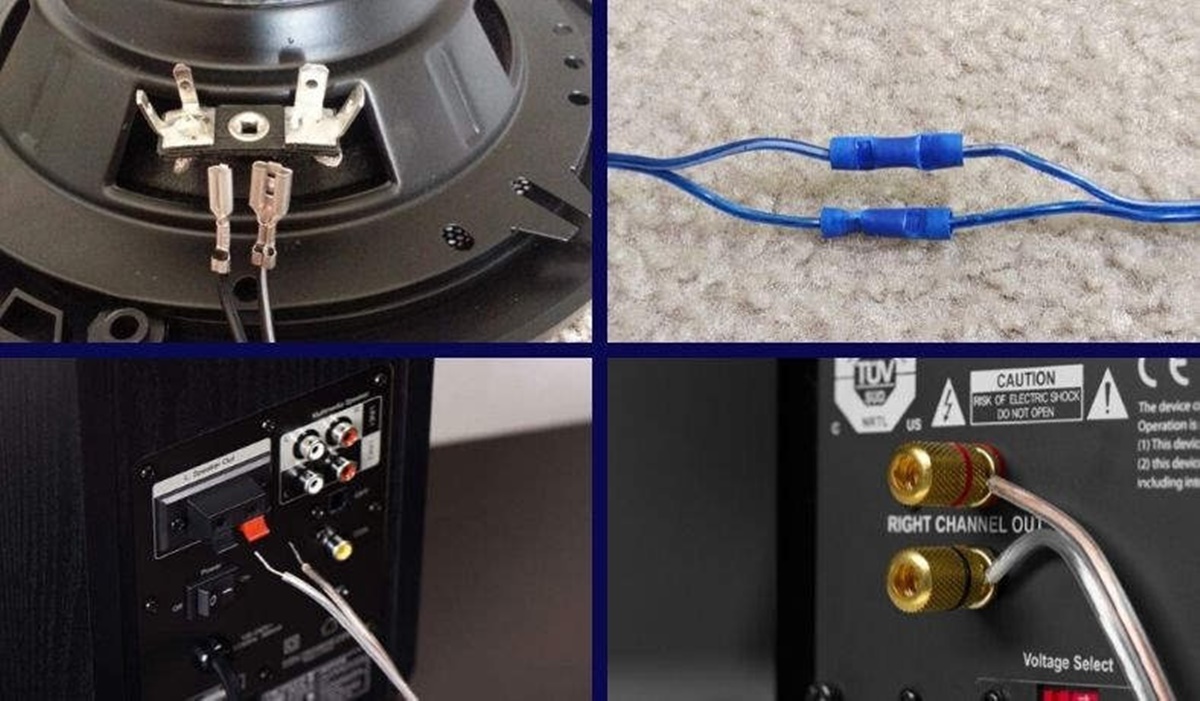
- Wire Connectors: Depending on your preference and the type of connectors your speakers require, you may need banana plugs, spade connectors, or pin connectors. These connectors make it easier to attach the speaker wire to the speakers and ensure a secure connection.
- Labels or Markers: It can be helpful to label each end of the speaker wire to indicate which speaker it will be connected to. This will simplify the installation process, especially if you have multiple speakers.
- Tape or Cable Management Solutions: To keep the speaker wires organized and prevent them from tangling, you may want to use tape or cable management solutions such as cable clips or ties.
- Scissors or a Utility Knife: These tools are handy for cutting and trimming the wire insulation as needed.
- Owner’s Manual: Consult the owner’s manual for your speakers, amplifier, or receiver. It contains valuable information about the specific connections and setup instructions.
Double-check that you have all the necessary tools and materials before proceeding with the speaker wire installation. Being prepared will save you time and ensure a successful and hassle-free connection process.
Identifying Positive and Negative Terminals
Before connecting speakers using speaker wire, it’s important to identify the positive and negative terminals on both the speakers and the amplifier or receiver. Proper polarity ensures that the speakers produce sound accurately and in phase with each other. Here are some tips to help you identify the positive and negative terminals:
- Speaker Terminals: Look for markings or symbols on the back of the speakers indicating which terminal is positive (+) and which is negative (-). It is common to find red markings or a “+” symbol for the positive terminal and black markings or a “-” symbol for the negative terminal.
- Amplifier or Receiver Terminals: Similarly, the amplifier or receiver will have markings or symbols indicating the positive (+) and negative (-) terminals for the speaker connections. Refer to the owner’s manual or look for color-coded terminals (red for positive, black for negative) to identify them.
- Polarity Alignment: In some cases, the positive terminal may have a slightly larger size or be marked with a dot or a + sign. Conversely, the negative terminal may be smaller or have a – sign. Pay attention to these details to ensure proper alignment.
- Wire Color: If your speaker wire is color-coded, it can further assist in identifying the positive and negative terminals. Red is often associated with the positive wire, while black is commonly used for the negative wire. However, it’s important to note that wire color coding can vary, so always double-check the markings on the speakers and amplifier or receiver.
Ensuring proper polarity is vital for achieving accurate sound reproduction and maintaining the intended soundstage. Reversing the polarity can result in muddled sound and reduced stereo imaging. Take the time to identify the positive and negative terminals on both ends of the speaker wire and make sure they align correctly with the corresponding terminals on the speakers and the amplifier or receiver.
Preparing the Speaker Wire
Before connecting speakers using speaker wire, it’s important to properly prepare the wire for installation. This involves stripping the insulation from the wire ends to expose the bare wire for a secure and reliable connection. Here’s how to prepare the speaker wire:
- Measure the Wire: Determine the length of wire needed to connect the speakers to the amplifier or receiver. Add a bit of extra length to each end to allow for flexibility during installation.
- Cut the Wire: Use wire cutters or strippers to cut the wire to the desired length. Make sure to cut the wire evenly to ensure a clean and professional-looking installation.
- Strip the Insulation: Take the wire cutters or strippers and carefully remove approximately 1/2 inch (1.27 cm) of the insulation from both ends of the wire. Be careful not to cut into the inner wire strands while stripping off the outer insulation.
- Separate the Wire Strands: Depending on the gauge of your speaker wire, you may have multiple strands of copper wire within the insulation. Gently separate and twist the strands together to ensure a solid connection.
- Twist the Ends: Once the wire strands are separated, twist the ends of each wire to form a tight bundle. This will prevent fraying of the wires and make it easier to insert them into the speaker terminals.
Properly preparing the speaker wire ends will ensure a clean and secure connection, minimizing signal loss and maintaining the integrity of the audio signal. Take your time to carefully measure, cut, strip, and twist the wire ends before proceeding to the next steps in the installation process.
Connecting the Speaker Wire to the Speakers
Now that you have prepared the speaker wire, it’s time to connect it to the speakers. This step is essential to ensure proper audio transmission and accurate sound reproduction. Here’s the process to connect the speaker wire to the speakers:
- Identify the Speaker Terminals: Look for the positive (+) and negative (-) terminals on the back of each speaker. Typically, the positive terminal is marked with a red label or a “+” symbol, while the negative terminal is marked with a black label or a “-” symbol. Ensure you are connecting the correct wire to each terminal.
- Insert the Bare Wire: Take the end of the speaker wire with the bare wire exposed and insert it into the corresponding terminal. If your speakers have binding posts, you may need to unscrew the binding post’s collar or push down on the spring-loaded terminal to reveal a small hole to insert the wire.
- Ensure a Secure Connection: Once the wire is inserted into the speaker terminal, tighten any existing screws or binding posts to ensure a secure connection. This will prevent the wire from coming loose and ensure optimal signal transmission.
- Repeat for Each Speaker: Repeat the process for each speaker in your setup, connecting the appropriate wire to the corresponding terminals. Double-check that all connections are secure and properly aligned.
As you connect the speaker wire to the speakers, be mindful of maintaining the correct polarity. The positive wire (+) should be connected to the respective positive terminal, and the negative wire (-) should be connected to the corresponding negative terminal. This ensures that the speakers produce sound accurately and in phase with each other.
Once you have connected the speaker wire to each speaker, you’re ready to move on to the next step: connecting the speaker wire to the amplifier or receiver.
Connecting the Speaker Wire to the Amplifier or Receiver
After connecting the speaker wire to the speakers, the next step is to connect the other end of the wire to the amplifier or receiver. This connection is vital for ensuring the audio signal is properly routed to the speakers. Here’s how to connect the speaker wire to the amplifier or receiver:
- Identify the Amplifier or Receiver Terminals: Locate the positive (+) and negative (-) terminals on the back of the amplifier or receiver. These terminals are usually labeled or color-coded to indicate the polarity. The positive terminal is typically red, and the negative terminal is generally black.
- Insert the Bare Wire: Take the end of the speaker wire with the bare wire exposed and insert it into the corresponding terminal on the amplifier or receiver. Similar to connecting the wire to the speakers, you may need to loosen a screw or open a spring-loaded terminal to insert the wire. Depending on your equipment, there may also be designated speaker output terminals for connecting multiple speakers.
- Tighten the Connections: Once the wire is inserted into the terminal, tighten any screws or binding posts to secure the connection. This will ensure a reliable and stable connection between the amplifier or receiver and the speaker wire.
- Repeat for Each Channel: If you have multiple channels or zones on your amplifier or receiver, repeat the process for each channel. In this case, you will have separate speaker wire connections for each set of speakers.
As you connect the speaker wire to the amplifier or receiver, double-check that the polarity is correct. The positive wire (+) should be connected to the positive terminal, and the negative wire (-) should be connected to the negative terminal.
Once you have completed the connections between the speaker wire and the amplifier or receiver, you are ready to move on to testing the connection and ensuring everything is working correctly.
Testing the Connection
After connecting the speaker wire to both the speakers and the amplifier or receiver, the next step is to test the connection to ensure everything is working properly. Testing the connection will help you identify any issues and allow you to address them before enjoying your audio system. Here’s how to test the connection:
- Power on the System: Ensure that the amplifier or receiver and the speakers are powered on.
- Set the Volume: Set the volume on the amplifier or receiver to a low level before proceeding with the test. This will prevent any sudden loud sounds that could potentially harm your speakers or your ears.
- Play Audio: Select a piece of audio content that you are familiar with, such as a song or a soundclip. Start playing the audio through the amplifier or receiver.
- Listen for Sound: As the audio plays, listen carefully to each speaker. Confirm that sound is coming from all speakers and that the sound is clear and balanced. Pay attention to any distortions, crackling, or buzzing sounds, which may indicate a wiring issue.
- Check Channel Configuration: If you have a multi-channel audio system, verify that the audio is being correctly distributed to each speaker. For example, if you have a 5.1 surround sound system, ensure that sounds intended for the center channel are coming from the center speaker, and so on.
- Adjust and Fine-tune: If necessary, make any adjustments to the audio settings on the amplifier or receiver to achieve the desired balance and sound quality. You may also need to reposition the speakers for optimal sound distribution.
If you encounter any issues during the testing process, double-check the speaker wire connections and ensure that they are secure and properly aligned. Additionally, inspect the amplifier or receiver settings to ensure they are correctly configured for your specific setup.
By testing the connection, you can ensure that the speakers are correctly receiving and reproducing the audio signal from the amplifier or receiver. With a successful test, you are ready to enjoy your audio system and experience high-quality sound.
Tips for Proper Speaker Wire Installation
Proper installation of speaker wire is essential for achieving optimal audio performance and ensuring a reliable and secure connection. Here are some helpful tips to keep in mind when installing speaker wire:
- Measure Twice, Cut Once: Take accurate measurements of the required wire length before cutting the wire. It’s always better to have slightly more wire than too little, as you can trim and adjust the length later if needed.
- Use Wire Labels or Markers: Labeling each end of the speaker wire can help you keep track of which wire connects to which speaker. This will make future troubleshooting or modifications easier.
- Route the Wire Safely: When running the wire through walls, ceilings, or floors, ensure it is safely secured and protected. Use conduit or cable raceways to protect the wire and prevent potential damage or hazards.
- Separate Power and Speaker Wires: To reduce the chances of interference and signal degradation, avoid running speaker wires parallel to power cables. If they have to cross paths, do so at perpendicular angles to minimize electromagnetic interference.
- Secure Connections Properly: Ensure that the wire is securely fastened to the speaker terminals and the amplifier or receiver terminals. Loose connections can cause signal loss, distortion, or complete loss of audio output.
- Test Connections Before Finalizing: Before completing the installation, it’s recommended to test the audio system to confirm that all connections are working correctly. This will save time and effort in case any adjustments or corrections are needed.
- Consider Cable Management: To keep the installation tidy and organized, use cable management solutions like cable clips, ties, or cable sleeves. This will help prevent tangling and make future maintenance or upgrades easier.
- Inspect Wire Ends Before Connecting: Before inserting the wire into the speaker or amplifier terminals, ensure that the bare wire ends are clean and free from frayed strands. Trim and re-strip the wire if necessary to ensure a solid connection.
Following these tips will help ensure a smooth and successful speaker wire installation. By paying attention to the details and taking precautions, you can avoid potential issues and enjoy the best possible audio experience from your speakers.