
Choosing the Right Router for Your Internet Connection
When it comes to connecting your router to the internet, choosing the right device is crucial for a seamless and reliable connection. With a wide variety of routers available on the market, it’s important to consider certain factors to ensure that you select the best one for your internet connection needs.
Firstly, you should take into account the speed and range requirements of your internet service provider (ISP). Different routers have different capabilities, so you need to make sure the router you choose can handle the maximum speed provided by your ISP. Additionally, if you have a large home or office space, you’ll want a router that can provide sufficient coverage to avoid dead zones.
Next, consider the number of devices that will be connected to the router. If you have a busy household with multiple users and devices, opt for a router with dual-band or tri-band capabilities. These routers can handle higher traffic and distribute the data more efficiently, ensuring a smooth internet experience for all users.
Another important consideration is the security features offered by the router. It’s essential to choose a router with strong built-in security protocols, such as Wi-Fi Protected Access (WPA2) encryption, to safeguard your network from unauthorized access. Additionally, features like firewall protection and parental controls can provide an extra layer of security and control over your internet usage.
Furthermore, look out for advanced features that may enhance your internet experience. Features such as Quality of Service (QoS) can prioritize certain types of internet traffic, ensuring that bandwidth-intensive activities like streaming and online gaming receive optimal performance. Additionally, routers with USB ports allow you to connect external storage devices or printers, adding convenience to your network setup.
Lastly, consider the overall user experience and ease of setup. Look for a router with an intuitive web interface that allows you to easily configure and customize your network settings. User-friendly documentation and customer support can also be beneficial, especially for those who may not be as tech-savvy.
By carefully considering these factors when choosing your router, you can ensure a reliable and efficient connection to the internet. Take your time to research and compare different models before making your final decision. Remember, investing in a quality router will ultimately enhance your internet experience and provide a strong foundation for all your online activities.
Gather the Necessary Equipment
Before you can connect your router to the internet, it’s important to gather all the necessary equipment to ensure a smooth and hassle-free setup process. Here are the essential items you’ll need:
1. Router: Of course, the central piece of equipment is the router itself. Ensure that you have a compatible and functioning router that meets the requirements of your internet connection.
2. Modem: In most cases, you’ll need to connect your router to a modem to establish an internet connection. If you don’t already have a modem, check if your internet service provider offers one, or purchase a modem that is compatible with your internet plan.
3. Ethernet Cables: You’ll need ethernet cables to connect your router and modem, as well as to connect your devices to the router. Make sure you have enough cables of appropriate length to properly connect and configure your network.
4. Power Adapters: Both the router and modem will require power, so ensure that you have the necessary power adapters or cords. Check that they are in good condition and able to supply power to the devices.
5. Computer or Mobile Device: You’ll need a computer or mobile device to access the router’s web interface for initial setup and configuration. Ensure that your device is connected to the internet (if using a mobile device, it can be connected via cellular data).
6. Documentation: Keep any documentation or manuals that came with your router and modem handy. They may contain important information and instructions for setup and troubleshooting.
Take the time to gather all these items before you begin the setup process. This will help prevent any unnecessary delays and ensure that you have everything you need to successfully connect your router to the internet.
Connecting the Router to a Modem
Once you have gathered all the necessary equipment, the next step is to connect your router to a modem to establish an internet connection. Follow these steps to ensure a proper connection:
1. Power off: Start by powering off your modem and router, if they are already turned on. This will ensure a clean start and avoid any potential connection issues.
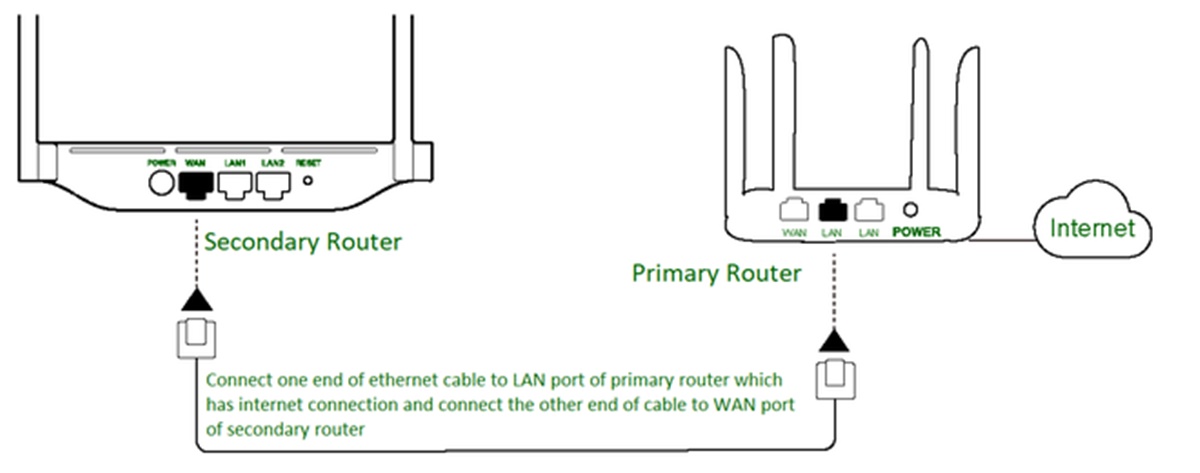
2. Locate the WAN port: On the back of your router, locate the WAN or Internet port. It is usually labeled and distinguished from the other ports on the router.
3. Connect the modem: Take an Ethernet cable and connect one end to the modem’s Ethernet port. Then, connect the other end of the cable to the WAN port on your router. Ensure the connection is secure on both ends.
4. Power on: Now, power on your modem and wait for it to establish a connection with your internet service provider. This process may take a few minutes, so be patient.
5. Power on the router: Once the modem is connected and online, you can proceed to power on your router and wait for it to initialize. The router should automatically detect the connection from the modem.
6. Check the connection status: Once both the modem and router are powered on and connected, check the connection status. This can usually be done by looking at the LED lights on the front panel of both devices. The lights should indicate a successful connection.
7. Test the connection: To ensure that your router is properly connected to the modem and receiving an internet signal, try connecting a device (such as a computer or smartphone) to your router’s Wi-Fi network or using an Ethernet cable. Open a web browser and try accessing a website to verify that you have a working internet connection.
By following these steps, you should be able to successfully connect your router to a modem and establish an internet connection. If you encounter any issues, refer to the documentation that came with your router and modem, or reach out to the customer support of your internet service provider for assistance.
Setting Up the Router Through Web Browser
Once your router is connected to the modem and you have established an internet connection, the next step is to set up the router through a web browser. The router’s web interface allows you to configure various settings and customize your network according to your preferences. Follow these steps to set up your router:
1. Open a web browser: On a computer or a mobile device connected to the router’s network, open a web browser (such as Google Chrome, Mozilla Firefox, or Safari).
2. Enter the router’s IP address: In the address bar of the web browser, type in the IP address of your router. The IP address is typically printed on the router or mentioned in the documentation that came with it. Common router IP addresses include 192.168.0.1 or 192.168.1.1. Press Enter to proceed.
3. Enter login credentials: You will be prompted to enter login credentials to access the router’s web interface. This may include a username and password. If you haven’t changed these credentials, consult the documentation or the manufacturer’s website for the default login details.
4. Navigate the web interface: Once logged in, you will have access to the router’s settings and configuration options. The web interface may have different sections and menus, depending on the make and model of your router. Explore the options and customize the settings as desired.
5. Configure wireless settings: If you want to enable Wi-Fi connectivity, navigate to the wireless settings section. Here, you can set a network name (SSID) for your Wi-Fi network and choose a strong password for improved security. You may also have options to configure the Wi-Fi channel, signal strength, and other advanced settings.
6. Save and apply changes: After making any desired changes to the router settings, be sure to save the changes and apply them. This will ensure that the new settings take effect and are applied to your network.
7. Test the connection: Once the router settings are configured, it’s a good idea to test the connection by connecting devices to the Wi-Fi network or using Ethernet cables. Ensure that you have internet access and that the network is functioning properly.
By following these steps, you can easily set up your router through a web browser and customize the settings to fit your specific needs. Remember to periodically check the router’s web interface to make any necessary adjustments or updates. The web interface offers a convenient way to manage and maintain your router and network configuration.
Configuring Basic Settings for the Router
After setting up your router through the web browser, the next step is to configure the basic settings. These settings will ensure the optimal performance and security of your network. Follow these steps to configure the basic settings for your router:
1. Change the router’s default password: One of the first and most important steps is to change the default password for your router. This will help protect your network from unauthorized access. Navigate to the settings menu in the router’s web interface and look for the option to change the password. Choose a strong and unique password that combines letters, numbers, and special characters.
2. Update the firmware: It is essential to keep your router’s firmware up to date to ensure stability and security. Check the manufacturer’s website for any available firmware updates for your specific router model. Follow the instructions provided to download and install the latest firmware version.
3. Set the time and date: In the router’s settings, look for the option to set the time and date. It is important to have accurate time and date information for certain network features and security protocols to function properly.
4. Configure network name (SSID): The network name, also known as the SSID (Service Set Identifier), is the name that will be displayed when people search for available Wi-Fi networks. Choose a unique and easily identifiable name for your network. Avoid using personal information that could identify you or your location.
5. Enable network encryption: To secure your network, it is recommended to enable network encryption. Look for the Wi-Fi security settings in the router’s web interface and select WPA2 (Wi-Fi Protected Access 2) as the encryption type. This is currently the most secure option available.
6. Set up DHCP: The DHCP (Dynamic Host Configuration Protocol) allows your router to automatically assign IP addresses to devices on your network. In most cases, DHCP is enabled by default. However, you can double-check the settings to ensure that it is properly configured.
7. Adjust DNS settings: DNS (Domain Name System) translates domain names into IP addresses. By default, your router may use the DNS settings provided by your internet service provider. You can consider changing these settings to a public DNS service like Google DNS or OpenDNS for improved performance and security.
It’s important to remember that these basic settings are just the starting point. Depending on your specific network requirements, you may need to explore and configure additional settings within your router’s web interface. Regularly review and update these settings as needed to keep your network running smoothly and securely.
Enabling Wireless Connectivity
Once you have set up the basic settings for your router, the next step is to enable wireless connectivity. This will allow you to connect your devices to the internet without the need for wired connections. Follow these steps to enable wireless connectivity on your router:
1. Access the wireless settings: Open the router’s web interface using a web browser and navigate to the wireless settings section. This may be labeled as “Wi-Fi” or “Wireless Settings.”
2. Enable the wireless network: Look for an option to enable the wireless network. This is usually a toggle switch or checkbox that allows you to turn on or off the Wi-Fi functionality of the router. Ensure that the wireless network is enabled.
3. Set the network name (SSID): Set a unique and easily recognizable network name, also known as the SSID (Service Set Identifier). This is the name that will be displayed when devices search for available Wi-Fi networks. Avoid using personal information in the SSID and opt for a name that is not easily guessable to enhance security.
4. Choose a wireless channel: Your router may automatically select a channel for its wireless network, or you may have the option to choose a specific channel. In crowded areas with multiple wireless networks, changing the channel may reduce interference and improve signal strength. Experiment with different channels and monitor the performance to find the optimal setting.
5. Select wireless security options: It is crucial to enable wireless security to protect your network from unauthorized access. WPA2 (Wi-Fi Protected Access 2) is the recommended security protocol. Set a strong and unique password for your wireless network, combining letters, numbers, and special characters. This will prevent unauthorized users from accessing your Wi-Fi.
6. Configure additional wireless settings: Explore the advanced wireless settings options in your router’s web interface. These settings may include options such as wireless mode (2.4GHz or 5GHz) and transmission power. Adjust these settings based on your specific needs and the capabilities of your devices.
7. Connect devices to the wireless network: Now that your wireless network is enabled and configured, proceed to connect your devices. On your computer or mobile device, search for available Wi-Fi networks, and select your network from the list. Enter the password you set in the previous step, and your device will establish a connection to the wireless network.
By following these steps, you will be able to enable wireless connectivity on your router and connect your devices to the wireless network. Remember to periodically review and update your wireless settings to ensure a secure and reliable Wi-Fi experience.
Securing Your Router and Network
Ensuring the security of your router and network is essential to protect your personal information and prevent unauthorized access. Here are some crucial steps you can take to secure your router and network:
1. Change default login credentials: The first step in securing your router is to change the default login credentials. This includes the username and password used to access the router’s web interface. Use a strong and unique password that is not easily guessable.
2. Update router firmware: Keeping your router’s firmware up to date is vital for security. Regularly check for firmware updates on the manufacturer’s website and install the latest version. Updated firmware often includes security patches and enhancements.
3. Enable a strong firewall: Ensure that the router’s firewall is enabled to protect your network from external threats. The firewall acts as a barrier between your network and the internet, filtering out potentially harmful traffic.
4. Disable remote management: Remote management allows access to your router’s settings from outside your network. Disable this feature unless you specifically need it, as it can potentially leave your network vulnerable to unauthorized access.
5. Secure your wireless network: Enable WPA2 (Wi-Fi Protected Access 2) encryption for your wireless network. This encryption method provides a higher level of security compared to older standards. Additionally, use a strong and unique password for your Wi-Fi network to prevent unauthorized access.
6. Change the network name (SSID): Avoid using personal information or easily identifiable details in your network name (SSID). Choose a unique and generic name to enhance privacy and security.
7. Disable guest network if not in use: If your router offers a guest network feature, disable it if you do not need it. Guest networks allow visitors to access the internet without accessing your main network. However, keeping it enabled can potentially introduce security vulnerabilities.
8. Use MAC address filtering: MAC address filtering allows you to specify which devices can connect to your network based on their unique MAC addresses. Enable this feature and add the MAC addresses of your trusted devices to enhance network security.
9. Regularly change passwords: It’s good practice to change your router’s login credentials and Wi-Fi password regularly. This helps prevent any unauthorized access that may have occurred if your passwords were compromised.
10. Disable unused network services: Review the services enabled on your router and disable any that you do not use. Additional services may introduce potential security risks, so it’s best to disable them if they are not necessary.
By following these steps and implementing strong security measures, you can significantly enhance the security of your router and network. Regularly review and update your security settings to stay protected against emerging threats.
Troubleshooting Common Connection Issues
Experiencing connection issues with your router can be frustrating, but there are several common problems you can easily troubleshoot. Here are some steps you can take to address and resolve common connection issues:
1. Restart your router: The first and simplest step is to restart your router. Power it off, wait for a few seconds, and then power it back on. This can often resolve temporary connectivity issues.
2. Check connections: Ensure that all the cables connecting your router to the modem, power source, and devices are securely plugged in. Loose or damaged cables can cause disruptions in connection.
3. Reset modem: If restarting the router doesn’t solve the issue, try resetting your modem. Locate the reset button on the modem and use a paperclip or a small tool to press and hold it for a few seconds. Wait for the modem to restart and establish a connection.
4. Check for firmware updates: Check if there are any firmware updates available for your router. Outdated firmware can cause connectivity issues. Visit the manufacturer’s website for instructions on how to update the firmware.
5. Check signal strength: If you are experiencing weak or intermittent Wi-Fi signals, try moving closer to the router or repositioning it to improve the signal strength. Remove any physical obstacles that may be blocking the signal.
6. Verify Wi-Fi settings: Ensure that your devices are connected to the correct Wi-Fi network and that the network password is entered correctly. Also, check if the Wi-Fi network is visible and not hidden.
7. Scan for interference: Other electronic devices, such as cordless phones, microwave ovens, and baby monitors, can interfere with the Wi-Fi signal. Keep your router away from these devices and try changing the channel or frequency your router operates on to minimize interference.
8. Update network drivers: If you are facing connection issues on a specific device, try updating the network drivers. Visit the manufacturer’s website for the device and download the latest drivers for the network adapter.
9. Check ISP status: Sometimes, the issue may lie with your internet service provider (ISP). Visit their website or contact their customer support to see if there are any known issues in your area.
10. Factory reset: If all else fails, you can perform a factory reset on your router. This will reset all settings to default and may help resolve persistent connection problems. Refer to your router’s documentation for instructions on how to perform a factory reset.
By following these troubleshooting steps, you can often resolve common connection issues with your router. If the problem persists, it may be necessary to contact your ISP or the manufacturer for further assistance.