
Why Clearing Your Search Bar History Is Important
Many of us use search engines on a daily basis to find information, discover new websites, or simply satisfy our curiosity. Every time we use a search engine, our queries and browsing history are recorded and stored in our search bar history. While this feature can be convenient for quickly accessing previous searches, it can also pose a potential risk to our privacy and security.
One of the main reasons why it’s important to clear your search bar history is to protect your privacy. Your search history contains a wealth of personal information, including your interests, preferences, and sometimes even sensitive data. It’s no secret that online privacy has become a growing concern in recent years, with the increasing number of data breaches and unauthorized access to personal information. By regularly clearing your search bar history, you reduce the chances of this sensitive data falling into the wrong hands.
Clearing your search bar history also helps to maintain a clutter-free browsing experience. Over time, the list of previous searches stored in your search bar can become long and cumbersome, making it difficult to find recent or relevant queries. By removing this history, you can ensure that your search bar remains clean and organized, allowing for quicker and more efficient searches.
Another important reason to clear your search bar history is to protect yourself from targeted ads. Search engines and websites often use your search history to tailor advertisements based on your interests and browsing habits. While this can result in more relevant ads, it can also feel intrusive and like a breach of privacy. By regularly clearing your search bar history, you prevent search engines from using this data to customize ads and maintain a sense of privacy while browsing the internet.
Furthermore, clearing your search bar history can help to prevent accidental or unauthorized access to your browsing activity. If you share your device with others or use a public computer, clearing your search history is essential to ensure that others cannot view or track your online activities. By taking this precaution, you can protect sensitive information and maintain your digital privacy.
Steps to Clear Your Search Bar History on Google Chrome
Clearing your search bar history on Google Chrome is a simple and straightforward process. By following these steps, you can ensure that your browsing activity remains private. Here’s how:
- Open Google Chrome: Launch the Google Chrome browser on your computer or mobile device. Ensure that you are using the latest version for the best user experience.
- Access the Settings menu: Click on the three-dot menu icon in the top right corner of the browser window. This will open a drop-down menu.
- Select “History”: From the drop-down menu, hover over the “History” option and click on it. This will open a new tab displaying your browsing history.
- Clear browsing data: On the left side of the page, you will see a panel with different options. Click on the “Clear browsing data” button to proceed.
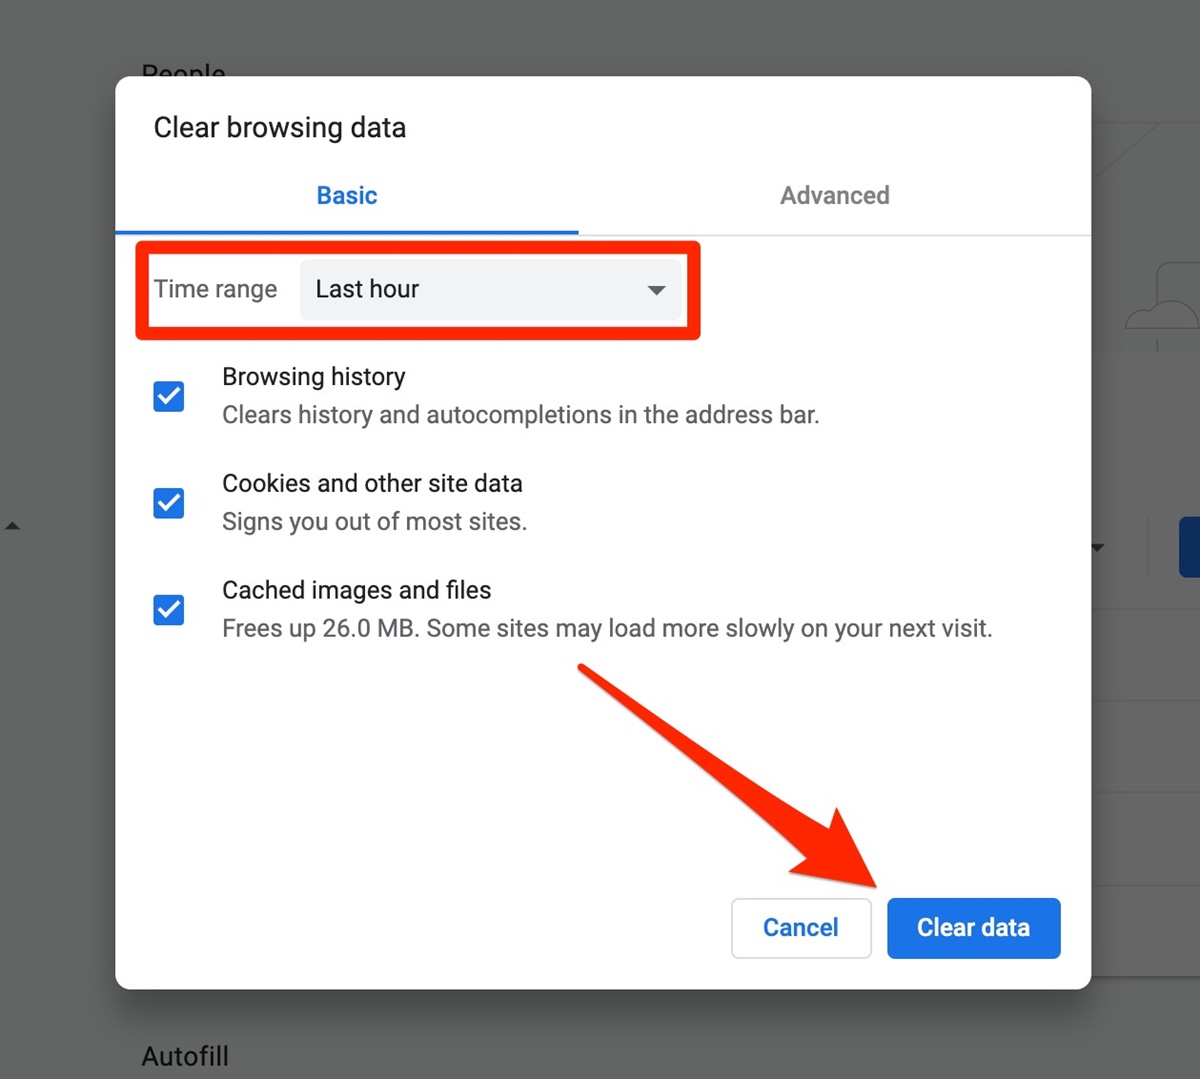
- Select the time range: A dialog box will appear, giving you the option to choose the time range for which you want to delete your search bar history. You can select “Last hour,” “Last 24 hours,” “Last 7 days,” “Last 4 weeks,” or “All time.” Choose the desired time range.
- Choose what to delete: Check the box next to “Browsing history” to indicate that you want to delete your search bar history. You can also select additional items, such as cached images and files or cookies, if desired.
- Click “Clear data”: Once you have selected the time range and items to delete, click on the “Clear data” button. Google Chrome will then proceed to delete your search bar history.
- Confirmation: After the process is complete, you will see a confirmation message at the top of the page. Your search bar history has now been cleared.
By regularly clearing your search bar history on Google Chrome, you can maintain your privacy and ensure that your browsing activity remains confidential. Remember to perform this task periodically to keep your search history clear and protect your personal information.
Steps to Clear Your Search Bar History on Mozilla Firefox
Clearing your search bar history on Mozilla Firefox is a simple process that can help protect your privacy. Follow these steps to clear your search bar history in Firefox:
- Open Firefox: Launch the Mozilla Firefox browser on your computer. Ensure that you are using the latest version to access all the latest features and security updates.
- Access the History menu: Click on the three horizontal lines in the top right corner of the browser window to open the Firefox menu. From the drop-down menu, select “Library” and then click on “History”.
- Choose “Clear Recent History”: In the Library window, click on “Clear Recent History” option. This will open a new window where you can customize the history deletion settings.
- Select the time range: In the “Time range to clear” drop-down menu, choose the desired time range for which you want to clear your search bar history. You can select “Everything,” “Last Hour,” “Last Two Hours,” “Last Four Hours,” “Today,” or “Custom”.
- Choose what to delete: Check the box next to “Browsing & Download History” to indicate that you want to delete your search bar history. You may also select additional items, such as cookies or cache, if desired.
- Click “Clear Now”: Once you have selected the time range and items to delete, click on the “Clear Now” button. Firefox will then proceed to clear your search bar history.
- Confirmation: Once the process is complete, you will see a notification at the bottom of the window indicating that your search bar history has been cleared.
By regularly clearing your search bar history on Mozilla Firefox, you can protect your privacy and keep your browsing activity confidential. Remember to perform this task periodically to ensure that your search history remains clear.
Steps to Clear Your Search Bar History on Safari
If you use Safari as your primary web browser, it’s essential to know how to clear your search bar history to maintain your privacy. Here are the steps to clear your search bar history on Safari:
- Open Safari: Launch the Safari browser on your Mac computer or iOS device. Ensure that you are using the latest version to access all the latest features and security updates.
- Access the History menu: In the top menu bar, click on “History” to open the History drop-down menu.
- Select “Clear History…”: From the History drop-down menu, hover over the “Clear History” option and click on it. This will open a dialog box where you can customize the history deletion settings.
- Choose the time range: In the “Clear” drop-down menu, you can select the time range for which you want to clear your search bar history. You can choose to clear your history from the past hour, today, today and yesterday, or all history.
- Select what to delete: Below the time range options, you can choose the specific data you want to delete. Ensure that the “Browsing history” option is selected to clear your search bar history. You may also choose to delete cookies and website data or remove download history.
- Click “Clear History”: Once you have selected the time range and data to delete, click on the “Clear History” button. Safari will then proceed to clear your search bar history and other selected data.
- Confirmation: After the process is complete, you will see a confirmation message confirming that your search bar history has been cleared.
Clearing your search bar history on Safari helps protect your privacy and ensures that your browsing activities remain confidential. It’s a good practice to perform this task periodically to keep your search history clear.
Steps to Clear Your Search Bar History on Microsoft Edge
If you use Microsoft Edge as your web browser, it’s important to regularly clear your search bar history to maintain your privacy. Follow these steps to clear your search bar history on Microsoft Edge:
- Open Microsoft Edge: Launch the Microsoft Edge browser on your computer. Make sure that you are using the latest version to access all the latest features and security updates.
- Access the Settings menu: Click on the three-dot menu icon in the top right corner of the browser window. This will open a drop-down menu.
- Select “Settings”: From the drop-down menu, click on “Settings”. This will open the Edge Settings page.
- Clear browsing data: Scroll down the Settings page and find the “Privacy, search, and services” section. Under this section, click on the “Choose what to clear” button.
- Select the time range: In the “Time range” drop-down menu, choose the desired time range for which you want to clear your search bar history. You can select “Last hour”, “Last 24 hours”, “Last 7 days”, “Last 4 weeks”, or “All time”.
- Choose what to delete: Check the box next to “Browsing history” to indicate that you want to delete your search bar history. You can also select additional items, such as cookies and saved website data or cached data and files, if desired.
- Click “Clear”: Once you have selected the time range and items to delete, click on the “Clear” button. Microsoft Edge will then proceed to clear your search bar history.
- Confirmation: After the process is complete, you will see a confirmation message at the top of the page. Your search bar history has now been cleared.
By regularly clearing your search bar history on Microsoft Edge, you can protect your privacy and maintain the confidentiality of your browsing activity. Make sure to perform this task periodically to keep your search history clear and secure.
Steps to Clear Your Search Bar History on Opera
Clearing your search bar history on Opera is a simple process that helps protect your privacy and keep your browsing activity confidential. Follow these steps to clear your search bar history on Opera:
- Open Opera: Launch the Opera browser on your computer. Make sure you have the latest version installed to access all the latest features and security updates.
- Access the Opera menu: Click on the “Menu” button located at the top left corner of the browser window. This will open a drop-down menu.
- Select “History”: From the drop-down menu, hover over the “History” option and click on it. This will open a new tab displaying your browsing history.
- Clear browsing data: In the browsing history tab, you will see a sidebar on the left side. Click on the “Clear browsing data…” button located at the bottom-left corner of the sidebar.
- Select the time range: A dialog box will appear, giving you the option to choose the time range for which you want to clear your search bar history. You can select “Last hour,” “Last 24 hours,” “Last 7 days,” “Last 4 weeks,” or “All time.” Choose the desired time range.
- Choose what to delete: Check the box next to “Browsing history” to indicate that you want to delete your search bar history. You can also select additional items, such as cookies or cached images and files, if desired.
- Click “Clear data”: Once you have selected the time range and items to delete, click on the “Clear data” button. Opera will then proceed to clear your search bar history.
- Confirmation: After the process is complete, you will see a confirmation message at the top of the page. Your search bar history has now been cleared.
By regularly clearing your search bar history on Opera, you can maintain your privacy and ensure that your browsing activity remains confidential. Perform this task periodically to keep your search history clear and secure.
Steps to Clear Your Search Bar History on Internet Explorer
Clearing your search bar history on Internet Explorer can help protect your privacy and keep your browsing activity confidential. Follow these steps to clear your search bar history on Internet Explorer:
- Open Internet Explorer: Launch the Internet Explorer browser on your computer. Ensure that you are using the latest version to access all the latest features and security updates.
- Access the Tools menu: Click on the gear icon located at the top right corner of the browser window. This will open a drop-down menu.
- Select “Safety”: From the drop-down menu, hover over the “Safety” option and click on it. This will open a submenu.
- Choose “Delete Browsing History”: From the “Safety” submenu, click on the “Delete Browsing History” option. This will open a dialog box with different options for deleting your browsing history.
- Select what to delete: In the “Delete Browsing History” dialog box, you can choose what items you want to delete. Make sure that the “History” checkbox is selected to clear your search bar history. You can also choose to delete other items such as cookies or temporary internet files, if desired.
- Click “Delete”: Once you have selected the items to delete, click on the “Delete” button. Internet Explorer will then proceed to clear your search bar history.
- Confirmation: After the process is complete, you will see a confirmation message indicating that your search bar history has been cleared.
By regularly clearing your search bar history on Internet Explorer, you can protect your privacy and maintain the confidentiality of your browsing activity. Make sure to perform this task periodically to keep your search history clear and secure.
Steps to Clear Your Search Bar History on Android
If you use an Android device, it’s important to know how to clear your search bar history to maintain your privacy. Follow these steps to clear your search bar history on Android:
- Open Google Chrome: Open the Google Chrome app on your Android device.
- Access the Menu: Tap on the three-dot menu icon in the top right corner of the browser window. This will open a drop-down menu.
- Select “History”: From the drop-down menu, tap on “History”. This will open a new tab displaying your browsing history.
- Clear browsing data: Tap on the “Clear browsing data” option at the bottom of the screen.
- Select the time range: In the “Time range” section, choose the desired time range for which you want to clear your search bar history. You can select “Last hour,” “Last 24 hours,” “Last 7 days,” “Last 4 weeks,” or “All time.”
- Choose what to delete: Select the types of data you want to delete. Make sure to check the box next to “Browsing history” to clear your search bar history. You can also choose to delete other items like cookies, cached images, and files.
- Tap “Clear data”: Once you have selected the time range and items to delete, tap on the “Clear data” button at the bottom of the screen. Google Chrome will then proceed to clear your search bar history.
- Confirmation: After the process is complete, you’ll see a confirmation message at the bottom of the screen. Your search bar history has now been cleared.
By regularly clearing your search bar history on Android, you can protect your privacy and ensure that your browsing activity remains confidential. Remember to perform this task periodically to keep your search history clear and secure.
Steps to Clear Your Search Bar History on iOS
If you use an iOS device, it’s important to know how to clear your search bar history to maintain your privacy. Follow these steps to clear your search bar history on iOS:
- Open Safari: Open the Safari browser app on your iOS device.
- Access the Settings: Tap on the “Settings” app on your home screen to access the device settings.
- Scroll down and tap “Safari”: Scroll down the settings menu and tap on the “Safari” option.
- Tap “Clear History and Website Data”: In the Safari settings, tap on the “Clear History and Website Data” option.
- Confirm: A confirmation dialog will appear asking if you want to clear your browsing history and other website data. Tap on “Clear History and Data” to proceed.
- Enter your Passcode (if required): If your device has a passcode enabled, you may need to enter it to confirm the action.
- Confirmation: After the process is complete, you’ll be returned to the Safari settings page. Your search bar history has now been cleared.
By regularly clearing your search bar history on iOS, you can protect your privacy and ensure that your browsing activity remains confidential. Remember to perform this task periodically to keep your search history clear and secure.
Steps to Clear Your Search Bar History on Bing
Clearing your search bar history on Bing can help protect your privacy and ensure that your browsing activity remains confidential. Follow these steps to clear your search bar history on Bing:
- Open Bing: Launch your preferred web browser and go to the Bing search engine website.
- Click on the Menu icon: Look for the three horizontal lines (also known as the “hamburger” icon) located in the top right corner of the Bing homepage. Click on it to open the menu.
- Access Settings: From the drop-down menu, select “Settings” to open the Bing settings page.
- Click on “Search history”: In the Bing settings page, find the “Search history” section. Click on the “Search history” link to manage your search history settings.
- Clear search history: On the search history settings page, you will see options to clear your search history. Click on the “Clear” button or link to remove your search bar history.
- Confirmation: After you have successfully cleared your search bar history, you may see a confirmation message indicating that your search history has been cleared.
By regularly clearing your search bar history on Bing, you can maintain your privacy and ensure that your browsing activity remains confidential. Remember to perform this task periodically to keep your search history clear and secure.
How Often Should You Clear Your Search Bar History?
The frequency at which you should clear your search bar history depends on your personal preferences and privacy concerns. However, it is generally recommended to clear your search bar history on a regular basis to maintain your privacy and keep your browsing activity confidential.
For individuals who prioritize their privacy and want to minimize the collection of their browsing data, clearing the search bar history once a week or every few weeks is a good practice. This ensures that your search history does not accumulate over time, reducing the amount of data that search engines and websites can gather about your online activities.
If you use a shared device or regularly access the internet from public computers, it is important to clear your search bar history after each use. This helps protect your sensitive information from being accessed or viewed by others who may use the device after you.
Additionally, it is a good idea to clear your search bar history before performing any sensitive or private searches. This includes searches related to personal finance, medical information, or any other topics you wish to keep confidential. Clearing your search bar history before these searches ensures that your search queries are not stored and can’t be linked back to you.
Remember that clearing your search bar history is just one aspect of maintaining your privacy online. It is also important to use other privacy-enhancing measures, such as using private browsing modes, disabling tracking cookies, and using virtual private networks (VPNs) when necessary.
Ultimately, the decision of how often to clear your search bar history depends on your comfort level and the level of privacy you desire. By regularly clearing your search bar history, you can better protect your privacy and ensure that your browsing activity remains confidential.
The Benefits of Clearing Your Search Bar History
Clearing your search bar history can bring several benefits to your online browsing experience. Here are some of the key advantages:
Protecting Your Privacy: One of the primary benefits of clearing your search bar history is enhanced privacy. By regularly clearing your history, you minimize the chances of your search queries and browsing behavior being tracked and associated with your identity. This helps protect your personal information and online activities from being monitored or used without your consent.
Maintaining Confidentiality: Clearing your search bar history ensures that your past searches aren’t readily accessible to others. Whether it’s preventing family members, friends, or coworkers from stumbling upon your sensitive search queries or thwarting unauthorized access to your browsing activity on a shared or public device, clearing your history helps maintain the confidentiality of your online behavior.
Reducing Targeted Advertising: Search engines and websites often use your search history to strategically tailor advertisements based on your preferences and interests. By clearing your search bar history, you can interrupt this data-driven advertising process and limit the personalized ads you encounter during your browsing sessions.
Enhancing Search Accuracy: Clearing your search bar history can help improve the accuracy and relevance of future search results. Search engines use past search queries to refine their algorithms and provide more targeted and customized results. By clearing your history, you allow search engines to present you with a more neutral and unbiased search experience.
Streamlining Browsing Performance: Over time, a long history list in your search bar can potentially slow down your browser’s performance. By regularly clearing your history, you can declutter your search bar and optimize search performance, ensuring a more efficient and faster browsing experience.
Securing Personal Information: Clearing your search bar history is particularly important if you have used your search bar to enter sensitive information, such as passwords, credit card numbers, or personal details. By clearing your history, you minimize the risk of this sensitive information being inadvertently exposed or accessed by unauthorized individuals.
Overall, regularly clearing your search bar history brings numerous benefits, including improved privacy, enhanced confidentiality, reduced targeted advertising, more accurate search results, streamlined browsing performance, and better security for your personal information. By incorporating this practice into your online routine, you can have greater control over your digital footprint and enjoy a safer and more private browsing experience.
How to Avoid Having Your Search Bar History Stored
If you want to prevent your search bar history from being stored, there are several steps you can take to enhance your privacy and browsing security:
Use Private Browsing: Most modern web browsers offer a private browsing mode, often referred to as “Incognito Mode” or “Private Browsing.” Enable this mode when you want to browse the internet without your search bar history being recorded. Private browsing sessions do not store your search history, browsing data, or cookies, providing a temporary and more private browsing experience.
Clear Cache and Cookies: Regularly clearing your browser’s cache and cookies can help prevent the storage of your search bar history. Cookies are small files stored by websites on your device to remember your preferences and track your activity. Clearing your cache and cookies removes any stored data, including your search history, ensuring a fresh start with regard to your browsing behavior.
Disable Search History: Many search engines, including Google, offer the option to disable the saving of your search history. By accessing the settings of your preferred search engine, you can choose to disable the feature that records your search bar history. Keep in mind that disabling search history may limit certain personalized features or suggestions that the search engine provides.
Regularly Clear Your Search Bar History: As mentioned earlier, regularly clearing your search bar history is an effective way to prevent it from being stored. Follow the steps provided for your specific web browser or search engine to clear your search history on a routine basis, ensuring that your past searches are promptly removed.
Use a VPN or Proxy: Virtual Private Networks (VPNs) and proxies can help protect your online privacy and prevent your search bar history from being stored. These tools create a secure and encrypted connection between your device and the internet, hiding your IP address and routing your internet traffic through a different server. This helps anonymize your browsing activities and prevents your search history from being linked back to you.
Use Alternative Search Engines: If you are concerned about your search bar history being stored, you might consider using alternative search engines that prioritize user privacy and do not track your search queries. Some examples of privacy-focused search engines include DuckDuckGo and Startpage, which do not store your search history or use your data for targeted advertising.
By implementing these measures, you can proactively avoid having your search bar history stored and protect your privacy while browsing the web. Remember, however, that no method can provide absolute privacy, so it’s important to stay informed about the latest privacy practices and regularly review and update your privacy settings.