
Why Check Computer Specs?
Checking your computer’s specifications is essential for several reasons. Whether you’re a tech enthusiast, a gamer, or someone who wants to ensure your system meets the requirements for specific software, knowing your computer specs is vital. Here are a few reasons why checking your computer specs is important:
- Performance Optimization: Understanding your computer’s specs helps you gauge its performance capabilities. By knowing the processor, RAM, and graphics card details, you can determine if your computer meets the requirements of resource-intensive tasks like gaming, video editing, or running complex software.
- Compatibility: Checking computer specs is crucial when installing new hardware or software. If you want to upgrade your RAM, add a new graphics card, or install the latest software, knowing your hardware specifications will ensure compatibility and prevent any potential issues.
- Troubleshooting: When encountering computer issues, knowing your computer specs can be beneficial in diagnosing and resolving problems. In case of software conflicts or driver issues, having accurate specifications can help support technicians assist you more effectively.
- Upgrades: If you’re considering upgrading your computer, checking the current specs is the first step. Knowing the existing hardware configuration will aid in determining which components can be upgraded and what needs to be replaced to achieve better performance.
- System Requirements: Many software applications, especially games and resource-intensive software, have minimum system requirements. Having knowledge of your computer specs enables you to verify whether your system meets these requirements before making a purchase.
- Evaluation and Comparison: By comparing your computer specs with those of other devices, you can evaluate its performance and determine if it’s time for an upgrade. It also allows you to compare your system’s capabilities with recommended specifications for various tasks.
- Resale Value: When selling or trading in your computer, having accurate knowledge of its specifications enhances its marketability and allows potential buyers to make informed decisions based on the capabilities of your system.
With these reasons in mind, it’s evident that checking your computer specs is not just a technical hassle but a necessity for optimizing performance, ensuring compatibility, troubleshooting, and making informed decisions about upgrades and software installations.
Method 1: Check through System Information
One of the easiest ways to check your computer’s specs is by using the built-in System Information tool. This method works on Windows operating systems and provides detailed information about your hardware and software configuration. Here’s how to do it:
- Press the Windows key on your keyboard to open the Start menu.
- Type “System Information” and click on the System Information desktop app that appears in the search results.
- Once the System Information window opens, you’ll see a comprehensive list of details about your computer’s hardware and software. The left-hand pane displays different categories such as System Summary, Hardware Resources, Components, and Software Environment.
- Browse through the different sections to find specific information about your computer’s processor, memory (RAM), storage devices, graphics card, and more.
- To view additional information about a specific component, select it in the left-hand pane, and the detailed information will appear in the right-hand pane.
System Information provides a wealth of information about your computer, making it a useful tool for checking and verifying your system specs. You can use this information to compare with minimum requirements for software installations or to troubleshoot any hardware-related issues.
It’s important to note that the System Information tool may have slight variations depending on the Windows version you are using. However, the general steps mentioned above should work for most Windows operating systems.
Method 2: Use Command Prompt or PowerShell
If you prefer using the command line interface, you can check your computer’s specs using Command Prompt or PowerShell on Windows. Here’s how:
- Open Command Prompt or PowerShell by searching for it in the Start menu or by pressing Windows key + X and selecting either option from the menu.
- Once the command line interface opens, type the following command and press Enter:
- systeminfo
- Wait for a few seconds while the system generates a comprehensive report that includes detailed information about your computer’s hardware and software.
- Scroll through the report to find information about the processor, memory (RAM), BIOS version, installed software, and more.
Using Command Prompt or PowerShell provides a quick way to access your computer’s specs without the need for graphical interfaces. The systeminfo command gathers the information directly from your system and presents it in a structured format.
This method is particularly useful when you need to retrieve your computer’s specs remotely or if you prefer the command line interface over other graphical tools.
It’s worth noting that the output from the systeminfo command can be quite extensive, so you may want to consider piping the output to a text file for easier examination. To do this, use the following command:
- systeminfo > specs.txt
This command saves the system information to a text file named “specs.txt” in the current directory.
Remember, using Command Prompt or PowerShell requires basic familiarity with commands and commands line interfaces. However, once you get the hang of it, these tools can provide a convenient way to check your computer’s specs.
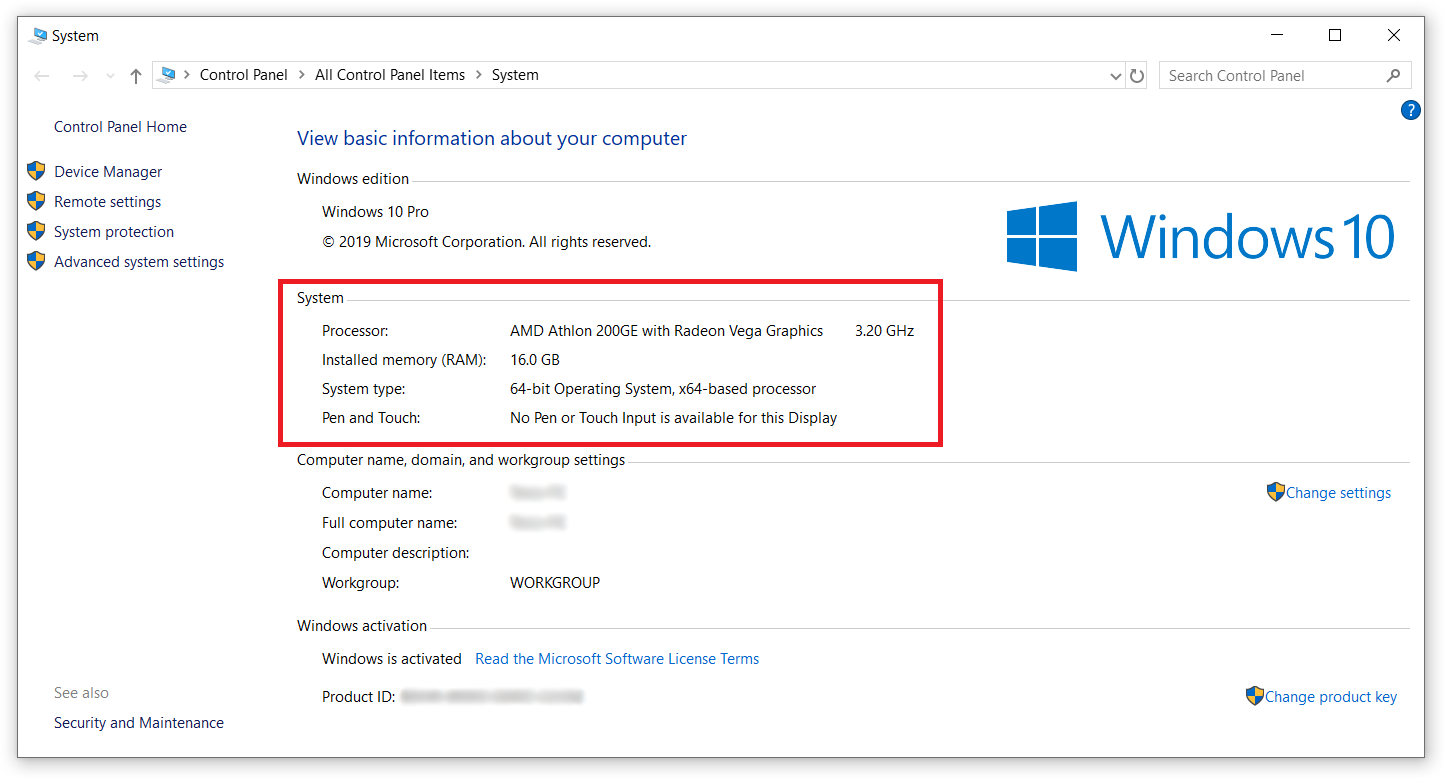
Method 3: Check through Control Panel
Another straightforward method to check your computer’s specs is through the Control Panel on Windows. This method provides a user-friendly graphical interface to access and view your system specifications. Here’s how:
- Click on the Start menu and select Control Panel.
- In the Control Panel window, click on the System and Security category.
- Next, click on System to open the System window, which displays basic information about your computer.
- In the System window, you’ll find details such as the operating system version, processor type, installed memory (RAM), and system type.
- For more detailed information about specific components, click on the Device Manager link on the left-hand side of the window.
- The Device Manager provides a categorized list of hardware components such as display adapters, network adapters, and sound devices. Expand each category to view the corresponding hardware details.
By accessing your computer’s specs through the Control Panel, you can easily gather important information about your system without the need for technical expertise. This method is especially useful if you prefer a more visual and intuitive approach.
Keep in mind that the Control Panel interface may vary slightly depending on the version of Windows you are using. However, the general steps provided above should work for most Windows operating systems.
Utilizing the Control Panel allows you to quickly access and review your system specifications, making it a convenient method for checking your computer’s specs.
Method 4: View Computer Specs on Windows 10
If you are using Windows 10, there is a dedicated settings section where you can easily view your computer’s specs. This method provides a direct and user-friendly way to access and verify your system specifications. Here’s how:
- Click on the Start menu and select the Settings gear icon to open the Settings app.
- In the Settings window, click on the System category.
- Within the System category, select the About option from the left-hand sidebar.
- Here, you will find detailed information about your Windows 10 system, including the device name, processor, installed RAM, system type, and more.
- Scroll down further to view additional specifications such as the device ID, product ID, and system firmware details.
The “About” section on Windows 10 provides a convenient and streamlined way to access and review your computer’s specs. This method eliminates the need to navigate through multiple menus or use third-party tools.
In addition to hardware specifications, the About section also provides information about your Windows edition and version, allowing you to easily confirm if you are up-to-date with the latest Windows updates.
Viewing computer specs on Windows 10 using the Settings app is a simple and efficient way to gather necessary information about your system.
Method 5: Check Specs on Mac
If you’re using a Mac computer, checking your system specifications is a straightforward process. Mac provides a built-in utility called “System Information” that allows you to view detailed information about your hardware and software configuration. Here’s how to check your specs on a Mac:
- Click on the Apple menu in the top-left corner of your screen.
- From the drop-down menu, select About This Mac.
- A window will appear displaying an overview of your Mac’s system information, including the macOS version, processor, memory (RAM), and graphics card.
- To view more detailed information, click on the System Report button.
- The System Report provides an expanded view of various hardware components, such as storage, network, display, and input devices.
By using the System Information utility on your Mac, you can quickly and easily access important specifications about your computer. This allows you to verify compatibility with software requirements, troubleshoot any hardware-related issues, or determine if your Mac meets the minimum specifications for certain tasks.
It’s important to note that the specifics of the System Information utility may vary depending on the macOS version you are using. However, the general steps outlined above should work for most recent versions of macOS.
Checking computer specs on a Mac is a breeze with the built-in System Information utility, providing you with the necessary information to make informed decisions and ensure optimal performance.
Method 6: Check Specs on Linux
When using a Linux-based operating system, you can easily check your computer’s specs using various built-in utilities and commands. Linux provides several ways to gather hardware and software information. Here are a few methods to check specs on Linux:
- Using the lshw Command: The lshw command is a powerful tool that provides detailed information about your hardware. Open the terminal and type “sudo lshw” followed by your password. This command will generate a comprehensive report displaying your system’s hardware details.
- Using the dmidecode Command: The dmidecode command provides useful information about your computer’s hardware components, including BIOS version, processor details, memory configuration, and more. Open the terminal and type “sudo dmidecode” to view the output.
- Using the neofetch Command: Neofetch is a command-line utility that displays system information in a user-friendly way. Install Neofetch if it is not already installed, and simply run the “neofetch” command in the terminal. It will present a visually-pleasing summary of your system specs.
- Using GUI System Tools: Many Linux distributions provide graphical system tools that allow you to view your computer’s specs. These tools can often be found in the System Settings or Control Center. Examples include GNOME System Monitor, KDE System Settings, and Xfce Settings.
These methods are just a few of the many ways to check your computer’s specs on Linux. Depending on your distribution and personal preference, you may find other tools or commands that provide similar or additional information.
Linux’s flexibility and robust command-line interface make it ideal for gathering detailed hardware and software information. By leveraging these tools, you can easily access and verify your computer’s specifications on a Linux-based system.
Method 7: Check Specs on Chromebook
Checking the specifications of your Chromebook is a straightforward process. Chrome OS provides a simple and user-friendly method to access your system information. Here’s how to check your specs on a Chromebook:
- Click on the clock located in the bottom-right corner of the screen.
- In the pop-up window, click on the gear-shaped icon to open the Settings menu.
- In the Settings menu, scroll down and click on About Chrome OS at the bottom of the list.
- A window will open, displaying the version of Chrome OS and other information about your Chromebook.
- To view more detailed specifications, click on the button labeled Detailed build information.
By following these steps, you can quickly access and view important information about your Chromebook’s specifications. This includes the device name, processor model, installed RAM, storage capacity, and more.
It’s worth noting that the specific options and menus may vary slightly depending on the version of Chrome OS you are using. However, the general steps provided above should work for most Chromebook devices.
Checking your Chromebook’s specs is a breeze with the built-in settings menu. This allows you to easily confirm the hardware specifications of your device and ensure it meets the requirements for software installations or desired tasks.
Method 8: Check Specs on Android
Checking the specifications of your Android device is important for various reasons, such as verifying compatibility, troubleshooting, or making informed decisions when installing new apps or games. Fortunately, Android provides a simple way to access and view your device’s specs. Here’s how to check your specs on an Android device:
- Open the Settings app on your Android device. This can typically be done by tapping on the gear-shaped icon in the app drawer or by swiping down from the top of the screen and tapping on the gear icon in the notification shade.
- Scroll down until you find the About phone or About device option. It may be located in the System or System & Updates section.
- Tap on About phone or About device to access detailed information about your Android device.
- In this section, you will see various details about your device, including the model name, Android version, processor type, RAM size, internal storage capacity, and more.
- Some Android devices may provide additional options for more detailed specifications, such as tapping on Software information or Hardware information.
By following these steps, you can easily access and view important specifications of your Android device. This information can be handy when troubleshooting technical issues, installing software updates, or determining if your device meets the requirements for specific apps or games.
It’s important to note that the specific options and menus may vary slightly depending on the Android version and device manufacturer. However, the general steps provided above should work for most Android devices.
Checking your Android device’s specs is a simple and useful process that allows you to have a better understanding of its capabilities and make informed decisions regarding software installations and usage.
Method 9: Check Specs on iOS
Checking the specifications of your iOS device can be helpful when understanding its capabilities, ensuring compatibility with apps, or troubleshooting any performance issues. Apple provides an easy method to access and view your device’s specs directly from the settings. Here’s how to check your specs on an iOS device:
- Open the Settings app on your iOS device. This can typically be found on the home screen.
- Scroll down and tap on General.
- In the General settings, tap on About.
- In this section, you will find various details about your iOS device, including the device name, storage capacity, iOS version, model name, processor type, and more.
- Scroll further to find specific information about the Wi-Fi address, Bluetooth address, cellular data number, and other relevant details.
By following these steps, you can quickly access and view important specifications of your iOS device. This information proves useful when troubleshooting, managing storage, or verifying compatibility with apps and software updates.
It’s worth noting that the specific options and menus may vary slightly depending on the iOS version you are using. However, the general steps provided above should work for most iOS devices.
Checking your iOS device’s specs is a convenient way to understand its capabilities and ensure smooth operation for your desired tasks and software experiences.
Method 10: Use Third-Party Software to Check Specs
In addition to the built-in options provided by operating systems, you can also use third-party software to check your computer’s specs. These tools offer more advanced features and a comprehensive overview of your system’s hardware and software configuration. Here’s how you can use third-party software to check your specs:
- Do some research and choose a reliable third-party software application that suits your needs. There are several popular options available, such as CPU-Z, Speccy, HWiNFO, and AIDA64.
- Visit the official website of the software or a trusted software repository to download and install the application onto your computer.
- Launch the third-party software and allow it to scan your computer’s hardware and software.
- Once the scan is complete, the software will provide a detailed report of your computer’s specifications, including information about the processor, memory (RAM), graphics card, storage devices, and more.
- Review the report and navigate through the different sections or tabs to inspect the specific hardware and software components in greater detail.
- Some third-party software applications may also offer additional features, such as temperature monitoring, system benchmarking, and performance optimization suggestions.
Using third-party software provides a more in-depth analysis of your computer’s specs, offering a comprehensive overview of your system’s capabilities. These tools often present the information in a user-friendly manner, making it easier to understand the technical details of your hardware and software configuration.
However, it’s important to download and install software from reputable sources to ensure the security and reliability of your system. Be cautious of potentially harmful software and always verify the legitimacy of the software before proceeding.
By utilizing third-party software, you can gain a detailed understanding of your computer’s specs, enabling you to make informed decisions regarding hardware upgrades, software installations, and system optimizations.