
Why Change Your Profile Picture on Instagram
Changing your profile picture on Instagram is not just a simple cosmetic update, but rather a powerful tool to express yourself and engage with your audience. Your profile picture is one of the first impressions users have of you on the platform, and it plays a crucial role in shaping your personal or brand identity. Here are a few reasons why you should consider updating your profile picture on Instagram:
1. Reflecting your current self: Your profile picture should represent who you are at the present moment. Changing your profile picture allows you to showcase your latest accomplishments, evolving style, or simply a fresh and updated version of yourself. It can also be a way to show your support for certain causes, campaigns, or events that resonate with you and your values.
2. Increasing engagement: When you change your profile picture, it grabs the attention of your followers and encourages them to interact with your posts. It creates a sense of curiosity and prompts users to explore your profile and the content you share. This increased engagement can lead to more likes, comments, and followers, ultimately helping you grow your presence on Instagram.
3. Building brand recognition: If you are using Instagram for business or personal branding purposes, maintaining a consistent and recognizable visual identity is essential. Your profile picture serves as a key component in building brand recognition. By regularly updating your profile picture with a logo or a symbol associated with your brand, you create a visual association that users will remember and recognize as they come across your content in their feed.
4. Showing your personality and uniqueness: Your profile picture is an opportunity to showcase your personality and uniqueness. It is a chance to differentiate yourself from others and make a lasting impression. Choose a photo that reflects your hobbies, interests, or passions. This will help your profile stand out and attract like-minded individuals who share similar interests.
5. Adding a personal touch: Changing your profile picture can also provide a sense of personal satisfaction and ownership of your online presence. By carefully selecting a photo that resonates with you and represents your identity, you are making a deliberate choice to authentically express yourself to your audience. This personal touch can help you connect on a deeper level with your followers and create a stronger bond.
Step 1: Open the Instagram App
To change your profile picture on Instagram, the first step is to open the Instagram app on your mobile device. Whether you’re using an iOS or Android device, the process is the same.
Locate the Instagram app on your home screen or in your app drawer, which is represented by a colorful camera icon. Tap on the icon to launch the app.
If you haven’t logged in to your Instagram account yet, you will be prompted to do so. Enter your username and password and tap “Log In.” If you have multiple accounts linked to the app, ensure that you select the correct account from the list.
Once you’re logged in, you will be taken to your Instagram feed. Here, you can see posts from the accounts you follow. Now that you’re inside the app, you are ready to proceed to the next step.
It’s important to note that Instagram also has a web version which can be accessed through a web browser on your computer. However, changing your profile picture is only possible through the mobile app. Therefore, make sure you have the Instagram app installed on your smartphone or tablet to follow the rest of the steps.
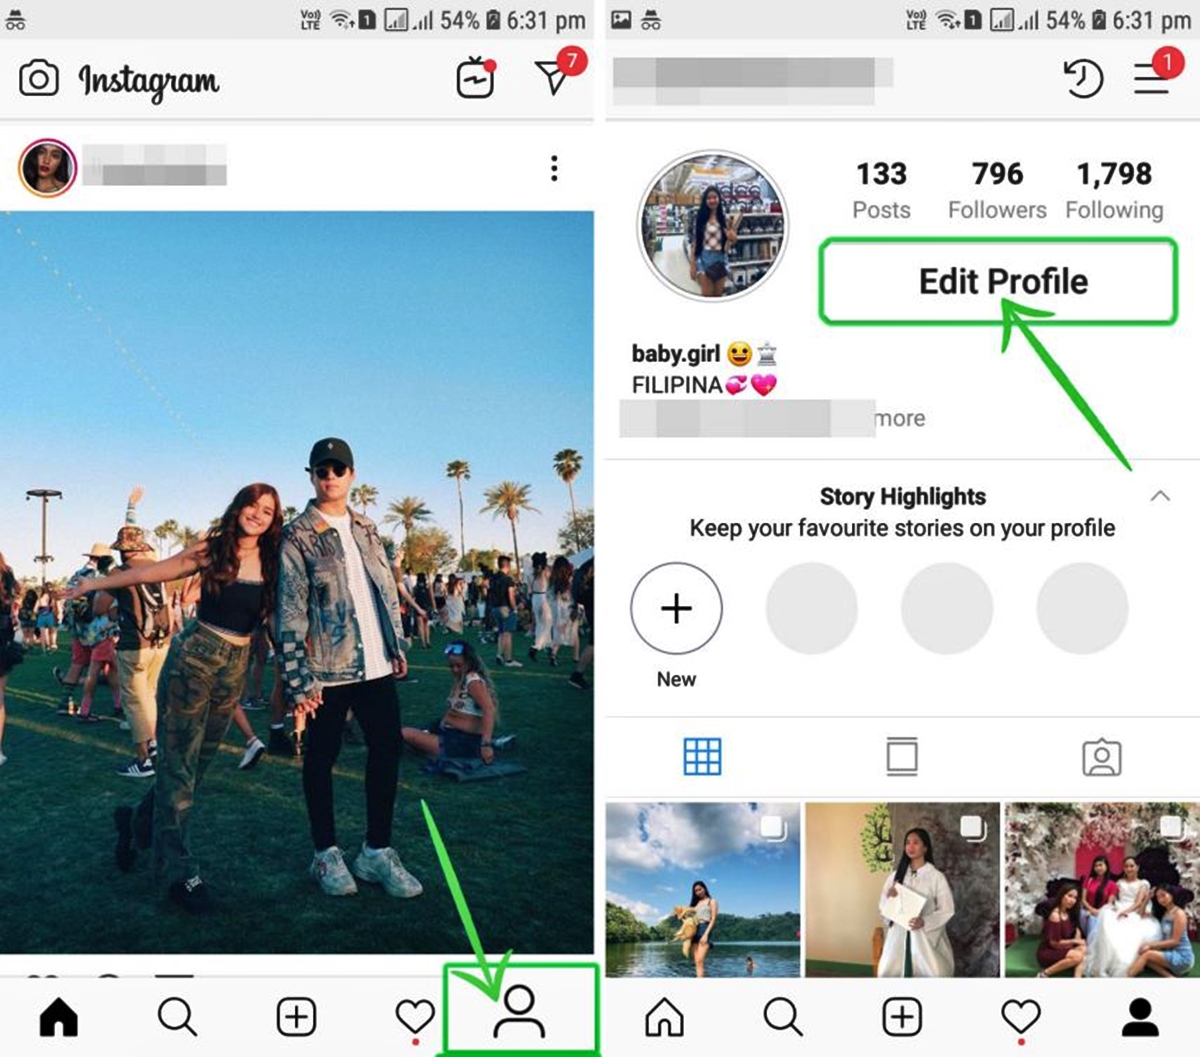
Step 2: Go to Your Profile Page
To change your profile picture on Instagram, you need to navigate to your profile page. Here’s how you can do it:
At the bottom of the Instagram app, you will find various icons including the Home, Search, Plus, Heart, and Profile icons. Tap on the Profile icon, which is represented by a silhouette of a person. This will take you directly to your profile page.
Alternatively, if you are already inside the app and on a different page, you can access your profile by tapping on the three horizontal lines in the top right corner of the screen. This will open a side menu where you can find your profile name and picture at the top. Tap on your profile name or picture to go directly to your profile page.
Once you are on your profile page, you will see your current profile picture displayed prominently at the center of the screen. This is the picture that you will be replacing with your new photo.
Take a moment to review your profile and ensure that it accurately represents who you are or the image you want to portray. This is your chance to make a visual impact on anyone who visits your profile, so it’s essential to have a cohesive and visually appealing profile page.
Now that you are on your profile page, you are ready to move on to the next step and start the process of changing your profile picture.
Step 3: Tap on the Profile Picture
Once you are on your profile page in the Instagram app, the next step to change your profile picture is to tap on the current profile picture image. Here’s how you can do it:
Locate your current profile picture, which is displayed prominently at the center of your profile page. It will be a circular image that represents your current profile picture.
Tap on the profile picture image to initiate the process of changing it. When you tap on the profile picture, a menu or prompt will appear with various options related to your profile picture.
Depending on the version of the Instagram app you are using, the menu or prompt may appear as a pop-up window or as a menu at the bottom of the screen. It may offer options such as “Change Profile Picture” or “Edit Profile Picture.”
By tapping on your profile picture, you are signaling to the app that you want to update or modify your current profile picture. This action will take you to the next step in the process of changing your profile picture on Instagram.
Take a moment to make sure you are ready to proceed before tapping on your profile picture. Ensure that you have a new photo ready to replace the current profile picture and that it meets the requirements and guidelines set by Instagram. Preparation will help streamline the process and ensure a smooth transition to the next step.
Now that you have tapped on your profile picture, you are ready to move on to the next step and select a new photo for your Instagram profile.
Step 4: Select a New Photo
After tapping on your profile picture in the Instagram app, the next step is to select a new photo to replace your current profile picture. You have a few options for choosing a new photo:
1. Choose from your photo library: Instagram allows you to select a photo from your device’s photo library. You can browse through your existing photos and select one that you want to use as your new profile picture. This is a convenient option if you have a photo saved on your device that you want to showcase on your profile.
2. Take a new photo: If you want to capture a fresh image to use as your profile picture, you can take a new photo directly within the Instagram app. By tapping the camera icon or the option to “Take a Photo,” you can use your device’s camera to snap a picture. This is a great choice if you want to ensure your profile picture reflects your current appearance or captures a specific moment.
3. Import an image you’ve edited or created: If you have a photo that you’ve edited or created using a separate app or software, you can import that image into the Instagram app. This allows you to add your own creative touch to your profile picture before uploading it.
Once you’ve selected the new photo you want to use, follow the on-screen prompts to confirm your selection. Depending on the version of the Instagram app you’re using, you may have the option to crop or resize the image at this stage.
Make sure to choose a photo that represents you or your brand effectively. Consider factors such as composition, lighting, and overall aesthetic appeal. Remember that your new profile picture will be displayed as a small circular thumbnail, so choose a photo that looks good in that format.
Once you’ve selected your new photo and made any necessary adjustments, you’re ready to move on to the next steps of the profile picture change process.
Step 5: Apply Photo Filters (Optional)
After selecting a new photo for your Instagram profile picture, you have the option to apply photo filters to enhance the aesthetic appeal of your image. Instagram offers a variety of filters that can add unique effects and artistic touches to your photo. Here’s how you can apply photo filters:
Once you have selected your new photo, you will be presented with a range of filters at the bottom of the editing screen. These filters are displayed as small previews, allowing you to see how they will affect your photo in real-time.
To apply a filter, simply swipe left or right across the filter options and observe the changes to your photo. Each filter applies a different combination of adjustments, such as brightness, contrast, saturation, and color temperature, to give your photo a specific look and feel.
Experiment with different filters to find the one that best complements your photo and aligns with your desired aesthetic. Some filters may add warmth or coolness, while others may enhance the vibrancy or create a vintage effect. Take your time to explore the various options and see how they transform your photo.
If you prefer a more subtle effect, you can adjust the intensity of the filter by tapping on the filter preview and using the slider that appears. Slide it to the left to decrease the intensity or to the right to increase it. This allows you to strike the right balance and achieve the desired effect without overpowering your photo.
It’s important to note that applying a filter is entirely optional. If you prefer the natural look of your photo without any extra adjustments, you can skip this step and proceed to the next one. Remember, the goal is to choose a profile picture that accurately represents you or your brand and resonates with your audience.
Once you are satisfied with the filter applied to your photo (or if you decide not to use a filter), you can move on to the next step of adjusting the photo’s position and size, if desired.
Step 6: Adjust the Photo Position and Size (Optional)
After applying a filter to your selected photo, you have the option to further customize the position and size of the image within the circular frame of your Instagram profile picture. This step allows you to ensure that the most important elements of the photo are visible and properly framed. Here’s how to adjust the photo position and size:
When you have chosen a filter or decided to keep the photo as is, you can proceed to the photo adjustment screen. Here, you will see your photo displayed within the circular frame, with editing tools surrounding it.
To adjust the position of your photo, simply tap and hold on the photo within the circular frame and drag it to the desired position. You can move it horizontally or vertically to ensure that the key elements of the image, such as your face or a specific object, are centered or positioned as desired.
If you need to resize the photo to fit within the circular frame, use the pinch-to-zoom gesture. Place two fingers on the photo and spread them apart to increase the size or pinch them together to decrease the size. This allows you to zoom in or out and adjust the scale of the image.
Take the time to adjust the position and size of your photo until it looks visually pleasing and aligned with your intentions. However, keep in mind that the circular profile picture will be displayed in a small thumbnail format, so ensure that the most important elements of the image are visible and not cropped out.
This step is optional, as you may already be satisfied with the position and size of your photo. If that’s the case, you can skip this step and move on to the next one to add a profile picture caption, if desired.
Once you are done adjusting the position and size of your photo, you can proceed to the next step and add a caption to your profile picture, if you wish.
Step 7: Add a Profile Picture Caption (Optional)
After finalizing the position and size of your profile picture, you have the option to add a caption to provide context or additional information about the photo. While adding a caption is not mandatory, it can be a great way to engage with your audience and share a message or story. Here’s how you can add a profile picture caption:
On the same screen where you adjusted the position and size of your photo, you will find a text box or field where you can enter your caption. Tap on the text box to activate it and start typing your caption. You can either provide a brief description of the photo, convey a message, or add relevant hashtags to increase discoverability.
Keep in mind that due to the limited space available for a profile picture caption, it’s best to keep it concise and impactful. Aim for a caption that is clear, engaging, and aligned with your personal or brand identity.
If you want to add hashtags to your caption, start typing the “#” symbol followed by relevant keywords or phrases. Instagram will provide suggestions based on the popular hashtags used by the community. Using relevant hashtags can help increase the visibility of your profile picture to users who are searching for specific topics or interests.
Once you have crafted your caption and added any desired hashtags, take a moment to review it for clarity and accuracy. Ensure that the message you want to convey aligns with the content of your profile picture and resonates with your intended audience.
Remember, adding a caption is optional. If you feel that your profile picture speaks for itself and does not require any further explanation, you can skip this step and move on to the final step of saving and publishing your new profile picture.
Once you are satisfied with your caption (or if you choose not to add one), you can proceed to the next and final step to save and publish your new profile picture.
Step 8: Save and Publish the New Photo
Once you have made all the desired changes to your profile picture, it’s time to save and publish the new photo on your Instagram profile. This final step will make your updated profile picture visible to your followers and the Instagram community. Here’s how you can save and publish the new photo:
After adding a caption (if desired) or finalizing the adjustments to your profile picture, look for a “Save” or “Done” button on the screen. The location of this button may vary depending on the version of the Instagram app you are using. Tap on this button when you are ready to proceed.
By saving the new photo, you are confirming the changes you’ve made and making them permanent on your Instagram profile. The app will process the image and update it on your profile page. It may take a few moments for the updated profile picture to appear, so be patient.
Once the new profile picture has been saved and published, it will be visible to your followers and anyone who visits your profile. The old profile picture will be replaced with the new one, reflecting the changes you’ve made.
Take a moment to review your profile page and ensure that the new profile picture appears as expected. If you are not satisfied with how it looks, you can repeat the process and make further adjustments or select a different photo.
Congratulations! You have successfully changed your profile picture on Instagram. Now, you can enjoy the refreshed look of your profile and the potential for increased engagement from your audience.
Remember that you can change your profile picture as often as you like, so don’t hesitate to update it whenever you want to showcase a new image, highlight a special occasion, or simply reflect the evolving aspects of your personal or brand identity on Instagram.