
Why Change the Mail Notification Sound in iOS Mail
When it comes to managing your emails on your iOS device, the default mail notification sound can become monotonous and easily overlooked. However, by changing the mail notification sound in iOS Mail, you can add a personal touch and make sure you never miss an important email again. Here are a few reasons why you might consider changing the mail notification sound:
- Personalization: Customizing the mail notification sound allows you to match it with your individual preferences or personality. It adds a sense of uniqueness to your device and can make checking your emails a more enjoyable experience.
- Differentiation: If you have multiple email accounts synced on your iOS device, changing the mail notification sound for each account can help you differentiate between them easily. This way, you can instantly recognize which account just received a new email without even looking at the screen.
- Alertness: The default mail notification sound may get lost in the sea of other sounds on your device. By selecting a distinctive or attention-grabbing sound, you can ensure that you are immediately alerted whenever an important email arrives, reducing the chances of missing it.
- Mood Enhancement: Sound has a powerful impact on our mood. By choosing a mail notification sound that resonates with you or uplifts your spirits, you can create a more positive and enjoyable email experience on your iOS device.
Changing the mail notification sound in iOS Mail is a simple process that allows you to personalize your device and enhance your email management experience. In the following steps, we will guide you through the process of changing the mail notification sound on your iOS device, ensuring that you never miss an important email again.
Step 1: Open the Settings App
In order to change the mail notification sound in iOS Mail, you will need to access the Settings app on your iOS device. The Settings app is where you can customize various aspects of your device, including sounds and notifications. Follow the steps below to open the Settings app:
- Locate the “Settings” app on your device’s home screen. The icon resembles gray gears and is usually placed in a prominent position.
- Tap on the “Settings” app icon to open it. The app will greet you with a list of different settings categories.
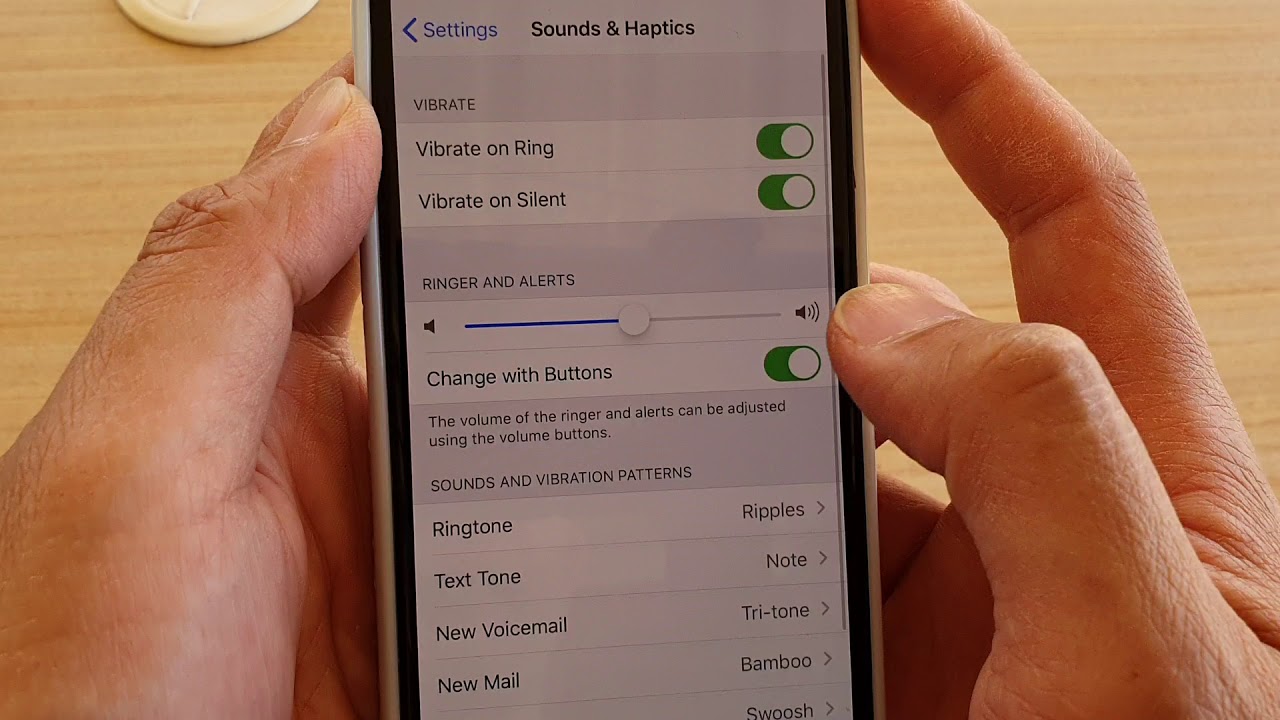
- Scroll through the settings categories until you find the one labeled “Sounds & Haptics”. This option allows you to customize various sound settings on your device, including the mail notification sound.
- Tap on the “Sounds & Haptics” option to access further customization options for sound-related settings.
The Settings app on your iOS device is where you can tweak various settings to suit your preferences. In the next step, we will guide you through the process of selecting the “Sounds & Haptics” option within the Settings app.
Step 2: Scroll Down and Tap on “Sounds & Haptics”
Once you have opened the Settings app on your iOS device, you need to locate the “Sounds & Haptics” option. This is where you can customize various sound settings, including the mail notification sound. Follow the step-by-step instructions below to find and access the “Sounds & Haptics” option:
- With the Settings app open on your device, you will see a list of different settings categories.
- Scroll down through the settings categories until you reach the “Sounds & Haptics” option. This category is usually located towards the middle or bottom of the list.
- Once you have located “Sounds & Haptics”, tap on it to access the sound and vibration settings for your device.
The “Sounds & Haptics” section of the Settings app allows you to customize various sound-related settings, such as the ringtone, notification sounds, and mail notification sound. In the next step, we will guide you further through the process of selecting the specific sound settings for mail notifications.
Step 3: Tap on “Sounds & Vibration Patterns”
After accessing the “Sounds & Haptics” section in the Settings app, you will find various sound-related settings for your iOS device. To continue customizing the mail notification sound, follow the steps below:
- Within the “Sounds & Haptics” section, you will see a list of different sound and vibration settings for different aspects of your device.
- Scroll through the options until you locate the section titled “Sounds and Vibration Patterns”. Tap on it to proceed with customizing the mail notification sound.
The “Sounds and Vibration Patterns” section provides you with a range of options to personalize the sounds and vibrations you experience on your device. This includes the ability to change the mail notification sound. In the following step, we will guide you on selecting the specific mail account you wish to customize the sound for.
Step 4: Scroll Down and Tap on “Mail”
Once you have accessed the “Sounds and Vibration Patterns” section in the Settings app, the next step is to navigate to the “Mail” settings. This is where you can customize the mail notification sound for your iOS device. Follow the steps below to proceed:
- Within the “Sounds and Vibration Patterns” section, scroll down until you find the category labeled “Mail”. This category allows you to configure the sound settings specifically for your email notifications.
- Tap on the “Mail” category to access the settings for your email notifications.
The “Mail” section within the “Sounds and Vibration Patterns” settings provides you with options to customize the sound and vibration settings for your email notifications. By selecting this category, you are one step closer to changing the mail notification sound for your iOS Mail app. In the following step, we will guide you on selecting the specific mail account for which you want to customize the sound.
Step 5: Select the Mail Account You Want to Change the Sound For
After accessing the “Mail” settings within the “Sounds and Vibration Patterns” section of the Settings app, you can now choose the specific mail account for which you want to change the notification sound. Follow the steps below to proceed:
- Within the “Mail” settings, you will see a list of all the mail accounts that are currently set up on your iOS device.
- Scroll through the list and select the mail account that you want to customize the notification sound for. Tap on the account to continue.
By selecting a specific mail account, you can personalize the notification sound for that account, allowing you to easily differentiate between emails from different sources. This is especially useful if you have multiple mail accounts linked to your iOS device. In the next step, we will guide you through the process of selecting the “New Mail” sound option for the chosen mail account.
Step 6: Tap on “New Mail”
Once you have selected the specific mail account for which you want to change the notification sound, you can now proceed to customize the sound. The next step is to tap on the “New Mail” option within the mail account settings. Follow the steps below to continue:
- Within the mail account settings, you will find various options to customize different aspects of the account.
- Scroll through the settings until you locate the “New Mail” option. This option controls the notification sound that plays when a new email arrives in your chosen mail account.
- Tap on the “New Mail” option to access the available sound choices.
By tapping on the “New Mail” option, you are now ready to explore and select a new sound from the provided list. This will allow you to personalize the notification sound for incoming emails in your chosen mail account. In the next step, we will guide you through the process of choosing a new sound from the list.
Step 7: Choose a New Sound from the List
After tapping on the “New Mail” option within the mail account settings, you can now select a new sound from the provided list. This will enable you to give your mail notifications a unique and personalized touch. Follow the steps below to proceed:
- Upon selecting the “New Mail” option, you will be presented with a list of pre-installed sounds to choose from.
- Scroll through the list and listen to the different sound options. This will allow you to get a sense of how each sound will sound when you receive a new email.
- Once you have found a sound that you like, tap on it to select it as the new notification sound for your mail account.
By choosing a new sound from the provided list, you can personalize the notification sound for incoming emails in your selected mail account. This allows you to add a touch of individuality and make your mail notifications more distinctive. In the next step, we will explore an optional customization feature where you can customize the vibration pattern for the mail notifications, if desired.
Step 8: Customize the Vibration Pattern (Optional)
As you personalize the notification sound for your mail account, you also have the option to customize the vibration pattern that accompanies the sound. This can help provide an additional layer of distinction and make your mail notifications even more unique. Follow the steps below to customize the vibration pattern:
- Within the mail account settings, locate the “Vibration” section. This section allows you to choose or create a custom vibration pattern for the mail notifications.
- Tap on the “Vibration” option to access the available vibration patterns.
- Scroll through the list of pre-set vibration patterns and select the one that best aligns with your preferences.
- If you want to create a custom vibration pattern, tap on the “Create New Vibration” option. Follow the prompts to create a unique pattern by tapping on the screen in a certain rhythm.
- Once you have chosen or created a vibration pattern, it will be associated with the selected notification sound for your mail account.
Customizing the vibration pattern, although optional, can provide an extra layer of personalization to your mail notifications. By associating a distinct vibration pattern with the chosen sound, you can easily differentiate between email notifications and other types of alerts on your device. In the next step, we will guide you through the process of repeating the steps for each mail account if necessary.
Step 9: Repeat Steps 5-8 for Each Mail Account
If you have multiple mail accounts linked to your iOS device and you wish to customize the mail notification sound for each account, you can easily do so by repeating the previous steps for each individual account. Follow the steps below to customize the notification sound for additional mail accounts:
- Go back to the main “Mail” settings category within the “Sounds and Vibration Patterns” section of the Settings app.
- Select the next mail account from the list that you want to customize the notification sound for.
- Tap on the “New Mail” option within the mail account settings to choose a new sound from the list.
- If desired, customize the vibration pattern for this mail account by accessing the “Vibration” section.
- Repeat the steps for each additional mail account that you want to personalize the notification sound for.
By repeating these steps for each mail account on your device, you can ensure that each account has its own unique notification sound and vibration pattern. This makes it easier to differentiate between the incoming emails from different accounts and gives you a more personalized email experience. In the final step, we will guide you on how to test the new mail notification sound.
Step 10: Test the New Mail Notification Sound
After customizing the notification sound for your mail accounts, it’s important to test the new settings to ensure they are working as desired. This will allow you to confirm that the chosen sound and vibration pattern are satisfactory. Follow the steps below to test the new mail notification sound:
- Exit the Settings app and return to your device’s home screen.
- Wait for a new email to arrive in one of the mail accounts you have customized.
- Once a new email arrives, you will hear the new notification sound that you selected for that specific mail account.
- Observe the vibration pattern, if applicable, to see if it matches your preferences for that account.
If the new mail notification sound plays, and the vibration pattern (if customized) is as desired, then congratulations, you have successfully changed the mail notification sound for your iOS Mail. However, if you do not hear the new sound or the vibration pattern is not as expected, you may need to revisit the “Sounds and Vibration Patterns” settings to ensure the correct options were selected.
By testing the new mail notification sound, you can ensure that you will be promptly alerted when important emails arrive in your customized mail accounts. Now you can enjoy a personalized and distinctive mail notification experience on your iOS device.