
Choosing your file format for screenshots
When it comes to capturing screenshots on your Mac, you have the flexibility to choose the file format that best suits your needs. By default, macOS saves screenshots in the PNG (Portable Network Graphics) format, which offers high-quality images with lossless compression. However, you may prefer using other file formats, such as JPEG (Joint Photographic Experts Group) or TIFF (Tagged Image File Format), depending on factors like file size, compatibility, or specific requirements.
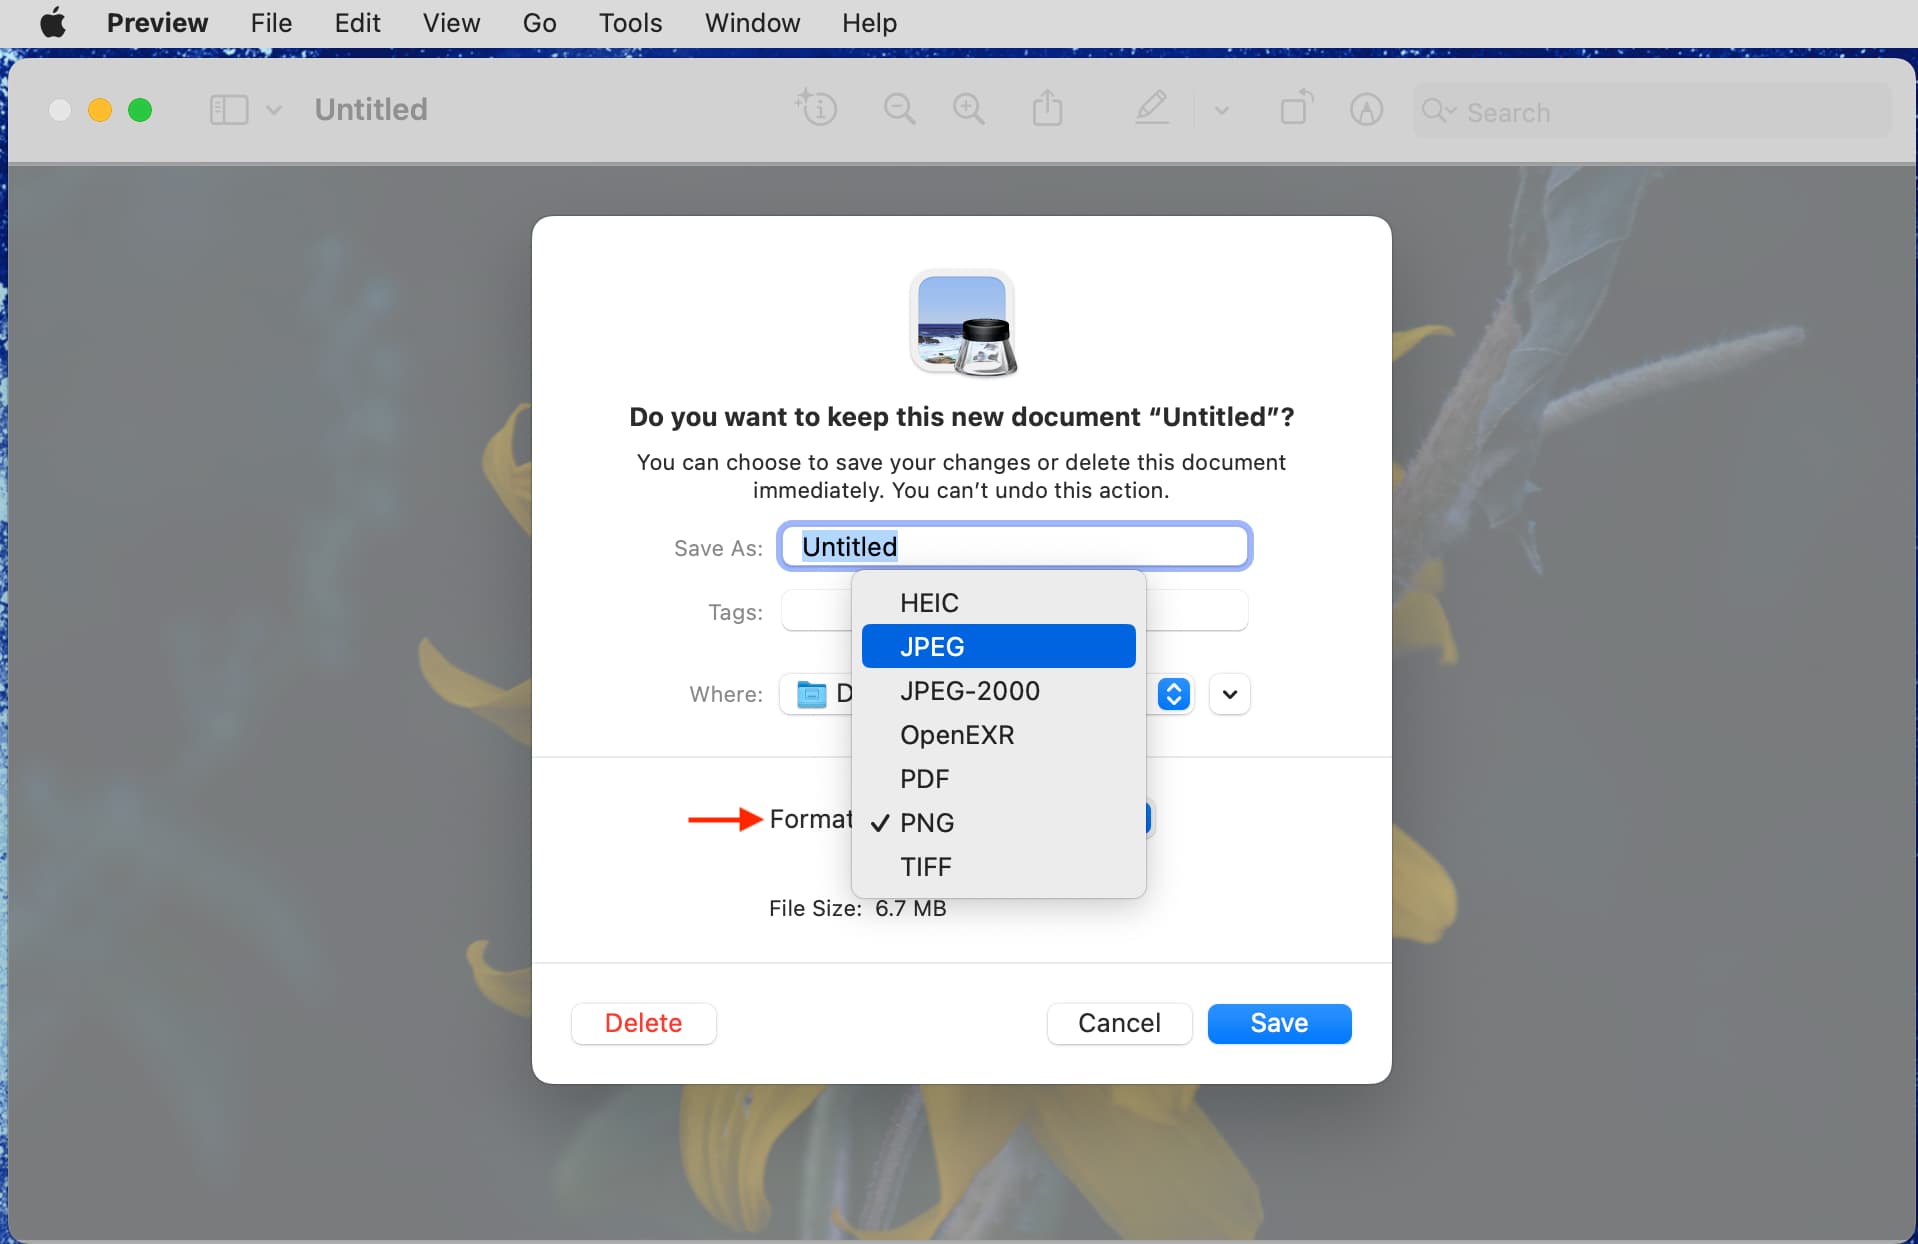
Let’s explore the different file formats available for capturing and saving screenshots on your Mac:
- PNG: This is the default file format used by macOS for screenshots. PNG files are lossless, which means they preserve the highest level of image quality but tend to have larger file sizes compared to other formats. They support transparency, making them ideal for capturing screenshots with a transparent background. PNG is widely supported across different platforms and web browsers.
- JPEG: JPEG files use lossy compression, resulting in smaller file sizes. This format is suitable for saving screenshots that don’t require transparency, such as capturing images of webpages or documents. However, due to compression, JPEG images may have a slight loss of quality compared to PNG. Keep in mind that repeated saving and editing of JPEG files can further degrade the image quality.
- TIFF: TIFF offers lossless compression like PNG but usually produces larger file sizes. This format is commonly used for professional or archival purposes, where preserving the highest image quality is of utmost importance. TIFF files support multiple layers and are widely compatible with various image editing software.
To choose a different file format for your screenshots, you can customize the format preferences within the screenshot capture settings on your Mac. By accessing the “Options” menu in the screenshot toolbar, you can select the desired format before capturing the screenshot.
It’s important to consider the intended use of your screenshots and balance the trade-off between image quality and file size when selecting the format. If you’re unsure, PNG is a reliable option that provides excellent image quality with broad compatibility.
Changing the default location for screenshots on your Mac
By default, when you take a screenshot on your Mac, the captured image is saved to the desktop. However, you may prefer to have your screenshots saved in a different location for better organization or convenience. Fortunately, macOS provides a straightforward method to change the default location for saving screenshots.
Follow these steps to change the default location for screenshots on your Mac:
- Open the “Finder” app on your Mac.
- Click on the “Go” menu in the menu bar and select “Go to Folder” (or use the keyboard shortcut Command + Shift + G).
- In the “Go to Folder” dialog box, enter the following path:
~/Library/Preferencesand click “Go”. - Look for the file named
com.apple.screencapture.plistand make a backup copy of this file, just in case. - Open the
com.apple.screencapture.plistfile using a text editor (such as TextEdit or Xcode). - Locate the line that begins with
<key>location</key>and below it, you will see the current location where screenshots are saved, usually the desktop. - Change the location by modifying the value between the
<string>tags to the desired folder or path. For example, to save screenshots in a folder named “Screenshots” within your Documents folder, you would enter<string>~/Documents/Screenshots</string>. - Save the changes to the file and close the text editor.
- Restart your Mac for the changes to take effect.
Once you’ve changed the default location for saving screenshots, all future screenshots will be stored in the newly specified location. If you ever want to revert to the original default location (the desktop), simply repeat the above steps and change the location back to <string>~/Desktop</string>.
This method of changing the default location for screenshots applies to most versions of macOS. However, it’s worth noting that system updates or changes in future macOS releases may introduce variations or new preferences.
Changing the file format through the Terminal
If you prefer a more advanced method to change the file format for screenshots on your Mac, you can utilize the Terminal. The Terminal provides a command-line interface that allows you to access and modify various system settings, including the file format for screenshots.
Follow the steps below to change the file format through the Terminal:
- Open the Terminal application on your Mac. You can find it in the Utilities folder within your Applications folder, or you can use Spotlight Search to quickly open it.
- Once the Terminal window is open, type the following command:
defaults write com.apple.screencapture type [file format]png: for PNG formatjpgorjpeg: for JPEG formattiff: for TIFF format- Press Enter to execute the command.
- After executing the command, type the following command to restart the SystemUIServer:
killall SystemUIServer- Press Enter again to execute the command.
Replace [file format] with the desired file format abbreviation:
Once you have completed these steps, the file format for your screenshots will be changed to the specified format. Any future screenshots you capture will be saved using the new file format.
It’s worth mentioning that changing the file format through the Terminal does not affect the default save location for screenshots. To change the save location, you will need to follow the instructions provided in the previous section.
Always exercise caution when using the Terminal, as modifying system settings can potentially have unintended consequences. Ensure that the commands you enter are correct and double-check any changes you make.
Using third-party apps to change the file format and location
While macOS provides built-in options to change the file format and location for screenshots, there are also third-party apps available that offer more advanced features and customization options. These apps provide a user-friendly interface and additional functionality to enhance your screenshot-taking experience on a Mac.
Here are some popular third-party apps that you can use to change the file format and location for screenshots:
- Snagit: Snagit is a comprehensive screen capture tool that allows you to capture screenshots, record videos, and edit them with ease. It offers a wide range of file format options, including PNG, JPEG, GIF, TIFF, and more. You can also specify a custom location to save your captured screenshots.
- Lightshot: Lightshot is a lightweight and user-friendly screenshot tool that enables you to capture screenshots and instantly edit and share them. It allows you to save screenshots in popular formats like PNG and JPEG. Lightshot also provides the option to choose a specific folder or location to save your captured screenshots.
- Skitch: Skitch is a simple yet powerful screenshot annotation tool by Evernote. It lets you capture screenshots, annotate them with arrows, texts, shapes, and more. Skitch supports various file formats, including PNG and JPEG. Although it doesn’t offer extensive options to change the default location, you can easily drag and drop the captured screenshots to the desired folder.
To use these third-party apps, you can download them from their respective websites or from trusted sources like the Mac App Store. Once installed, you can customize the file format and location settings within the app’s preferences or settings menu.
It’s important to note that third-party apps may come with additional features and functionality beyond changing the file format and location. They often offer editing tools, cloud storage integration, and sharing options, making them suitable for various professional and creative needs.
Before choosing a third-party app, consider your specific requirements, ease of use, and user reviews to ensure the selected app aligns with your preferences and workflow.
Accomplishing the change on older versions of macOS
If you are using an older version of macOS, the process of changing the file format and location for screenshots may vary slightly compared to the instructions provided earlier. Here’s how you can accomplish the change on older versions of macOS:
- Open the Terminal application on your Mac. You can find it in the Utilities folder within your Applications folder, or you can use Spotlight Search to quickly open it.
- Once the Terminal window is open, enter the following command:
defaults write com.apple.screencapture [key] [value]- Replace
[key]withlocationortypedepending on what you want to change: - To change the default location, use
location. - To change the file format, use
type. - Replace
[value]with the desired location or file format. - Press Enter to execute the command.
- After executing the command, type the following command to restart the SystemUIServer:
killall SystemUIServer- Press Enter again to execute the command.
By following these steps, you can change the default location or file format for screenshots on older versions of macOS. It’s important to note that the specific file format options or default location customization may be limited on older macOS versions.
If you’re unable to achieve the desired change through the Terminal on an older version of macOS, consider exploring third-party apps, as mentioned in the previous section. These apps often provide more extensive features and compatibility across different macOS versions.
Always exercise caution when using the Terminal, and ensure that the commands you enter are correct. Creating a backup of any files you modify or change is highly recommended.