
Why Change the Language on Your iPhone
As a versatile device that caters to users from around the globe, the iPhone offers a wide range of language options to suit individual preferences and needs. Changing the language on your iPhone can bring a host of benefits, making it easier to navigate and use your device. Whether you’re learning a new language, traveling to a foreign country, or simply want to personalize your iPhone, changing the language settings can enhance your overall user experience.
One of the main reasons to change the language on your iPhone is if you’re learning or practicing a new language. By switching the language settings, you can immerse yourself in the language you’re learning and get a real-world experience using the iPhone in that language. This can help improve your language skills and make the learning process more enjoyable.
Moreover, if you’re traveling to a country where a different language is spoken, changing the language on your iPhone can be immensely helpful. It allows you to interact with locals, navigate apps, and read content in the local language. This can facilitate communication and make your travel experience more seamless and enjoyable.
Additionally, changing the language on your iPhone can also be a way to personalize your device. It adds a unique touch and reflects your individuality. You can choose a language that resonates with your cultural background, personal preferences, or simply for the novelty of trying something new.
Furthermore, changing the language settings on your iPhone can also provide certain practical advantages. For example, if you’re sharing your iPhone with someone who speaks a different language, changing the language can make it easier for them to use the device. It can also be beneficial when troubleshooting or seeking support, as you can interact with customer service in a language you’re more comfortable with.
Step 1: Accessing the Language Settings
Changing the language on your iPhone is a straightforward process that can be done in just a few simple steps. To begin, you’ll need to access the Language settings on your device. Here’s how:
- Unlock your iPhone and go to the Home screen.
- Tap on the “Settings” app, which is represented by a gear icon. It is usually located on the first page of your apps.
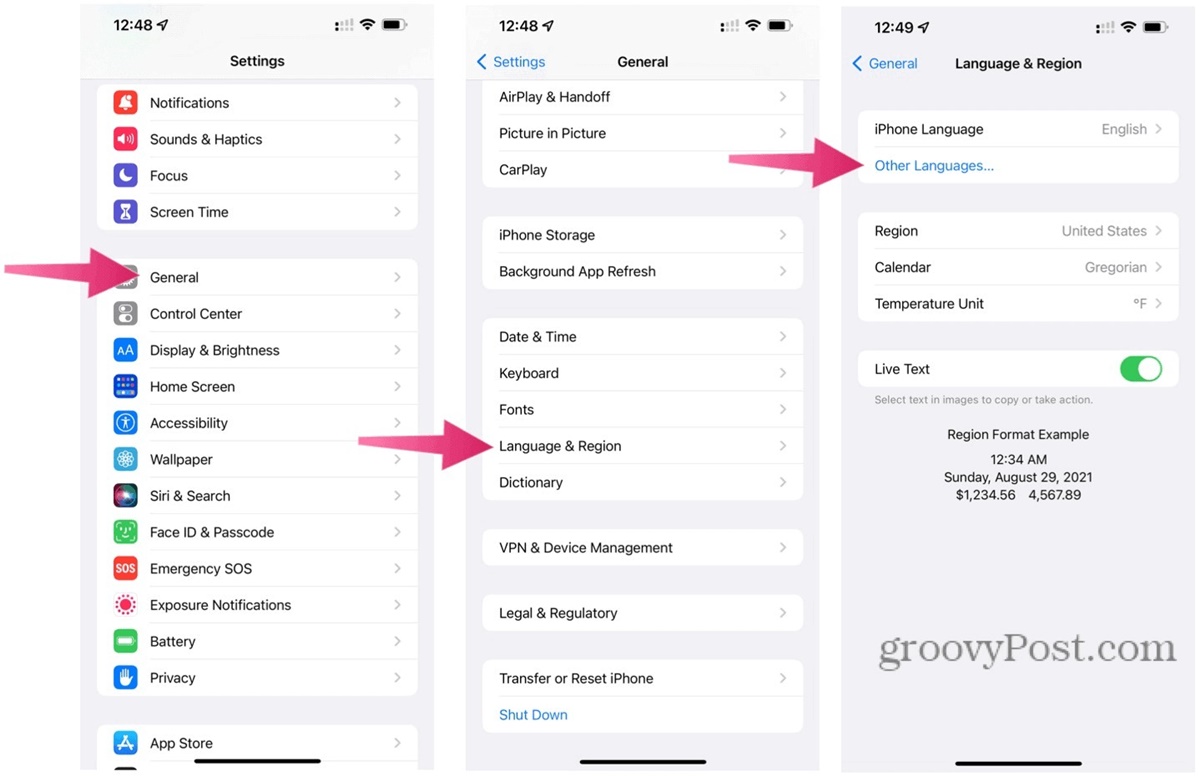
- Scroll down until you find the “General” option and tap on it.
- In the General settings, look for the “Language & Region” option and select it.
- Once you’re in the Language & Region settings, you’ll see a list of available languages. Tap on “iPhone Language” to proceed.
By following these steps, you will be able to access the Language settings on your iPhone and start the process of changing the language to your desired preference.
It’s important to note that the steps may vary slightly depending on the version of iOS you have on your iPhone. However, the basic process remains the same, and you should be able to locate the Language settings by navigating through the General settings.
Now that you’ve accessed the Language settings, you’re ready to move on to the next step and choose your preferred language for your iPhone.
Step 2: Selecting your Preferred Language
Once you have accessed the Language settings on your iPhone, you can now proceed to select your preferred language. The following steps will guide you through the process:
- Inside the Language & Region settings, locate the “iPhone Language” option that you tapped on in the previous step.
- A list of available languages will appear. Scroll through the list to find your preferred language.
- Tap on your desired language to select it.
- A confirmation prompt will appear, asking if you want to change the iPhone’s language to the selected one. Tap “Change to [language]” to confirm your choice.
Once you confirm the language change, your iPhone will proceed to update the system language to your preferred language. This may take a few moments, and your device may restart to apply the changes.
It’s important to note that changing the language will not affect your personal data, apps, or settings. It will only change the language of the system interface and built-in apps.
If you ever wish to revert to your original language or choose a different language, you can follow the same steps to access the Language settings and make the necessary changes.
Now that you have successfully selected your preferred language, you can further customize your language settings by changing the keyboard language, Siri language, and other language-related features on your iPhone. Continue to the next steps to learn how.
Step 3: Changing the Keyboard Language
Changing the keyboard language on your iPhone allows you to type and communicate in multiple languages. Here’s how you can change the keyboard language:
- Go to the Settings app on your iPhone and navigate to the “General” settings.
- Select the “Keyboard” option from the list of settings.
- In the Keyboard settings, tap on the “Keyboards” option.
- A list of keyboards that are currently active on your iPhone will appear. Tap on “Add New Keyboard” to add a new language.
- Scroll through the list of available languages and select the one you want to add as a keyboard. This will enable the keyboard for that language.
Once you’ve added the desired language keyboard, it will be available for use whenever you text or type on your iPhone. You can easily switch between different keyboard languages by tapping on the globe icon on the keyboard, which is located next to the space bar. This allows you to seamlessly switch between languages while typing.
If you no longer need a particular keyboard language, you can remove it by going back to the “Keyboards” settings and swiping left on the language keyboard you want to delete. Then, tap on the “Delete” button that appears.
By changing the keyboard language on your iPhone, you can effectively communicate in different languages and enhance your typing experience with ease.
Now that you’ve learned how to change the keyboard language, let’s move on to the next step: changing the Siri language.
Step 4: Changing the Siri Language
Changing the Siri language on your iPhone allows you to interact with Siri, Apple’s voice assistant, in a language of your choice. Here’s how you can change the Siri language:
- Open the Settings app on your iPhone and navigate to the “Siri & Search” settings.
- Tap on the “Language” option.
- A list of available languages for Siri will appear. Scroll through the list and select your preferred language.
- If the language you want is not listed, you may need to check if it is supported by Siri on your iOS version or make sure that you have downloaded the necessary language packs from the App Store.
Once you’ve selected the Siri language, you can start interacting with Siri in your chosen language. Simply activate Siri by saying “Hey Siri” or holding down the side button or Home button, depending on your iPhone model, and speak your commands or queries in the selected language.
It’s worth noting that changing the Siri language may also affect the Siri voice. Siri often comes with language-specific voices that match the selected language, providing a more authentic and localized user experience. The voice options may vary depending on the selected language.
If you’re unsure about the voice options or wish to change the Siri voice to a different variant within the selected language, you can explore the available voice options within the Siri settings or consult Siri’s documentation for more details.
Now that you’ve changed the Siri language, you can proceed with the next steps to customize the language settings for the App Store, region format, calendar language, and more on your iPhone.
Step 5: Changing the App Store Language
Changing the language setting for the App Store on your iPhone allows you to browse and discover apps in a preferred language. Here’s how you can change the App Store language:
- Launch the Settings app on your iPhone and go to the “App Store” settings.
- Tap on the “App Store Language” option.
- A list of available languages will appear. Scroll through the list and select your desired language for the App Store.
After changing the App Store language, the content within the App Store, including app names, descriptions, and reviews, will be displayed in your selected language. This can make it easier for you to search for apps, read information, and make informed decisions about the apps you download.
It’s worth noting that changing the App Store language does not affect the language of apps you have already downloaded. It only alters the language in which you browse and discover new apps within the App Store.
If you want to change the language for a specific app that you have already downloaded, you may need to check the app’s individual settings or preferences. Not all apps support changing the language within the app itself, as it depends on how the app is developed and localized.
By customizing the App Store language on your iPhone, you can have a more personalized and user-friendly experience when exploring and downloading apps. Now, let’s proceed to the next step and learn how to change the region format and calendar language.
Step 6: Changing the Region Format and Calendar Language
Changing the region format and calendar language on your iPhone allows you to adapt the device to your preferred date and time format, as well as the calendar system used in your region. Here’s how you can make these changes:
- Open the Settings app on your iPhone and navigate to the “General” settings.
- Select the “Language & Region” option.
- In the Language & Region settings, scroll down to find the “Region” option and tap on it.
- A list of available regions will appear. Scroll through the list and select the region that corresponds to your desired date and time format, as well as the calendar system.
- Additionally, you can tap on the “Calendar” option within the Language & Region settings to choose the calendar language that matches your preferred language.
By changing the region format, your iPhone will automatically adjust the date, time, and number formats based on the selected region. This ensures that you have a localized experience when it comes to scheduling events, viewing dates, and dealing with numerical data.
The calendar language allows you to view the days, months, and events in your chosen language within the Calendar app. Changing the calendar language ensures that your schedule and events are presented in a language that is more familiar and comfortable to you.
It’s worth noting that changing the region format and calendar language can have certain implications. For example, it may affect how certain apps display content and handle time zone settings. Some apps use the region and language settings to determine location-based services, currency conversion, and other region-specific features.
If you encounter any issues with specific apps or services after changing the region format and calendar language, you may need to review the app’s settings or consult the app’s documentation for additional assistance.
Now that you’ve learned how to change the region format and calendar language, let’s move on to the next step: changing the Apple ID language.
Step 7: Changing the Apple ID Language
Changing the language setting for your Apple ID ensures that your account information and communication from Apple are presented in your preferred language. Here’s how you can change the Apple ID language:
- Open the Settings app on your iPhone and go to the “iTunes & App Store” settings.
- Tap on your Apple ID at the top of the screen. If you’re not signed in, you’ll need to do so with your Apple ID credentials.
- From the Apple ID menu, choose the “View Apple ID” option.
- Scroll down and tap on the “Language & Region” option.
- Tap on the “Apple ID Language” option.
- A list of available languages will appear. Scroll through the list and select your desired language for your Apple ID.
- Tap on the “Done” button to save the changes.
Once you’ve changed the Apple ID language, your account information, including your billing details, purchase history, and communication from Apple, will be displayed in your selected language. This makes it easier for you to manage your account and understand important notifications and updates from Apple.
It’s important to note that changing the Apple ID language does not affect the language settings of your device or individual apps. It is specific to your Apple ID account language preferences.
If you have multiple Apple IDs, you will need to repeat these steps for each Apple ID if you wish to change the language settings for all of them.
Now that you’ve successfully changed the language for your Apple ID, let’s move on to the next step: changing the language for specific apps on your iPhone.
Step 8: Changing the Language for Specific Apps
In addition to changing the system language and Apple ID language, you may also have the option to change the language settings for specific apps on your iPhone. This allows you to use certain apps in a different language than the one set for your device. Here’s how you can change the language for specific apps:
- Open the Settings app on your iPhone and go to the “General” settings.
- Scroll down and select the “Language & Region” option.
- Tap on the “App Language” option.
- A list of apps installed on your iPhone that support multiple languages will appear.
- Select the app for which you want to change the language.
- Choose the desired language from the available options for that specific app.
By changing the language for specific apps, you can enjoy a customized experience and interact with the app in a language that is more comfortable for you. This can be particularly useful if you’re using an app that offers content or features specific to a particular language.
It’s worth noting that not all apps allow you to change the language within the app settings. The availability of language options for specific apps depends on how the app developers have designed and localized the app. If you don’t see the option to change the language for a particular app, it means that the app does not support multiple languages.
Now that you’ve learned how to change the language for specific apps, you can tailor your app experience to your preferred language. Let’s move on to the next step: changing the language settings for Family Sharing.
Step 9: Changing Language Settings for Family Sharing
If you’re part of a Family Sharing group and want to change the language settings for Family Sharing on your iPhone, you can do so by following these steps:
- Open the Settings app on your iPhone and go to the “Screen Time” settings.
- Tap on your name at the top of the screen, which is your Apple ID.
- Select the “Family Sharing” option.
- Within the Family Sharing settings, tap on your name under the “Family Members” section.
- Scroll down and select “Language & Region.”
- You will see a list of available languages. Choose the preferred language for Family Sharing by tapping on it.
Changing the language settings for Family Sharing ensures that the content and communication related to your Family Sharing group, such as shared purchases, event invitations, and reminders, are presented in the selected language. This makes it easier for all members of the group to understand and participate in Family Sharing activities.
It’s important to note that changing the language settings for Family Sharing will only affect how Family Sharing-related content is displayed. It does not change the language settings of individual devices or apps for family members.
If you’re the organizer of the Family Sharing group and you want to change the language settings for another family member’s device, they will need to follow the steps outlined in earlier sections to change the language on their own device.
Now that you’ve successfully changed the language settings for Family Sharing, let’s move on to the final step: troubleshooting language change issues.
Step 10: Troubleshooting Language Change Issues
If you’re experiencing issues while trying to change the language on your iPhone, here are some troubleshooting tips to help you resolve any language change issues:
- Make sure you’re running the latest version of iOS on your iPhone. Software updates often include bug fixes and improvements that can resolve language-related issues.
- Restart your iPhone. Sometimes, a simple restart can resolve minor glitches and allow for smoother language changes.
- Check the language compatibility. Not all languages are available on every iOS version or for every device. Ensure that the language you want to select is supported by your iOS version and device model.
- Double-check your internet connection. Language changes may require an internet connection to download language packs or verify certain settings, so ensure that you’re connected to a stable network.
- If you’re experiencing issues with a specific app not changing its language, check the app’s settings or preferences. Not all apps support language changes within the app itself, so the language may be specific to the app’s design and implementation.
- If you’re part of a Family Sharing group and the language changes are not reflecting across Family Sharing devices, verify that each family member has followed the language change steps correctly on their individual devices.
- If none of the above steps resolve the language change issues, you may need to contact Apple Support for further assistance. They can provide personalized guidance and troubleshoot any specific issues you may be facing.
By following these troubleshooting steps, you should be able to overcome any language change issues and successfully set your preferred language on your iPhone.
With the language settings adjusted to your liking, you can now fully enjoy your iPhone experience in your chosen language.
Congratulations! You’ve completed all the steps to change the language on your iPhone. Now you can navigate your iPhone, communicate with Siri, and use apps in your preferred language with ease.