
Steps to Change the Default Font and Size in Outlook
Outlook is a popular email client that allows you to customize various settings, including the default font and size. Changing the default font and size can help improve readability and make your emails and other Outlook elements more visually appealing. Here are the steps to change the default font and size in Outlook:
- Open Outlook: Launch the Outlook application on your computer.
- Go to Options: Click on the “File” tab located at the top left corner of the screen. From the drop-down menu, select “Options.”
- Select the Mail tab: In the Outlook Options window, navigate to the “Mail” tab.
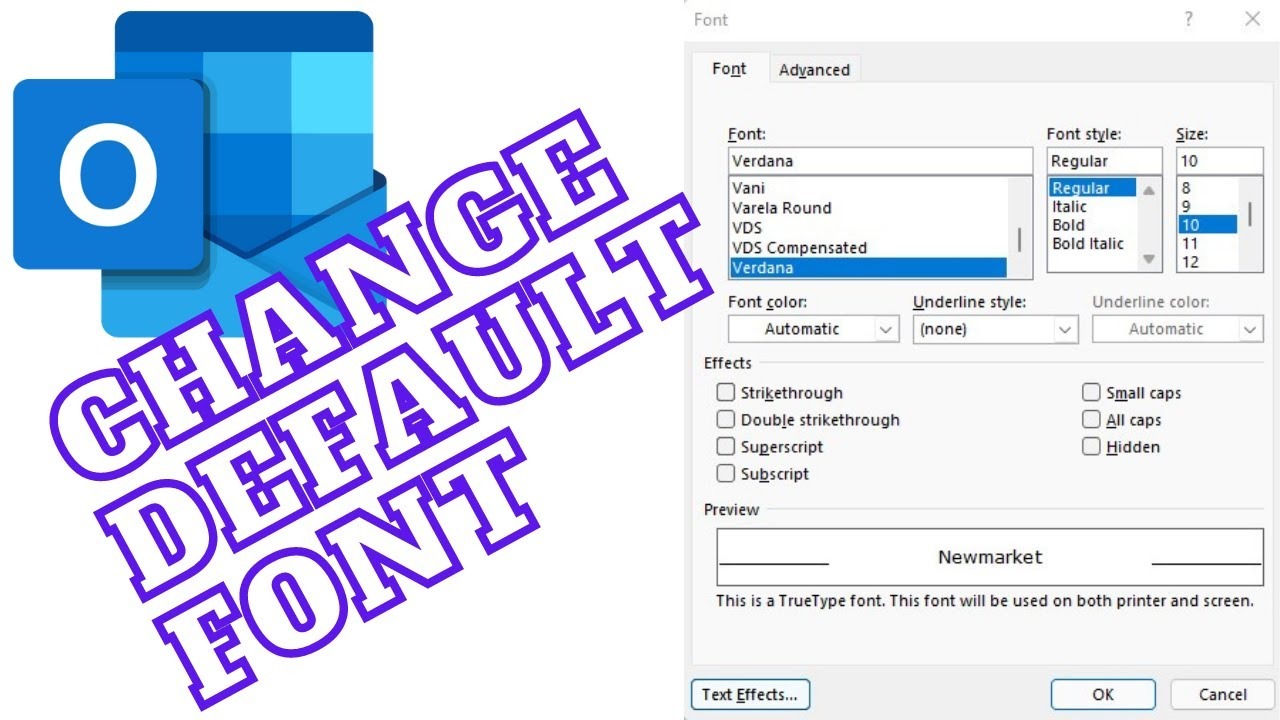
- Find the Stationery and Fonts button: Under the Compose messages section, click on the “Stationery and Fonts” button.
- Change the default font: In the Signatures and Stationery window, select the “Personal Stationery” tab if it is not already selected. Click on the “Font” button under the “New mail messages” section to change the default font.
- Choose a new font and size: In the Font window, you can select your desired font and size from the available options. You can also customize other attributes such as font style, color, and effects. Once you have made your selections, click “OK” to confirm the changes.
- Apply the changes: In the Signatures and Stationery window, click “OK” to apply the changes and close the window. You will now see the updated default font and size in the email composition window.
- Repeat for other Outlook elements: If you want to change the default font and size for other Outlook elements such as new calendar appointments, notes, tasks, or meeting requests, follow the same steps but select the corresponding options in the “Stationery and Fonts” window.
- Test the changes: Create a new email or use the specific Outlook element you modified to ensure that the default font and size changes have taken effect.
By following these steps, you can easily change the default font and size in Outlook to suit your preferences. Remember that customizing the font and size can enhance the visual appearance of your emails and other Outlook elements, making them more professional and visually appealing to recipients. Experiment with different fonts and sizes to find the combination that works best for you.
Part 1: Changing the Default Font and Size in Emails
Sending emails is one of the primary functions of Outlook, and customizing the default font and size can make your messages stand out and reflect your personal style. Here are the steps to change the default font and size in emails:
- Open Outlook: Launch the Outlook application on your computer.
- Go to Options: Click on the “File” tab located at the top left corner of the screen. From the drop-down menu, select “Options.”
- Select the Mail tab: In the Outlook Options window, navigate to the “Mail” tab.
- Find the Stationery and Fonts button: Under the Compose messages section, click on the “Stationery and Fonts” button.
- Change the default font: In the Signatures and Stationery window, select the “Personal Stationery” tab if it is not already selected. Click on the “Font” button under the “New mail messages” section to change the default font.
- Choose a new font and size: In the Font window, you can select your desired font and size from the available options. You can also customize other attributes such as font style, color, and effects. Once you have made your selections, click “OK” to confirm the changes.
- Apply the changes: In the Signatures and Stationery window, click “OK” to apply the changes and close the window. You will now see the updated default font and size in the email composition window.
With these simple steps, you can change the default font and size for composing emails in Outlook. Whether you prefer a classic and professional look or a more creative and playful style, customizing the font and size allows you to make your emails more visually appealing and unique.
Part 2: Changing the Default Font and Size in New Calendar Appointments
In addition to emails, Outlook also allows you to customize the default font and size for new calendar appointments. By changing the font and size, you can ensure that your calendar entries are easily readable and organized. Follow these steps to modify the default font and size in new calendar appointments:
- Open Outlook: Launch the Outlook application on your computer.
- Go to Options: Click on the “File” tab located at the top left corner of the screen. From the drop-down menu, select “Options.”
- Select the Calendar tab: In the Outlook Options window, navigate to the “Calendar” tab.
- Find the Fonts button: Under the Display options section, click on the “Fonts” button.
- Change the default font: In the Fonts window, select the desired font and size for new calendar appointments by clicking on the appropriate drop-down menus. You can also make additional changes to font style and color.
- Apply the changes: Once you have chosen your preferred font and size, click “OK” to apply the changes and close the Fonts window.
By following these steps, you can easily modify the default font and size for new calendar appointments in Outlook. Whether you prefer a larger, more readable font or a specific font style that suits your needs, customizing the default settings allows you to personalize your calendar entries and enhance the overall experience of using Outlook’s calendar feature.
Part 3: Changing the Default Font and Size in Notes and Tasks
In Outlook, notes and tasks serve as valuable tools for staying organized and keeping track of important information. To make your notes and tasks more visually appealing and easier to read, you have the option to change the default font and size. Follow these steps to customize the font and size in notes and tasks:
- Open Outlook: Launch the Outlook application on your computer.
- Go to Options: Click on the “File” tab located at the top left corner of the screen. From the drop-down menu, select “Options.”
- Select the Notes and Journal tab: In the Outlook Options window, navigate to the “Notes and Journal” tab.
- Find the Fonts button: Under the Notes options section, click on the “Fonts” button.
- Change the default font: In the Fonts window, choose the desired font and size for notes and tasks by selecting the appropriate options from the drop-down menus. You can also adjust the font style and color to suit your preferences.
- Apply the changes: Once you have made the necessary font and size modifications, click “OK” to apply the changes and close the Fonts window.
By following these simple steps, you can easily change the default font and size in Outlook’s notes and tasks. This customization allows you to make your notes more visually appealing and legible, ensuring that you can easily review and manage your tasks and important information within the Outlook application.
Part 4: Changing the Default Font and Size in Calendar Invites
When sending and receiving calendar invites in Outlook, it’s important to ensure that the default font and size are visually appealing and easy to read. Customizing the font and size in calendar invites can help make them stand out and convey information effectively. Follow these steps to change the default font and size for calendar invites:
- Open Outlook: Launch the Outlook application on your computer.
- Go to Options: Click on the “File” tab located at the top left corner of the screen. From the drop-down menu, select “Options.”
- Select the Calendar tab: In the Outlook Options window, navigate to the “Calendar” tab.
- Find the Calendar options button: Under the Calendar options section, click on the “Calendar Options” button.
- Change the default font: In the Calendar Options window, click on the “Font” button to customize the default font and size for calendar invites.
- Choose a new font and size: In the Font window, select your preferred font and size from the available options. Additionally, you can customize other attributes such as font style and color. After making your selections, click “OK” to confirm the changes.
- Apply the changes: In the Calendar Options window, click “OK” to apply the changes and close the window. The default font and size for calendar invites will now be updated.
By following these steps, you can easily change the default font and size for calendar invites in Outlook. Customizing the font and size ensures that your calendar invites are visually appealing and clearly communicate the relevant information to recipients. Experiment with different font styles and sizes to find the combination that suits your preferences and enhances the overall experience of working with calendar invites within Outlook.
Part 5: Changing the Default Font and Size in Meeting Requests
Meeting requests are an important part of scheduling and organizing meetings in Outlook. To ensure that your meeting requests are visually appealing and easy to read, you have the option to change the default font and size. Follow these steps to customize the font and size in meeting requests:
- Open Outlook: Launch the Outlook application on your computer.
- Go to Options: Click on the “File” tab located at the top left corner of the screen. From the drop-down menu, select “Options.”
- Select the Calendar tab: In the Outlook Options window, navigate to the “Calendar” tab.
- Find the Calendar options button: Under the Calendar options section, click on the “Calendar Options” button.
- Change the default font: In the Calendar Options window, click on the “Font” button to customize the default font and size for meeting requests.
- Choose a new font and size: In the Font window, select your preferred font and size from the available options. You can also customize other attributes such as font style and color. Once you have made your selections, click “OK” to confirm the changes.
- Apply the changes: In the Calendar Options window, click “OK” to apply the changes and close the window. The default font and size for meeting requests will now be updated.
By following these steps, you can easily change the default font and size for meeting requests in Outlook. Customizing the font and size ensures that your meeting requests are visually appealing and clearly convey the necessary details to recipients. Experiment with different font styles and sizes to find the combination that suits your preferences and enhances the overall experience of working with meeting requests within Outlook.
Part 6: Changing the Default Font and Size in Read and Compose Views
When reading and composing emails in Outlook, it’s important to have the default font and size set to your liking for a comfortable and enjoyable experience. Outlook allows you to customize the font and size in both the read and compose views. Follow these steps to change the default font and size in read and compose views:
- Open Outlook: Launch the Outlook application on your computer.
- Go to Options: Click on the “File” tab located at the top left corner of the screen. From the drop-down menu, select “Options.”
- Select the Mail tab: In the Outlook Options window, navigate to the “Mail” tab.
- Find the Stationery and Fonts button: Under the Compose messages section, click on the “Stationery and Fonts” button.
- Change the default font: In the Signatures and Stationery window, select the “Personal Stationery” tab if it is not already selected. Click on the “Font” button under the “New mail messages” section to change the default font for compose view.
- Choose a new font and size: In the Font window, select your desired font and size for the compose view from the available options. Make any other desired changes, such as font style and color, and click “OK” to confirm the changes.
- Change the default font for read view: In the Signatures and Stationery window, select the “Personal Stationery” tab if it is not already selected. Click on the “Font” button under the “Replying or forwarding messages” section to change the default font for read view.
- Choose a new font and size: In the Font window, select your desired font and size for the read view from the available options. Make any other desired changes, such as font style and color, and click “OK” to confirm the changes.
- Apply the changes: In the Signatures and Stationery window, click “OK” to apply the changes and close the window. The default font and size for both read and compose views will now be updated.
By following these steps, you can easily change the default font and size in both the read and compose views in Outlook. Customizing the font and size allows you to have a consistent and personalized experience when reading and composing emails in Outlook, making it easier and more enjoyable for you to navigate and communicate effectively.
Part 7: Changing the Default Font and Size in Signatures
Signatures are an important and often-used feature in Outlook, allowing you to add a personal touch to your emails. To ensure that your signature matches your desired style and appearance, you can customize the default font and size. Follow these steps to change the default font and size in signatures:
- Open Outlook: Launch the Outlook application on your computer.
- Go to Options: Click on the “File” tab located at the top left corner of the screen. From the drop-down menu, select “Options.”
- Select the Mail tab: In the Outlook Options window, navigate to the “Mail” tab.
- Find the Signatures button: Under the Compose messages section, click on the “Signatures” button.
- Change the default font: In the Signatures and Stationery window, select the signature you want to modify and click on the “Font” button to change the default font and size for that signature.
- Choose a new font and size: In the Font window, select your desired font and size from the available options. You can also customize other attributes such as font style and color. Once you are satisfied with your selections, click “OK” to confirm the changes.
- Apply the changes: In the Signatures and Stationery window, click “OK” to apply the changes and close the window. The default font and size for the selected signature will now be updated.
By following these steps, you can easily change the default font and size in Outlook signatures. Customizing the font and size allows you to create signatures that align with your personal or professional branding. Whether you prefer a sleek and minimalist look or a more decorative style, customizing the font and size in signatures enables you to make a lasting impression with every email you send.
Part 8: Changing the Default Font and Size in Replies and Forwards
When replying to or forwarding emails in Outlook, it’s important to have control over the font and size to ensure clarity and consistency in your communication. By customizing the default font and size in replies and forwards, you can make your responses visually appealing and easier to read. Follow these steps to change the default font and size in replies and forwards:
- Open Outlook: Launch the Outlook application on your computer.
- Go to Options: Click on the “File” tab located at the top left corner of the screen. From the drop-down menu, select “Options.”
- Select the Mail tab: In the Outlook Options window, navigate to the “Mail” tab.
- Find the Stationery and Fonts button: Under the Compose messages section, click on the “Stationery and Fonts” button.
- Change the default font for replies: In the Signatures and Stationery window, select the “Personal Stationery” tab if it is not already selected. Click on the “Font” button under the “Replies and forwards” section to change the default font and size for replies.
- Change the default font for forwards: In the same Signatures and Stationery window, click on the “Font” button under the “When forwarding a message” section to change the default font and size for forwards.
- Choose a new font and size: In the Font window, select your desired font and size for replies and forwards. You can also customize other attributes such as font style and color. Once you are satisfied with your selections, click “OK” to confirm the changes.
- Apply the changes: In the Signatures and Stationery window, click “OK” to apply the changes and close the window. The default font and size for replies and forwards will now be updated.
By following these steps, you can easily change the default font and size in replies and forwards in Outlook. Customizing the font and size ensures that your responses and forwarded messages appear consistent and professional. Whether you prefer a specific font, size, or other stylistic elements, customizing the font and size allows you to craft visually appealing and well-formatted email correspondences.
Part 9: Changing the Default Font and Size in Plain Text Emails
Plain text emails can be a preferred choice for simplicity or compatibility purposes. While they may lack the visual enhancements of HTML emails, you can still customize the default font and size in Outlook for an improved reading experience. Here’s how you can change the default font and size in plain text emails:
- Open Outlook: Launch the Outlook application on your computer.
- Go to Options: Click on the “File” tab located at the top left corner of the screen. From the drop-down menu, select “Options.”
- Select the Mail tab: In the Outlook Options window, navigate to the “Mail” tab.
- Find the Stationery and Fonts button: Under the Compose messages section, click on the “Stationery and Fonts” button.
- Change the default font for plain text emails: In the Signatures and Stationery window, select the “Personal Stationery” tab if it is not already selected. Click on the “Font” button under the “Plain text font” section to change the default font and size.
- Choose a new font and size: In the Font window, select your desired font and size for plain text emails. You can also customize other attributes such as font style and color. Once you have made your selections, click “OK” to confirm the changes.
- Apply the changes: In the Signatures and Stationery window, click “OK” to apply the changes and close the window. The default font and size for plain text emails will now be updated.
By following these steps, you can easily change the default font and size in plain text emails in Outlook. Customizing the font and size ensures that your plain text emails have better readability, making it easier for recipients to understand and respond to your messages. Whether you prefer a specific font or a larger font size, customizing the default settings allows you to enhance the overall appearance and legibility of your plain text emails.
Part 10: Changing the Default Font and Size for Remote Content
Remote content refers to external images, stylesheets, or scripts that are embedded within emails. By default, Outlook may block remote content for security reasons. However, if you trust the sender and want to view the content, you can customize the default font and size specifically for remote content. Here’s how to change the default font and size for remote content:
- Open Outlook: Launch the Outlook application on your computer.
- Go to Options: Click on the “File” tab located at the top left corner of the screen. From the drop-down menu, select “Options.”
- Select the Trust Center tab: In the Outlook Options window, navigate to the “Trust Center” tab.
- Click on the Trust Center Settings button: Under the Trust Center section, click on the “Trust Center Settings” button.
- Select the Automatic Download tab: In the Trust Center window, select the “Automatic Download” tab.
- Change the default font and size: Under the RSS Feeds and Web sites section, click on the “Change AutoDownload Settings” button.
- Select the Fonts tab: In the Automatic Download Settings window, navigate to the “Fonts” tab to customize the default font and size for remote content.
- Choose a new font and size: In the Fonts tab, select your preferred font and size options. You can also adjust other attributes such as font style and color if desired.
- Apply the changes: Click “OK” to apply the changes and close the Automatic Download Settings and Trust Center windows.
By following these steps, you can customize the default font and size for remote content in Outlook. It allows you to have consistent and visually pleasing formatting for external images and other content embedded in emails. Ensure that you exercise caution and only enable remote content from trusted sources to protect yourself from potential security risks.