
Preparing to Change the Battery
Before you begin the process of changing the battery in your Samsung tablet, it is important to gather the necessary tools and take some precautions to ensure a smooth and safe battery replacement. Here are the steps to prepare for the battery replacement:
1. Power Down the Tablet: Before you start handling the battery, make sure to power off your Samsung tablet and disconnect it from any power source. This step is crucial to prevent any accidental damage or electrical shocks during the battery replacement process.
2. Find a Clean and Well-Lit Workspace: Look for a spacious area with good lighting to work on your tablet. Ensure that the workspace is clean and free from any clutter or static electricity. This will help prevent any potential damage to the tablet or the new battery.
3. Gather the Necessary Tools: To successfully replace the battery, you will need a few tools, including a screwdriver (often a small Phillips head), a spudger or plastic opening tool to pry open the tablet, and a pair of tweezers to handle small components. Having these tools ready will make the battery replacement process easier and more efficient.
4. Order a Replacement Battery: It is essential to have a compatible replacement battery for your specific Samsung tablet model. Check the tablet’s model number and search for a genuine replacement battery from a reliable source. Avoid purchasing counterfeit batteries, as they may cause malfunction or even damage your tablet.
5. Ensure Anti-Static Precautions: Static electricity can harm electronic components, so it is crucial to discharge any static charge from your body before handling the tablet. You can do this by touching a grounded object or using an anti-static wristband. Additionally, avoid wearing synthetic or woolen clothing that can generate static electricity.
By following these preparatory steps, you are ready to embark on the battery replacement process for your Samsung tablet. Taking the time to gather the necessary tools and create an optimal workspace will help ensure a smooth and successful battery replacement, allowing your tablet to regain its full power and functionality.
Removing the Back Cover
To access the battery in your Samsung tablet, you will need to remove the back cover. Follow these steps to safely remove the back cover:
1. Locate the Screws: Most Samsung tablets have screws holding the back cover in place. Look for these screws on the edges or corners of the back cover. Use a small Phillips head screwdriver to remove them. Remember to keep the screws in a safe place, as you will need them later to reassemble the device.
2. Use a Spudger or Plastic Opening Tool: Once the screws are removed, gently insert a spudger or a plastic opening tool into the small gaps between the back cover and the tablet’s frame. Slowly and carefully pry the back cover away from the frame. Work your way around the edges of the tablet until the back cover is fully separated.
3. Be Gentle and Patient: It’s important to be gentle and patient while removing the back cover to avoid any damage to the tablet or its components. Take your time and apply pressure evenly to prevent the cover from snapping or cracking.
4. Watch Out for Adhesive Strips: In some tablets, you may encounter adhesive strips that secure the back cover to the frame. If you notice resistance when trying to remove the back cover, stop and check for adhesive strips. Carefully peel them off to release the back cover.
5. Set Aside the Back Cover: Once you have successfully detached the back cover, set it aside in a safe and clean place. Keep it in a position where it won’t get scratched, damaged, or accumulate dust.
Remember, each tablet model may have slight variations in the process of removing the back cover. If you encounter any resistance or are unsure about proceeding, consult the user manual for your specific tablet model or seek professional assistance.
By carefully following these steps, you will be able to remove the back cover from your Samsung tablet and gain access to the battery for replacement. With the back cover safely removed, you are ready to proceed to the next step of disconnecting the battery connector.
Disconnecting the Battery Connector
After successfully removing the back cover of your Samsung tablet, the next step is to disconnect the battery connector. This will ensure your safety and prevent any potential electrical damage during the battery replacement process. Follow these steps carefully:
1. Locate the Battery Connector: Look for the battery connector, which is usually a small ribbon or cable connected to the tablet’s motherboard. The connector is typically located near the center or bottom of the device. Take note of how the connector is attached before proceeding.
2. Use a Spudger or Tweezers: Gently insert a spudger or a pair of tweezers under the edge of the connector to lift it up. Apply a slight upward pressure to disconnect the connector from its socket. Be careful not to pull too hard or use excessive force, as this may damage the connector or its connection point.
3. Be Mindful of Ribbon Cables: Some tablets may have battery connectors that involve ribbon cables. In such cases, carefully detach the ribbon cable from its connector by pulling it out gently. Take note of the alignment and orientation of the ribbon cable for later reconnection.
4. Double-Check for Additional Connectors: Depending on the tablet model, there may be additional connectors attached to the battery or nearby components. Take a moment to visually inspect the area for any other connectors, and disconnect them if necessary. Pay attention to any securing clips or adhesive that may be holding the connectors in place.
5. Verify Disconnect: Once you have disconnected the battery connector(s), double-check that they are completely detached. Ensure that there are no visible tension or connections between the battery and the tablet’s motherboard.
By carefully following these steps, you have successfully disconnected the battery connector in your Samsung tablet. This step is crucial to prevent any accidental electrical transfers or short circuits during the battery replacement process. With the battery connector safely disconnected, you can now move on to the next step of removing the old battery.
Removing the Old Battery
With the battery connector safely disconnected, you can now proceed to remove the old battery from your Samsung tablet. Follow these steps to ensure a successful removal:
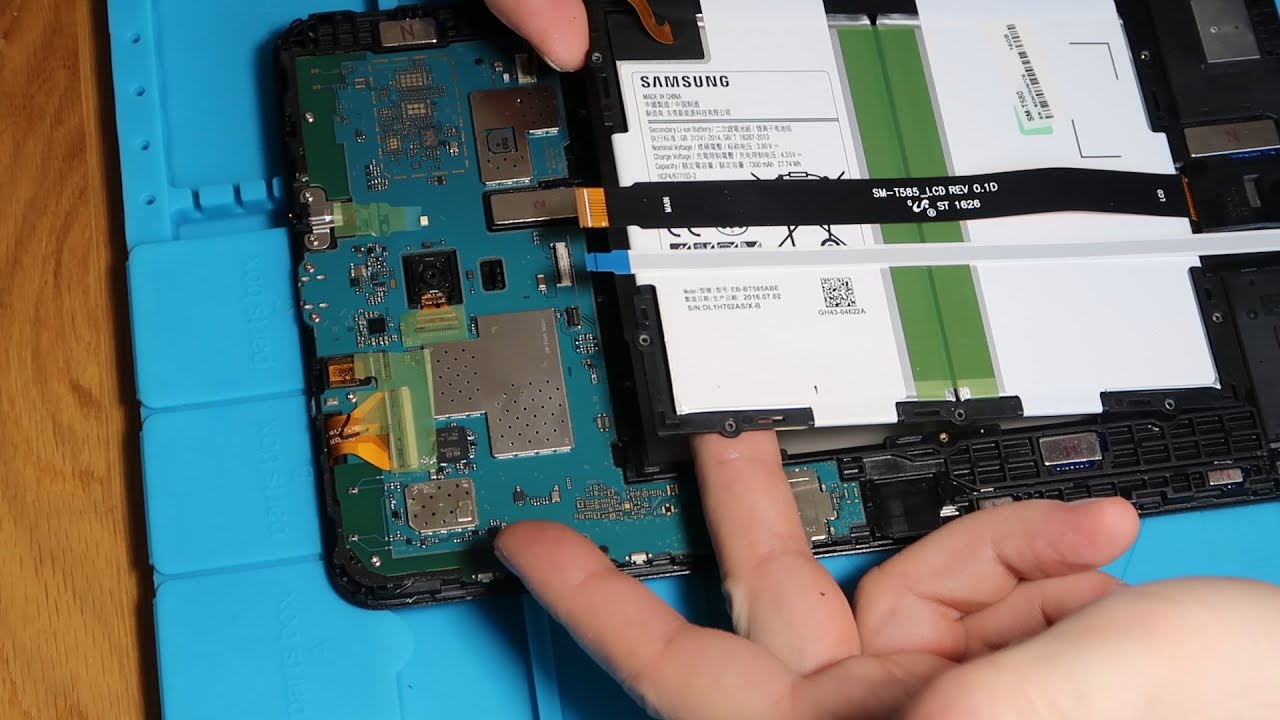
1. Identify the Battery: Locate the battery inside your tablet. It is a rectangular or square-shaped component, usually attached to the back of the device or near the center. Take note of any adhesive or brackets holding the battery in place.
2. Check for Adhesive: Some tablets may have adhesive strips or pads securing the battery to the device. If you see any adhesive, gently pry it away using a spudger or plastic opening tool. Be careful not to damage the battery or other components while doing so.
3. Detach Brackets or Clips: In some cases, there may be brackets or clips holding the battery in place. Carefully remove any screws or detachable brackets to release the battery. Use a screwdriver or appropriate tool if necessary, and keep track of all the screws or clips for later reassembly.
4. Gently Lift the Battery: Once any adhesive or brackets are detached, gently lift the battery from the device using your fingers or a plastic opening tool. Apply even pressure and ensure not to bend or twist the battery, as it could damage the internal components.
5. Inspect the Battery: While removing the old battery, take a moment to inspect its condition. Look for any signs of swelling, leakage, or damage. If you spot any issues, handle the battery with extreme caution, following proper disposal procedures for electronic waste.
6. Set Aside the Old Battery: Once removed, place the old battery in a safe and designated container for proper recycling or disposal. Be sure to adhere to local regulations regarding the disposal of electronic waste.
Removing the old battery is a critical step in the battery replacement process. By following these steps carefully, you have successfully removed the old battery from your Samsung tablet. With the old battery out of the way, you are now ready to insert the new battery and complete the replacement process.
Inserting the New Battery
Now that you have successfully removed the old battery from your Samsung tablet, it’s time to insert the new battery. Follow these steps to ensure a proper and secure installation:
1. Check the New Battery: Before inserting the new battery, double-check that it is the correct replacement for your Samsung tablet model. Ensure that the new battery matches the specifications and design of the original battery.
2. Position the New Battery: Align the new battery with the designated slot in your tablet. Ensure that the connectors match up with the corresponding connectors on the device’s motherboard. Take note of any guides or notches that help in proper alignment.
3. Secure the Battery: If the new battery comes with adhesive strips or pads, remove any protective backing and carefully press the battery into place. Make sure it fits securely and snugly within the designated compartment. If there are brackets or clips, reattach them to secure the battery.
4. Double-Check Connections: Verify that the battery connectors are aligned properly and securely connected. They should be snug and fit without any gaps or visible tension. Improper connection can result in poor battery performance or device malfunctions.
5. Test Battery Alignment: Gently press down on the new battery to ensure it is properly seated and does not move or shift. If it feels loose, double-check the alignment and connection before proceeding.
6. Replace Any Covers or Brackets: If the new battery came with additional covers or brackets, ensure they are properly reattached. Secure any screws or clips to hold them in place. This will help protect the battery and ensure a tidy reassembly.
By following these steps, you have successfully inserted the new battery into your Samsung tablet. The proper installation of the new battery is crucial for optimal performance and longevity. With the new battery securely in place, you are now ready to reconnect the battery connector and reassemble your tablet.
Reconnecting the Battery Connector
With the new battery securely inserted into your Samsung tablet, the next step is to reconnect the battery connector. Follow these steps to ensure a proper and secure reconnection:
1. Locate the Battery Connector: Look for the battery connector, which is a small ribbon or cable attached to the tablet’s motherboard. Take note of how the connector was originally connected before you disconnected it.
2. Align the Connector: Align the battery connector with its corresponding socket on the tablet’s motherboard. Pay attention to the orientation and alignment of the connector to ensure a proper fit.
3. Insert the Connector: Gently press the battery connector into its socket until it is fully seated. Apply a slight downward pressure to ensure a snug and secure connection. Take care not to use excessive force or bend the connector.
4. Check for Secure Connection: Verify that the battery connector is securely connected. Ensure there are no gaps or visible tension between the connector and the socket. A loose connection may result in poor battery performance or device malfunctions.
5. Reconnect Any Other Connectors: If you disconnected any additional connectors during the battery replacement process, now is the time to reconnect them. Ensure they are properly aligned and inserted into their respective sockets. Double-check the connections to ensure everything is securely attached.
6. Carefully Tuck Away Wires: If there are any excess wires or cables, carefully tuck them away to prevent interference with other components. Make sure they are out of the way and properly secured to avoid any damage or accidental disconnection.
With the battery connector reconnected, you have successfully completed this crucial step in the battery replacement process. The secure connection ensures proper power flow to the tablet and enables the new battery to function optimally. Now, you can proceed to the final step of reassembling your Samsung tablet.
Replacing the Back Cover
Now that you have successfully reconnected the battery connector in your Samsung tablet, it’s time to replace the back cover. Follow these steps to ensure a secure and proper reassembly:
1. Align the Back Cover: Position the back cover over the tablet, aligning it with the edges and corners. Ensure that any camera or speaker openings are properly aligned with their respective components on the tablet.
2. Insert the Back Cover: Gently press the back cover onto the tablet, starting from one edge and working your way around. Apply even pressure to ensure a snug fit. Be careful not to bend or force the cover into place, as this may damage the tablet or the cover itself.
3. Listen for Clicks or Snaps: As you press the back cover, listen for clicks or snaps that indicate the cover is securely in place. This is especially important if your tablet has tabs or clips that hold the back cover in position. Make sure all edges are properly aligned and seated.
4. Check for Proper Fit: Once the back cover is in place, check for any gaps or unevenness. The cover should fit smoothly and seamlessly onto the tablet. If there are any issues, remove the cover and check for obstructions or misalignments before reattaching.
5. Replace the Screws: If your tablet’s back cover is held in place with screws, retrieve the screws you set aside earlier. Carefully insert and tighten the screws one by one, following the correct screw pattern for your tablet model. Use a screwdriver that fits securely to avoid stripping the screws.
6. Test the Back Cover: After reattaching the back cover, give it a gentle press to ensure it is securely fastened. It should not shift or move when pressed. If it feels loose, double-check the alignment and attachment of the cover.
With the back cover securely in place, you have successfully completed the reassembly of your Samsung tablet. The properly replaced cover not only protects the internal components but also gives your tablet a finished look. Now, you’re ready to move on to the final step – testing the new battery.
Testing the New Battery
After successfully replacing the back cover of your Samsung tablet, it’s time to test the new battery and ensure it is functioning properly. Follow these steps to verify the performance of the new battery:
1. Power On the Tablet: Press and hold the power button to turn on your Samsung tablet. If the tablet does not power on, connect it to a power source and allow it to charge for a few minutes before attempting to power it on again.
2. Monitor Battery Level: Once the tablet is powered on, keep an eye on the battery level indicator. It should show an adequate charge level or begin to increase if the battery was previously depleted. If the battery level does not increase or the tablet shuts off unexpectedly, there may be an issue with the new battery.
3. Run Battery Tests: If your tablet has diagnostic tools or battery testing apps, use them to assess the performance of the new battery. These tests can provide valuable information about the battery’s capacity, charging speed, and overall health.
4. Observe Battery Life: Use your tablet as you normally would and observe the battery life. The new battery should provide extended usage time compared to the old battery. If you notice the battery drains rapidly or the tablet shuts down unexpectedly, there may be an issue with the new battery or its installation.
5. Check for Overheating: While using the tablet, pay attention to any excessive heat generated by the new battery. Overheating can be a sign of a faulty battery or poor installation. If you notice significant heat, remove the back cover and verify that the battery is properly seated and connected.
6. Repeat Charging Cycles: To ensure the new battery reaches its optimal performance, allow it to fully discharge and then recharge it several times. This will help calibrate the battery and maximize its capacity.
By following these steps, you can test the new battery in your Samsung tablet and ensure it is functioning properly. If you encounter any issues or suspect a problem with the new battery, consult the manufacturer’s guidelines or consider seeking professional assistance. With a fully functional battery, you can now enjoy extended usage time and a reliable power source for your Samsung tablet.