
Adjusting Display Settings on Windows
Windows offers a variety of options to adjust the display settings to suit your preferences. Whether you want to change the screen resolution or adjust the scaling for better readability, the following steps will guide you through the process.
To change the screen resolution, right-click on the desktop and select “Display settings.” This will open the display settings page where you can adjust the resolution. Choose the resolution that best suits your needs from the drop-down menu and click “Apply.” Keep in mind that selecting a higher resolution will provide sharper images but may make certain elements appear smaller.
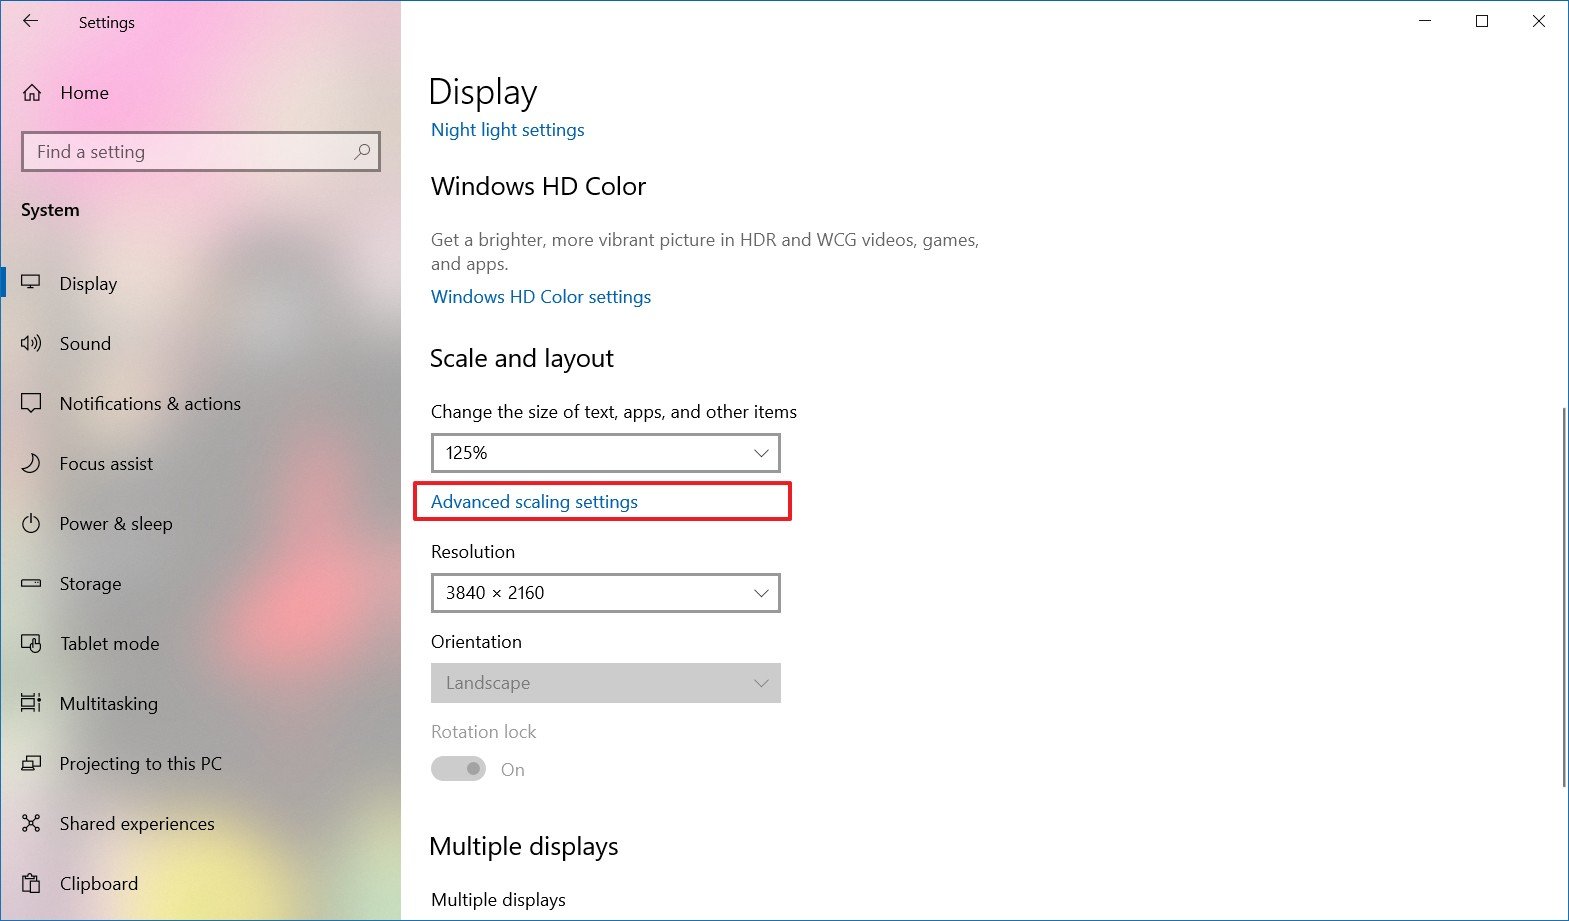
If you find that the text or icons on your screen are too small to read comfortably, you can adjust the scaling settings. From the display settings page, scroll down to the “Scale and layout” section and choose the desired scaling percentage. The recommended setting is usually 100%, but you can experiment with different percentages until you find the one that works best for you.
In addition to resolution and scaling, you can also adjust other display settings such as orientation, brightness, and contrast. To access advanced display settings, click on “Advanced display settings” at the bottom of the display settings page. Here, you can make further adjustments to enhance your viewing experience.
If you have multiple monitors connected to your Windows system, you can customize the display settings for each individual monitor. Simply select the monitor you wish to adjust from the “Choose display” dropdown menu on the display settings page and modify the settings as desired.
Once you’ve made the necessary changes, click “Apply” to save the settings. If you’re not satisfied with the changes, you can revert to the previous settings by clicking “Revert” or waiting for the settings to automatically revert after a few seconds.
Remember, adjusting the display settings can greatly enhance your overall computing experience by providing a more comfortable and visually pleasing display. Take the time to explore the different options available on Windows and find the settings that work best for you.
Changing Display Resolution on Mac
Whether you want to increase the screen real estate or optimize the display for specific tasks, changing the display resolution on a Mac is a simple process. Follow the steps below to adjust the display resolution according to your preferences.
To begin, click on the Apple menu in the top left corner of the screen and select “System Preferences.” In the System Preferences window, click on “Displays” to access the display settings.
In the Displays tab, you will see a list of available resolutions for your display. Select the resolution that suits your needs from the list. You can choose a higher resolution for more screen space or a lower resolution for larger text and icons. Keep in mind that the available resolutions depend on the capabilities of your display.
Once you’ve selected your desired resolution, macOS will apply the changes immediately. Take a moment to assess the new resolution and check if it meets your requirements. If the new resolution is not suitable, you can always go back to the Display settings and choose a different resolution.
In addition to changing the resolution, you can also adjust the refresh rate of your display. The refresh rate determines how many times the image on the screen is refreshed per second. To customize the refresh rate, click on the “Display” tab and then click on the “Display” tab. Here, you can select the desired refresh rate from the available options. Keep in mind that not all displays support higher refresh rates, so make sure to choose a rate that is compatible with your monitor.
Changing the display resolution on a Mac is a quick and effective way to optimize your visual experience. Whether you need more screen space for multitasking or larger text for improved readability, adjusting the display resolution to suit your needs is a straightforward process. Experiment with different resolutions until you find the one that provides the best balance between clarity and usability.
Changing Display Size on Linux
Linux provides users with the flexibility to adjust the display size according to their preferences. Whether you’re looking to increase the screen real estate or optimize the display for better readability, the following steps will guide you through the process of changing the display size on Linux.
The method to change the display size may vary depending on the Linux distribution and desktop environment you are using. However, the most common way to adjust the display size is through the system settings or display settings utility.
To begin, access the system settings or display settings utility by clicking on the corresponding icon in your desktop environment’s taskbar or by navigating through the system menu. Once you’re in the display settings, look for an option that allows you to change the resolution or scale of the display.
Click on the resolution or scaling option and select the desired display size from the available options. You may see a list of resolutions or a slider to adjust the scaling. Choose the display size that best suits your needs and apply the changes.
After applying the new display size, the screen will immediately adjust to the selected resolution or scaling. Take a moment to assess the new display size and check if it meets your requirements. If not, you can always go back to the display settings and choose a different size.
It’s worth noting that some Linux distributions also provide advanced customization options for the display, allowing you to fine-tune various parameters such as the refresh rate, orientation, and position of the display. These options can usually be accessed through the advanced display settings or a dedicated utility provided by your distribution.
Changing the display size on Linux gives you the flexibility to tailor your visual experience to your liking. Whether you’re working on complex tasks that require more screen space or need larger elements for improved accessibility, adjusting the display size on Linux allows you to optimize your display for maximum comfort and productivity.
Adjusting DPI Scaling on Windows
DPI scaling refers to the adjustment of the size of text, icons, and other graphical elements on the screen based on the DPI (dots per inch) of the display. This feature is particularly useful for high-resolution displays or for users with visual impairments. Here’s how you can adjust DPI scaling on Windows.
To begin, right-click on the desktop and select “Display settings” from the context menu. In the Display settings window, scroll down to the “Scale and layout” section.
Here, you will find a slider with the label “Change the size of text, apps, and other items.” Drag the slider to the right to increase the scaling or to the left to decrease it. As you move the slider, the changes will be reflected in real-time on the preview screen.
Windows also provides an option to make the scaling more uniform across all connected displays. To enable this option, click on the “Advanced scaling settings” link below the slider. In the Advanced scaling settings, toggle on the “Let Windows try to fix apps so they’re not blurry” option.
Keep in mind that adjusting the DPI scaling may require logging out and back into your Windows account to fully apply the changes. Windows will prompt you to do so if necessary.
In some cases, certain apps or programs may not scale properly with DPI changes, resulting in blurry or incorrectly sized content. To fix this, Windows provides an option to override the DPI scaling behavior for specific apps. In the Display settings window, scroll down to the “App DPI” section and click on the “Change high DPI settings” link. Here, you can customize the behavior of individual apps and determine how they scale with DPI changes.
By adjusting the DPI scaling on Windows, you can ensure that your display is comfortable and legible for your specific needs. Whether you need larger text and icons for better visibility or want to maximize screen space on high-resolution displays, DPI scaling allows you to fine-tune the visual elements on your screen for an optimal viewing experience.
Changing Screen Size on Chromebook
Chromebooks offer a simple and straightforward process for changing the screen size to suit your preferences. Whether you want to increase the screen real estate or optimize the display for better readability, the following steps will guide you through changing the screen size on a Chromebook.
To begin, click on the clock in the bottom-right corner of the screen to open the system tray. From there, click on the gear icon to access the settings menu.
In the settings menu, click on the “Display” option. Here, you will find the screen size or resolution settings for your Chromebook. Click on this option to proceed.
You will see a list of available screen resolutions. Choose the one that fits your needs. Keep in mind that selecting a higher resolution will provide sharper images but may make certain elements appear smaller.
Once you’ve selected the desired screen size, the Chromebook will immediately adjust the display according to the chosen resolution. Take a moment to assess the new screen size and check if it meets your requirements. If not, you can always go back to the display settings and choose a different resolution.
In addition to changing the screen size, Chromebooks also provide the option to adjust the screen orientation. You can rotate the screen to landscape or portrait mode depending on your preferences. This feature is especially useful when using a Chromebook in tablet mode or for tasks that require a specific screen orientation.
By adjusting the screen size on your Chromebook, you can enhance your visual experience and tailor the display to your liking. Whether you’re working on productivity tasks or enjoying multimedia content, changing the screen size allows you to optimize the display for maximum comfort and usability.
Changing Display Settings on Gaming Monitors
Gaming monitors often come with a variety of customizable display settings to help enhance your gaming experience. By adjusting these settings, you can optimize the visuals, reduce motion blur, and enjoy smoother gameplay. Here’s how you can change the display settings on gaming monitors.
Most gaming monitors come with an on-screen display (OSD) menu that allows you to access and customize the display settings. To open the OSD menu, look for the buttons or a joystick located on the monitor itself. Each button or direction on the joystick corresponds to a different menu option.
Once you’re in the OSD menu, navigate to the display settings section. Here, you will find a range of options to adjust various aspects of the display, including brightness, contrast, color temperature, sharpness, and more. These settings can significantly impact the visuals and overall clarity of the displayed image.
Experiment with different configurations to find the settings that best suit your preferences and the specific requirements of the game you’re playing. For example, you may want to increase the brightness for darker game environments or reduce motion blur by adjusting the response time settings.
Some gaming monitors also offer advanced features like HDR (High Dynamic Range) or G-Sync/FreeSync compatibility. HDR enhances the contrast and color accuracy of the image, while G-Sync/FreeSync technology synchronizes the monitor’s refresh rate with the graphics card, resulting in smoother gameplay and reduced screen tearing.
To enable these features, navigate to the corresponding settings in the OSD menu. Keep in mind that not all games or graphics cards may support these features, so it’s important to check compatibility beforehand and adjust the settings accordingly.
Once you’ve made the desired changes, exit the OSD menu, and your gaming monitor will save the settings. Don’t forget to periodically recheck and fine-tune the display settings based on your evolving gaming preferences and the requirements of different games.
By changing the display settings on your gaming monitor, you can optimize the visuals for an immersive gaming experience. Take advantage of the customization options offered by your gaming monitor to enhance picture quality, reduce motion blur, and fine-tune the display to your liking while enjoying your favorite games.
Calibrating Display Size on Smart TVs
Calibrating the display size on your smart TV is crucial to ensure optimal viewing and a more immersive entertainment experience. By properly adjusting the display settings, you can eliminate overscan, fix aspect ratio issues, and enjoy content the way it was intended. Here’s how you can calibrate the display size on your smart TV.
Start by accessing the settings menu of your smart TV. The location and layout of the settings menu may vary depending on the brand and model of your TV. Look for options like “Settings,” “Picture,” or “Display” to proceed.
Once you’re in the settings menu, navigate to the display settings section. Here, you will find several options to calibrate the display size, including aspect ratio, screen fit, zoom, and overscan.
The aspect ratio setting determines the proportional relationship between the width and height of the displayed image. Select the aspect ratio that matches the content you are watching. For most modern TVs, the “16:9” aspect ratio is the standard choice.
If you notice that some parts of the screen are cut off or not visible, overscan may be enabled. Overscan is a feature that zooms in the image slightly to eliminate any noise or interference near the edges of the screen. However, it can lead to the loss of some content. Disable overscan to ensure that the full picture is visible on the screen.
To fix any aspect ratio or overscan issues, look for the “Screen Fit” or “Just Scan” option. This option ensures that the content is displayed in its original size without any cropping or stretching.
In some cases, you may want to adjust the display size manually. If your smart TV provides a zoom or picture size option, you can experiment with different settings to find the one that best fits your preferences and the content you’re watching.
It’s recommended to use calibration test patterns or reference images to help you fine-tune the display size and ensure the most accurate representation of colors, contrast, and sharpness. These patterns can be found online or on calibration discs designed for TVs.
Once you’ve calibrated the display size, take the time to revisit the settings periodically, especially if you switch between different sources or content types. Different devices and content may have different aspect ratios or display requirements.
By calibrating the display size on your smart TV, you can enjoy a more immersive and enjoyable viewing experience. Take advantage of the settings available on your TV to adjust the aspect ratio, disable overscan, and fine-tune the display size to ensure that you’re getting the best possible picture quality.
Adjusting Display Size on Mobile Devices
Mobile devices like smartphones and tablets offer various ways to adjust the display size, allowing you to customize the visual experience according to your preferences. Whether you want to make the content appear larger for improved readability or maximize the screen space for better multitasking, here’s how you can adjust the display size on mobile devices.
On most mobile devices, you can adjust the display size through the accessibility settings. To access these settings, go to the device settings menu and look for the “Accessibility” or “Display & Text Size” option.
In the accessibility settings, you will find options like “Text Size,” “Display Zoom,” or “Display Size.” These settings allow you to increase or decrease the overall size of the text and other elements on the screen.
If you want to increase the size of the text specifically, select the “Text Size” option and drag the slider to the desired size. This will make the text larger and more legible throughout the system and apps.
To adjust the overall display size, choose the “Display Size” or “Display Zoom” option. Here, you can increase or decrease the size of the display elements, including icons and UI components. Drag the slider or select from the available preset options to find the display size that suits your needs.
Aside from the accessibility settings, some devices may also offer additional display customization options under the “Display” or “Display & Brightness” settings. These options may include screen resolutions, color temperature adjustments, or night mode settings. Explore these settings to further enhance your visual experience.
Keep in mind that adjusting the display size may affect the layout and formatting of certain apps or webpages. If you encounter any display issues or find that the content doesn’t fit properly on the screen after changing the display size, you can always revert to the default settings or experiment with different sizes until you find the right balance.
Adjusting the display size on mobile devices allows you to personalize the visual experience and ensure that the content is easily readable and accessible. Take advantage of the accessibility settings and display customization options provided by your device to optimize the display size for your comfort and usability.
Troubleshooting Common Display Size Issues
While adjusting the display size on your devices can enhance your viewing experience, you may encounter some common issues that affect the display size. Understanding and troubleshooting these issues can help ensure that you get the most out of your device’s screen. Here are some common display size issues and their potential solutions.
1. Content not fitting on the screen: If you notice that the content is cut off or does not fit properly on the screen, it could be due to overscan or incorrect aspect ratio settings. Adjust the display settings on your device to disable overscan and set the correct aspect ratio for the content you’re viewing.
2. Text or icons appearing too small: If the text or icons on your screen are too small to read comfortably, it may be due to the display scaling being set too low. Increase the display scaling or text size settings in the device’s accessibility or display settings to make the content larger and more legible.
3. Content appearing too large: On the other hand, if the content appears too large and it’s affecting the overall usability, you may need to decrease the display scaling or text size settings. Adjust these settings in the device’s accessibility or display settings to make the content smaller and optimize screen real estate.
4. Screen flickering or abnormalities: If you’re experiencing screen flickering or other abnormalities after adjusting the display size, it could be due to incompatible or outdated graphics drivers. Update the graphics drivers on your device to the latest version available from the manufacturer’s website. If the issue persists, contact technical support for further assistance.
5. Unintended changes in display size: Sometimes, the display size settings may change unexpectedly or reset after device updates or other system changes. In such cases, revisit the display settings and adjust them back to your preferred size. Additionally, check for any system updates and install them, as they may include bug fixes or improvements related to display settings.
If you continue to experience display size issues despite troubleshooting using the above steps, it’s recommended to consult the user manual or search for specific guidance related to your device model and operating system version. Alternatively, contact the manufacturer’s support team or seek assistance from technical experts who can provide specific solutions based on your device and its settings.
By troubleshooting common display size issues, you can ensure that your device’s screen displays content accurately and optimally for your viewing pleasure. Understanding the causes and implementing the appropriate solutions will help you make the most of your device’s display capabilities.
Recommended Monitor Sizes for Different Use Cases
Choosing the right monitor size is essential for an optimal viewing experience based on your specific needs and use cases. Whether you’re a gamer, a creative professional, or a regular user, here are some general recommendations for monitor sizes across different use cases.
1. Regular Use: For general everyday use like web browsing, email, and streaming videos, a 22 to 24-inch monitor is usually sufficient. This size provides a good balance between screen real estate and compactness, fitting well on most desks or workspaces.
2. Productivity and Multitasking: If you require multiple windows and applications side by side, consider a larger display size like 27 inches or above. A larger screen will allow you to have more windows open simultaneously, improving productivity and multitasking capabilities.
3. Gaming: Gaming enthusiasts may prefer larger monitor sizes to immerse themselves in the gaming experience and enjoy more detailed visuals. Consider a 27-inch or larger monitor with a higher refresh rate and low response time for smoother gameplay and reduced motion blur.
4. Content Creation and Design: Creative professionals working with graphic design, video editing, or other visually demanding tasks would benefit from a larger monitor size. A 27-inch or 32-inch display offers ample screen space to work on intricate details and provides a more accurate representation of colors and contrast.
5. Media Consumption: If your primary use is watching movies, TV shows, or enjoying multimedia content, a larger monitor size will enhance your viewing experience. Consider a 32-inch or even a 40-inch monitor to fully appreciate the details and immerse yourself in the content.
6. Data Analysis and Coding: Data analysts and software developers who work with vast amounts of data or code may benefit from an ultra-wide monitor. Ultra-wide monitors provide an extended horizontal workspace, allowing more data or code to be displayed simultaneously, making analysis and coding more efficient.
These recommendations serve as a general guideline, and personal preferences may vary depending on individual needs and workspaces. It’s also important to consider the display resolution in conjunction with size. Higher resolutions like 1440p or 4K are often paired with larger monitors, ensuring sharper and more detailed visuals.
Before making a purchase, it’s advisable to visit a physical store or read reviews to understand the actual size and ergonomics of a particular monitor. This will help you make an informed decision based on your specific requirements and preferences.
By considering the recommended monitor sizes for different use cases, you can find the right balance between screen size, usability, and optimal viewing experience. Investing in a monitor that aligns with your needs will greatly enhance your productivity, gaming, or media consumption activities.