
Sign in to your Microsoft account
Changing your Microsoft email address is a straightforward process that begins with signing in to your Microsoft account. Your Microsoft account is the central hub for accessing a range of Microsoft services, including Outlook, OneDrive, and Skype. To begin the email address change process, follow the steps outlined below:
1. Open a web browser and navigate to the Microsoft account sign-in page.
2. Enter the email address and password associated with your Microsoft account, then click “Sign in.”
Once signed in, you will gain access to your account settings, where you can make the necessary changes to your email address. It’s important to note that you need to have access to your current email address to receive verification emails throughout the process.
12345678901234567890123456789012345678901234567890123456789012345678901234567890
Go to Account settings
Once you have successfully signed in to your Microsoft account, the next step is to navigate to the Account settings section. Here’s how you can do it:
1. After signing in, you will be redirected to the main page of your Microsoft account. Look for the profile icon or your profile picture at the top right corner of the page and click on it.
2. In the drop-down menu that appears, select the “Account settings” option. This will take you to the account settings page, where you can manage various aspects of your Microsoft account.
On the Account settings page, you will find a range of options to customize and update your account information. This includes changing your password, privacy settings, security features, and more. However, for the purpose of changing your email address, you need to navigate to the specific section dedicated to managing your email information.
Note that the layout and design of the Account settings page may vary slightly depending on the version of Microsoft services you are using. However, the general steps provided above should help you find the necessary settings regardless of the specific interface.
Select Your info
Once you have accessed the Account settings page, you will need to locate the section called “Your info” to proceed with changing your email address. This section contains the necessary options to update and modify your personal information, including your email address. Follow the steps below to find and select this section:
1. On the Account settings page, look for the “Your info” tab or link. It is usually located in the main navigation menu on the left-hand side of the page. Click on it to access the section.
2. Within the “Your info” section, you will find various options to manage your personal information, such as your name, photo, and contact details. Look for the option specifically related to your email address, as this is where you can make the necessary changes.
Some versions of Microsoft services may have a dedicated “Email addresses” or “Email options” subsection within the “Your info” section. If this is the case, click on that subsection to proceed.
Once you have successfully located the section related to your email address, you are ready to edit and update your email information. Follow the prompts and instructions provided on the page to proceed with changing your email address.
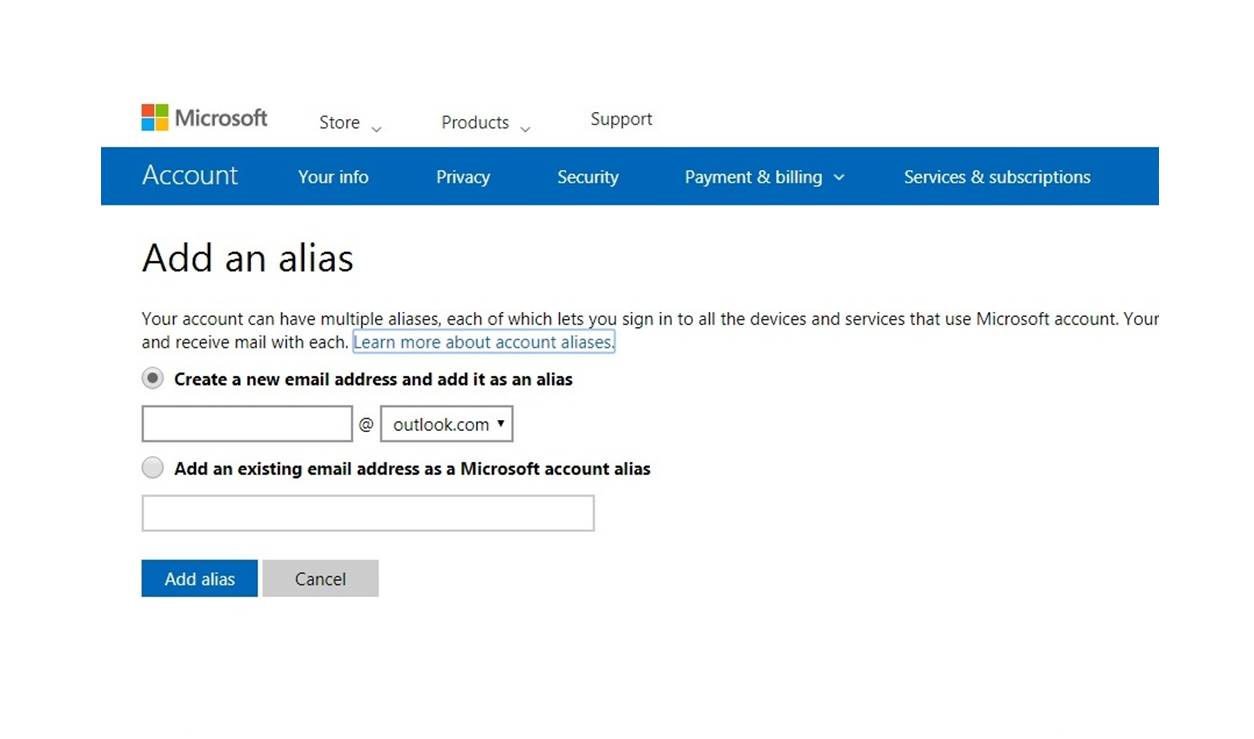
Edit your email address
Now that you have navigated to the section dedicated to managing your email address, it’s time to edit and update this information. Follow the steps outlined below to make the necessary changes:
1. In the “Edit your email address” section, you will typically find two options: “Add email” and “Remove.” To change your email address, click on the “Add email” option.
2. A form will appear where you can enter your new email address. Carefully type in the new email address you wish to use, ensuring that it is accurate and free of any errors. Take a moment to verify that you entered it correctly to avoid any issues later on.
3. Review your new email address to make sure it meets the required criteria. Some common requirements include using a valid email format (e.g., example@example.com) and avoiding any spaces or special characters in the address.
4. After entering your new email address, click on the “Next” or “Continue” button to proceed to the next step. Depending on the version of Microsoft services you are using, you may be asked to provide additional information or verify your identity during this process.
5. Follow the instructions provided on the screen to complete the verification process. This typically involves receiving a verification code or link sent to your new email address or current email address associated with your Microsoft account.
6. Once you have successfully verified your new email address, you will see a confirmation message on the screen. Take note of this message as it indicates that your email address change has been made successfully.
By following these steps, you can easily edit and update your email address within your Microsoft account. Now that you have made the necessary changes, it’s important to set your new email address as the primary address and ensure that it is updated on all your devices and associated services.
Verify your new email address
After entering your new email address, the next step is to verify its ownership. Verification is an important security measure that ensures only the rightful owner has access to the account and associated information. Follow the steps below to verify your new email address:
1. Check your new email inbox: Shortly after submitting your new email address, you should receive an email from Microsoft. Open your email inbox and look for the message with the subject line that includes “Verify your new email address” or a similar indication.
2. Open the verification email: Locate the email sent by Microsoft and click on it to open it. If you cannot find it in your inbox, remember to check your spam or junk folder as well. Sometimes, legitimate emails can be filtered incorrectly.
3. Follow the verification link or enter the verification code: Within the verification email, you will find a link or a verification code. Depending on the instructions provided, either click on the link or enter the code in the designated field on the verification page.
4. Complete the verification process: Once you have followed the verification link or entered the code correctly, you will be redirected to a confirmation page. This page confirms that your new email address has been successfully verified.
5. Verify your current email address (optional): In some cases, Microsoft may require you to verify your current email address as an additional security measure. If prompted to do so, simply follow the instructions provided in the email sent to your current email address.
6. Repeat the process if necessary: If you have changed multiple email addresses, make sure to repeat the verification process for each new email address you added.
Verifying your new email address is a crucial step to ensure the security and functionality of your Microsoft account. By completing this process, you confirm that you have access to the email account and have full control over your account information.
Set your new email address as primary
Now that you have successfully verified your new email address, the next step is to set it as the primary email address associated with your Microsoft account. This will ensure that all future communications, notifications, and account-related information are sent to your new email address. Follow the steps below to set your new email address as the primary:
1. Go back to the Account settings page: Navigate back to the Account settings page, where you initially accessed the section to edit your email address.
2. Locate the “Email addresses” or “Email options” section: Within the Account settings page, look for the specific section related to managing your email addresses. It may be labeled as “Email addresses” or “Email options,” depending on the version of Microsoft services you are using.
3. Select your new email address: In the email address management section, you will see a list of all the email addresses associated with your Microsoft account. Look for your newly added and verified email address in the list.
4. Set your new email address as primary: Next to your new email address, you will find an option or button labeled “Set as primary” or something similar. Click on this option to designate your new email address as the primary one.
5. Confirm the change: A prompt or confirmation message will appear to confirm that your new email address has been set as the primary. Take a moment to review the information and ensure that your new email address is indeed selected as the primary one.
By setting your new email address as the primary, you are ensuring that all future correspondence and important account-related information will be directed to this email. Make sure to keep your primary email address updated at all times to stay informed about any changes or updates to your Microsoft account.
Confirm the change of email address
After setting your new email address as the primary, it’s essential to confirm the change to ensure that all future communications are directed to the correct email. Follow the steps below to confirm the change of your email address:
1. Check your email inbox: Shortly after setting your new email address as the primary, Microsoft will send a confirmation email to both your new email address and your previous email address.
2. Open the confirmation email: Look for the email with the subject line that includes “Confirm your Microsoft email address change” or a similar indication. Open the email to access the confirmation message.
3. Click on the confirmation link: Within the confirmation email, you will find a link that you need to click to confirm the change of your email address. By clicking on this link, you are verifying that you initiated the change and want to proceed with it.
4. Confirmation page: After clicking on the confirmation link, you will be directed to a confirmation page. This page will display a message confirming that your email address change has been successfully confirmed.
5. Verify on other devices or services (if necessary): If you use multiple devices or services with your Microsoft account, it is important to update your email address on each of them. Sign in to those devices and services and verify that your new email address is correctly displayed and functioning.
By following these steps and confirming the change of your email address, you ensure that Microsoft has processed the request and that all future communications and account-related information will be sent to your new email address. Take a moment to double-check that your new email address is correctly updated on all devices and services associated with your Microsoft account.
Update your email address on all devices and services
Once you have confirmed the change of your email address with Microsoft, it is important to update this information on all devices and services associated with your account. This ensures that you receive important notifications, emails, and information on your new email address. Follow the steps below to update your email address on all devices and services:
1. Mobile devices: If you have your Microsoft account connected to your smartphone or tablet, open the settings app and navigate to the Accounts or Email section. Locate your Microsoft account and select the option to update your email address. Follow the prompts to enter your new email address and save the changes.
2. Desktop or laptop computers: On your computer, open the email client or application, such as Outlook, Thunderbird, or Mail. Find the account settings or preferences section, usually located under the “File” or “Settings” menu. Within the account settings, look for the email address associated with your Microsoft account and update it with your new email address.
3. Online services: If you use any online services or platforms that are associated with your Microsoft account, such as social media sites or cloud storage services, log in to each of these services and update your email address in the account settings. Look for the “Profile” or “Account” section where you can edit and update your contact information.
4. Online accounts: Similarly, if you have any online accounts or subscriptions linked to your Microsoft email address, visit each website or service provider and update your email address in the account settings or profile section. This includes shopping sites, banking accounts, and other online platforms where you receive emails or notifications.
5. Inform contacts: Notify your family, friends, colleagues, and important contacts about your email address change. Send them a brief email or update your email signature with a note informing them about your new email address. This ensures that they update their contact information and continue to communicate with you without any interruptions.
By following these steps and ensuring that your new email address is updated on all devices and services, you can continue using your Microsoft account seamlessly. Regularly check your old email address for any residual emails and make sure to inform any important contacts or organizations about your email address change to maintain smooth communication.
Troubleshooting tips
While changing your email address with Microsoft is typically a straightforward process, you may encounter some hurdles along the way. If you experience any difficulties or run into issues during or after the email address change, try the troubleshooting tips below:
1. Double-check your new email address: Ensure that you have entered your new email address correctly without any typographical errors. Any mistakes can lead to complications in the verification and confirmation process.
2. Verify your email account settings: If you’re having trouble receiving verification emails, check your spam or junk folder. Sometimes, legitimate emails can be filtered incorrectly. Additionally, confirm that your email account settings allow messages from Microsoft or other trusted senders.
3. Clear cache and cookies: In some cases, cached data or cookies can interfere with the functionality of the account settings page. Clear your browser’s cache and cookies, then try accessing and updating your email address again.
4. Contact Microsoft support: If you are encountering persistent issues or are unable to make the necessary changes, reach out to Microsoft support for assistance. They can provide guidance and troubleshoot any technical difficulties you may be facing.
5. Update your recovery options: While changing your email address, ensure that your recovery options, such as your phone number and alternate email address, are up to date. This will help in case you need to recover or access your Microsoft account in the future.
Remember, it’s essential to follow the instructions provided by Microsoft during the email address change process. If you encounter any issues, refer to the support resources provided by Microsoft or reach out to their customer support for personalized assistance.
Frequently Asked Questions (FAQs)
Below are some common questions related to changing Microsoft email addresses:
1. Can I change my Microsoft email address without creating a new account?
Yes, you can change your Microsoft email address without creating a new account. By following the steps outlined in this guide, you can update your email address while retaining all your account information, settings, and data.
2. Can I use any email address as my Microsoft email address?
While Microsoft allows you to use various email providers, some restrictions may apply. Ensure that the email address you choose is in a valid email format and not already associated with another Microsoft account.
3. Can I revert to my old email address after changing it?
In some cases, you may be able to revert to your old email address. However, this depends on various factors, including the availability of the previous email address and the time that has passed since you changed it. It is recommended to contact Microsoft support for assistance with reverting to an old email address.
4. Will changing my email address affect my Microsoft subscriptions or services?
Generally, changing your email address should not affect your Microsoft subscriptions or services. However, it is essential to update your email address on all devices and services to ensure a seamless experience and continued access to your Microsoft account features.
5. How long does it take for the email address change to take effect?
The email address change typically takes effect immediately after completing the verification and confirmation steps. However, it may take some time for the changes to reflect across all devices, services, and associated accounts. It is recommended to allow a reasonable amount of time for the updates to propagate.
6. Can I change my email address multiple times?
Yes, you can change your email address multiple times as per your requirement. However, it is important to note that frequent email address changes may cause confusion for your contacts and could disrupt your email communications.
If you have any further questions or concerns not covered here, it is advisable to consult the official Microsoft documentation or contact their customer support for personalized assistance.