
Why Change Channels on Your Router?
When it comes to optimizing the performance of your router, changing the channel can make a significant difference. A router channel is a frequency band on which your Wi-Fi signal operates. By default, routers are usually set to automatically select the channel with the least interference. However, due to various factors such as neighboring networks, electronic devices, and physical obstacles, your Wi-Fi signal can still experience congestion or slowdowns.
Changing the channel on your router can help mitigate these issues and improve your overall internet experience. By selecting a less crowded channel, you can reduce interference, increase network stability, and potentially boost your Wi-Fi speed. This is particularly important in densely populated areas such as apartment buildings or office complexes where multiple Wi-Fi networks coexist in close proximity.
Moreover, if you often experience dropped connections or weak signal strength, changing channels can help address these problems. Certain channels may perform better in specific locations or environments, so finding the right channel for your router can lead to better connectivity and fewer interruptions.
It’s worth noting that not all routers support channel changing. Older models or routers provided by your internet service provider may have limited options in this regard. However, if you have a newer router or one with advanced settings, it’s definitely worth exploring the possibility of changing channels.
Overall, changing the channel on your router can be a simple yet effective solution to enhance your Wi-Fi performance. It allows you to optimize your network and minimize interference from other devices or networks in your vicinity. So, if you’re experiencing slow speeds, connection drops, or weak signals, consider checking and changing the channel on your router to improve your internet browsing, streaming, and gaming experience.
Checking Your Current Router Channel
Before you can change the channel on your router, it’s essential to identify the current channel it is using. Here are some steps to help you check the channel your router is currently set on:
- Access your router’s web interface: Open a web browser on a device connected to your router. Type the router’s IP address into the address bar and press Enter. If you’re unsure of the IP address, it can usually be found on the router or in the user manual.
- Enter your router’s login credentials: You will be prompted to enter your router’s username and password. If you’ve never changed these from the default settings, consult your router’s documentation or contact your internet service provider.
- Navigate to the wireless settings: Once logged into the web interface, look for the wireless settings or Wi-Fi settings tab. The exact location of this option may vary depending on your router’s brand and model.
- Locate the current channel: Within the wireless settings, you should find a section that displays the current channel your router is using. It may be labeled as “Channel,” “Wireless Channel,” or something similar.
- Note down the channel number: Take note of the channel number currently selected. It will typically be a number between 1 and 11, representing the available Wi-Fi channels.
By following these steps, you will be able to determine the current channel on which your router is operating. This knowledge will be crucial when it comes to selecting a new channel that offers better performance and minimizes interference. In the next section, we’ll explore the benefits of changing router channels and how they work.
Benefits of Changing Router Channels
Changing the channel on your router can provide several key benefits for your Wi-Fi network. Let’s explore some of the advantages you can expect by making this simple adjustment:
- Reduced interference: One of the primary benefits of changing router channels is the reduction of interference. Wi-Fi signals operate in different frequency bands, and neighboring networks or electronic devices can cause congestion and interference. By switching to a less crowded channel, you can minimize these disruptions and improve the overall stability of your Wi-Fi connection.
- Improved network performance: By selecting an optimal channel with less interference, you can enhance the performance of your Wi-Fi network. This can result in faster download and upload speeds, reduced latency during online gaming, and smoother video streaming experiences.
- Better signal strength: Certain channels may perform better in specific locations or environments. By identifying and switching to a channel that offers stronger signal strength, you can enjoy better Wi-Fi coverage throughout your home or office. This can help eliminate dead zones and allow you to connect to your network from farther distances.
- Enhanced reliability: Changing router channels can lead to increased network reliability. By reducing interference and optimizing your Wi-Fi signal, you can minimize or even eliminate dropped connections and intermittent disconnections. This is especially beneficial for activities that require a stable connection, such as video conferencing or online gaming.
- Compatibility with older devices: Older Wi-Fi devices may have limitations when it comes to operating on certain channels. By changing channels, you can ensure compatibility with older devices and prevent any connection issues that may arise.
Overall, changing router channels can significantly improve the performance and reliability of your Wi-Fi network. It allows you to optimize your network settings and minimize interference from other devices or networks in your vicinity. In the next section, we’ll delve into how router channels work and how to find the best channel for your specific router.
How Router Channels Work
Router channels are specific frequency bands within the 2.4 GHz and 5 GHz wireless spectrum. These bands are divided into multiple channels to allow for simultaneous communication between devices. Each channel operates on a different frequency, and routers can be set to broadcast their Wi-Fi signal on a particular channel.
In the 2.4 GHz band, there are 11 channels available, with each channel occupying a frequency range of 20 MHz. However, due to overlapping frequencies, it is recommended to use channels 1, 6, and 11 for optimal performance and to avoid interference. These channels do not overlap with each other, allowing for better signal quality.
The 5 GHz band offers more channels, typically ranging from 36 to 165, depending on the router’s capabilities and region. Unlike the 2.4 GHz band, the channels in the 5 GHz band do not overlap, allowing for greater flexibility in channel selection. This reduces the chance of interference, particularly in areas with numerous Wi-Fi networks.
When deciding which channel to use, it’s important to consider the surrounding environment. Factors such as neighboring Wi-Fi networks, physical barriers like walls and floors, and electronic devices can all impact the performance of the chosen channel. It’s crucial to identify the least congested channel to minimize interference and maximize network efficiency.
Routers typically come with a feature called “Auto Channel” that automatically selects the channel with the least interference. However, these automatic settings are not always accurate and may not consider the unique characteristics of your environment. Manually selecting a channel that works best for your specific situation can yield better results.
To find the best channel for your router, you can use Wi-Fi analyzer apps or built-in tools provided by your router’s manufacturer. These tools can scan the nearby Wi-Fi networks and display the channels they are using, allowing you to identify the least congested options.
Understanding how router channels work and the factors that affect their performance is essential for optimizing your Wi-Fi network. In the next section, we’ll explore the steps to find the best channel for your specific router and how to change it in the web interface.
Finding the Best Channel for Your Router
When it comes to finding the best channel for your router, there are a few methods you can use to determine the least congested and most optimal option. Here are a few steps to help you find the ideal channel for your specific router:
- Use a Wi-Fi Analyzer: Wi-Fi analyzer apps are helpful tools that allow you to scan the nearby Wi-Fi networks and analyze the channels they are using. These apps display a visual representation of the Wi-Fi signals in your area, making it easier to identify the channels with the least congestion. Some popular Wi-Fi analyzer apps include NetSpot, WiFi Analyzer, and Acrylic Wi-Fi Home.
- Check your router’s interface: Some routers come with built-in tools and features that can scan for nearby networks and show the channels they are operating on. Access your router’s web interface and navigate to the wireless settings section. Look for options like “Site Survey,” “Wireless Scan,” or similar terms that allow you to view the available networks and their respective channels.
- Manually switch channels: Once you have identified the least congested channels, you can manually change the channel in your router’s web interface. Select a channel that is not being heavily used by other networks to avoid interference. It is advisable to choose channels 1, 6, or 11 in the 2.4 GHz band to ensure they do not overlap.
- Monitor performance: After changing the channel, monitor the performance of your Wi-Fi network. Keep an eye on factors like signal strength, upload/download speeds, and stability. If you notice an improvement in performance, you have likely found the optimal channel. However, if issues persist, you may need to experiment with different channels until you find the one that works best for your specific environment.
Keep in mind that the Wi-Fi landscape is dynamic, with networks and devices constantly changing and adapting. Consequently, it may be necessary to periodically reassess and adjust your router’s channel settings to maintain optimal performance.
By finding the best channel for your router, you can significantly improve your Wi-Fi network’s performance and reduce interference. In the next sections, we’ll explore how to change the router channel in the web interface and through a mobile app.
Changing the Router Channel in the Web Interface
To change the channel on your router through the web interface, follow these steps:
- Access your router’s web interface: Open a web browser on a device connected to your router. Enter the router’s IP address into the address bar and press Enter. If you’re unsure of the IP address, it can usually be found on the router or in the user manual.
- Log in to the router: Enter your router’s login credentials when prompted. If you haven’t changed these from the default settings, consult your router’s documentation or contact your internet service provider.
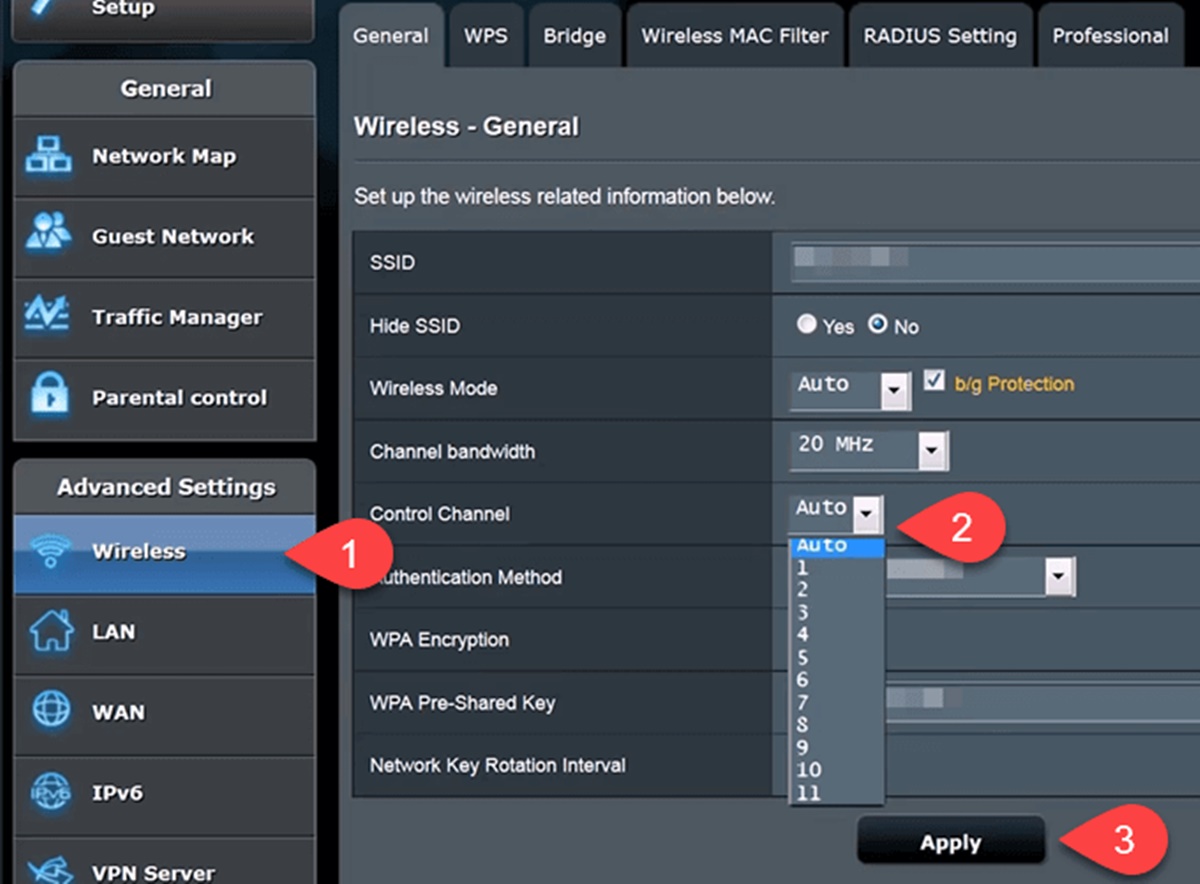
- Navigate to the wireless settings: Once logged in, look for the wireless settings or Wi-Fi settings tab. The exact location of this option may vary depending on your router’s brand and model.
- Select the channel option: Within the wireless settings, locate the channel option or a similar setting that allows you to change the channel of your router.
- Choose a new channel: Select a new channel from the available options. It is recommended to choose channels 1, 6, or 11 in the 2.4 GHz band to avoid overlap with neighboring networks. In the 5 GHz band, select a channel that is least congested.
- Save the changes: After selecting the new channel, save the changes and allow the router to reboot if prompted. This will ensure that the new channel settings take effect.
- Verify the new channel: After the router has rebooted, go back to the wireless settings and confirm that the channel has been successfully changed. It should now display the new channel you selected.
By following these steps, you can easily change the channel on your router through the web interface. Remember to choose a channel that offers the least interference and aligns with the guidelines for optimal performance in either the 2.4 GHz or 5 GHz band.
Next, we’ll explore how to change the router channel using a mobile app, which can provide convenience and flexibility for managing your router settings on the go.
Changing the Router Channel on a Mobile App
If your router supports it, you can also change the channel using a dedicated mobile app provided by the router manufacturer. Here’s how you can change the router channel using a mobile app:
- Download and install the app: Search for the official app of your router manufacturer in the App Store or Google Play Store. Download and install the app on your smartphone or tablet.
- Connect to your router: Ensure that your mobile device is connected to the Wi-Fi network generated by your router. Open the app and follow the on-screen instructions to connect to your router.
- Access the router settings: Once connected, navigate to the settings or options section in the app. Look for wireless settings or Wi-Fi settings.
- Select the channel option: Within the wireless settings, locate the channel option or a similar setting that allows you to change the channel of your router.
- Choose a new channel: Select a new channel from the available options provided in the app. Refer to the guidelines mentioned earlier to choose the best channel for minimal interference and optimal performance.
- Save the changes: After selecting the new channel, save the changes within the app.
- Verify the new channel: Open the app’s settings again and confirm that the channel has been successfully changed. It should now display the new channel you selected.
Using a mobile app to change the channel on your router offers convenience and flexibility. It allows you to manage your router settings while on the go, without the need to access a computer or use the web interface.
Remember to choose a channel that minimizes interference and aligns with the guidelines for optimal performance in either the 2.4 GHz or 5 GHz band. Keep in mind that not all router models or manufacturers provide a dedicated mobile app, so make sure to check if your router supports this feature.
In the next section, we’ll provide some valuable tips for optimizing your router’s performance to ensure the best possible Wi-Fi experience.
Tips for Optimizing Router Performance
To ensure the best possible performance from your router, here are some tips and best practices to optimize its performance:
- Position your router properly: Place your router in a central location within your home or office to ensure optimal coverage. Avoid placing it near walls, thick furniture, or other obstacles that may hinder the Wi-Fi signal.
- Keep the router away from interference sources: Keep your router away from devices that may cause interference, such as cordless phones, microwave ovens, or Bluetooth devices. These devices can disrupt the Wi-Fi signal and impact performance.
- Update your router’s firmware: Regularly check for firmware updates from your router manufacturer and apply them. These updates often include bug fixes, security enhancements, and performance improvements.
- Use strong and unique passwords: Secure your router with a strong and unique password. This prevents unauthorized access to your network, ensuring that only trusted devices can connect.
- Enable network encryption: Use WPA2 or WPA3 encryption to secure your Wi-Fi network. This prevents unauthorized users from intercepting and accessing your data.
- Enable Quality of Service (QoS) settings: If your router has QoS settings, enable them to prioritize certain types of network traffic. This can help ensure a smoother and more reliable experience when streaming or gaming.
- Regularly reboot your router: Restarting your router occasionally can help clear out any temporary issues or memory leaks that may be affecting its performance.
- Limit the number of connected devices: If you have many devices connected to your router, it can affect the overall performance. Consider disconnecting devices that are not in use or invest in a router with a higher device capacity.
- Optimize your Wi-Fi channels: As discussed earlier, periodically monitor the available Wi-Fi channels and switch to the least congested channel to minimize interference from neighboring networks.
- Monitor your network activity: Use network monitoring tools or your router’s web interface to keep an eye on your network’s activity. Identify any unusual or excessive bandwidth usage that may be impacting performance.
By following these tips, you can improve the performance, security, and reliability of your router and Wi-Fi network. Experiment with different approaches and settings to find the optimal configuration that works best for your specific environment.
Next, we’ll wrap up this article with a brief summary of the key points discussed.