
Understand Wi-Fi Channels
When it comes to setting up a Wi-Fi network, choosing the right Wi-Fi channels is crucial for optimal performance. Wi-Fi channels are like virtual lanes on which your wireless devices communicate with your router. Understanding how Wi-Fi channels work can help you avoid interference, congestion, and ultimately, improve the overall speed and reliability of your network.
Wireless routers operate on two main frequency bands: 2.4 GHz and 5 GHz. The 2.4 GHz band offers wider coverage but is prone to more interference due to the number of devices competing for the same channels. On the other hand, the 5 GHz band provides faster speeds and is less congested, making it ideal for bandwidth-intensive activities like streaming and gaming.
Each frequency band is further divided into multiple channels. In the case of the 2.4 GHz band, there are 11 channels in total, while the 5 GHz band offers even more channels. However, not all channels are created equal, and some may be more crowded than others.
Interference from nearby networks can significantly impact the performance of your Wi-Fi network. To determine the least congested Wi-Fi channels, you can make use of Wi-Fi analyzer tools. These tools scan the surrounding environment and display the signal strength and channel usage of neighboring networks. By identifying the channels with the least traffic, you can choose a less congested channel for your network.
In addition to channel congestion, you should also consider the distance between your access points. In large environments, multiple access points can be used to extend coverage. However, if access points are too close to each other, they can overlap and interfere with each other’s signals. To avoid this, ensure that access points are placed at an appropriate distance and on different channels to minimize interference.
Choosing the best Wi-Fi channels for your network is not a one-time task. It is recommended to periodically review and adjust your channel settings, especially if you notice a decrease in network performance. Most routers allow you to change Wi-Fi channels through the router’s configuration interface. Simply access the interface, navigate to the wireless settings, and choose the desired channel.
By understanding Wi-Fi channels and taking steps to optimize their usage, you can significantly improve the performance and reliability of your Wi-Fi network. Take the time to analyze your environment, choose the least congested channels, and regularly review your network settings to ensure maximum efficiency.
Know the Difference Between 2.4 GHz and 5 GHz Bands
When setting up your Wi-Fi network, it is important to understand the difference between the 2.4 GHz and 5 GHz bands. These bands refer to the frequencies at which your wireless devices communicate with your router, and each band has its own advantages and considerations.
The 2.4 GHz band is the older and most commonly used frequency band for Wi-Fi networks. It offers wider coverage and can penetrate through walls and obstacles more effectively. However, due to its popularity and the number of devices that operate on this band, it is more prone to interference and congestion.
On the other hand, the 5 GHz band operates at higher frequencies and provides faster speeds and lower latency compared to the 2.4 GHz band. It is less crowded and offers more channels to choose from, resulting in reduced interference and improved performance. However, its coverage range is shorter, making it better suited for smaller spaces or for devices that are closer to the router.
When deciding which band to use for your network, consider the types of devices you have and their compatibility. Most modern devices support both 2.4 GHz and 5 GHz bands, but older devices may only support the 2.4 GHz band. If you have devices that only support the 2.4 GHz band, it may be necessary to use this band to ensure compatibility.
If you primarily use your Wi-Fi network for web browsing, email, and other everyday tasks, the 2.4 GHz band should suffice. However, if you engage in activities that require higher bandwidth, such as streaming HD videos or online gaming, the 5 GHz band can provide a smoother and more reliable experience.
It’s worth noting that some routers offer a feature called “dual-band” or “dual-band selectable,” which allows you to broadcast both the 2.4 GHz and 5 GHz bands simultaneously. This provides the flexibility of connecting devices to the appropriate band based on their capabilities and optimizing performance.
Learn About the Various Wi-Fi Channels Available
Wi-Fi channels play a crucial role in the performance and reliability of your wireless network. They determine the frequency range at which your devices communicate with your router. Understanding the various Wi-Fi channels available and their characteristics can help you make informed decisions when setting up your network.
For the 2.4 GHz band, there are a total of 11 Wi-Fi channels to choose from, typically labeled as channels 1 through 11. These channels have a frequency separation of 20 MHz, but they overlap with neighboring channels. This means that if neighboring networks are using nearby channels, there is a higher likelihood of interference, which can degrade your network’s performance.
On the 5 GHz band, things are a bit more complex. The available channels vary depending on your region and regulatory requirements. However, the 5 GHz band generally provides more non-overlapping channels compared to the 2.4 GHz band. This results in less interference and improved overall network performance.
Some routers support a feature known as “auto channel selection,” which allows the router to automatically choose the least congested channel. While this feature can be convenient, it may not always select the best channel, particularly in crowded areas with many Wi-Fi networks. Manual selection of channels is often recommended for optimal performance.
When choosing Wi-Fi channels for your network, it is important to consider both the number of neighboring networks and the channel overlap. Analyzing your environment and using Wi-Fi analyzer tools can help you identify the least congested channels. These tools provide valuable information about neighboring networks, signal strengths, and channel usage, enabling you to make an informed decision.
Remember that the goal is to select channels with the least interference from neighboring networks. By doing so, you can minimize congestion and improve the performance of your Wi-Fi network.
Determine the Least Congested Wi-Fi Channels
Ensuring that your Wi-Fi network operates on the least congested channels is essential for optimal performance and a reliable internet connection. By avoiding interference from neighboring networks, you can minimize disruptions and experience faster speeds. Here are some steps to determine the least congested Wi-Fi channels for your network.
Firstly, it’s important to assess the Wi-Fi environment in which your network operates. This involves identifying the number of nearby networks and the channels they are using. A crowded area with many Wi-Fi networks operating on the same or overlapping channels can lead to interference and decreased performance.
To analyze your Wi-Fi environment, consider using Wi-Fi analyzer tools available for both mobile devices and computers. These tools scan and monitor nearby networks, providing information on signal strength, channel usage, and congestion levels. With this data, you can identify the channels that are least congested and select one for your own network.
When using a Wi-Fi analyzer tool, pay attention to the signal strength and interference from neighboring networks. Channels with weak or no signals from neighboring networks are usually less congested and offer better performance. These channels provide a clearer frequency range for your network to operate without interference.
Additionally, consider the channel overlap between neighboring networks. Channels that have the least overlap with nearby networks are less likely to experience interference. For example, if neighboring networks are using channels 1 and 6, choosing channel 11 can help avoid overlapping signals.
Regularly monitoring the Wi-Fi environment is important, as network configurations can change over time. It is recommended to periodically re-evaluate the congestion levels and switch to less crowded channels if necessary.
By taking the time to determine the least congested Wi-Fi channels, you can significantly improve the performance and reliability of your network. This will result in faster speeds, fewer interruptions, and a smoother online experience. Utilize Wi-Fi analyzer tools and consider factors like signal strength and channel overlap to make informed decisions for your Wi-Fi network.
Use Wi-Fi Analyzer Tools to Find the Best Channels
Wi-Fi analyzer tools are invaluable resources when it comes to optimizing your Wi-Fi network. These tools provide crucial information about the surrounding Wi-Fi environment, allowing you to identify the best channels for your network and avoid interference from neighboring networks. Here’s how you can use Wi-Fi analyzer tools to find the best channels.
Firstly, you’ll need to download a Wi-Fi analyzer app or software. There are numerous options available, both for mobile devices and computers. Some popular choices include NetSpot, Wifi Analyzer, and inSSIDer. Make sure to select a tool that is compatible with your device and offers the features you need.
Once you have installed the Wi-Fi analyzer tool, launch it and proceed with the scanning process. The tool will scan the nearby networks and provide you with a wealth of information, including signal strength, channel utilization, and the number of networks operating on different channels.
Pay attention to the signal strength of nearby networks. Ideally, you want to find channels with weak or no signals from neighboring networks, as this indicates less congestion and potential interference. Channels with stronger signals from other networks may experience more interference and should be avoided.
Another important factor to consider is the channel overlap. Look for channels that have the least overlap with neighboring networks. For example, if neighboring networks are using channels 1 and 6, choosing channel 11 can help reduce the chances of channel interference.
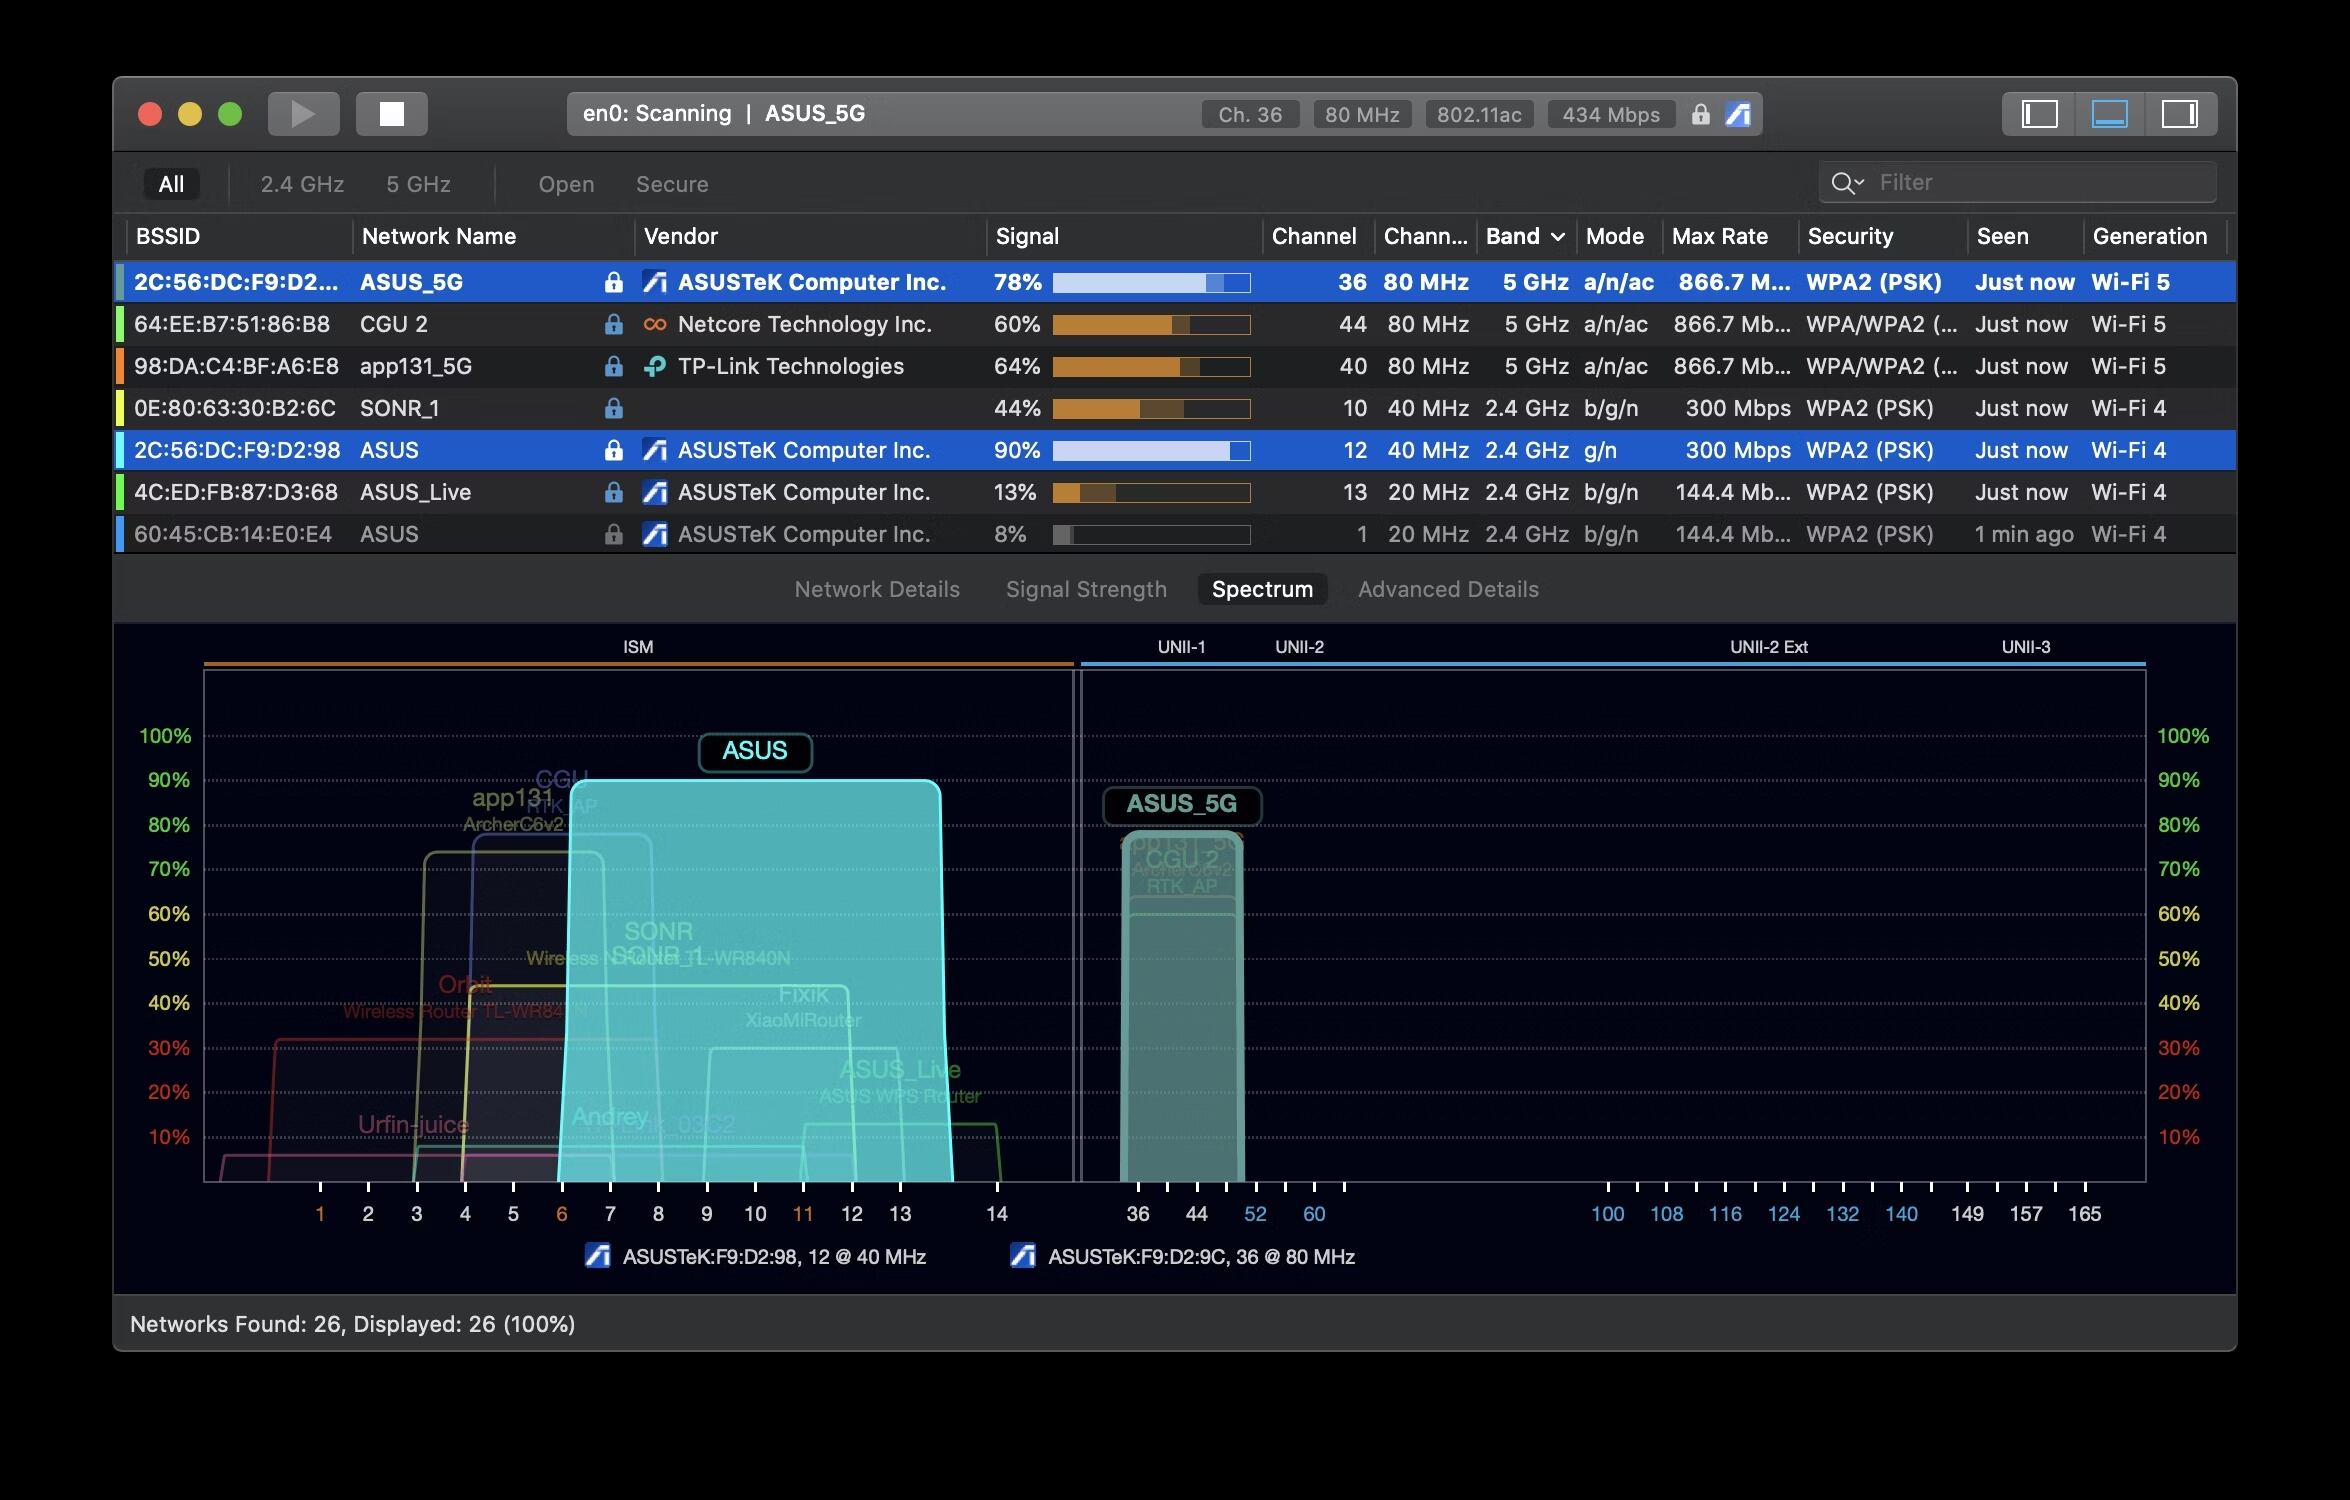
Some Wi-Fi analyzer tools provide visual representations of the Wi-Fi environment, showcasing the channel occupancy and signal strength in a graph or heatmap format. These visualizations can greatly assist in identifying the least congested channels and making informed decisions for your network.
It’s worth noting that Wi-Fi analyzer tools need to be used in the location where you plan to install your Wi-Fi router or access point. This will ensure accurate results as the tool scans the actual environment where your network will operate.
Regularly using Wi-Fi analyzer tools is recommended, especially if you notice a decrease in network performance. By periodically scanning and analyzing the Wi-Fi environment, you can adapt to changes and switch to less congested channels if necessary.
By utilizing Wi-Fi analyzer tools to find the best channels, you can optimize your network’s performance and minimize interference from neighboring networks. Take advantage of these tools to make informed decisions and create a stable and efficient Wi-Fi network.
Consider Channel Bonding for Higher Data Rates
If you’re looking to boost the data rates and overall performance of your Wi-Fi network, channel bonding is a technique worth considering. Channel bonding allows you to combine multiple adjacent Wi-Fi channels to increase the available bandwidth and achieve higher data transfer rates. Here’s how channel bonding works and why you should consider it for your network.
By default, Wi-Fi networks use a single channel to transmit and receive data. This means that the available bandwidth is limited to the capacity of that single channel. However, with channel bonding, you have the option to combine two or more channels to create a wider channel and increase the overall bandwidth.
Channel bonding works best in the 5 GHz band, as it offers more available channels compared to the 2.4 GHz band. Many modern Wi-Fi routers and devices support channel bonding on the 5 GHz band, allowing you to take advantage of this feature for improved performance.
When configuring channel bonding, keep in mind that not all Wi-Fi devices in your network may support it. Ensure that all devices connected to your network are compatible with channel bonding for optimal results. Additionally, it’s important to note that channel bonding can create more interference for neighboring networks, as it utilizes a wider frequency range. Therefore, it’s recommended to use channel bonding in environments where interference from neighboring networks is minimal.
One important consideration when it comes to channel bonding is the channel width. Wi-Fi channels can have different widths, typically 20 MHz or 40 MHz. When bonding channels, the width increases accordingly. For example, bonding two 20 MHz channels results in a combined 40 MHz channel width. However, it’s worth noting that wider channel widths may have limitations due to regulatory requirements in certain regions.
By implementing channel bonding, you can achieve higher data rates and improved performance for bandwidth-intensive activities like video streaming, online gaming, and large file transfers. The increased bandwidth allows for faster and more efficient data transmission, reducing latency and improving the overall user experience on your network.
Before enabling channel bonding, it’s important to evaluate your Wi-Fi environment and analyze the congestion levels and interference from neighboring networks. If the environment is heavily congested, channel bonding may not provide significant benefits and could potentially cause more interference.
Overall, channel bonding is a powerful tool to enhance the performance of your Wi-Fi network by increasing available bandwidth and data rates. Consider this option if you have a compatible network setup and minimal interference from neighboring networks. Experiment with channel bonding to optimize your network for high-bandwidth activities and enjoy a faster and more reliable Wi-Fi experience.
Understand the Impact of Neighboring Networks
When setting up a Wi-Fi network, it is crucial to understand the impact that neighboring networks can have on your network’s performance. The presence of nearby Wi-Fi networks can cause interference and congestion, leading to decreased signal quality and slower speeds. Here’s why it’s important to consider neighboring networks and their influence on your Wi-Fi network.
Neighboring Wi-Fi networks operate on the same frequency bands and use overlapping Wi-Fi channels. As a result, the signals from these networks can interfere with each other, leading to reduced signal strength and overall network performance. This interference can cause packet loss, slow data transfer rates, and even disconnections.
In areas with high population density, multiple overlapping Wi-Fi networks can coexist in close proximity. This creates a more challenging environment for your Wi-Fi network, as the available channels can become crowded and congested. The interference from neighboring networks becomes more significant, contributing to a decrease in signal quality and overall network efficiency.
Interference from neighboring networks can be particularly problematic in the 2.4 GHz band, which is more widely used and has a limited number of available channels. The 5 GHz band, on the other hand, offers more channels and provides a better opportunity to avoid congestion from neighboring networks.
When selecting the Wi-Fi channels for your network, it’s important to choose channels that have the least overlap with other networks in your vicinity. Analyzing the Wi-Fi environment using Wi-Fi analyzer tools can help you identify the channels that are least congested and have the lowest interference levels. By selecting channels with minimal overlap, you can minimize the impact of neighboring networks and optimize your network’s performance.
It’s worth noting that Wi-Fi networks are not the only potential sources of interference. Other electronic devices, such as cordless phones, microwave ovens, and baby monitors, can also operate on similar frequencies and cause interference. Placement of your Wi-Fi router and keeping it away from such devices can help reduce the impact of non-Wi-Fi interference.
By understanding the impact of neighboring networks and considering their influence on your Wi-Fi network, you can take appropriate steps to mitigate interference and optimize your network for better performance. Analyze the Wi-Fi environment, select channels with minimal overlap, and position your router strategically to minimize interference. Implementing these measures will result in a more reliable and efficient Wi-Fi experience for you and your network users.
Avoid Overlapping Channels from Neighboring Networks
One of the key factors that can impact the performance of your Wi-Fi network is the presence of overlapping channels from neighboring networks. When multiple Wi-Fi networks share the same or adjacent channels, it can lead to interference, signal degradation, and slower speeds. Avoiding overlapping channels is crucial to ensure optimal performance for your network. Here’s how you can mitigate the impact of neighboring networks by avoiding overlapping channels.
Firstly, it’s important to understand the channel layout and frequency allocation in your region. In the 2.4 GHz band, there are a total of 11 channels available. However, due to the overlap between channels, it is recommended to only use channels 1, 6, and 11 to minimize interference. These channels have a separation of at least four Wi-Fi channels between them, which helps reduce the chances of overlapping signals from neighboring networks.
In the 5 GHz band, there are typically more channels available, allowing for greater flexibility. However, it’s still important to select channels that do not overlap with neighboring networks. The exact number of available channels may vary depending on your region or regulatory restrictions, so it’s important to check the specific guidelines for your location.
To avoid overlapping channels, you need to identify the Wi-Fi channels that are being used by neighboring networks in your area. Wi-Fi analyzer tools are the go-to solution for this task. These tools scan the nearby Wi-Fi networks and provide you with information on the channels they are operating on. By analyzing this data, you can determine which channels are being used and select a channel that has the least interference.
When selecting a channel, be mindful of neighboring networks that may be operating on adjacent channels. These networks can still cause interference, even if they are not using the exact same channel as yours. For example, if a nearby network is using channel 5, it can still overlap with channels 1 and 6, causing interference.
Regularly monitoring and evaluating the Wi-Fi environment is crucial, as the channel usage of neighboring networks can change over time with new network setups or adjustments. Periodically check for new networks or changes in channel assignments in your vicinity, and adjust your channel selection if necessary to maintain optimal performance.
By avoiding overlapping channels from neighboring networks, you can significantly reduce interference and improve the performance of your Wi-Fi network. Take the time to analyze the Wi-Fi environment using a Wi-Fi analyzer tool, select channels that do not overlap with neighboring networks, and regularly monitor for changes. These steps will help ensure a smoother and more reliable internet experience for you and your network users.
Consider the Distance Between Access Points
When setting up a Wi-Fi network, the distance between access points (APs) is an important factor to consider. The placement of APs can significantly impact the coverage, signal strength, and overall performance of your network. Understanding how the distance between APs affects your Wi-Fi network can help you optimize its efficiency and ensure reliable connectivity throughout your space.
Access points are devices that facilitate wireless communication between Wi-Fi-enabled devices and the router. Placing APs too close to each other can cause interference and signal overlapping, leading to reduced signal strength and diminished network performance. On the other hand, if APs are positioned too far apart, the coverage may be insufficient, resulting in dead spots where the Wi-Fi signal is weak or non-existent.
The ideal distance between APs depends on various factors, including the size of the space you want to cover, the materials used in the construction of the building, and the strength of your Wi-Fi signal. In general, it is recommended to position APs at a sufficient distance from each other to avoid signal overlap but close enough to provide seamless coverage.
For larger spaces or areas with multiple floors, you may need to deploy multiple APs strategically to ensure adequate coverage. In such cases, ensure that the APs are positioned in a way that evenly distributes the Wi-Fi signal, minimizing dead spots and maintaining consistent connectivity throughout the entire area.
When determining the distance between APs, take into account the signal strength in specific areas. You can use tools like Wi-Fi analyzers or mobile apps to measure the signal strength at different locations within your space. This will help you identify areas with weak signals and adjust the AP placement accordingly.
Additionally, consider the potential sources of interference that can affect the distance between APs. Other electronic devices, such as microwave ovens or cordless phones, can emit signals that interfere with Wi-Fi signals. Keep APs away from these devices to minimize interference and maximize the Wi-Fi coverage.
Remember to periodically evaluate the Wi-Fi network’s performance and consider adjusting the distance between APs if you notice areas with weak signals or degraded performance. As your network environment and requirements change, the placement of APs may need to be adjusted to ensure optimal performance and coverage.
By carefully considering the distance between access points, you can maximize Wi-Fi coverage, minimize interference, and ensure a seamless and reliable network experience for all connected devices in your space.
Determine the Best Channel for Your Specific Environment
Choosing the best Wi-Fi channel for your specific environment is crucial to ensure optimal performance and minimize interference. Since channel availability and congestion can vary depending on your location and surrounding Wi-Fi networks, it’s important to analyze your specific environment and select the most suitable channel. Here’s how you can determine the best Wi-Fi channel for your network.
Start by conducting a Wi-Fi scan using a Wi-Fi analyzer tool or mobile app. This scan will provide you with valuable information about the nearby Wi-Fi networks, their respective channels, and the signal strength. Analyzing this data will give you insights into the channel congestion and help you identify the least crowded channels.
The goal is to choose a Wi-Fi channel that has minimal interference from neighboring networks. Look for channels with fewer networks operating on them and weaker signal strengths from nearby networks. These less crowded channels will enable your network to operate more efficiently with less interference.
Avoiding overlapping channels is also crucial. Neighboring networks that use the same or adjacent channels can cause interference, even if their signals are weaker. For example, if a neighboring network is using channel 6, it can interfere with your network if you are also using channels 1, 6, or 11. Choose channels that have as little overlap as possible with nearby networks to minimize interference.
It’s worth noting that the 5 GHz band generally offers more available channels and less congestion compared to the 2.4 GHz band. If your devices support the 5 GHz band, consider using this band to take advantage of the additional channels and reduce interference.
Periodically reassess the Wi-Fi channels in your specific environment, as network configurations can change over time. New networks could be added or existing networks may change their channel assignments. Regularly monitoring the Wi-Fi environment will ensure that you are utilizing the best channel for your network’s performance.
If your Wi-Fi router supports automatic channel selection, consider enabling this feature. Automatic channel selection allows the router to identify the least congested channel and adjust its channel assignment accordingly. However, it’s still recommended to periodically check and verify the automatically selected channels to ensure they are the best options.
By analyzing your specific environment, considering channel congestion and overlapping networks, and periodically evaluating the Wi-Fi channels, you can determine the best channel for your network. This will result in improved performance, reduced interference, and a more reliable Wi-Fi experience for all your connected devices.
Changing Wi-Fi Channels on Your Router
If you’re experiencing performance issues or interference on your Wi-Fi network, one effective solution is to change the Wi-Fi channel on your router. By selecting a less congested channel, you can improve the overall performance and stability of your network. Here’s a step-by-step guide on how to change the Wi-Fi channel on your router.
1. Access your router’s configuration interface: Open your preferred web browser and enter the IP address of your router in the address bar. This address is usually in the form of “192.168.1.1” or “192.168.0.1.” If you’re unsure of the IP address, consult your router’s manual or contact your Internet Service Provider for assistance.
2. Log in to your router’s admin panel: Enter the username and password for your router. This information is typically provided on a sticker on the router itself or in the router’s manual. If you previously changed the username and password and can’t recall them, you may need to perform a factory reset on the router.
3. Navigate to the wireless settings: Once logged in, locate the wireless settings or Wi-Fi settings section. This may be labeled differently depending on your router’s model and firmware.
4. Choose the Wi-Fi channel: Look for the channel selection option. Some routers may have an “Auto” option that automatically chooses the least congested channel. If you want to manually select a channel, consult your Wi-Fi analyzer tool’s results to identify the least crowded channel. Choose the desired channel from the available options.
5. Save the changes: After selecting the new channel, click on the “Save” or “Apply” button to save the new Wi-Fi channel settings. The router will then usually restart to apply the changes. During this time, your Wi-Fi network may be temporarily unavailable.
6. Reconnect your devices: Once the router has restarted, reconnect your devices to the Wi-Fi network using the new channel. Check your devices’ Wi-Fi settings and select the network with the updated channel.
7. Monitor network performance: After changing the Wi-Fi channel, monitor the performance of your network to assess if the new channel has improved the overall signal strength and reduced interference. If you notice further issues or congestion, you may need to repeat the process and select a different channel.
It’s important to note that the process of changing the Wi-Fi channel may vary depending on your router’s brand and model. Some routers may have different user interfaces or additional settings. Consult your router’s manual or the manufacturer’s website for specific instructions related to your router’s configuration.
By changing the Wi-Fi channel on your router, you can effectively manage congestion and interference, leading to improved network performance and a more stable Wi-Fi connection for your devices.