
Overview
Changing the name of your Apple Watch is a simple process that can be done right from your iPhone. Whether you want to give your Apple Watch a personal touch or differentiate it from other devices, changing the name is a convenient way to do so.
In this article, we will guide you through the step-by-step process of changing the Apple Watch name on your iPhone. By following these instructions, you’ll be able to customize the name of your Apple Watch in no time.
The process involves using the Apple Watch app on your iPhone, which allows you to manage various settings and configurations for your Apple Watch easily. With just a few taps, you can rename your Apple Watch to reflect your personal style or preferences.
It’s important to note that changing the name of your Apple Watch will only affect the display name on your iPhone. The actual functionality and performance of your Apple Watch will remain the same. However, having a customized name can make it easier to identify and connect with your device, especially if you own multiple Apple Watches.
So, if you’re ready to give your Apple Watch a new name, let’s dive into the step-by-step instructions on how to change the Apple Watch name on your iPhone. Follow the guide below, and you’ll be able to personalize your Apple Watch with a name that suits your style and taste.
Step 1: Open the Apple Watch app on your iPhone
The first step in changing the name of your Apple Watch is to open the Apple Watch app on your iPhone. This app is pre-installed on your iPhone and allows you to manage and customize various settings for your Apple Watch.
To open the Apple Watch app, simply locate the app icon on your home screen. It features a black icon with a white outline of an Apple Watch. Once you’ve found the app icon, tap on it to launch the Apple Watch app.
Alternatively, you can also use the Spotlight Search feature on your iPhone. Swipe down on your home screen to reveal the search bar, then type “Apple Watch” in the search field. The Apple Watch app should appear in the search results. Tap on it to open the app.
Once the Apple Watch app is open, you’ll be greeted with a user-friendly interface that provides access to various settings and options for your Apple Watch. The app allows you to customize watch faces, manage notifications, install apps, and more.
Now that you have successfully opened the Apple Watch app on your iPhone, you’re ready to proceed to the next step in changing the name of your Apple Watch. The app will serve as the control center for all the configuration changes you wish to make to your Apple Watch.
Step 2: Tap on the “My Watch” tab
After opening the Apple Watch app on your iPhone, you will see a bottom menu with several tabs. To proceed with changing the name of your Apple Watch, you need to tap on the “My Watch” tab.
The “My Watch” tab is the central hub within the Apple Watch app where you can access and modify various settings related to your Apple Watch. It provides an overview of your watch’s configuration and allows you to customize different aspects of your device.
To tap on the “My Watch” tab, simply look for the icon at the bottom of the screen that resembles a small picture of an Apple Watch. It should be the second tab from the left, just right after the “Featured” tab.
Once you have located the “My Watch” tab, tap on it to enter the section where you can manage all the settings and options for your Apple Watch. This tab will give you access to a wide range of customization possibilities, from adjusting the watch face to handling app notifications and more.
By tapping on the “My Watch” tab, you’re taking a step closer to changing the name of your Apple Watch. It’s important to note that the changes you make here will only affect your specific Apple Watch and will not impact any other devices associated with your Apple ID.
Now that you’ve successfully tapped on the “My Watch” tab, let’s move on to the next step, where you’ll find the option to change the name of your Apple Watch in the “General” settings.
Step 3: Scroll down and tap on “General”
Once you’re in the “My Watch” tab of the Apple Watch app, you’ll need to scroll down to access the various settings and options available for your Apple Watch. The next step in changing the name of your Apple Watch is to locate and tap on the “General” option.
To scroll down, simply swipe your finger upwards on the screen. As you swipe up, the screen will move and reveal additional options and settings. Keep swiping until you reach the “General” section.
The “General” section contains a range of general settings for your Apple Watch, including options for software updates, language preferences, accessibility, and more. It’s where you’ll find the option to change the name of your Apple Watch.
Once you’ve reached the “General” section, look for the word “General” written in bold letters at the top. Underneath it, you’ll find various subcategories and settings. One of these subcategories is where you can change the name of your Apple Watch.
To access this subcategory, simply tap on the “General” option. Tapping on it will open a new screen with more specific settings related to the general configuration of your Apple Watch.
Now that you have successfully scrolled down and tapped on “General”, you’re ready to proceed to the next step, where you’ll find the option to change the name of your Apple Watch in the “About” section.
Step 4: Tap on “About”
After accessing the “General” section within the Apple Watch app, the next step in changing the name of your Apple Watch is to tap on the “About” option. This will take you to a screen that provides you with specific details about your Apple Watch.
To tap on “About”, simply scroll through the options in the “General” section until you locate the “About” option. It should be listed as one of the subcategories under “General”. Tap on it to proceed.
Once you tap on “About”, a new screen will appear displaying important information about your Apple Watch, such as the model, software version, serial number, and more. This screen provides you with an overview of your device’s hardware and software specifications.
It’s worth noting that the “About” section is not only where you can find the option to change the name of your Apple Watch but also where you can find essential information about your device. This includes details that may be required for troubleshooting or when seeking Apple support.
By tapping on “About”, you’re now one step closer to changing the name of your Apple Watch. The next step will guide you to the specific option within the “About” section where you can edit and customize the name of your Apple Watch.
Now that you’ve successfully tapped on “About”, let’s move on to the next step, where you’ll find the option to change the name of your Apple Watch by tapping on “Name”.
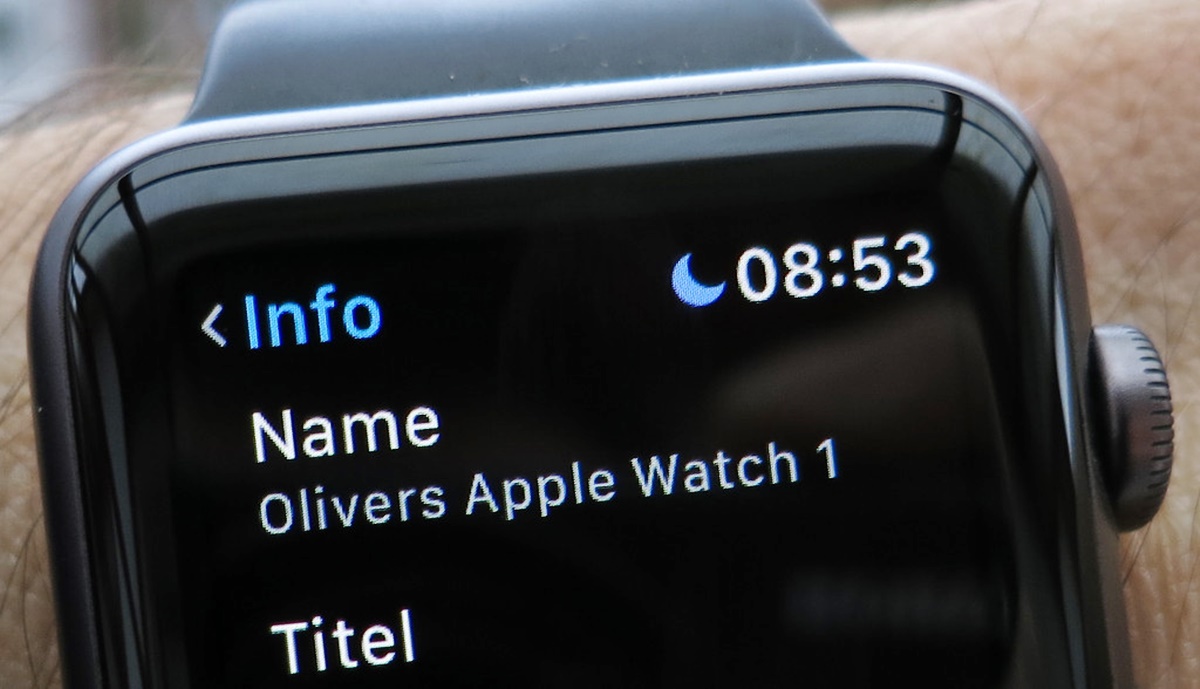
Step 5: Tap on “Name”
After accessing the “About” section within the Apple Watch app, the next step in changing the name of your Apple Watch is to tap on the “Name” option. This will allow you to edit and customize the name of your Apple Watch according to your preference.
To locate the “Name” option, scroll through the “About” section until you find it. It should be listed as one of the settings within this section. Once you find it, tap on it to proceed with changing the name.
Tapping on “Name” will take you to a new screen where you can edit the current name of your Apple Watch. This screen will display the current name of your Apple Watch, and you can simply tap on the existing name to enter the edit mode.
Once you’re in the edit mode, you can use the on-screen keyboard to enter a new name for your Apple Watch. Feel free to get creative and choose a name that reflects your personal style or makes your Apple Watch more easily identifiable.
It’s important to note that the name you choose for your Apple Watch should be unique and not conflict with any other device names in your ecosystem. This will help prevent any potential confusion or Bluetooth connectivity issues.
After you’ve entered the new name for your Apple Watch, take a moment to review the spelling and ensure it accurately reflects your desired name. Once you’re satisfied, proceed to the next step to apply the new name.
By tapping on “Name”, you’re now ready to personalize your Apple Watch with a unique name of your choice. Let’s move on to the next step, where you’ll be able to apply the new name to your Apple Watch by tapping on “Done”.
Step 6: Enter the new name for your Apple Watch
Once you’re in the editing mode after tapping on the “Name” option, it’s time to enter the new name for your Apple Watch. This step allows you to customize the name according to your preference and make it more personal or easily identifiable.
To enter the new name, simply tap on the existing name displayed on the screen. This will activate the on-screen keyboard, allowing you to type in the new name using the alphanumeric keys.
As you enter the new name, keep in mind a few considerations. Firstly, choose a unique and descriptive name that differentiates your Apple Watch from other devices you may own. This can be your initials, a nickname, or any word or phrase that resonates with you.
Secondly, be mindful of the length of the name. While there is no strict character limit, it’s best to keep the name relatively short and concise. Lengthy names may not display fully on certain screens and can lead to visual clutter.
Lastly, ensure that the new name you choose is appropriate and does not violate any guidelines or terms of service. Avoid using offensive or derogatory language as well as any trademarks or copyrighted names.
Once you’ve entered the new name for your Apple Watch, take a moment to review it for accuracy and clarity. Check for any potential spelling or typing errors. When you’re satisfied with the new name, proceed to the next step to apply the change.
By entering the new name for your Apple Watch, you’re making it uniquely yours and reflecting your personal style. Let’s continue to the next step, where you’ll apply the new name by tapping on “Done”.
Step 7: Tap on “Done”
After entering the new name for your Apple Watch, the next step in changing the name is to tap on the “Done” button. This will apply the new name to your Apple Watch and save the changes you have made.
To find the “Done” button, look for it at the top or bottom of the screen, usually in the right-hand corner. The button will be labeled “Done” and may be highlighted or in a different color to draw attention.
When you tap on “Done”, the Apple Watch app will finalize the changes and update the name of your Apple Watch. You may briefly see a loading or syncing indicator as the app applies the new name to your device.
It’s important to note that the changes you make in the app will not be immediately reflected on your Apple Watch. To synchronize the new name with your Apple Watch, you need to proceed to the next step, where you will sync your Apple Watch with your iPhone.
By tapping on “Done”, you have successfully completed the process of changing the name of your Apple Watch using the Apple Watch app on your iPhone. Take a moment to admire your newly personalized Apple Watch name before moving on to the final step.
Now that you’ve tapped on “Done”, let’s move on to the last step, where you’ll sync your Apple Watch with your iPhone to apply the new name and complete the process.
Step 8: Sync your Apple Watch with your iPhone to apply the new name
After tapping on “Done” to apply the new name for your Apple Watch, the final step is to sync your device with your iPhone. This step ensures that the new name is successfully transferred to your Apple Watch and will be displayed accordingly on the device.
To sync your Apple Watch, make sure that your iPhone is nearby and connected to the internet. Keep the Apple Watch and iPhone close together during the syncing process to ensure a smooth transfer of data.
Your Apple Watch will automatically sync with your iPhone in the background as long as they are connected via Bluetooth and both devices are powered on. However, you can also manually trigger a sync if needed.
To manually sync your Apple Watch, simply navigate to the home screen of your Apple Watch by pressing the Digital Crown. From there, swipe up from the bottom of the screen to access the Control Center.
In the Control Center, look for the icon that resembles two arrows forming a circle. This icon represents the sync or “refresh” function. Tap on this icon to initiate the syncing process.
Once the sync process is complete, your Apple Watch will be updated with the new name you have chosen. You can verify the change by viewing the device’s name in the settings or by simply glancing at the watch face.
It’s important to note that the syncing process may take a few moments to complete, depending on the amount of data that needs to be transferred between your Apple Watch and iPhone. Be patient and allow sufficient time for the sync to finish.
By syncing your Apple Watch with your iPhone, you have successfully applied the new name to your device. Enjoy your personalized Apple Watch with its unique name that reflects your style and preference.
Congratulations! You have now completed the process of changing the name of your Apple Watch. Your device is now uniquely customized and ready to accompany you on various adventures.