
Checking your availability
Before canceling a meeting in Outlook, it’s important to check your availability to ensure that you are not inadvertently canceling a meeting that you still need to attend. Outlook provides an easy way to view your schedule and see if there are any conflicts.
To check your availability, follow these steps:
- Open your Outlook calendar by clicking on the “Calendar” tab at the bottom of the Outlook window.
- Make sure you are in the desired time frame by selecting the appropriate date range.
- Take a quick look at the calendar to see if there are any conflicting appointments or meetings during the time slot of the meeting you want to cancel. This will help you avoid canceling a meeting that you should actually be attending.
By checking your availability beforehand, you can be confident that canceling the meeting will not create any scheduling conflicts or interrupt any important appointments or commitments.
Now that you have verified your availability, you’re ready to proceed with canceling the meeting in Outlook. The next step is to open the meeting request and initiate the cancellation process.
Opening the meeting request
Once you have confirmed your availability and decided to cancel a meeting in Outlook, the first step is to open the meeting request. Here’s how you can do it:
- Go to your Outlook calendar and locate the meeting you want to cancel.
- Double-click on the meeting request to open it.
By opening the meeting request, you will have access to all the details of the meeting, including the date, time, location, agenda, and list of attendees. This information will be helpful when composing the cancellation message and notifying the participants about the cancellation.
Once you have opened the meeting request, you will see various options and buttons related to the meeting. One of these options is the “Cancel Meeting” button, which you will use to initiate the cancellation process. Clicking on this button will bring up the necessary options and settings to proceed with the cancellation.
Now that you have opened the meeting request, you are ready to move on to the next step: clicking on the “Cancel Meeting” button and composing the cancellation message.
Clicking on “Cancel Meeting”
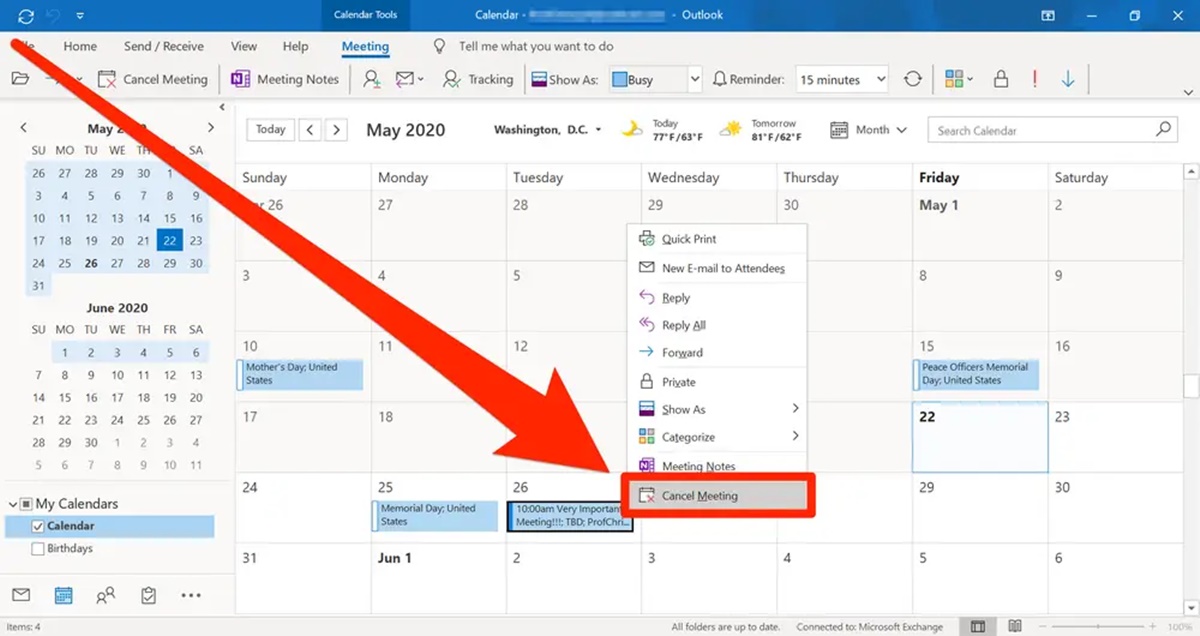
After opening the meeting request in Outlook, the next step to cancel a meeting is to click on the “Cancel Meeting” button. This button is located within the meeting request and initiates the cancellation process. Here’s how you can do it:
- Within the meeting request window, locate and click on the “Cancel Meeting” button. It is usually found in the toolbar or options menu.
- When you click on the “Cancel Meeting” button, a confirmation prompt may appear. This prompt will ask you to confirm if you really want to cancel the meeting. Click “Yes” or “OK” to proceed.
By clicking on the “Cancel Meeting” button, you are signaling to Outlook that you wish to cancel the scheduled event. This step is crucial in initiating the cancellation process and notifying all the attendees about the change.
Once you have confirmed the cancellation, you will be directed to a new window where you can compose a cancellation message. This message will be sent to all the meeting attendees to inform them of the cancellation and provide any necessary information or updates.
Now that you have successfully clicked on the “Cancel Meeting” button, it’s time to compose the cancellation message and notify the participants about the cancellation.
Adding a cancellation message
After clicking on the “Cancel Meeting” button in Outlook, the next step is to add a cancellation message. This message will be sent to all the meeting attendees to inform them about the cancellation and provide any necessary details. Here’s how you can do it:
- In the cancellation window, you will see a text box or area where you can compose the cancellation message. Click in this area to start typing.
- Begin by addressing the attendees and stating that the meeting has been canceled. Be clear and concise in your message.
- Provide a brief explanation for the cancellation. This can include reasons such as a scheduling conflict, a change in priorities, or unforeseen circumstances.
- Offer any relevant alternatives or next steps, if applicable. For example, you might suggest rescheduling the meeting or provide alternative methods of communication.
- Make sure to express your apologies for any inconvenience caused by the cancellation and thank the attendees for their understanding.
When composing the cancellation message, it’s important to be professional and courteous. Keep the tone concise and clear, and avoid any unnecessary details or complex explanations.
Once you have finished composing the cancellation message, take a moment to review it for any errors or omissions. Make sure that the message is clear and conveys the necessary information to the attendees.
Now that you have added the cancellation message, you are ready to proceed with selecting your preferred cancellation options and sending the cancellation notification to the attendees.
Selecting your preferred cancellation options
After adding a cancellation message in Outlook, the next step is to select your preferred cancellation options. Outlook provides several options that allow you to customize how the cancellation notification is sent and handled. Here’s what you need to do:
- Within the cancellation window, look for the “Cancellation Options” or “Send Cancellation” section.
- Choose whether you want to send the cancellation to all attendees or only to a specific group. This option is useful if you want to exclude certain individuals from receiving the cancellation notification.
- If you want to provide an additional note or explanation to specific attendees, check for any individual notes section or options available. This allows you to customize the cancellation message for specific individuals.
- Decide whether you want to keep a copy of the cancellation message in your Sent folder. This can be helpful for future reference or record-keeping purposes.
- Consider selecting the option to automatically delete the meeting from your calendar after sending the cancellation. This ensures that the meeting is removed from your schedule and helps avoid any confusion.
- Review the cancellation options to ensure that they align with your preferences and needs.
By selecting your preferred cancellation options, you can tailor the cancellation process to suit your specific requirements. This allows you to maintain control over how the cancellation notification is sent and managed.
Once you have reviewed and chosen your cancellation options, you are ready to proceed with sending the cancellation notification to the attendees and completing the cancellation process.
Sending the cancellation notification
After selecting your preferred cancellation options in Outlook, the next step is to send the cancellation notification to the meeting attendees. This notification informs them about the cancellation and any relevant details. Here’s how you can send the cancellation notification:
- Within the cancellation window, review the cancellation message and ensure that it contains all the necessary information.
- Double-check the list of attendees to make sure that all the relevant individuals are included.
- Click on the “Send” or “OK” button to send the cancellation notification.
Once you have clicked on the send button, Outlook will automatically generate and send the cancellation notification email to all the meeting attendees. The cancellation notification will include the cancellation message you composed earlier, along with any additional notes or explanations you provided.
It’s important to note that sending the cancellation notification does not automatically remove the meeting from your calendar. To avoid any confusion, make sure to delete the meeting from your calendar manually after sending the cancellation notification.
By promptly sending the cancellation notification, you provide the attendees with ample time to adjust their schedules and make alternative arrangements if necessary. This demonstrates your professionalism and consideration for their time and commitments.
Now that you have sent the cancellation notification, you can proceed with deleting the meeting from your calendar and notifying the attendees about the cancellation.
Deleting the meeting from your calendar
After sending the cancellation notification in Outlook, the next step is to delete the meeting from your calendar. This step ensures that the canceled meeting is removed from your schedule and helps you stay organized. Here’s how you can delete the meeting from your calendar:
- Go to your Outlook calendar and locate the canceled meeting.
- Right-click on the meeting and select “Delete” or “Remove” from the context menu. Alternatively, you can select the meeting and press the “Delete” key on your keyboard.
- A confirmation prompt may appear, asking you to confirm the deletion. Click “Yes” or “OK” to proceed.
Once you have deleted the meeting from your calendar, it will no longer appear on your schedule. This helps to avoid any confusion or conflicts caused by a canceled meeting that is still visible on your calendar.
It’s important to note that deleting the meeting from your calendar does not automatically notify the attendees about the cancellation. You still need to take the final step of notifying the attendees to ensure they are aware of the cancellation.
By promptly deleting the meeting from your calendar, you maintain accurate and up-to-date information in your schedule, allowing you to manage your time effectively and avoid any potential conflicts.
Now that you have deleted the meeting from your calendar, let’s move on to the final step of notifying the attendees about the cancellation.
Notifying attendees about the cancellation
After canceling a meeting in Outlook, it is important to notify the attendees about the cancellation to ensure that they are aware of the change and can adjust their schedules accordingly. Here’s how you can notify the attendees about the cancellation:
- Compose a separate email or message addressed to all the meeting attendees.
- In the email, clearly state that the meeting has been canceled.
- Provide a brief explanation for the cancellation, if necessary.
- Apologize for any inconvenience caused and thank the attendees for their understanding.
- Include any relevant alternative plans or next steps, if applicable.
- Attach the cancellation notification or include the pertinent details in the email.
- Double-check the recipient list to ensure all the relevant attendees are included.
- Click “Send” or “OK” to send the notification to the attendees.
By notifying the attendees about the cancellation, you demonstrate professionalism and respect for their time and commitments. This allows them to adjust their schedules and make alternative arrangements, if necessary. It also helps to maintain clear and open communication within your professional network.
Once you have sent the notification to the attendees, it’s important to monitor your email for any responses or inquiries related to the cancellation. Promptly address any questions or concerns to ensure a smooth transition and minimize any potential disruptions caused by the cancellation.
Now that you have notified the attendees about the cancellation, it’s time to consider rescheduling the meeting or taking any further actions, if needed.
Rescheduling the meeting
After canceling a meeting in Outlook, you may need to reschedule it if the meeting is still necessary or if there is a need to discuss the topics at a later time. Rescheduling allows you to find a new date and time that works for all the attendees. Here’s how you can reschedule a meeting:
- Review your calendar and identify potential time slots that are available for rescheduling the meeting.
- Consider the availability of the meeting attendees and try to find a time that works for everyone. This may involve coordinating different schedules and finding a mutually convenient time.
- Once you have identified a suitable time slot, open a new meeting request in Outlook.
- Enter the details of the meeting, including the date, time, location, agenda, and list of attendees.
- Compose a rescheduling message that explains the reason for the change and provides the new date and time for the meeting.
- Attach any relevant documents or materials that the attendees may need for the rescheduled meeting.
- Double-check the recipient list to ensure all the relevant attendees are included.
- Click “Send” or “OK” to send the rescheduling request to the attendees.
By rescheduling the meeting, you ensure that the topics and discussions can still take place in a timely manner. It also shows your commitment to finding a convenient time for all the participants and helps maintain the productivity and effectiveness of your meetings.
Once the rescheduling request has been sent, it’s important to monitor your email for any responses or confirmations from the attendees. Promptly address any questions or concerns to ensure a smooth transition to the new meeting time.
Now that you have successfully rescheduled the meeting, you can prepare for the upcoming meeting and make any necessary updates to your calendar and agenda.