
Choosing the Right Software for Broadcasting on Steam
Broadcasting on Steam can be an exciting opportunity to share your gaming experiences with a wider audience. But before you start streaming, it’s important to choose the right software that suits your needs. Here are some factors to consider when selecting broadcasting software for Steam.
1. Platform Compatibility: Ensure that the software you choose is compatible with the platform you are gaming on. Whether you’re using Windows, macOS, or Linux, make sure the software supports your operating system.
2. User-Friendly Interface: Look for broadcasting software that offers a user-friendly interface. It should be intuitive and easy to navigate, allowing you to quickly set up your stream without any technical hitches.
3. Customization Options: Consider software that offers a range of customization options. This allows you to personalize your streaming layout, overlays, and alerts to reflect your brand or desired style.
4. Stream Stability: Look for software that provides a stable streaming experience. It should have features that prevent buffering, frame drops, and other disruptions that can hinder the viewing experience for your audience.
5. Encoding Options: Pay attention to the encoding options available in the software. Advanced encoding options can ensure optimal video quality while minimizing the strain on your network connection.
6. Compatibility with Streaming Platforms: Determine if the software of your choice is compatible with popular streaming platforms, including Steam. This helps streamline the process of connecting your stream to your Steam account.
7. Additional Features: Consider the additional features offered by the software. Features like chat integration, scene transitions, and instant replay can enhance the overall quality of your stream and engage your viewers.
8. Resource Utilization: Evaluate how efficiently the software utilizes your system’s resources. Software that doesn’t overly burden your CPU or GPU can ensure smooth gameplay while streaming.
By considering these factors, you’ll be well-equipped to choose the right software for broadcasting on Steam. Remember to take your time researching and testing different options to find the one that best suits your needs and enhances your streaming experience.
Setting Up Your Steam Account for Broadcasting
Before you can start broadcasting your gameplay on Steam, you’ll need to properly set up your Steam account for streaming. Follow these steps to ensure a smooth broadcasting experience:
1. Ensure your Steam account is in good standing: Make sure your Steam account is in good standing and free of any restrictions or suspensions. Broadcasting may not be available if your account is limited in any way.
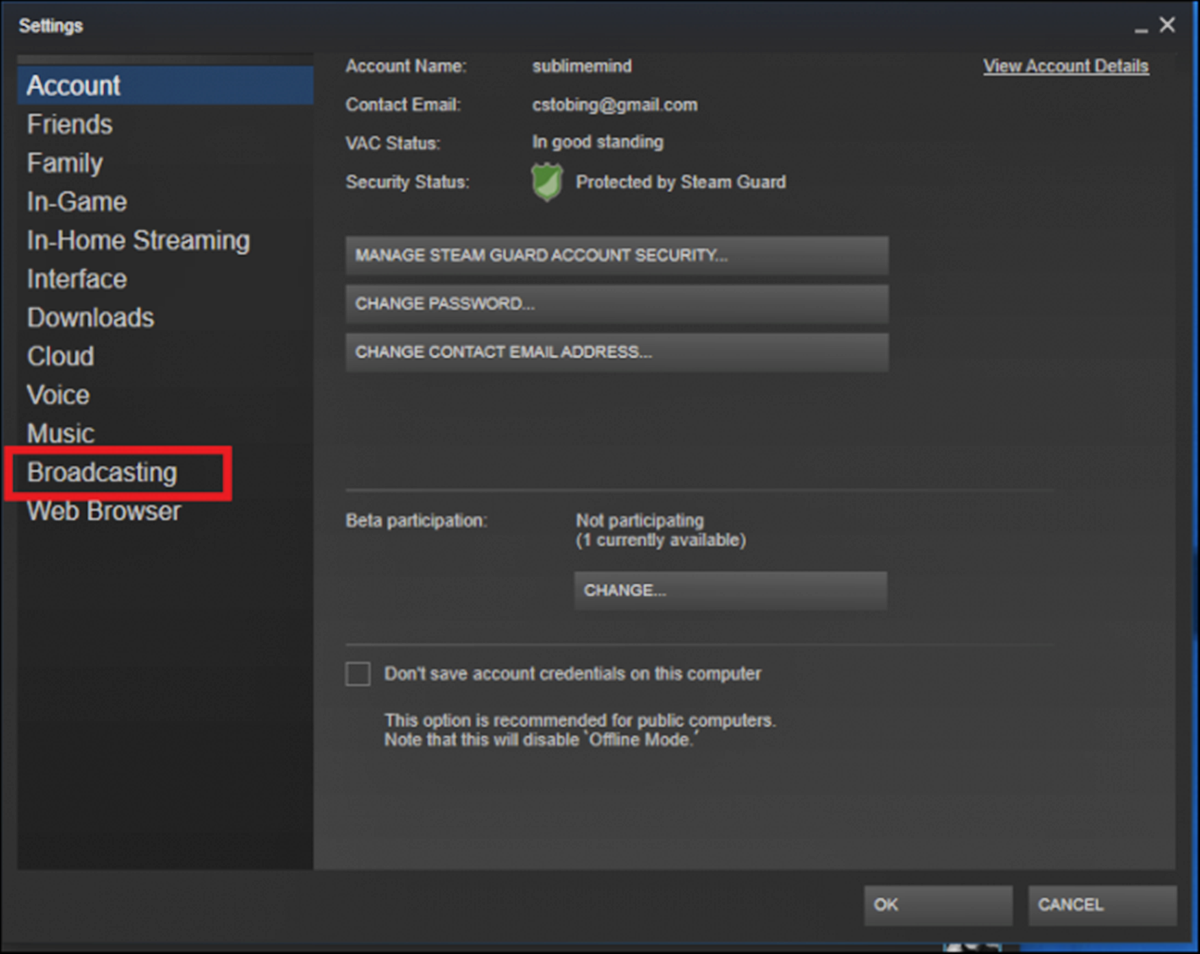
2. Enable Steam Broadcasting: To enable broadcasting on Steam, open the Steam client and go to “Steam” in the top left corner. From the dropdown menu, select “Settings”. In the settings window, click on the “Broadcasting” tab and ensure that the “Enable Broadcasting” option is checked.
3. Set up your privacy settings: Decide on the privacy settings for your broadcasts. You can choose to make your streams public for anyone to watch, restrict them to your Steam friends, or even set up a password for private streams. Go to the “Broadcasting” tab in the settings window and adjust the privacy settings according to your preferences.
4. Set your broadcast delay: If you want to add a delay to your broadcasts, you can do so in the settings window under the “Broadcasting” tab. Adding a slight delay can help prevent stream sniping or any unwanted interactions during your gameplay.
5. Optimize your broadcast quality: In the settings window, you’ll find options to adjust your broadcast quality. Determine the desired resolution, frame rate, and bitrate for your streams. Keep in mind that higher quality settings may require a more stable internet connection.
6. Test your broadcast settings: Before you go live, it’s a good idea to test your broadcast settings. Steam provides a “View” button in the broadcasting settings window that allows you to preview your stream. Take this opportunity to ensure that your audio, video, and overall stream quality are up to par.
7. Customize your broadcast layout: While not required, you can customize your broadcast layout to add a unique touch to your streams. Consider adding overlays, webcam frames, or custom graphics to enhance the visual appeal of your broadcasts.
8. Familiarize yourself with Steam Broadcasting features: Take the time to explore additional features provided by Steam Broadcasting, such as chat integration, moderation tools, and the ability to invite friends to watch. Understanding these features will help you engage with your audience and create an interactive streaming experience.
By following these steps, you’ll be well on your way to setting up your Steam account for broadcasting. Take the time to ensure that all your settings are properly configured before you start your first stream. This will help you provide an enjoyable viewing experience to your audience and make the most out of your streaming endeavors.
Configuring Your Broadcasting Settings on Steam
Once you have set up your Steam account for broadcasting, the next step is to configure your broadcasting settings to ensure a smooth and high-quality stream. Here’s a guide on how to configure your broadcasting settings on Steam:
1. Video Settings: Under the broadcasting settings, you’ll find options to configure your video settings. Choose the desired resolution and frame rate for your stream. Higher resolutions and frame rates may require a more powerful system and a stable internet connection.
2. Audio Settings: Adjust your audio settings to ensure clear and balanced audio in your stream. Steam allows you to select the audio devices you want to capture, such as your microphone and game audio. Make sure to test your audio levels before going live.
3. Camera Settings: If you plan on using a webcam during your stream, configure your camera settings in the broadcasting settings. Adjust the resolution, frame rate, and positioning of your webcam overlay to suit your preferences and desired stream layout.
4. Stream Delay: Consider utilizing a stream delay to prevent stream sniping and unwanted interactions. Under the broadcasting settings, you have the option to add a delay to your stream. Set an appropriate delay time based on your specific needs.
5. Stream Permissions: Define the permissions for your stream, such as who can watch, chat, or interact with your broadcast. You can choose to allow anyone to watch and chat, restrict it to friends only, or even set a custom list of permitted users.
6. Moderation Tools: Familiarize yourself with the moderation tools available through Steam Broadcasting. Understand how to manage chat, handle trolls or spammers, and control the overall environment of your stream.
7. Network Settings: Optimize your network settings to ensure a stable and reliable internet connection. If you experience buffering or lag during your streams, consider adjusting your streaming bitrate or using a wired connection for a more stable experience.
8. Stream Titles and Tags: When configuring your broadcasting settings, pay attention to the options for stream titles and tags. Use descriptive and catchy titles to attract viewers, and select relevant tags to help categorize your stream and make it discoverable.
9. Test your settings: Before going live, make sure to thoroughly test your broadcasting settings. Use the “View” button in your broadcasting settings to check the quality of your video, audio, and overall stream performance. Make any necessary adjustments based on the results of your tests.
By carefully configuring your broadcasting settings on Steam, you can ensure a seamless and enjoyable streaming experience for both you and your viewers. Take the time to explore all the available options and customize them according to your preferences and requirements.
Optimizing Your Network for a Smooth Broadcast
When it comes to broadcasting on Steam, having a smooth and uninterrupted stream is crucial. To ensure optimal performance, it’s important to optimize your network. Here are some tips to help you optimize your network for a smooth broadcast:
1. High-Speed Internet Connection: A stable and high-speed internet connection is essential for a smooth broadcast. Ensure that you have a reliable internet service provider (ISP) with a connection speed that meets the requirements for streaming.
2. Use a Wired Connection: Whenever possible, use a wired ethernet connection instead of relying on Wi-Fi. A wired connection provides a more stable and consistent internet connection, which is crucial for streaming without interruptions.
3. Close Unnecessary Network-Intensive Applications: Close any applications or programs that may consume a significant amount of your network bandwidth. This includes file-sharing programs, downloads, and other online activities that compete for bandwidth with your stream.
4. Prioritize your Network for Streaming: Some routers allow you to prioritize certain devices or applications for network traffic. Prioritize your streaming software or gaming applications to ensure they receive optimal bandwidth and minimize any potential latency or packet loss.
5. Check Your Router Settings: Access your router settings and make sure that UPnP (Universal Plug and Play) is enabled. This can help with port forwarding and ensuring a smooth connection for your broadcast.
6. Update Your Router’s Firmware: Regularly update your router’s firmware to ensure that you have the latest security features and performance improvements. Check the manufacturer’s website for any available updates.
7. Enable Quality of Service (QoS) Settings: Some routers offer QoS settings that allow you to prioritize certain types of network traffic. Enable QoS and allocate a higher priority to your streaming or gaming applications to ensure a smooth and stable broadcast.
8. Test Your Network Speed: Use online speed test tools to check your network’s upload and download speeds. Ensure that your upload speed meets the recommended requirements for streaming on Steam. If the speed falls short, consider contacting your ISP for an upgrade.
9. Consider a Dedicated Streaming PC: If possible, consider using a separate dedicated streaming PC. This allows you to offload the streaming process from your gaming rig, ensuring that it can focus solely on delivering a smooth gaming experience.
By following these network optimization tips, you can greatly enhance the quality and stability of your broadcast on Steam. Remember to regularly check your network settings, upgrade your hardware if necessary, and run speed tests to ensure that your network is capable of handling your streaming needs.
Setting Up Your Audio and Video Options
When broadcasting on Steam, it’s crucial to have optimal audio and video settings to deliver a high-quality and engaging stream. Here’s a guide on how to set up your audio and video options for a seamless broadcasting experience:
1. Audio Devices: Start by selecting the appropriate audio devices for your stream. In your broadcasting software or Steam settings, select the microphone you want to use for commentary and the audio device for capturing game sounds.
2. Microphone Setup: Configure your microphone settings to ensure clear and balanced audio. Adjust the microphone volume, sensitivity, and noise cancellation settings as needed. Test your microphone beforehand to make sure it sounds crisp and doesn’t distort.
3. Game Audio Levels: It’s important to find the right balance between the game audio and your microphone commentary. Test your settings to ensure that the game sounds are audible but do not overpower your voice. Adjust the game audio levels accordingly.
4. Webcam Setup: If you plan to include a webcam feed in your stream, set up your webcam properly. Ensure that it is positioned correctly and that the lighting is adequate. Adjust the webcam settings in your broadcasting software to achieve the desired image quality.
5. Video Resolution and Frame Rate: Choose the appropriate video resolution and frame rate for your stream. Consider factors such as your internet bandwidth and the capabilities of your computer. Higher resolutions and frame rates may require more processing power and a stable internet connection.
6. Video Bitrate: Determine the ideal video bitrate for your stream. A higher bitrate results in better video quality but requires a more stable and faster internet connection. Experiment with different bitrate settings to find the right balance between quality and stability.
7. Overlay and Graphic Options: Customize your stream layout by adding overlays, graphics, and other visual elements. Ensure that they do not obstruct important gameplay elements or distract viewers. Strike a balance between a visually appealing stream and maintaining the focus on the game.
8. Preview and Test: Before going live, preview and test your audio and video settings. Use the preview feature in your broadcasting software to ensure that your selected devices are working, audio levels are balanced, and video quality is satisfactory.
9. Monitor Stream Performance: Keep an eye on your stream performance during the broadcast. Look out for any audio desync or video buffering issues. If you encounter any problems, adjust your settings accordingly or troubleshoot any network or hardware-related issues.
By properly setting up your audio and video options, you can deliver an immersive and high-quality streaming experience for your viewers on Steam. Take the time to fine-tune and test your settings before going live to ensure a smooth and professional-looking stream.
Preparing Your Stream for a Professional Look
When broadcasting on Steam, it’s important to create a professional and visually appealing stream that captivates your viewers. Here are some tips to help you prepare your stream for a professional look:
1. Design a Stream Overlay: Create a custom stream overlay that reflects your personal brand or the theme of your stream. Include elements such as webcam frames, social media handles, and a visually appealing layout that enhances the viewer’s experience.
2. Utilize Scene Transitions: Impress your viewers by using scene transitions to switch between different scenes or gameplay moments seamlessly. Use smooth fades, slides, or creative effects to ensure a polished and professional transition.
3. Choose a Clean and Organized Stream Layout: Arrange your stream layout in a logical and aesthetically pleasing manner. Place your webcam feed, overlays, and alerts in locations that do not obstruct important gameplay elements. Avoid cluttering the screen with unnecessary graphics.
4. Display On-Screen Graphics and Alerts: Use on-screen graphics and alerts to engage your viewers and provide important information. Customize notifications for new followers, subscribers, or donations. Ensure that they align with your visual theme and are not intrusive.
5. Optimize Your Webcam Setup: If you’re using a webcam, pay attention to your lighting, positioning, and framing. Ensure that your face is well lit, your background is presentable, and your webcam feed does not block any important on-screen elements.
6. Use High-Quality Audio: Invest in a good quality microphone to provide clear and crisp commentary. Consider using a pop filter to reduce unwanted noise. Test your audio levels and ensure that your voice is audible without being overpowering.
7. Engage with Your Chat: Interact with your viewers by actively monitoring and responding to the chat. Take the time to acknowledge and respond to messages from your audience. This creates a sense of community and involvement, giving your stream a professional and welcoming vibe.
8. Establish Consistent Branding: Create a consistent visual branding for your stream. Use the same fonts, colors, and graphics across your overlays, social media banners, and channel art. Consistency helps in building recognition and professionalism.
9. Review and Improve: Regularly review your stream setup and seek feedback from your viewers. Take note of any areas for improvement and update your stream layout, graphics, or audio setup accordingly.
By implementing these tips, you can elevate the visual appeal and professionalism of your stream on Steam. Remember to experiment, adapt, and seek feedback to continuously improve your streaming experience and engage your audience effectively.
Interacting with Your Viewers during the Broadcast
One of the key aspects of a successful stream on Steam is actively engaging with your viewers. Taking the time to interact with your audience creates a sense of community, fosters loyalty, and enhances the overall streaming experience. Here are some tips to help you effectively interact with your viewers during your broadcasts:
1. Monitor and Respond to Chat: Keep a close eye on the chat window and respond to messages from your viewers. Acknowledge their presence, answer their questions, and take note of their feedback. Engaging with chat creates a personal connection and makes viewers feel heard and valued.
2. Use Viewers’ Names: Address viewers by their usernames whenever possible. This personal touch makes the interaction more intimate and establishes a friendly atmosphere. It emphasizes that you value your viewers as individuals.
3. Host Viewer-Participation Events: Organize viewer-participation events such as multiplayer game matches, viewer challenges, or Q&A sessions. This allows viewers to actively participate in your stream and promotes a sense of collaboration and excitement.
4. Respond to Donations and Subscriptions: Express gratitude and acknowledge donations and subscriptions during your stream. Thank the viewer by name and make them feel appreciated for their support. Consider incorporating on-screen notifications as a way to visually recognize and celebrate their contributions.
5. Use Polls and Surveys: Incorporate interactive elements such as polls and surveys to involve your viewers and gather their input on certain decisions, game choices, or stream topics. This not only keeps them engaged but also helps you tailor your content to their interests.
6. Host Giveaways and Contests: Plan occasional giveaways and contests to reward your viewers. This can be in the form of game keys, merchandise, or other relevant prizes. Create excitement and anticipation, and make sure to clearly communicate the entry requirements and deadlines.
7. Engage with Social Media: Extend your interaction beyond the stream by actively engaging with your viewers on social media platforms. Respond to comments, engage in conversations, and share highlights or stream updates. This helps strengthen your online presence and fosters a loyal and supportive community.
8. Address Feedback and Suggestions: Encourage your viewers to share their feedback and suggestions regarding your stream. Take the time to address their comments, thank them for their input, and consider implementing their suggestions when appropriate. This shows that you value their opinions and are committed to providing a better streaming experience.
9. Be Authentic and Genuine: Be yourself and let your personality shine through. Authenticity builds trust and connection with your viewers. Show enthusiasm, share personal stories, and don’t be afraid to have fun. This creates a welcoming and enjoyable environment for everyone involved.
By actively interacting with your viewers, you can foster a strong community and elevate your stream on Steam. Remember that building relationships and connecting with your audience is key to long-term success as a streamer.
Promoting Your Stream to Attract More Viewers
While streaming on Steam provides a platform to showcase your gaming content, it’s essential to promote your stream to attract a larger audience. Here are some effective strategies to help you promote your stream and engage with potential viewers:
1. Utilize Social Media: Leverage social media platforms such as Twitter, Facebook, Instagram, and Reddit to promote your stream. Share highlights, upcoming stream schedules, and interact with gaming communities to expand your reach.
2. Collaborate with Other Streamers: Collaborate with other streamers to cross-promote each other’s streams. Participate in multiplayer games together or host joint streaming events. This exposes you to their audience and vice versa, helping you reach new viewers.
3. Engage with Gaming Communities: Join relevant gaming communities and forums where your target audience is active. Participate in discussions, share your stream highlights, and genuinely contribute to the community. This can lead to organic growth and attract viewers with similar interests.
4. Utilize Hashtags and Keywords: Use relevant and trending hashtags and keywords in your social media posts and stream titles. This helps your content become discoverable to users searching for specific games, topics, or streaming-related content.
5. Create Compelling Stream Titles and Thumbnails: Craft attention-grabbing stream titles that accurately represent the content you’ll be streaming. Use high-quality and visually appealing thumbnails that entice potential viewers to click on your stream.
6. Establish Consistent Streaming Schedule: Create and maintain a consistent streaming schedule to build anticipation and attract loyal viewers. Regularly promote your upcoming streams across your social media platforms, reminding your audience when and where to find you.
7. Engage with Your Existing Audience: Nurture and engage with your existing viewers to keep them coming back and promote word-of-mouth recommendations. Respond to their comments, questions, and suggestions during your streams. This fosters a sense of community and encourages viewers to invite others to watch.
8. Network and Seek Cross-Promotion Opportunities: Network with other content creators, gaming influencers, and streamer communities. Explore opportunities for cross-promotion through shout-outs, interviews, or collaborative events. This mutual support can significantly boost your visibility.
9. Provide Value Beyond the Stream: Consider creating additional content such as video tutorials, highlights, or behind-the-scenes vlogs related to your gaming adventures. Share these supplementary materials on your social media channels to generate interest in your stream.
Remember that promoting your stream requires consistent effort and engagement. Be active and creative in your promotional activities, and always strive to provide value to your audience. With time and dedication, your stream will gain traction and attract more viewers.
Troubleshooting Common Issues during the Broadcast
Streaming on Steam may occasionally come with technical challenges that can disrupt the quality of your broadcast. Being prepared to troubleshoot common issues will help you quickly resolve problems and maintain a smooth streaming experience. Here are some common issues and troubleshooting tips to keep in mind:
1. Internet Connectivity Problems: If you experience internet connectivity issues during your stream, start by checking your network connection. Ensure that you are connected to a stable and high-speed internet network. Restart your modem or router if needed.
2. Frame Drops and Lag: If you notice frame drops or lag in your stream, check your computer’s resource usage. Close any unnecessary applications or processes that may be consuming system resources. Lowering your stream settings, such as resolution or bitrate, can also help reduce strain on your system.
3. Audio Sync Issues: If your audio becomes out of sync with your video, try adjusting the audio sync settings in your broadcasting software. You can add a slight delay to your audio to synchronize it with your video. Test the changes and make fine adjustments if needed.
4. Webcam or Microphone Malfunctions: In case your webcam or microphone malfunctions during the broadcast, unplug and reconnect the devices. Check the device settings in your broadcasting software to ensure they are properly selected and configured. Updating the device drivers may also help resolve any compatibility issues.
5. Encoding and Bitrate Issues: If viewers report buffering or pixelation, your encoding settings or bitrate may be causing the problem. Lower your bitrate to reduce the strain on your network connection. Additionally, double-check your encoding settings in the broadcasting software to ensure they are optimized for your stream.
6. Green Screen or Chroma Key Problems: If you encounter issues with your green screen or chroma key setup, ensure that your lighting is adequate and properly diffused. Adjust your chroma key settings in your broadcasting software, such as the color range and sensitivity, to achieve a clean and accurate keying effect.
7. Stream Delay Issues: If your stream has a delay that is longer than desired, review your broadcasting settings. Adjust the stream delay setting to a lower value to minimize the delay. Keep in mind that too short of a delay can potentially lead to stream sniping or unwanted interactions.
8. Chat and Viewer Engagement Problems: If you have difficulty keeping up with the chat or engaging with your viewers, consider using chat moderation tools. Assign trusted moderators to help manage chat interactions. Implement follower-only or subscriber-only modes during busy streams to control the conversation and prioritize engagement with your dedicated audience.
9. Test, Experiment, and Learn: Regularly test different settings, equipment, and techniques to identify the root cause of any issues. Take note of what works and what doesn’t, and make adjustments accordingly. Continuously learning and troubleshooting will help you build a more stable and professional streaming setup.
Remember, troubleshooting technical issues requires patience and persistence. By actively identifying and resolving issues, you can deliver a high-quality and uninterrupted stream to your viewers on Steam.
Analyzing Your Broadcasting Performance and Making Improvements
An essential part of streaming on Steam is regularly analyzing your broadcasting performance to identify areas for improvement and enhance the quality of your stream. Here are some key steps to help you analyze and make improvements to your broadcasting performance:
1. Review Stream VODs: Take the time to watch and analyze your past stream videos on Steam. Observe the quality of your video and audio, identify any technical issues, and evaluate the overall viewer experience. Pay attention to factors such as audio sync, video clarity, and stream stability.
2. Monitor Viewer Engagement: Analyze viewer engagement metrics such as chat activity, viewer count, and viewer retention. Pay attention to when your audience is most engaged and which segments of your stream receive the most interaction. This data can help you tailor your content and engage your viewers more effectively.
3. Seek Viewer Feedback: Ask your viewers for feedback and suggestions through social media, chat interactions, or post-stream surveys. Encourage them to provide constructive feedback on various aspects of your stream, including audio quality, video clarity, content variety, or overall stream experience.
4. Track Key Performance Indicators (KPIs): Set and track key performance indicators specific to your stream, such as follower growth rate, average viewer count, or conversion rate from viewers to subscribers. Regularly evaluate these metrics to gauge your progress and identify areas that need improvement.
5. Experiment with Stream Settings: Continuously experiment with different stream settings, such as video resolution, bitrate, or audio filters. Pay attention to how different settings impact your stream quality and viewer experience. Fine-tune your settings based on viewer feedback and your own analysis to optimize your broadcasting performance.
6. Assess Hardware and Software Upgrades: Evaluate your current hardware and software setup to determine if there are any upgrades that can improve your streaming capabilities. Consider factors such as a more powerful CPU or GPU, additional RAM, or upgrading to advanced streaming software with more features.
7. Learn from Other Streamers: Study successful streamers on Steam and learn from their strategies and techniques. Analyze their broadcasting performance, engage with their content, and identify elements that you can incorporate into your own stream to enhance viewership and quality.
8. Stay Up-to-Date with Streaming Trends: Keep yourself informed about the latest streaming trends, broadcasting techniques, and new features on Steam. Stay active in streaming communities, attend virtual conferences or webinars, and engage in discussions with other streamers to stay abreast of industry updates.
9. Implement and Evolve: Take the insights gained from analyzing your broadcasting performance and implement necessary changes and improvements. Continuously evolve your stream setup, content, and engagement strategies based on your analysis to create a more engaging, high-quality, and enjoyable experience for your viewers.
Remember that analyzing your broadcasting performance is an ongoing process. Regularly assess your stream’s strengths and weaknesses, embrace feedback, and be willing to adapt and make improvements to provide the best possible experience for your viewers on Steam.