
What is sound mirroring?
Sound mirroring is the process of duplicating the audio output from one device to another. It allows you to hear the same sound on multiple devices simultaneously. In the case of HTC Vive, sound mirroring is particularly useful for creating a more immersive virtual reality (VR) experience.
When using HTC Vive, you are immersed in a virtual world through the headset, which can isolate you from the real-world sounds. Sound mirroring helps bridge this gap by allowing you to hear the virtual audio through your VR headset while simultaneously broadcasting it to an external device, such as speakers or headphones.
This functionality becomes essential in situations where you want others to be able to hear what you are experiencing in the VR environment. Whether you are showcasing a game or presenting a VR training demonstration, sound mirroring ensures that everyone is on the same auditory page.
Not only does sound mirroring enhance the social aspect of VR experiences, but it also contributes to overall immersion. By synchronizing the audio from the virtual environment with your physical surroundings, sound mirroring creates a more cohesive and realistic experience.
Overall, sound mirroring on HTC Vive brings the best of both worlds together. It allows you to fully immerse yourself in the virtual reality while also sharing the experience with others in a more engaging and inclusive way. Now that you understand the importance of sound mirroring, let’s explore how you can set it up on your HTC Vive headset.
Why mirror sound on HTC Vive?
Sound mirroring on HTC Vive offers several benefits that enhance your overall virtual reality (VR) experience. Let’s delve into why you should consider mirroring sound on your HTC Vive headset.
1. Social Sharing: When you’re using HTC Vive for gaming or virtual experiences, mirroring sound allows others to join in. By broadcasting the audio to external speakers or headphones, friends and family can hear what you hear, making the experience more social and interactive.
2. Training and Education: In educational or training settings, mirroring sound on HTC Vive becomes crucial. Teachers, trainers, or presenters can ensure that everyone in the room can hear the instructions or explanations simultaneously, making it easier to deliver effective instruction in a classroom or workshop environment.
3. Collaboration and Communication: In collaborative VR applications, such as architectural design or team-based simulations, mirroring sound enables better communication among team members. Each person can hear the same audio cues, instructions, or feedback, fostering better coordination and teamwork.
4. Accessibility: Sound mirroring is also essential for accessibility purposes. Sharing the audio output allows individuals with hearing impairments or disabilities to participate fully in the virtual experience. By mirroring sound to their preferred assistive devices, they can engage in VR content without any limitations.
5. Immersive Experience: Mirroring sound on HTC Vive enhances immersion by syncing the virtual audio with the real-world environment. This synchronization creates a more realistic and engaging experience, as you can hear the virtual sounds while still being aware of your physical surroundings.
6. Recording and Streaming: Suppose you want to capture your VR gameplay or create VR content for streaming. In that case, sound mirroring is essential. It ensures that the audio is captured along with the video, making your recordings or live streams more engaging and comprehensive.
By mirroring sound on your HTC Vive, you not only improve the social and collaborative aspects of VR experiences but also enhance the accessibility, immersion, and overall quality of your virtual reality adventures.
How to mirror sound on HTC Vive using Windows 10
Mirroring sound on your HTC Vive headset using Windows 10 is a straightforward process. Follow the steps below to set up sound mirroring:
1. Open the Sound settings: Right-click on the speaker icon in the system tray at the bottom right of your screen and select “Sounds” from the context menu.
2. Navigate to the Playback tab: In the Sound settings window, click on the “Playback” tab.
3. Select the HTC Vive audio device: Look for the audio output device associated with your HTC Vive headset. It may be listed as “HTC-VIVE-0” or “HTC-VIVE-USB Audio.” Right-click on the HTC Vive audio device and select “Set as Default Communication Device.”
4. Enable sound mirroring: Once you’ve set the HTC Vive audio device as the default communication device, right-click on the audio device you want to mirror to (e.g., your speakers or headphones) and select “Set as Default Device.”
5. Adjust sound settings (optional): If necessary, you can adjust the volume levels and other sound settings for the HTC Vive and the mirroring device. To do this, select the respective device and click on “Properties.”
6. Test the sound mirroring: To ensure that sound mirroring is working correctly, play any audio or launch a VR application on your HTC Vive. You should hear the sound simultaneously from both the headset and the mirroring device.
That’s it! You have successfully set up sound mirroring on your HTC Vive using Windows 10. Now you can enjoy an immersive VR experience while simultaneously sharing the audio with others through external speakers or headphones.
How to mirror sound on HTC Vive using macOS
If you are using an HTC Vive headset with macOS, you can easily mirror the sound to external devices. Follow these steps to set up sound mirroring:
1. Open System Preferences: Click on the Apple menu at the top left of your screen and select “System Preferences.”
2. Select Sound Preferences: In the System Preferences window, click on the “Sound” icon.
3. Go to the Output tab: Within the Sound preferences, navigate to the “Output” tab.
4. Choose HTC Vive as the sound output: Locate the audio output device associated with your HTC Vive headset. It may be listed as “HTC Vive” or “HTC-VIVE-USB Audio.” Select it as the default sound output device.
5. Enable sound mirroring: To mirror the sound to an external device, such as speakers or headphones, select the desired output device from the list. It could be your Mac’s built-in speakers or any connected audio device.
6. Adjust sound settings (optional): You can adjust the volume and other sound settings for the HTC Vive and the mirroring device by selecting the respective device and adjusting the settings accordingly.
7. Test the sound mirroring: To ensure that sound mirroring is working correctly, play any audio or launch a VR application on your HTC Vive. You should hear the sound simultaneously from both the headset and the mirroring device.
That’s it! You have successfully set up sound mirroring on your HTC Vive using macOS. Now you can experience immersive VR audio while also sharing it with others through external speakers or headphones.
How to mirror sound on HTC Vive using OBS Studio
OBS Studio is a popular software used for recording and streaming content, and it can also be utilized to mirror sound on your HTC Vive. Follow the steps below to set up sound mirroring using OBS Studio:
1. Download and install OBS Studio: Visit the official OBS Studio website (obsproject.com) and download the appropriate version for your operating system. Follow the on-screen instructions to install the software.
2. Open OBS Studio: Launch OBS Studio after the installation is complete.
3. Add an audio source: In the Sources section of OBS Studio, click on the “+” button and select “Audio Output Capture.” Enter a name for the audio source (e.g., HTC Vive Audio).
4. Configure audio settings: In the Audio Output Capture properties, select the HTC Vive audio device from the dropdown menu. Ensure that the audio device selected matches the audio output device associated with your HTC Vive headset.
5. Enable audio mirroring: After selecting the appropriate audio device, check the “Enable Audio” checkbox. This will ensure that the sound from your HTC Vive is mirrored to OBS Studio.
6. Adjust audio levels (optional): If necessary, you can adjust the volume levels for the HTC Vive audio source in OBS Studio. This can be done by selecting the audio source and adjusting the volume slider accordingly.
7. Test the sound mirroring: To verify that sound mirroring is functioning correctly, play any audio or launch a VR application on your HTC Vive. You should hear the sound both through the headset and in OBS Studio.
8. Optional: Configure streaming or recording settings: If you intend to stream or record your HTC Vive gameplay or VR experiences, you can customize OBS Studio settings to meet your requirements. This includes adjusting video settings, bitrate, streaming platforms, and recording formats.
That’s it! You have successfully set up sound mirroring on your HTC Vive using OBS Studio. Now you can capture and mirror the audio from your VR experiences while recording or streaming them to your audience. Enjoy sharing your immersive adventures!
How to mirror sound on HTC Vive using SteamVR Advanced Settings
SteamVR Advanced Settings is a powerful tool that extends the functionality of SteamVR, including the ability to mirror sound from your HTC Vive headset. Follow these steps to set up sound mirroring using SteamVR Advanced Settings:
1. Install SteamVR Advanced Settings: Open your Steam client and navigate to the SteamVR page. Search for “SteamVR Advanced Settings” in the Steam store and click on “Add to Cart” and then “Purchase for Myself.” Complete the installation process.
2. Launch SteamVR Advanced Settings: After installation, you can find the SteamVR Advanced Settings in your Steam library under the “Tools” category. Double-click on it to launch the application.
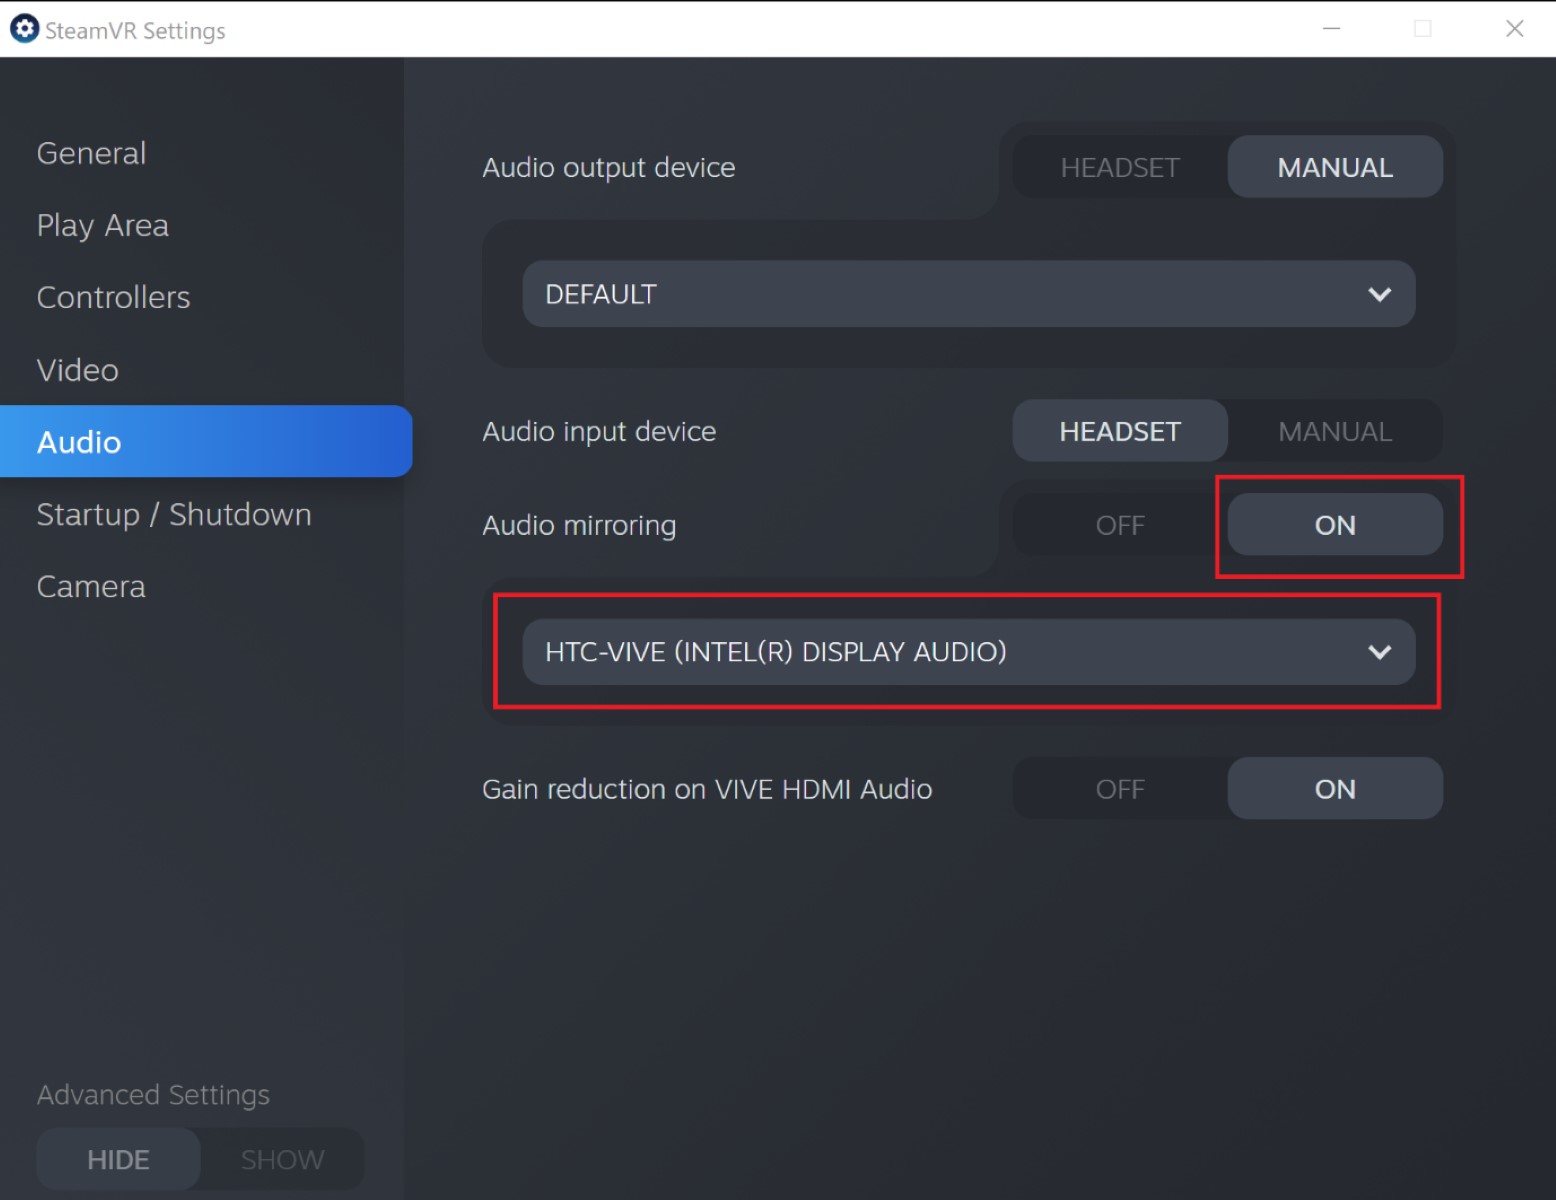
3. Open the Audio settings: Within SteamVR Advanced Settings, click on the “Audio” tab located at the top of the window.
4. Enable sound mirroring: Under the “Audio” tab, you will find the “Mirror Audio To Device” section. Check the box next to “Enable” to activate sound mirroring.
5. Choose the mirroring device: Select the audio output device you want to mirror the sound to from the “Destination Device” dropdown menu. This can be your computer speakers, headphones, or any other audio device connected to your computer.
6. Adjust sound settings (optional): SteamVR Advanced Settings also provides options to adjust the volume, balance, and other audio settings. Make any necessary adjustments according to your preferences.
7. Test the sound mirroring: To ensure that sound mirroring is functioning correctly, play any audio or launch a VR application on your HTC Vive. You should hear the sound both through the headset and the mirroring device.
That’s it! You have successfully set up sound mirroring on your HTC Vive using SteamVR Advanced Settings. Now you can enjoy immersive VR experiences while simultaneously sharing the audio with others through external speakers or headphones. Make the most out of your HTC Vive headset and explore the virtual world with enhanced sound mirroring!
Troubleshooting tips
While setting up sound mirroring on your HTC Vive, you may encounter some common issues. Here are some troubleshooting tips to help you resolve them:
1. Verify headset connection: Ensure that your HTC Vive headset is properly connected to your computer. Check the connections and cables to make sure they are secure.
2. Update audio drivers: Make sure that your audio drivers are up to date. Outdated or incompatible drivers can cause sound mirroring issues. Visit the manufacturer’s website or use a driver update tool to check for the latest drivers.
3. Restart HTC Vive and computer: Sometimes, simply restarting your HTC Vive headset and computer can resolve temporary sound mirroring issues. Power off the headset, shut down your computer, and then power them back on after a few moments.
4. Adjust audio device settings: Double-check the audio device settings in your operating system and ensure that the correct HTC Vive audio device is selected as the default communication device and default device for sound output.
5. Disable other audio enhancements: If you are experiencing audio distortion or latency, disable any additional audio enhancements or effects on your HTC Vive audio device or the mirroring device. These enhancements can interfere with sound mirroring.
6. Test with different mirroring devices: If you are not hearing sound on the mirroring device, try using a different set of speakers or headphones. It is possible that the issue lies with the mirroring device rather than the HTC Vive headset.
7. Restart SteamVR: If you are encountering sound mirroring issues specifically within SteamVR, try restarting SteamVR. Close SteamVR, wait a few moments, and then launch it again.
8. Check for conflicting applications: Some applications or audio software may interfere with sound mirroring on your HTC Vive. Temporarily disable or close any unnecessary applications to see if it resolves the issue.
If you have tried these troubleshooting tips and are still experiencing difficulties with sound mirroring on your HTC Vive, it may be helpful to seek additional support from the official HTC Vive support forums or contact the HTC Vive support team directly.