
Why Block Someone on Skype
Blocking someone on Skype is a useful feature that allows you to maintain control over your online interactions and protect your privacy. There are several reasons why you might want to block someone on Skype:
- Unwanted communication: If you find yourself receiving persistent and unwanted messages or calls from someone on Skype, blocking them can help you put an end to the unwanted communication. It gives you the power to choose who can contact you on the platform.
- Harassment or bullying: Unfortunately, the internet is not always a friendly place, and you may encounter individuals who engage in harassment or bullying. If you experience such behavior on Skype, blocking the person involved can offer a sense of relief and ensure your well-being.
- Spam or scams: Some users may try to use Skype as a platform for spamming or perpetrating scams. By blocking these individuals, you reduce the chances of falling victim to their fraudulent activities and maintain a safer online environment.
- Personal conflicts: In certain situations, you may have personal conflicts with someone on Skype. Blocking them can provide temporary respite and allow you to distance yourself from the situation until it can be resolved more constructively.
Overall, blocking someone on Skype is a self-defense mechanism that empowers you to control your online experience and safeguard your well-being. It better enables you to maintain a positive and harassment-free environment in your digital interactions.
Steps to Block Someone on Skype
If you find yourself in a situation where you need to block someone on Skype, don’t worry, the process is simple. Just follow these steps:
- Select the Person to Block: Open your Skype contacts and choose the person you want to block. This can be someone you’ve already had a conversation with or a request you’ve received.
- Open the Contact’s Profile: Once you’ve selected the person, right-click on their name and select “View Profile” from the drop-down menu. This will open their profile information.
- Block the Contact: In the contact’s profile, click on the ellipsis (…) icon next to their name. A drop-down menu will appear. Select “Block” from the options provided.
- Confirm the Block: A confirmation dialog box will appear, asking if you’re sure you want to block the contact. Take a moment to consider your decision, as blocking someone will prevent them from contacting you on Skype. If you’re certain, click on the “Block” button.
- Unblock a Contact on Skype: If you ever decide to unblock the contact in the future, you can do so by going to your Skype settings, selecting the “Contacts & Privacy” tab, and navigating to the “Blocked contacts” section. Find the contact you want to unblock and click on the “Unblock” button next to their name.
- Managing Blocked Contacts on Skype: If you want to view or manage your list of blocked contacts, you can do so by going to your Skype settings and selecting the “Contacts & Privacy” tab. From there, you can add or remove contacts from your blocked list as needed.
- Reporting Abuse on Skype: In cases of severe harassment or abuse, it’s important to report the incident to Skype. You can do this by going to the contact’s profile, clicking on the ellipsis (…), and selecting “Report” from the options provided. Skype takes these reports seriously and will take appropriate action.
By following these steps, you can easily block and manage contacts on Skype, ensuring a safer and more enjoyable experience on the platform.
Step 1: Select the Person to Block
The first step in blocking someone on Skype is selecting the person you want to block. This can be done by following these simple instructions:
- Open Skype and navigate to your contacts list. This can typically be found on the left side of the Skype interface.
- Browse through your contacts until you find the person you wish to block. This may be someone you’ve had previous interactions with or someone who has sent you a friend request.
- If you’re having trouble finding the person, you can use the search bar at the top of the contacts list to search for their name or username.
- Once you’ve located the person you want to block, click on their name to select them.
It’s important to ensure that you’ve chosen the correct person to block, as blocking someone will prevent them from contacting you on Skype and vice versa. Take a moment to double-check their profile information and make sure it aligns with the person you want to block.
Whether you’re blocking someone due to unwanted communication, harassment, or personal conflicts, confirming the identity of the contact is an essential first step. It ensures that you’re taking the necessary action against the intended individual and helps maintain a safer and more secure Skype experience.
Step 2: Open the Contact’s Profile
After selecting the person you want to block on Skype, the next step is to open their profile. Here’s how you can do it:
- Once you have the contact selected, right-click on their name. A menu will appear with several options.
- From the menu, click on “View Profile.” This action will open the selected contact’s profile information.
- The contact’s profile will provide you with more details about them, such as their username, profile picture, and any additional information they have chosen to share.
- You can also access the contact’s recent conversation history, which can help you verify their identity or review past interactions.
Opening the contact’s profile allows you to gather necessary information and gain a better understanding of who the person is before proceeding with the block. It ensures that you are taking action against the intended contact and not mistakenly blocking someone else.
By reviewing the contact’s profile, you can also make more informed decisions about whether blocking is the appropriate course of action. It’s a good opportunity to consider whether any misunderstandings or miscommunications may have occurred and whether there are any alternative solutions to address the issue at hand.
Opening the contact’s profile is an important step in the blocking process, as it provides you with valuable context and aids in making informed decisions about managing your Skype contacts.
Step 3: Block the Contact
Once you have opened the profile of the contact you wish to block on Skype, it’s time to proceed with the blocking process. Follow these steps to block the contact effectively:
- In the contact’s profile, locate the ellipsis (…) icon next to their name. This icon represents additional options and actions that can be taken with the contact.
- Click on the ellipsis icon to reveal a drop-down menu with various options.
- From the drop-down menu, select the “Block” option. This action will initiate the blocking process for the selected contact.
- Once you click on the “Block” option, a confirmation dialog box will appear, asking you to confirm your decision to block the contact. This prompt ensures that you are intentionally choosing to block the individual.
- Take a moment to consider your decision and confirm that you want to proceed with blocking the contact. If you are certain, click on the “Block” button within the dialog box.
Blocking the contact effectively restricts any further communication from them. It ensures that you have control over who can contact you on Skype and creates a barrier between you and the individual you’ve blocked.
It’s important to note that blocking someone on Skype is a serious action and should be undertaken responsibly. Make sure to consider the implications of blocking and weigh the alternatives before proceeding. Blocking should be reserved for situations where it is the appropriate solution to address unwanted communication, harassment, or any other valid reasons for blocking a contact.
By following these steps and confirming the blocking action, you can successfully prevent the selected contact from contacting you on Skype.
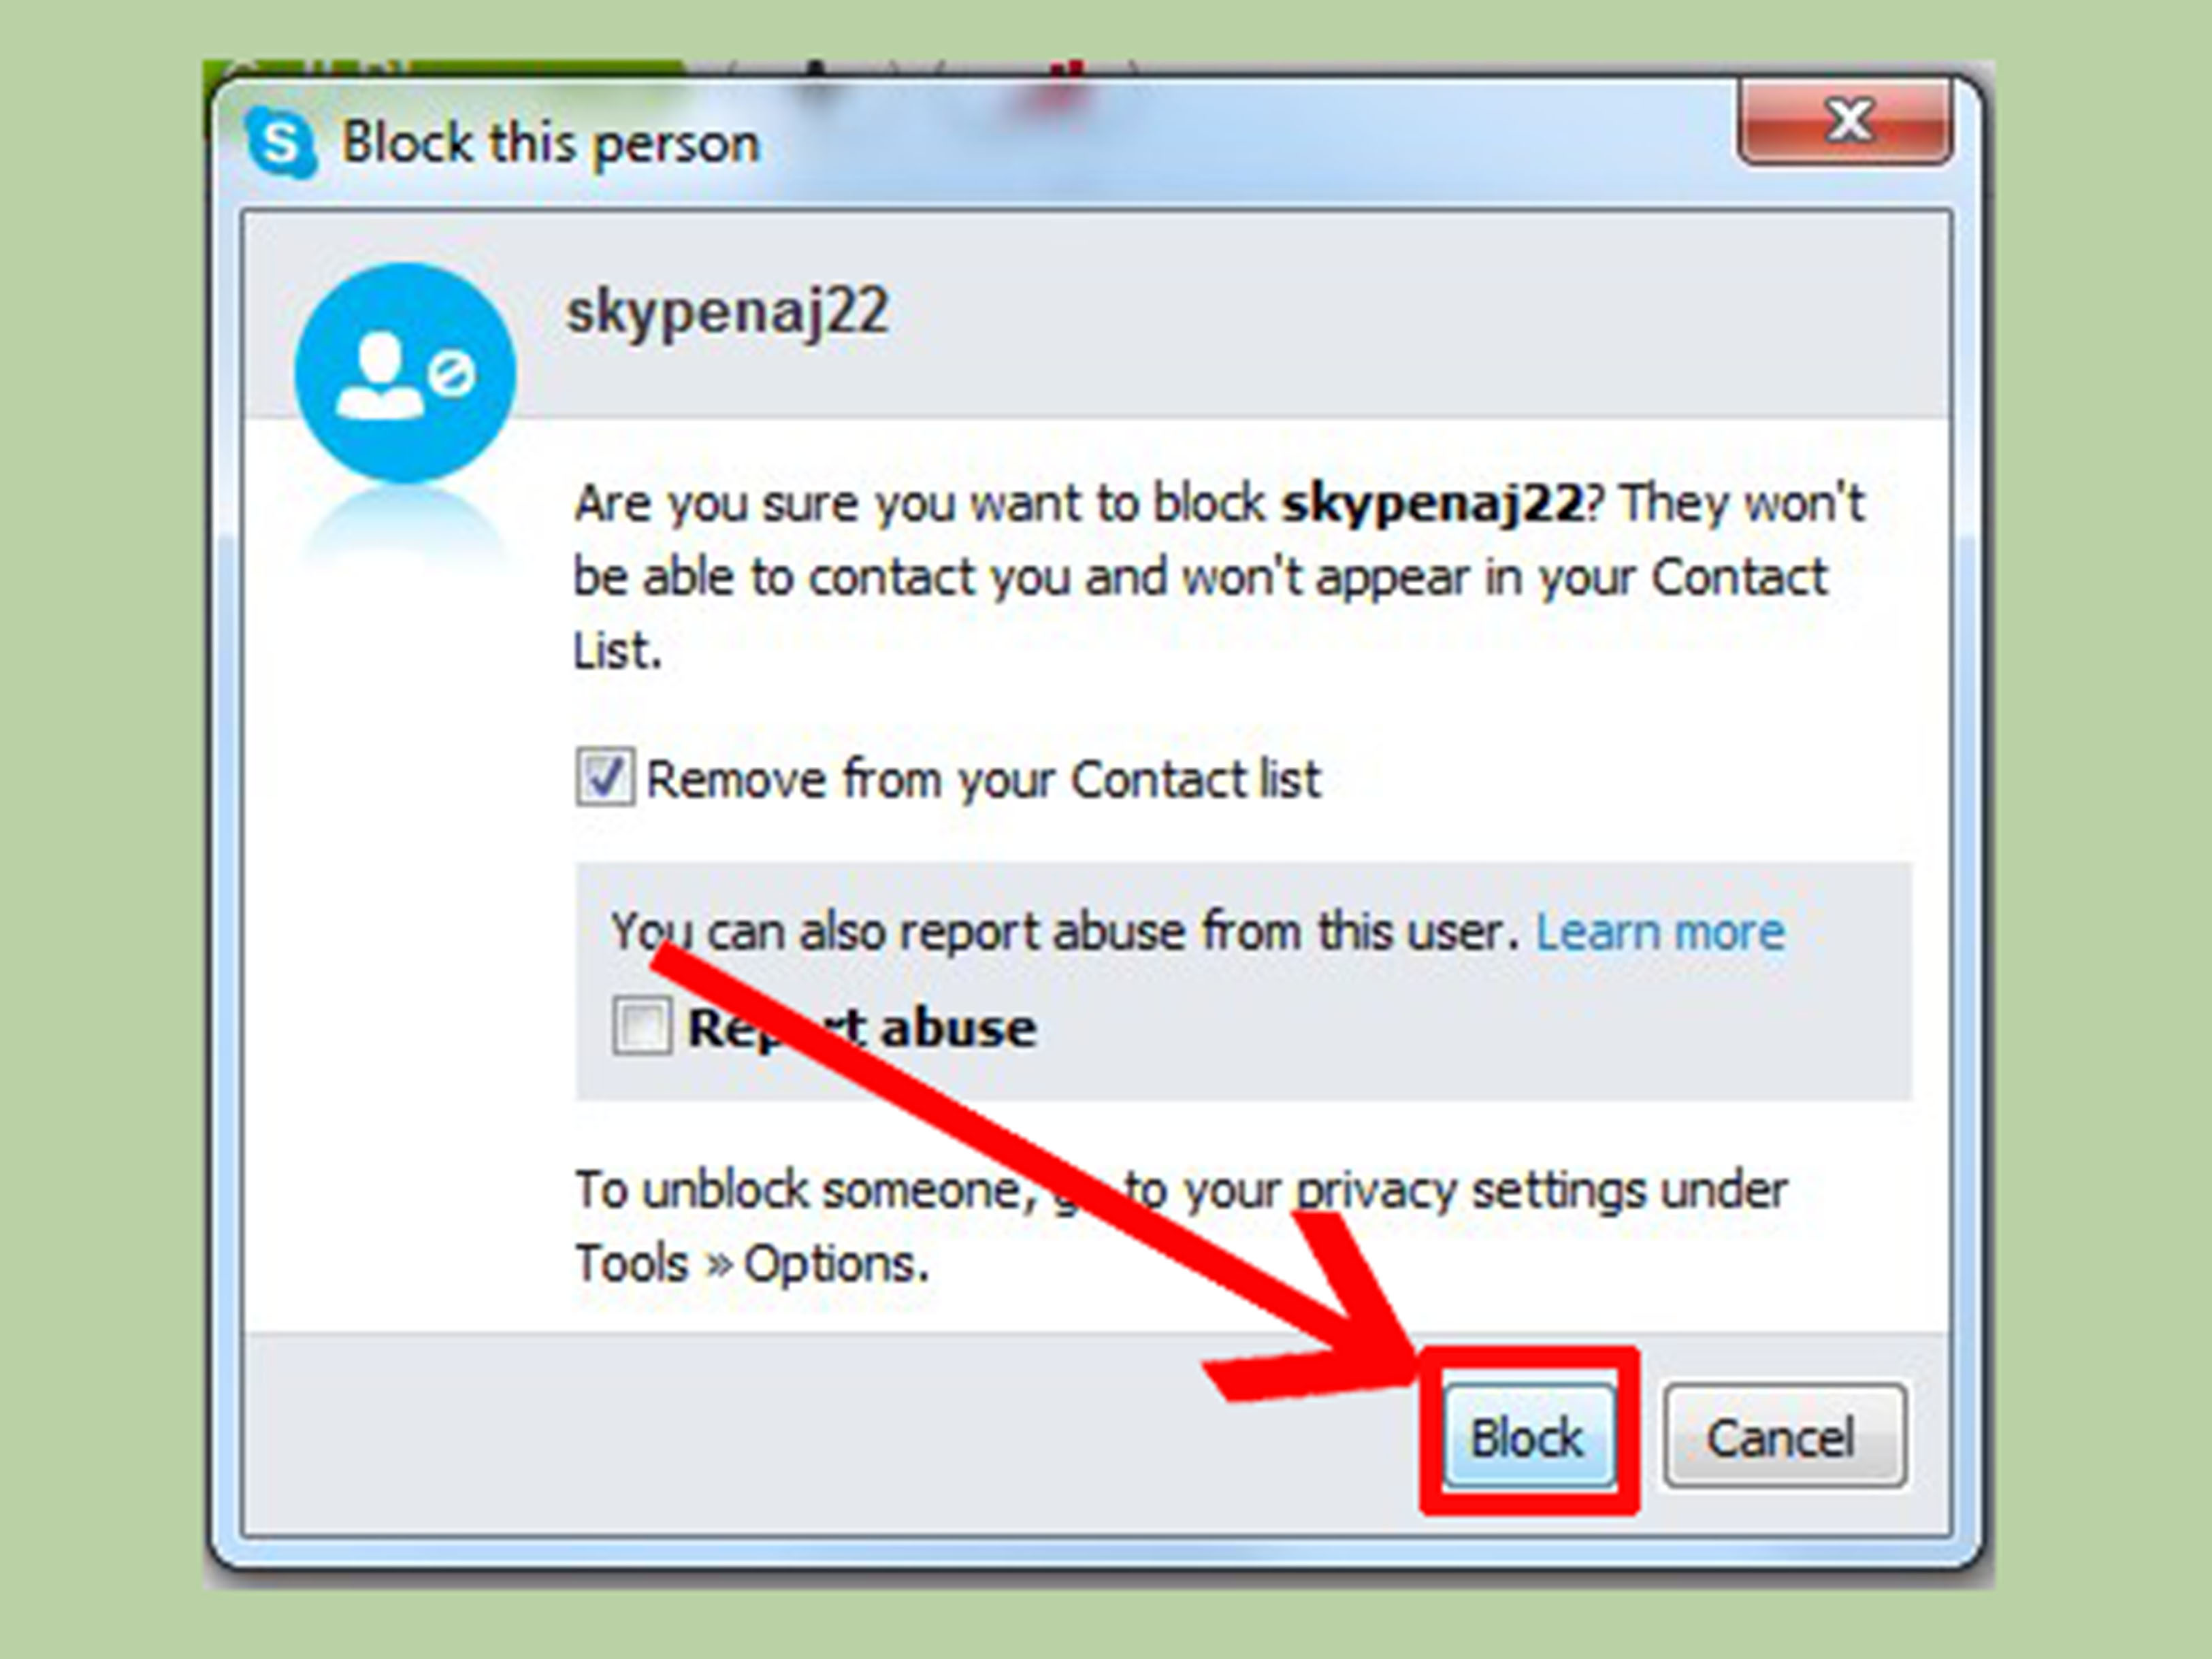
Step 4: Confirm the Block
After initiating the blocking process for a contact on Skype, it is important to confirm your decision before the block takes effect. Follow these steps to confirm the block:
- Once you click on the “Block” option in the contact’s profile, a confirmation dialog box will appear on your screen.
- The confirmation dialog box serves as a final checkpoint to ensure that you intend to block the selected contact. It gives you the opportunity to double-check your decision and make sure that you are taking the appropriate action.
- Take a moment to review the details of the confirmation dialog box. It will typically provide information about the consequences of blocking the contact, such as preventing them from messaging or calling you on Skype.
- If you are certain about blocking the contact, click on the “Block” button within the dialog box.
- After confirming the block, the contact will be officially blocked, and they will no longer be able to reach out to you on Skype. Any existing conversations you had with the contact will also be hidden from your view.
Confirming the block is an important step to ensure that you are taking the desired action and that there are no misunderstandings. It provides an additional layer of confirmation before finalizing the block.
Take note that once the block is confirmed, it can be challenging to reverse or undo. However, if you ever change your mind and wish to unblock the contact in the future, you can follow the necessary steps outlined by Skype to do so.
By carefully confirming the block, you can be assured that the selected contact has been successfully blocked and that they will no longer be able to communicate with you on Skype.
Step 5: Unblock a Contact on Skype
If you have previously blocked a contact on Skype and now wish to unblock them, you can follow these steps to reverse the block:
- Open Skype and go to your settings by clicking on your profile picture or initials at the top-left corner of the Skype interface.
- In the settings menu, select the “Contacts & Privacy” tab. This tab contains various options related to managing your Skype contacts.
- Scroll down until you find the “Blocked contacts” section. This section lists all the contacts you have blocked on Skype.
- Locate the contact that you want to unblock from the list. You can use the search bar within the “Blocked contacts” section to quickly find the contact if needed.
- Click on the “Unblock” button next to the contact’s name. A confirmation prompt may appear to confirm your decision to unblock the contact.
- Review the details of the confirmation prompt and click on the “Unblock” button to proceed with unblocking the contact.
- Once the contact is unblocked, they will be able to contact you again on Skype, and any previously hidden conversations with them will become visible.
Unblocking a contact on Skype allows you to re-establish communication and connect with the individual again. It gives you the flexibility to reverse the block if circumstances change or if you have resolved any conflicts or issues that led to the original block.
Keep in mind that unblocking a contact should be done thoughtfully. Ensure that you are comfortable with resuming communication with the unblocked contact, and consider any necessary steps to establish healthy and positive interactions.
By following these steps, you can easily unblock a contact on Skype and regain the ability to connect and communicate with them on the platform.
Step 6: Managing Blocked Contacts on Skype
In addition to blocking and unblocking contacts on Skype, it is important to have the ability to manage your blocked contacts effectively. Here’s how you can do it:
- Open Skype and access your settings by clicking on your profile picture or initials at the top-left corner of the interface.
- In the settings menu, navigate to the “Contacts & Privacy” tab. This tab contains various options for managing your Skype contacts and privacy settings.
- Scroll down to find the “Blocked contacts” section. This section provides an overview of all the contacts you have currently blocked on Skype.
- Here, you have several options for managing your blocked contacts. You can add new contacts to the block list by clicking on the “Add” button or remove existing contacts from the block list by clicking on the “Unblock” button next to their name.
- You can also view additional information about the blocked contacts, such as their profile picture, username, and any relevant details. This can help you ensure that you are managing the correct contacts.
- Regularly review your blocked contacts list to make any necessary adjustments. Consider removing contacts from the block list if the need no longer exists or adding new contacts to the block list if they engage in unwanted behaviors or interactions.
- It is also important to note that managing blocked contacts is an ongoing process. As your Skype contacts change and evolve, you may need to update your block list accordingly.
Effectively managing your blocked contacts on Skype allows you to maintain control over your online interactions and ensure a safer and more positive experience. It provides the flexibility to adjust your settings as needed and gives you the power to choose who can and cannot contact you on the platform.
By regularly reviewing and managing your blocked contacts, you can maintain a clean and organized contacts list and foster a more enjoyable Skype experience.
Step 7: Reporting Abuse on Skype
While blocking someone on Skype can effectively prevent further interactions, there may be instances where you encounter severe harassment or abuse. In such cases, it is crucial to report the incident to Skype. Here’s how you can report abuse on Skype:
- Open Skype and navigate to the profile of the contact you wish to report.
- Click on the ellipsis (…) icon next to their name to reveal a drop-down menu.
- From the drop-down menu, select the “Report” option. This action will notify Skype about the issue.
- A reporting form or dialog box will appear, allowing you to provide more details about the abuse or harassment you have encountered.
- Take the time to accurately describe the incident, including relevant information such as the nature of the harassment, timestamps, and any evidence you have, such as screenshots or audio recordings.
- Once you have filled out the necessary information, submit the report to Skype by clicking on the appropriate button or following the instructions provided.
- Skype takes reports of abuse seriously and will investigate the matter to take appropriate action against the offending user.
Reporting abuse on Skype is crucial to maintaining a safe and supportive online community. It helps create a better digital environment for all users by holding accountable those who engage in harmful or inappropriate behavior.
Remember, abusing the reporting feature can have serious consequences, so it’s important to only report valid incidents of abuse or harassment. False or malicious reports can lead to unintended consequences for innocent individuals.
By following these steps and reporting instances of abuse on Skype, you are actively contributing to creating a safer and more respectful online space for yourself and others.