
Why Block Someone on a MacBook?
Blocking someone on a MacBook can be a necessary step to safeguard your privacy, maintain a peaceful digital environment, and protect yourself from unwanted interactions. While the reasons may vary from person to person, here are a few common situations where blocking can be beneficial:
- Unwanted or Harassing Messages: If you receive persistent, offensive, or threatening messages from someone, blocking them can help prevent further contact and ensure your peace of mind.
- Personal Safety: In some cases, blocking someone may be necessary for personal safety reasons. If you feel that someone is posing a threat to you or your well-being, blocking them can offer a level of protection and help create a safer digital environment.
- Overwhelming Notifications: It’s possible to receive excessive notifications from certain individuals, especially on messaging platforms or social media. By blocking such users, you can minimize distractions and focus on the important aspects of your digital life.
- Unwanted Relationships: If you want to distance yourself from a person or end a relationship, blocking them can provide a clear boundary and help you move on.
- Unsolicited Spam: Blocking can also be useful for filtering out spam or unwanted promotional messages that can clutter your inbox and waste your time.
Understanding why you might want to block someone on your MacBook can help you make informed decisions when it comes to managing your online interactions. Whether it’s protecting your privacy, maintaining your well-being, or simply keeping your digital space clutter-free, blocking someone can give you the control and peace of mind you desire.
How to Block Someone on Messages
If you receive unwanted messages from a specific individual on your MacBook’s Messages app, you can easily block them to stop further communication. Here’s how:
- Launch the Messages app on your MacBook.
- Select the conversation with the person you want to block.
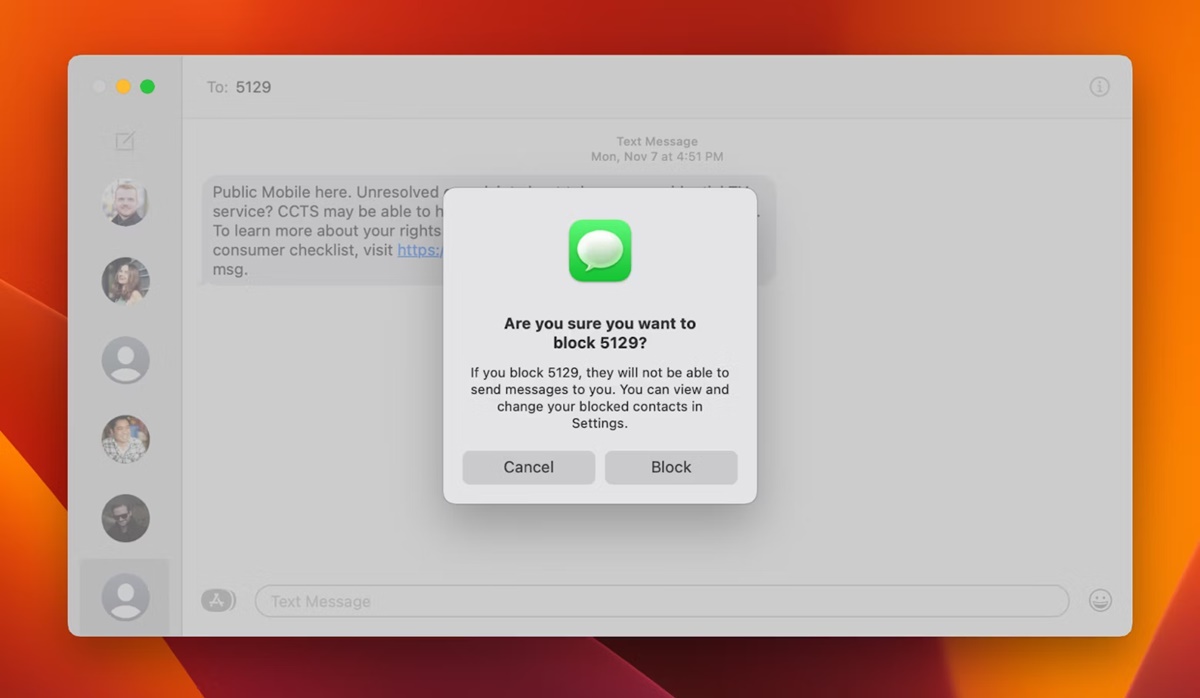
- Click on the “Details” button located at the top-right corner of the conversation window.
- In the pop-up window that appears, click on the person’s name or phone number.
- Scroll down and click on the “Block Contact” option.
- A confirmation message will appear, asking if you want to block the contact. Click “Block” to proceed.
- The contact will now be blocked, and you will no longer receive messages or notifications from them.
Blocking someone on Messages ensures that the person will not be able to send you messages or see when you are online. However, please note that this only blocks them within the Messages app on your MacBook. They may still be able to contact you through other means, such as email or social media platforms.
If you ever change your mind and want to unblock the person, you can follow the same steps and click on the “Unblock” option instead.
Remember, blocking someone on Messages can be an effective way to maintain your peace of mind and control over your communications. It allows you to filter out unwanted messages and focus on conversations with the people who matter most to you.
How to Block Someone on FaceTime
If you find yourself frequently receiving unwanted calls or video chats from a specific individual on your MacBook’s FaceTime, you have the option to block them. Here’s a step-by-step guide on how to do it:
- Launch the FaceTime app on your MacBook.
- In the menu bar, click on “FaceTime” and select “Preferences.”
- Go to the “Settings” tab.
- Click on the “Block” button next to the text that says “To block a contact, click the plus button.”
- A pop-up window will appear, displaying your contact list. Select the person you want to block and click “Block.”
- The contact will be added to your blocked list, and you will no longer receive calls or video chats from them through FaceTime.
Blocking someone on FaceTime is an effective way to minimize unwanted disruptions and maintain your privacy. However, it’s important to note that this only blocks them from contacting you through FaceTime on your MacBook. They may still be able to reach you through other platforms or devices.
If you ever decide to unblock the person, you can go back to the “Preferences” tab in FaceTime, click on the blocked contact, and select the “Unblock” option.
Remember to use blocking functionality responsibly and only block individuals when necessary to maintain the digital environment that suits your needs.
How to Block Someone on Mail
If you receive unwanted emails from a particular sender in the Mail app on your MacBook, you can block them to prevent their emails from cluttering your inbox. Here’s how you can block someone on Mail:
- Open the Mail app on your MacBook.
- Select an email from the sender you want to block.
- Click on the button with a horizontal ellipsis (three dots) located at the top-right corner of the email.
- In the dropdown menu, click on “Block Sender.”
- A confirmation message will appear, asking if you want to block the sender. Click “Block” to proceed.
Once you block a sender, their future emails will be automatically redirected to your Junk or Trash folder, depending on your Mail settings. This prevents these emails from appearing in your inbox and reduces further interaction with the blocked sender.
If you ever change your mind and want to unblock the sender, you can follow these steps again and select “Unblock Sender” instead.
It’s important to note that blocking someone in Mail only affects emails received on your MacBook’s Mail app. The sender may still be able to contact you through other means or email clients.
Blocking unwanted senders on Mail helps you maintain an organized inbox and minimize distractions, allowing you to focus on important messages without interference from undesirable sources.
How to Block Someone on Safari
Blocking someone on Safari can be useful if you want to restrict their access to your MacBook’s web browser. While Safari doesn’t offer a direct blocking feature, you can take certain steps to limit their interaction with your browsing experience. Here’s how:
1. Clear Browsing History and Data:
If someone is trying to track your online activities or you want to prevent any information from being stored, you can clear your browsing history and data in Safari. This will remove any saved information, including login credentials, cookies, and website data.
To clear browsing history and data in Safari:
- Open Safari on your MacBook.
- In the menu bar, click on “History” and select “Clear History.”
- In the dropdown menu, choose the time range for which you want to clear your browsing history.
- Click “Clear History” to confirm.
2. Enable Private Browsing:
If you want to ensure that your browsing activities are not stored locally on your MacBook, you can use Safari’s private browsing mode. In this mode, Safari does not keep a record of your visited websites, search history, or any other data.
To enable private browsing in Safari:
- Open Safari on your MacBook.
- In the menu bar, click on “File” and select “New Private Window.”
3. Manage Website Permissions:
You can also manage specific website permissions in Safari to control access to certain websites. This can be helpful if you want to restrict someone’s access to specific sites or block certain websites altogether.
To manage website permissions in Safari:
- Open Safari on your MacBook.
- In the menu bar, click on “Safari” and select “Preferences.”
- Go to the “Websites” tab.
- Choose the specific website category from the left sidebar.
- Adjust the settings for each website as desired, such as allowing or blocking camera access, microphone access, location access, and more.
By following these steps, you can take control of your browsing experience on Safari and limit the interaction of unwanted users with your browser data and settings.
How to Block Someone on Social Media Platforms
Blocking someone on social media platforms can be an effective way to protect your online presence and maintain a positive digital environment. Each platform has its own blocking feature, allowing you to prevent specific individuals from contacting you or viewing your content. Here’s how you can block someone on some popular social media platforms:
1. Facebook:
- Go to the profile of the person you want to block.
- Click on the “More” button (three dots) located at the bottom-right corner of their cover photo.
- In the dropdown menu, select “Block.”
- Confirm the action in the pop-up window.
2. Twitter:
- Go to the profile of the person you want to block.
- Click on the three-dot button (more options) next to the “Follow” button.
- In the dropdown menu, select “Block.”
- Confirm the action by clicking “Block” again.
3. Instagram:
To block someone on Instagram:
- Go to the profile of the person you want to block.
- Tap on the three-dot button (more options) located at the top-right corner of their profile.
- In the options menu, select “Block.”
- Confirm the action by tapping “Block” again.
4. LinkedIn:
- Go to the profile of the person you want to block.
- Click on the “More” button (three dots) located at the top-right corner of their profile.
- In the dropdown menu, select “Block or Report.”
- Follow the on-screen instructions to block the person.
Remember, blocking someone on social media platforms will restrict their access to your content, prevent them from contacting you, and hide their interactions with your profile. It gives you control over your online experience and can help maintain a positive and safe digital space.
If you ever decide to unblock someone, you can typically do so through the platform’s settings or privacy options.
How to Block Someone on Skype
If you encounter unwanted messages or calls from a specific individual on Skype, you can block them to prevent further interactions. Here’s how to block someone on Skype:
- Open the Skype application on your MacBook.
- Sign in to your Skype account if you haven’t already.
- In the contacts list or chat window, locate the person you want to block.
- Right-click on their name or profile picture to open the context menu.
- In the menu, click on “Block Contact” or “Block.”
- A confirmation message will appear, asking if you want to block the contact. Click “Block” to proceed.
- The person will now be blocked, and they will no longer be able to send you messages or make calls on Skype.
When you block someone on Skype, they will not be notified of the block. Additionally, they will not be removed from your contacts list, but their messages and calls will be automatically redirected to your blocked list.
If you decide to unblock the person at any time, you can do so by right-clicking on their name or profile picture, selecting “Unblock Contact” or “Unblock,” and confirming your action.
Blocking someone on Skype is an effective way to maintain a peaceful and secure communication environment. It helps protect your privacy and ensures that you only receive messages and calls from the people you want to connect with.
How to Block Someone on WhatsApp
If you want to stop receiving messages, calls, or any form of communication from a specific person on WhatsApp, you can easily block them. Here’s how you can block someone on WhatsApp:
- Open the WhatsApp application on your MacBook.
- Find the chat or conversation with the person you want to block.
- Right-click on their name or chat in the sidebar.
- In the dropdown menu, select “Block.”
- A confirmation message will appear, asking if you want to block the contact. Click “Block” to proceed.
- The person will now be blocked, and they will not be able to send you messages, make calls, or see your online status on WhatsApp.
When you block someone on WhatsApp, they will not be notified of the block. However, they will no longer be able to see your profile picture, status, or last seen information.
If you ever change your mind and want to unblock the person, simply follow these steps again, and instead of selecting “Block,” choose “Unblock.” This will remove the block and allow the person to contact you on WhatsApp.
Blocking someone on WhatsApp is an effective way to control who can interact with you on the platform. It ensures that you only receive messages and calls from the people you want to communicate with, maintaining a safe and personalized digital experience.
How to Block Someone on Facebook Messenger
If you are receiving unwanted messages or encounters from a specific person on Facebook Messenger, you can block them to prevent further contact. Here’s how you can block someone on Facebook Messenger:
- Open the Facebook Messenger app on your MacBook or visit the Messenger website.
- Find the conversation with the person you want to block.
- Click on the name of the person at the top of the conversation window.
- In the dropdown menu that appears, click on “Block.”
- A confirmation popup will appear, asking if you want to block the contact. Click on “Block” to proceed.
- The person will now be blocked on Facebook Messenger, and they will no longer be able to send you messages or see your online status.
When you block someone on Facebook Messenger, they will not be notified of the block. However, they will no longer be able to see your profile, send you messages, or call you through the platform.
If you decide to unblock the person in the future, you can follow these steps again and click on “Unblock” in the dropdown menu to remove the block.
Blocking someone on Facebook Messenger gives you control over your conversations and helps you maintain a positive online experience. It is an effective way to stop unwanted interactions and ensure your privacy on the platform.
How to Unblock Someone on a MacBook
If you have previously blocked someone on your MacBook and have now decided to give them access again, you can unblock them using the respective app or platform. Here’s how you can unblock someone on a MacBook:
- Messages: Launch the Messages app and open the conversation with the person you want to unblock. Click on the “Details” button at the top-right corner, then scroll down and click on “Unblock Contact.”
- FaceTime: Open the FaceTime app and go to the “Preferences” section from the menu bar. Navigate to the “Settings” tab, find the blocked contact, and click the “Unblock” button next to their name.
- Mail: Open the Mail app and go to the blocked sender’s email. Click on the button with a horizontal ellipsis (three dots) at the top-right corner of the email and select “Unblock Sender.”
- Safari: There is no direct unblocking option in Safari, as blocking is typically done on a website-by-website basis. To unblock someone, go to Safari’s “Preferences,” click on the “Websites” tab, and manage the permissions for the desired website.
- Social Media Platforms: The process of unblocking someone on social media platforms can vary. Generally, you can visit the person’s profile or settings, look for the blocking option, and select “Unblock” or a similar option.
- Skype: Open the Skype app, locate the blocked contact, right-click on their name or profile picture, and select “Unblock Contact.”
- WhatsApp: Open the WhatsApp app, find the chat with the blocked person, click on their name at the top of the chat window, and select “Unblock” from the dropdown menu.
- Facebook Messenger: Open the Messenger app or website, go to the conversation with the blocked person, click on their name at the top of the chat window, and select “Unblock” from the dropdown menu.
By following these steps, you can successfully unblock someone on your MacBook and restore their access to the respective app or platform. Take note that unblocking someone may require mutual consent, and it is essential to consider the reasons why you initially chose to block that person before making your decision.
Additional Tips to Ensure Blocked Users Stay Blocked
Blocking someone on your MacBook can be an effective way to maintain your privacy and online security. However, it’s essential to take additional precautions to ensure that blocked users stay blocked. Here are some tips to help you achieve that:
- Regularly Update Privacy Settings: Stay updated with the latest privacy settings and features of the apps and platforms you use. Familiarize yourself with any changes that might affect your blocked contacts and adjust your settings accordingly.
- Avoid Sharing Personal Information: Be cautious about sharing personal information on public platforms. Restricted access to your personal details can help deter blocked users from attempting to contact you through other means.
- Review Friend Requests and Follow Requests: Be selective about accepting friend requests or follow requests from unknown individuals. Doing so could potentially provide blocked users with alternative ways to reach out to you.
- Report any Violations: If a blocked user attempts to contact you or harasses you through other means, report their behavior to the appropriate platform. This can help enforce the consequences of their actions and maintain a safer digital environment.
- Regularly Review Blocked Contacts: Periodically review your blocked contacts list to ensure that unwanted individuals have not found ways to unblock themselves or create new accounts to bypass the block. If necessary, reblock them or take additional actions as needed.
- Enable Two-Factor Authentication: Protect your online accounts by enabling two-factor authentication. This adds an extra layer of security and reduces the risk of unauthorized access from blocked individuals or others.
- Education and Awareness: Stay informed about the latest online security practices and educate yourself about potential risks and vulnerabilities. This knowledge can help you make more informed decisions and maintain a safer digital space.
Adhering to these additional tips can help ensure that blocked users stay blocked and minimize the chances of unwanted interactions or harassment. It’s important to remember that online safety is an ongoing process, and taking proactive measures is vital to protecting yourself and maintaining a secure digital environment.