
Why Backing Up Your Mac is Important
Backing up your Mac is a crucial step to protect your valuable data from unexpected events such as hard drive failure, accidental file deletion, or even theft. It ensures that your important files, documents, photos, and videos are safe and can be easily recovered.
Imagine this scenario: you have spent hours creating a presentation for an important meeting, but suddenly your Mac crashes and all your hard work disappears. Without a backup, you would have to start from scratch and potentially lose valuable time and effort.
Moreover, Macs, like any other device, are vulnerable to malware and viruses. A backup can help you restore your system to a previous clean state, ensuring that your files remain intact and protected.
Another important reason to back up your Mac is for seamless recovery in case of a hardware failure. An external hard drive backup allows you to easily transfer your files to a new Mac without the hassle of manually reinstalling applications and retrieving data from scratch.
By regularly backing up your Mac, you can also avoid the potential loss of sentimental or irreplaceable files such as photos and videos. These precious memories are irreplaceable, and a backup ensures that they remain safe and accessible.
Additionally, having a reliable backup system in place provides peace of mind. It allows you to work without the constant fear of losing important data and gives you the confidence to explore new applications and experiment without worrying about potential data loss.
What is Time Machine?
Time Machine is a built-in backup feature in macOS that allows you to easily create automatic backups of your Mac’s data. It was introduced in Mac OS X Leopard and has since become an essential tool for Mac users to protect their important files and system settings.
Time Machine works by creating incremental backups, which means that it only backs up the changes made since the last backup, resulting in faster backup times and less storage usage. It initially performs a full backup of your Mac, and then it continuously updates the backup with any changes you make.
One of the standout features of Time Machine is its ability to create a complete snapshot of your Mac’s system at specific points in time. This allows you to easily browse through different versions of files or even restore your entire Mac to a previous state if needed.
Time Machine provides a simple and intuitive interface that makes it easy to set up and use. Once you connect an external hard drive to your Mac, Time Machine prompts you to use it for backups. You can also set up multiple backup destinations, allowing for additional redundancy or flexibility.
In addition to backing up your personal files, Time Machine also includes system files, applications, and preferences, making it easier to restore your entire Mac or migrate to a new one.
Time Machine offers seamless integration with macOS, and you can access it directly from the menu bar or the System Preferences. From there, you can configure the backup frequency, manage storage allocation, exclude specific files or folders from backups, and even encrypt your backups for added security.
Overall, Time Machine provides a hassle-free and reliable backup solution for Mac users, ensuring that your data is protected against any unfortunate events. Whether you need to recover a single file or restore your entire system, Time Machine makes the process seamless and straightforward.
What You Need to Back Up Your Mac with Time Machine
To back up your Mac using Time Machine, you’ll need a few things to get started:
- External Hard Drive: You will need an external hard drive with sufficient storage capacity to hold your backup files. Ideally, the size of the external hard drive should be larger than the total storage capacity of your Mac. This will ensure that you have enough space to accommodate future backups.
- Compatibility: Make sure that your external hard drive is compatible with your Mac. Most external hard drives are compatible with macOS, but it’s always a good idea to check for any specific compatibility requirements or limitations.
- USB or Thunderbolt Connection: Ensure that your external hard drive has the necessary USB or Thunderbolt connection to connect to your Mac. This will allow for a reliable and fast data transfer between your Mac and the external hard drive.
- Power Source: Depending on the type of external hard drive you use, it may require its own power source. Make sure that your external hard drive is properly connected to a power outlet to ensure uninterrupted backup operations.
Once you have these essentials, you’re ready to set up Time Machine and start backing up your Mac.
It’s worth noting that if your Mac has limited storage space or you prefer a more convenient and automated backup solution, you can also consider using network-attached storage (NAS) or cloud-based backup services that are compatible with Time Machine. These options allow you to back up your data wirelessly and provide additional security and accessibility features.
Remember, to ensure the safety of your data, it’s important to regularly connect your external hard drive to your Mac and perform backups. Set a schedule that works for you, whether it’s daily, weekly, or monthly, to ensure that your backup is always up to date.
By having the necessary equipment and understanding the requirements, you can confidently set up Time Machine and enjoy the peace of mind that comes with knowing your Mac is backed up and protected.
Step 1: Choose an External Hard Drive
Choosing the right external hard drive is an essential first step in setting up Time Machine to back up your Mac. Here are some factors to consider when selecting an external hard drive:
- Storage Capacity: Determine the amount of storage capacity you need based on the size of your Mac’s internal storage and the type of data you want to back up. It’s important to choose an external hard drive with a capacity that exceeds your current and future storage needs.
- Compatibility: Make sure the external hard drive you select is compatible with your Mac. Nowadays, most external hard drives work seamlessly with macOS, but it’s always a good idea to confirm compatibility, especially if you have an older Mac model.
- Connection Type: Consider the connection type of the external hard drive. USB 3.0 or Thunderbolt connections provide faster data transfer speeds compared to USB 2.0, resulting in quicker backups. Choose a connection type that is supported by your Mac for optimal performance.
- Portability: If you plan to travel frequently or need to back up multiple Macs, consider the portability of the external hard drive. Look for a compact, lightweight, and rugged design that can withstand travel and offers easy connectivity.
- Reliability: Research the reliability and durability of the external hard drive brand and model you’re considering. Read customer reviews and consider factors such as warranty coverage and customer support to ensure a reliable backup solution.
- Extra Features: Some external hard drives come with additional features like hardware encryption or built-in backup software. These features can provide added security and convenience, but it’s important to assess whether they align with your specific backup needs.
Once you have considered these factors, you can make an informed decision and choose the best external hard drive for your Time Machine backups. Remember that investing in a high-quality, reliable external hard drive is crucial to ensure the safety and integrity of your backups.
After selecting an external hard drive, you’re ready to move on to the next step of connecting it to your Mac and setting up Time Machine.
Step 2: Connect the External Hard Drive to Your Mac
After choosing the right external hard drive for your Time Machine backups, the next step is to connect it to your Mac. Follow these steps to establish the connection:
- Power off your Mac: Before connecting the external hard drive, ensure that your Mac is powered off. This will help prevent any data loss or hardware issues during the connection process.
- Locate the appropriate port: Identify the type of connection port on your Mac that matches the interface of the external hard drive. Common connection types include USB, Thunderbolt, or USB-C. If necessary, refer to your Mac’s user manual or the manufacturer’s website to determine the exact port location.
- Connect the cable: Plug one end of the cable into the external hard drive and the other end into the corresponding port on your Mac. Ensure a firm and secure connection.
- Power on your Mac: Once the external hard drive is connected, power on your Mac. It will recognize the presence of the new device and prepare it for use.
- Wait for disk recognition: Give your Mac a few moments to recognize the external hard drive. You may see a notification or an icon appear on the desktop or in the Finder window.
Depending on your Mac’s settings, you may be prompted to format the external hard drive for use with Time Machine. Follow the on-screen instructions if this prompt appears.
It’s worth noting that once you connect the external hard drive for the first time, Time Machine will automatically detect it as a potential backup destination and ask if you want to use it. At this point, you can choose to set up Time Machine and proceed with the backup configuration.
Remember, it’s important to keep the external hard drive connected to your Mac for regular backups. If you disconnect the external hard drive, Time Machine will pause the backup process until you reconnect it.
By properly connecting the external hard drive to your Mac, you’re one step closer to setting up Time Machine and ensuring the safety of your precious data.
Step 3: Set Up Time Machine
Now that you have connected the external hard drive to your Mac, it’s time to set up Time Machine. Follow these steps to configure Time Machine and start backing up your data:
- Open System Preferences: Click on the Apple menu in the top left corner of your screen, and select “System Preferences” from the drop-down menu.
- Select Time Machine: In the System Preferences window, locate and click on the “Time Machine” icon. This will open the Time Machine settings panel.
- Turn on Time Machine: In the Time Machine settings panel, toggle the switch to “On” to activate Time Machine.
- Select your backup disk: Click on the “Select Disk” button to choose the external hard drive you connected earlier as the backup destination for Time Machine.
- Choose your backup disk: From the list of available disks, select the external hard drive you want to use for Time Machine backups, and click on the “Use Disk” button.
- Enable encrypted backups (optional): If you want to add an extra layer of security to your backups, you can choose to enable encrypted backups. This will require you to set a password for accessing the backup data.
- Start the backup: After selecting the backup disk and configuring any additional settings, Time Machine will begin the initial backup process. This may take some time, depending on the amount of data being backed up.
Once the initial backup is complete, Time Machine will automatically perform regular backups according to the schedule you’ve set. By default, Time Machine backups occur hourly, but you can adjust the frequency and timing in the Time Machine settings panel.
Please note that during the backup process, it’s important to keep your Mac connected to a power source to prevent any interruptions. Also, avoid disconnecting the external hard drive while a backup is in progress to avoid data corruption.
By following these steps, you have successfully set up Time Machine and initiated the backup process. Your important data will now be continuously protected and easily recoverable in the event of any data loss or system issues.
Step 4: Customize Your Time Machine Preferences
After setting up Time Machine, you have the option to customize the preferences to tailor the backup process according to your specific needs. Follow these steps to customize your Time Machine preferences:
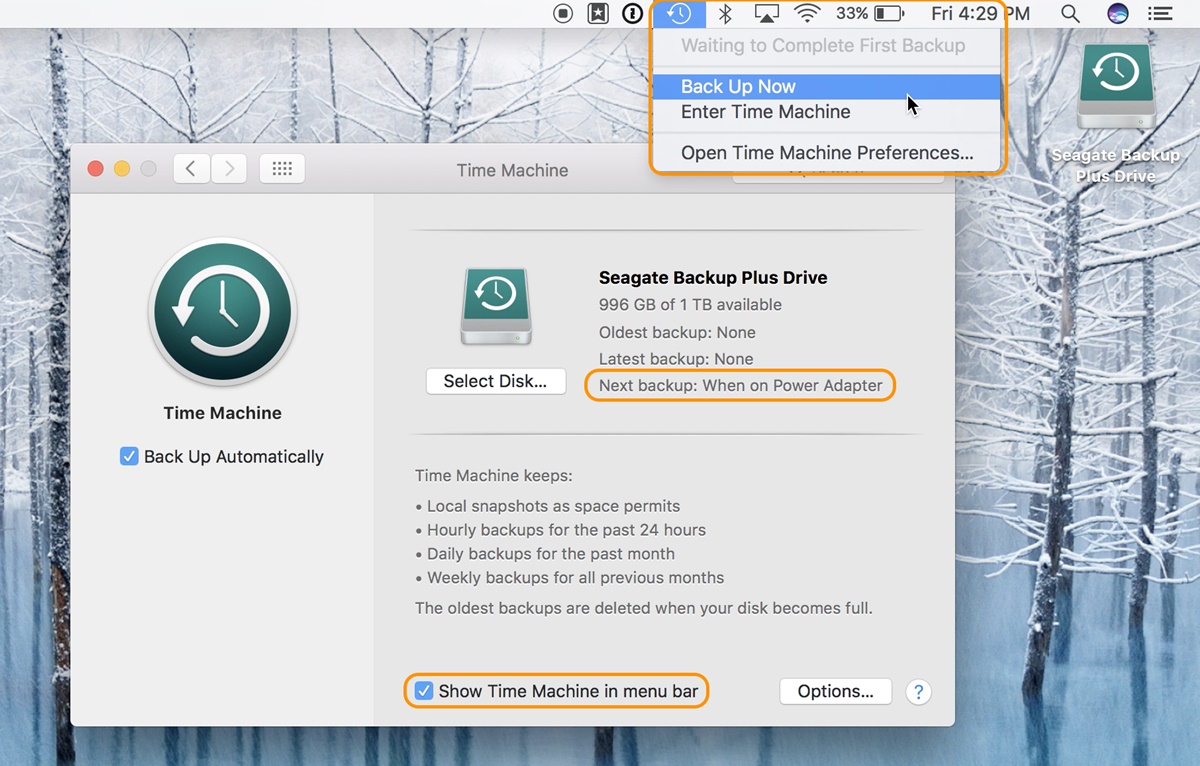
- Open Time Machine Preferences: Click on the Time Machine icon in the menu bar at the top right corner of the screen and select “Open Time Machine Preferences.”
- Exclude items from backup: In the Time Machine preferences panel, click on the “Options” button. Here, you can exclude certain files, folders, or entire volumes from being included in your Time Machine backups. This can be useful for excluding large files or folders that you don’t need to back up or that are already being backed up by another method.
- Manage backup disk space: By default, Time Machine will automatically manage the backup disk space by deleting older backups when the disk becomes full. If you want to customize this behavior, click on the “Options” button and deselect the “Notify after old backups are deleted” option. This will prevent Time Machine from sending you notifications when it needs to delete old backups to free up space.
- Encrypt backups: If you didn’t enable encryption during the initial setup, you can choose to encrypt your backups in the preferences panel. Click on the “Encrypt backups” checkbox and set a password to protect your backup data from unauthorized access.
- Backup while on battery power: By default, Time Machine will pause backups when your Mac is running on battery power to conserve energy. If you want Time Machine to continue backing up even when your Mac is not connected to a power source, deselect the “Back up while on battery power” option in the preferences panel. However, keep in mind that this may impact your battery life.
Once you have customized the Time Machine preferences according to your preferences, click on the “Save” or “Apply” button to save the changes.
Remember, it’s important to periodically review and adjust your Time Machine preferences as your backup needs and storage requirements may change over time. By customizing your Time Machine preferences, you can optimize the backup process to suit your specific requirements and ensure that your important data is backed up efficiently.
Step 5: Start the Backup Process
Once you have set up Time Machine and customized the preferences, it’s time to start the backup process. Follow these steps to initiate your first Time Machine backup:
- Ensure your external hard drive is connected: Make sure that the external hard drive you have chosen as your backup destination is properly connected to your Mac.
- Open the Time Machine menu: Click on the Time Machine icon in the menu bar at the top right corner of the screen.
- Select “Back Up Now”: From the Time Machine dropdown menu, select “Back Up Now.” This will immediately begin the backup process.
- Monitor the progress: Time Machine will display a progress bar indicating the status of the backup. You can also click on the Time Machine icon in the menu bar to get information about the backup process.
- Avoid interrupting the backup: It’s important to keep your Mac connected to a power source and refrain from disconnecting or interrupting the external hard drive while the backup is in progress. This will help ensure that the backup completes smoothly and without any data corruption.
- Let the backup complete: The duration of the backup process will depend on the amount of data being backed up and the speed of your external hard drive connection. Time Machine will continue to back up your data in the background, allowing you to work on your Mac without interruptions.
Once the initial backup is complete, Time Machine will automatically perform subsequent backups according to the schedule you have set. These subsequent backups will only include new and modified files, resulting in quicker backup times and less storage usage.
It’s important to note that during the backup process, Time Machine will prioritize backing up important system files and user data first. Files that are actively being used by your Mac may be backed up in subsequent backups.
Congratulations! You have successfully started the backup process with Time Machine. From now on, Time Machine will ensure that your data is regularly backed up and protected, providing you with the peace of mind that your important files are safe and recoverable.
Step 6: Monitoring and Managing Your Time Machine Backups
Once you have set up and initiated your Time Machine backups, it’s important to monitor and manage them to ensure the safety and effectiveness of your backup system. Follow these steps to monitor and manage your Time Machine backups:
- Access Time Machine: Click on the Time Machine icon in the menu bar at the top right corner of your screen and select “Enter Time Machine.”
- Restore files: Time Machine provides a visual timeline that allows you to browse through your backups and restore specific files or folders. Use the arrows or scrollbar to navigate through different points in time and locate the files you need. Once you’ve found the file(s), click the “Restore” button to retrieve them.
- Delete backups: If you want to delete specific backups or files from your Time Machine backup, navigate to the desired backup date and select the files or folders you want to remove. Then, right-click and choose “Delete All Backups of [file/folder x].” This can help free up disk space and manage your backups.
- Monitor backup progress: While Time Machine is running, you can monitor the backup progress by clicking on the Time Machine icon in the menu bar. It will display the status of the backup and provide an estimated time remaining.
- Check backup status: If you want to check when the last backup was performed, simply click on the Time Machine icon in the menu bar, and it will display the date and time of the last successful backup.
- View backup volume: Time Machine allows you to view the contents of your backups on the external hard drive. Simply open a Finder window, select the external hard drive, and navigate to the “Backups.backupdb” folder. From here, you can explore the different backups and access your files.
- Modify backup settings: If you wish to change your Time Machine preferences or adjust the backup schedule, open the Time Machine preferences panel by clicking on the Time Machine icon in the menu bar and selecting “Open Time Machine Preferences.” Make the necessary changes and save the settings.
By effectively monitoring and managing your Time Machine backups, you can ensure that your important files are backed up regularly, track the progress of your backups, restore files when needed, and maintain efficient use of your backup disk space.
Make it a habit to periodically check on your backups and ensure that they are running smoothly. This will help you maintain the integrity and reliability of your backup system, providing you with peace of mind and the assurance that your important data is properly protected.
Restoring Files from Time Machine Backups
Time Machine makes it easy to restore specific files, folders, or even your entire system from a previous backup. Follow these steps to restore files from your Time Machine backups:
- Connect your Time Machine backup disk: Ensure that your external hard drive containing the Time Machine backups is connected to your Mac.
- Open a Finder window: Navigate to the location where the file or folder you want to restore is currently located.
- Access Time Machine: Click on the Time Machine icon in the menu bar and select “Enter Time Machine” from the dropdown menu. Alternatively, you can launch the Time Machine application from the Applications folder.
- Browse through backups: Time Machine will display a visual timeline showing your backups. Use the arrows or scrollbar to navigate to the desired backup date and time.
- Select files or folders: Once you’ve located the files or folders you want to restore, select them by clicking on them. You can select multiple items by holding down the Command key while clicking.
- Restore the files or folders: After selecting the desired files or folders, click on the “Restore” button to initiate the restoration process. Time Machine will copy the selected items from the backup location to your Mac.
- Monitor the progress: Time Machine will display a progress bar indicating the status of the restoration process. Depending on the size and number of files being restored, this may take some time.
- Completing the restoration: Once the restoration process is complete, the restored files or folders will be available in their original location on your Mac.
If you wish to restore your entire system from a Time Machine backup, you can do so by following a similar process. However, instead of selecting specific files or folders, you would select the option to restore your entire Mac during the Time Machine setup process.
Remember that Time Machine keeps multiple versions of your files, so you can restore to different points in time. This allows you to recover files that were accidentally edited or deleted, providing you with great flexibility and peace of mind.
By utilizing Time Machine’s powerful restoration capabilities, you can easily retrieve lost, damaged, or deleted files, ensuring that your important data remains safe and accessible.
Troubleshooting Time Machine Backups
While Time Machine is generally a reliable backup solution, there may be instances where you encounter issues or errors. Here are some common troubleshooting steps to help resolve Time Machine backup problems:
- Check the backup disk connection: Ensure that the external hard drive containing your Time Machine backups is properly connected to your Mac. Make sure the cables are secure and try reconnecting the drive if necessary.
- Restart your Mac and the backup disk: Sometimes, a simple restart can resolve connectivity or software-related issues. Try restarting both your Mac and the external hard drive to see if it resolves any problems.
- Free up disk space: If your backup disk is running out of space, Time Machine may encounter errors. Delete unnecessary files or consider freeing up disk space by removing old backups or using a larger backup disk.
- Exclude problematic files or folders: If Time Machine encounters errors while backing up specific files or folders, you can try excluding them from the backup. Open Time Machine preferences, click on the “Options” button, and add the problematic items to the “Exclude these items from backups” list.
- Reset Time Machine preferences: In some cases, resetting the Time Machine preferences can help resolve issues. Open Terminal and enter the following command:
sudo tmutil resetpreferences. Enter your administrator password when prompted. - Repair the backup disk: If your backup disk is experiencing issues, you can use Disk Utility to repair it. Open Disk Utility, select the backup disk, and click on the “First Aid” button to initiate a disk repair process.
- Verify your backups: Time Machine has a built-in verification feature that checks the integrity of your backups. Open Time Machine preferences, click on the “Options” button, and enable the “Verify backups” option.
- Update macOS and Time Machine: Ensure that your macOS and Time Machine software are up to date. Apple regularly releases updates that address bugs and improve compatibility.
- Reset Time Machine: If none of the above steps resolve the issue, you can try resetting Time Machine by removing the Time Machine preferences file. Open Terminal and enter the following command:
sudo rm /Library/Preferences/com.apple.TimeMachine.plist. Enter your administrator password when prompted. - Seek professional help: If you have exhausted all troubleshooting steps and are still encountering issues with Time Machine backups, it may be beneficial to seek assistance from an Apple support professional or authorized service provider.
Remember to always back up your important data using alternate methods if you encounter persistent issues with Time Machine. This will ensure that your data remains safe and accessible, even if you experience challenges with your primary backup solution.
By following these troubleshooting steps, you can resolve common Time Machine backup issues and maintain the reliability and effectiveness of your backup system.
Frequently Asked Questions about Time Machine
Here are some frequently asked questions about Time Machine:
- Can I use Time Machine to back up multiple Macs?
Yes, Time Machine allows you to back up multiple Macs to the same external hard drive. Simply connect the backup disk to each Mac and select it as the backup destination in the Time Machine preferences. - Can I exclude specific files or folders from Time Machine backups?
Yes, you can exclude specific files or folders from Time Machine backups. Open Time Machine preferences, click on the “Options” button, and add the files or folders to the “Exclude these items from backups” list. - Can I use Time Machine with network-attached storage (NAS)?
Yes, Time Machine is compatible with network-attached storage (NAS) devices. You can use a supported NAS device as the backup destination instead of an external hard drive. Configure the NAS according to the manufacturer’s instructions and select it as the backup disk in Time Machine preferences. - Will Time Machine delete old backups to free up space?
Yes, by default, Time Machine automatically manages the backup disk space by deleting older backups when the disk becomes full. This ensures that your most recent backups are prioritized. However, you can choose to prevent Time Machine from deleting old backups by disabling the “Notify after old backups are deleted” option in Time Machine preferences. - Can I access files from different time periods within Time Machine backups?
Yes, Time Machine keeps multiple versions of your files, allowing you to access and restore files from different time periods. Use the visual timeline in Time Machine to navigate through backups and choose the specific version of a file you want to restore. - Can I encrypt my Time Machine backups?
Yes, Time Machine offers the option to encrypt your backups for added security. Open Time Machine preferences, enable the “Encrypt backups” checkbox, and set a password. Make sure to remember the password because it is required to access the encrypted backups. - How do I restore my entire system from a Time Machine backup?
To restore your entire system from a Time Machine backup, restart your Mac and hold down the Command and R keys until the Apple logo appears. This will boot your Mac into macOS Recovery. From there, select “Restore from Time Machine Backup” and follow the on-screen instructions to restore your entire system. - Can I use other backup software alongside Time Machine?
Yes, you can use other backup software alongside Time Machine if desired. However, it’s important to ensure that the backup schedules and destinations do not conflict to avoid potential issues. Coordinate backup schedules and consider using different backup destinations for each software solution.
These frequently asked questions cover some of the common concerns and inquiries about Time Machine. If you have further questions or need more specific support, consult Apple’s official documentation or reach out to their support channels for assistance.