
Why is Backing Up Your Windows System Important?
As a Windows user, it is crucial to understand the importance of regularly backing up your system. While it may seem like a tedious task, the consequences of not having a backup can be catastrophic. Here are several reasons why backing up your Windows system is vital:
- Data protection: Your computer contains a plethora of valuable data, including personal files, documents, photos, and videos. Without a backup, these files are at risk of being lost forever in the event of a system failure, hardware malfunction, or even a malicious virus or ransomware attack.
- System recovery: If your Windows system becomes corrupted or crashes, having a backup ensures that you can restore your system to a previous working state. This helps to minimize downtime and allows you to resume your work quickly without losing important files or settings.
- Protection against hardware failure: Computers are not immune to hardware failures, such as hard drive crashes. Without a backup, you risk losing everything stored on your computer, including installed software, personal files, and customized settings. Having a recent backup can save you from the frustration and expense of data recovery services.
- Easy migration to a new system: When it comes time to upgrade your computer or switch to a new device, having a backup simplifies the migration process. You can easily transfer your files, programs, and settings to the new system, ensuring a smooth transition without the need to reinstall everything from scratch.
- Protection against accidental file deletion: We’ve all experienced the sinking feeling of accidentally deleting an important file. With regular backups, you can quickly recover deleted files from a previous backup, avoiding any long-term consequences.
Given these potential risks and benefits, it is evident that backing up your Windows system is not something to be taken lightly. It provides peace of mind, protects your valuable data, and ensures that you can recover quickly from any system mishaps or disasters.
What is Macrium Reflect?
Macrium Reflect is a powerful and reliable backup and imaging software designed specifically for Windows systems. It offers a comprehensive set of features that allow users to create full system backups, image backups of individual drives or partitions, and schedule automatic backups for regular data protection. With its user-friendly interface and advanced functionality, Macrium Reflect has become a popular choice among both personal and business users.
At its core, Macrium Reflect provides the ability to create a complete snapshot, or image, of your Windows system. This includes the operating system, installed software, settings, and all your personal files. This image can then be stored on an external hard drive, network storage, or cloud-based storage for safekeeping.
One of the standout features of Macrium Reflect is its ability to perform fast and efficient backups using Incremental and Differential backup methods. These methods only backup the changes made since the last full backup, resulting in smaller backup files and faster backup times. This makes it ideal for regular scheduled backups without taking up excessive storage space.
Additionally, Macrium Reflect offers a straightforward and intuitive restore process. In the event of a system failure or data loss, you can easily restore your system from a previous backup by booting from a Macrium Reflect bootable rescue media. This guarantees a reliable recovery process and ensures your system is up and running quickly.
Macrium Reflect also provides advanced features such as disk cloning and disk imaging, enabling you to migrate your entire system to a new drive or create an exact copy of your disk for redundancy purposes.
Furthermore, Macrium Reflect is known for its robust and reliable backup technology. It uses industry-standard compression algorithms to reduce the size of backup files without compromising the integrity of your data. It also offers various encryption options to securely protect your backups from unauthorized access.
Downloading and Installing Macrium Reflect
To get started with Macrium Reflect, follow these simple steps to download and install the software:
- Visit the official Macrium Reflect website at www.macrium.com.
- Navigate to the Downloads section of the website.
- Choose the edition of Macrium Reflect that suits your needs. There are several editions available, including Free, Home, Workstation, and Server editions.
- Click on the download link for the selected edition. This will initiate the download process.
- Once the download is complete, locate the downloaded file and double-click on it to start the installation process.
Follow the on-screen instructions to complete the installation. You may need to accept the software license agreement, choose the installation directory, and configure additional settings as prompted.
After the installation is complete, launch Macrium Reflect from the desktop shortcut or the Start menu.
Please note that the free edition of Macrium Reflect offers basic backup and imaging functionality, while the paid editions provide additional features such as ransomware protection, centralized management, and advanced scheduling options. Choose the edition that aligns with your specific backup needs.
Once you have successfully installed Macrium Reflect, you are ready to start creating backups and protecting your Windows system.
It is worth mentioning that Macrium Reflect provides comprehensive documentation and video tutorials on their website to help you get familiar with the software’s features and functionalities. Take some time to explore these resources to make the most out of Macrium Reflect and ensure a successful backup strategy.
Creating a Full System Image Backup with Macrium Reflect
Creating a full system image backup with Macrium Reflect is a straightforward process that ensures all your system settings, installed programs, and personal files are securely backed up. Follow these steps to create a full system image backup:
- Launch Macrium Reflect from the desktop shortcut or the Start menu.
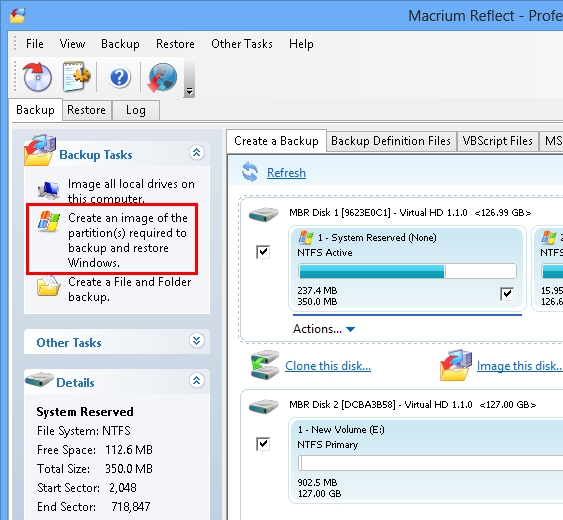
- In the Macrium Reflect interface, click on the “Create a backup” button located on the toolbar. This will open the “Backup Tasks” window.
- In the “Backup Tasks” window, ensure that the “Image selected disks or partitions” option is selected, and click the “Next” button.
- On the next screen, make sure that all the partitions and drives that you want to include in the backup are selected. By default, Macrium Reflect selects all necessary partitions for a complete system backup. If you want to exclude any specific partitions, you can uncheck them from the list. Click the “Next” button to proceed.
- In the destination selection screen, choose where you want to store the backup image. You can select an external hard drive, network location, or cloud-based storage. It is recommended to choose a location separate from the system drive to avoid data loss in the event of system failure. Click the “Next” button to continue.
- In the “Advanced options” screen, you can configure additional settings such as compression level and encryption for the backup image. Adjust these options according to your preferences and click the “Next” button.
- In the “Schedule” screen, you have the option to schedule regular backups to ensure continuous data protection. Choose the desired backup schedule or select “Do not schedule this backup” if you prefer to create the backup manually. Click the “Next” button to proceed.
- Review the summary of your backup settings on the “Summary” screen. Double-check that all the selected partitions and options are correct. If everything looks good, click the “Finish” button to start the backup process.
- Macrium Reflect will now create a full system image backup of your selected partitions and save it to the specified destination. The backup process may take some time, depending on the size of your system and the speed of your storage device. You can monitor the progress in the Macrium Reflect interface.
Once the backup process is complete, you will have a comprehensive full system image backup of your Windows system. It is recommended to test your backups periodically to ensure their integrity and store multiple copies in different locations for added redundancy.
Scheduling Regular Backups with Macrium Reflect
Scheduling regular backups with Macrium Reflect is a convenient way to automate the backup process and ensure that your Windows system and data are consistently protected. Follow these steps to schedule regular backups:
- Launch Macrium Reflect from the desktop shortcut or the Start menu.
- In the Macrium Reflect interface, click on the “Create a backup” button located on the toolbar. This will open the “Backup Tasks” window.
- In the “Backup Tasks” window, choose the “Image selected disks or partitions” option and click the “Next” button.
- Select the partitions and drives that you want to include in the backup. Ensure that all necessary partitions are selected. Click the “Next” button to proceed.
- Choose the destination where you want to store the backup image. This can be an external hard drive, network storage, or cloud-based storage. Click the “Next” button to continue.
- In the “Advanced options” screen, configure the desired compression level and encryption settings for the backup image. Adjust these options according to your preferences and click the “Next” button.
- In the “Schedule” screen, select the “On a schedule” option. Choose the frequency and time for the backups. Macrium Reflect offers various scheduling options such as daily, weekly, or monthly backups. Set the desired schedule and click the “Next” button.
- Review the summary of your backup settings on the “Summary” screen. Double-check that all the selected partitions, options, and schedule are correct. If everything looks good, click the “Finish” button to save the scheduled backup task.
Once the scheduled backup task is set up, Macrium Reflect will automatically perform backups based on the defined schedule. You can monitor the backup progress and status in the Macrium Reflect interface.
It is crucial to periodically review and adjust the backup schedule to ensure it aligns with your changing needs. Additionally, it is recommended to regularly inspect the backup logs and test the backups to ensure their reliability and data integrity.
By scheduling regular backups with Macrium Reflect, you can have peace of mind knowing that your Windows system and data are continuously protected and easily recoverable in the event of a system failure or data loss.
Restoring Your Windows System with Macrium Reflect
In the unfortunate event of a system failure or data loss, Macrium Reflect provides a straightforward and reliable process to restore your Windows system from a previously created backup. Follow these steps to restore your Windows system with Macrium Reflect:
- Launch Macrium Reflect from the desktop shortcut or the Start menu.
- In the Macrium Reflect interface, click on the “Restore” tab located at the top of the window. This will display a list of available backup images.
- Select the backup image that you want to restore. If you have multiple backups, choose the most recent one or the specific backup that contains the desired system state.
- On the right-hand side of the window, you will see a list of partitions included in the selected backup image. Ensure that all the necessary partitions are selected for restoration. You may need to adjust the partition sizes to match the original configuration.
- Choose the destination where you want to restore the backup image. This should be the original system drive or a new drive with sufficient space to accommodate the restored system.
- In the “Additional restore options” section, you can configure advanced settings such as disk resizing, drive letter assignments, and other options. Adjust these settings according to your requirements.
- Review the summary of your restore settings on the “Summary” screen. Double-check that all the selected partitions and options are correct. If everything looks good, click the “Finish” button to start the restore process.
- Macrium Reflect will now restore your Windows system from the selected backup image. The restoration process may take some time, depending on the size of the backup image and the speed of your storage device.
- Once the restore process is complete, restart your computer and let the restored system boot up normally. You should now have your Windows system back to the state captured in the backup image.
It is essential to ensure that your backups are up to date and regularly tested to guarantee their integrity. Regularly monitor the backup process and review the restore process to familiarize yourself with the steps involved. Being prepared will help minimize downtime in the event of a system failure or data loss.
Macrium Reflect simplifies the restoration process and gives you the confidence that your Windows system can be quickly and efficiently recovered from a backup when needed.
Creating Incremental and Differential Backups with Macrium Reflect
Macrium Reflect offers the flexibility to create incremental and differential backups in addition to full system backups. These backup methods provide a more efficient way to keep your data protected while minimizing the storage space required for backups. Here’s how you can create incremental and differential backups with Macrium Reflect:
Incremental Backups:
- Launch Macrium Reflect from the desktop shortcut or the Start menu.
- In the Macrium Reflect interface, click on the “Create a backup” button located on the toolbar. This will open the “Backup Tasks” window.
- Choose the “Image selected disks or partitions” option and click the “Next” button.
- Select the partitions and drives that you want to include in the backup. Ensure that all the necessary partitions are selected. Click the “Next” button to proceed.
- Choose the destination where you want to store the backup image. This can be an external hard drive, network storage, or cloud-based storage. Click the “Next” button to continue.
- In the “Advanced options” screen, select the “Enable backup encryption” option if desired, and choose the desired compression level. Ensure that the “Enable Intelligent Sector Copy” option is selected for incremental backups. Click the “Next” button.
- In the “Schedule” screen, select the “Do not schedule this backup” option to create a manual backup or choose the desired backup schedule. Click the “Next” button to proceed.
- Review the summary of your backup settings on the “Summary” screen. Ensure that all the selected partitions, options, and schedule are correct. Click the “Finish” button to start the backup process.
With incremental backups, Macrium Reflect will only back up the changes made since the last backup, resulting in smaller backup files and faster backup times.
Differential Backups:
- Launch Macrium Reflect from the desktop shortcut or the Start menu.
- In the Macrium Reflect interface, click on the “Create a backup” button located on the toolbar. This will open the “Backup Tasks” window.
- Choose the “Image selected disks or partitions” option and click the “Next” button.
- Select the partitions and drives that you want to include in the backup. Ensure that all the necessary partitions are selected. Click the “Next” button to proceed.
- Choose the destination where you want to store the backup image. This can be an external hard drive, network storage, or cloud-based storage. Click the “Next” button to continue.
- In the “Advanced options” screen, select the “Enable backup encryption” option if desired, and choose the desired compression level. Ensure that the “Enable Intelligent Sector Copy” option is not selected for differential backups. Click the “Next” button.
- In the “Schedule” screen, select the “Do not schedule this backup” option to create a manual backup or choose the desired backup schedule. Click the “Next” button to proceed.
- Review the summary of your backup settings on the “Summary” screen. Ensure that all the selected partitions, options, and schedule are correct. Click the “Finish” button to start the backup process.
Differential backups capture the changes made since the last full backup rather than the last incremental backup. This makes the restoration process faster, as you only need to restore the last differential backup along with the initial full backup.
By utilizing incremental and differential backup methods with Macrium Reflect, you can efficiently manage your backup storage space while ensuring that your data remains protected and easily recoverable.
Creating Bootable Rescue Media with Macrium Reflect
Creating bootable rescue media with Macrium Reflect is an essential step in ensuring that you can easily recover your Windows system in the event of a catastrophic failure. Bootable rescue media allows you to boot your computer from an external source and perform system restores or access backup images. Follow these steps to create bootable rescue media with Macrium Reflect:
- Launch Macrium Reflect from the desktop shortcut or the Start menu.
- In the Macrium Reflect interface, click on the “Other Tasks” menu located on the toolbar.
- From the drop-down menu, select “Create Rescue Media”.
- The “Create Rescue Media Wizard” will open. Choose the type of media you want to use for the rescue media. Macrium Reflect supports various options, including CD/DVD, USB stick, or an ISO file for later burning to media.
- Follow the on-screen instructions to prepare the selected media type for rescue creation. If you choose a USB stick, ensure it is inserted and accessible by your computer.
- Click the “Next” button to proceed.
- Select the “Windows PE” option for the rescue media type.
- In the next step, choose the drivers that you want to include in the rescue media. Macrium Reflect provides an “Auto-detect” option to include the necessary drivers automatically.
- Choose the display resolution for the rescue media.
- Review the summary of your rescue media creation settings on the final screen.
- Click the “Finish” button to begin creating the bootable rescue media.
- Follow the progress on the screen until the process completes.
- Once the bootable rescue media is created, safely eject the media and keep it in a secure location in case of emergencies.
Having bootable rescue media ensures that you can restore your Windows system even if it becomes unbootable. In the event of a system failure, you can boot your computer from the created rescue media, access your backups, and restore your system to a previous working state.
It is important to regularly update your bootable rescue media to match any changes in your system configuration or hardware. This will ensure compatibility and usability when you need to rely on it for system recovery.
By following these steps, you can create bootable rescue media with Macrium Reflect, giving you added peace of mind and a reliable solution for system recovery.
Tips for a Successful Backup with Macrium Reflect
Creating backups with Macrium Reflect is a crucial step in safeguarding your Windows system and data. To ensure a successful backup process and optimal protection, consider the following tips:
- Regularly review your backup schedule: Take the time to review and adjust your backup schedule as needed. Regular backups offer better protection against data loss and give you more options for system recovery.
- Store backups in multiple locations: It is advisable to store backups in multiple locations to protect against physical damage or loss. Consider using external hard drives, network storage, or cloud-based storage for added redundancy.
- Verify backup integrity: Periodically verify the integrity of your backups by performing test restores. This ensures that your backups are usable and that your data can be successfully restored if needed.
- Regularly update backup images: If you make significant changes to your system, such as installing new software or updating operating system patches, it is wise to create a new backup image to capture these changes and ensure an up-to-date restore point.
- Monitor backup logs: Check the backup logs in Macrium Reflect to identify any errors or warnings. Addressing potential issues early on can prevent future backup failures or data loss.
- Secure your backups: To protect sensitive data, consider enabling backup encryption in Macrium Reflect. This adds an extra layer of security to your backups, preventing unauthorized access.
- Keep track of storage space: Monitor the available storage space on your backup destination to ensure that you have enough capacity to accommodate your backups. Regularly clean up old or unnecessary backups to free up space.
- Familiarize yourself with restore procedures: Take the time to understand how to restore your system from a backup using Macrium Reflect. Knowing the steps involved will help you act quickly and confidently in the event of a system failure.
- Update Macrium Reflect: Keep Macrium Reflect up to date with the latest software version to benefit from bug fixes, feature enhancements, and improved compatibility with your operating system. Check for updates regularly or enable automatic updates.
- Seek professional assistance if necessary: If you encounter difficulties or have specific backup requirements, do not hesitate to seek professional assistance from Macrium Reflect support or other IT experts. They can help troubleshoot issues or provide guidance to optimize your backup strategy.
By following these tips, you can elevate your backup strategy with Macrium Reflect, ensuring the safety of your Windows system and valuable data.