
Choosing the Right SSD
When it comes to installing an SSD (Solid State Drive) in your computer, choosing the right one is essential. An SSD can greatly enhance the performance and speed of your computer, so it’s important to select one that meets your storage requirements and fits your budget. Here are some key factors to consider when choosing an SSD:
- Storage Capacity: SSDs come in various storage capacities, ranging from 128GB to several terabytes. Assess your storage needs and determine how much space you require for your files, applications, and operating system.
- Performance: Look for SSDs with high read and write speeds. The performance of an SSD is measured in megabytes per second (MB/s). Opt for an SSD with faster speeds to ensure quick data transfer and smooth operation.
- Form Factor: Consider the form factor of the SSD, as it should be compatible with your computer’s storage bay. The most common form factors are 2.5-inch and M.2. Check your computer’s specifications or consult the manufacturer’s manual to determine the form factor that fits.
- Interface: SSDs use different interfaces to connect with the motherboard, such as SATA (Serial ATA) and NVMe (Non-Volatile Memory Express). Determine the interface supported by your computer and choose an SSD accordingly. NVMe SSDs offer faster data transfer rates compared to SATA SSDs.
- Reliability and Endurance: Look for SSDs from reputable manufacturers known for their reliability and endurance. Check the drive’s durability rating and warranty period to ensure long-term usage.
- Price: Set a budget for your SSD purchase and compare prices across different brands and models. It’s important to balance cost with the desired features and performance.
By carefully considering these factors, you can choose an SSD that fits your needs and provides a significant performance boost to your computer. Once you have selected the right SSD, you can move on to the next steps of the installation process.
Backing up Your Data
Before you begin the process of installing an SSD in your computer, it is crucial to back up your data. This step ensures that you don’t lose any important files or documents during the installation. Here are some methods you can use to backup your data:
- External Hard Drive: Connect an external hard drive to your computer and copy all the important files onto it. This method allows you to have a physical backup that can easily be accessed later.
- Cloud Storage: Upload your files to a cloud storage service, such as Google Drive, Dropbox, or OneDrive. This option provides the advantage of accessing your files from anywhere with an internet connection.
- Network Attached Storage (NAS): If you have a NAS device connected to your network, you can transfer your files to it for safekeeping.
- Disk Imaging Software: Use disk imaging software, like Macrium Reflect or Acronis True Image, to create a complete backup of your entire hard drive. This method allows you to restore not only your files but also your operating system and installed programs.
Whichever method you choose, make sure that you have successfully backed up all your important data before proceeding with the SSD installation. It is also a good idea to double-check the backup to ensure that everything has been copied correctly and is accessible.
Having a reliable backup ensures that even if something goes wrong during the installation process, you can easily restore your files and get back up and running without any data loss. Once you have your data safely backed up, you can move on to the next steps of installing the SSD into your computer.
Gathering the Necessary Tools
Before you can begin the process of installing an SSD in your computer, it is important to gather all the necessary tools. Having the right tools on hand will make the installation process much smoother and more efficient. Here are the essential tools you will need:
- Screwdriver: A Phillips head screwdriver is typically needed to open the computer case and remove the screws holding the hard drive in place.
- Static-Discharge Bracelet: Although optional, a static-discharge bracelet can help protect your computer’s components from static electricity, which can cause damage.
- SSD Mounting Bracket: If your computer’s storage bay is designed for a larger form factor, you may need an SSD mounting bracket to securely fit the smaller SSD.
- SATA Data Cable: This cable connects the SSD to the motherboard and allows for data transfer.
- SATA Power Cable: This cable provides power to the SSD from the power supply unit (PSU).
It is important to note that the specific tools required may vary depending on your computer’s make and model. Consulting the manufacturer’s manual or online resources can help you determine the exact tools needed for your particular installation.
Before you begin the installation process, ensure that you have all the necessary tools readily available. This will minimize interruptions or delays during the process and streamline the installation of your new SSD. With your tools at the ready, you can now proceed to the next steps of shutting down your computer and opening the case in preparation for installing the SSD.
Shutting Down and Opening Your Computer
Before you can install an SSD in your computer, you need to properly shut down your system and open the computer case. This section will guide you through the necessary steps:
- Save and Close: Save any open documents or files and close all running applications.
- Shut Down: Click on the “Start” menu and select “Shut Down” or “Restart.” Allow your computer to completely power down before proceeding.
- Unplug: Disconnect the power cord from the wall outlet to ensure safety and prevent any accidental damage due to electric shock.
- Ground Yourself: To avoid damaging sensitive electronic components with static electricity, make sure to ground yourself. You can do this by wearing an anti-static wrist strap or by touching a grounded metal surface.
- Remove the Case: Depending on the design of your computer, you may need to unscrew the case using a screwdriver or release latches to open it. Consult your computer’s manual or online resources for specific instructions.
- Locate the SSD Bay: Once the case is open, locate the storage bay where the existing hard drive is installed. This is where you will later install the SSD.
It is important to follow these steps carefully to ensure the safety of your computer and the proper installation of the SSD. Taking precautionary measures, such as grounding yourself and shutting down the computer correctly, will help prevent any potential damage.
With your computer shut down and the case open, you are now ready to proceed to the next steps of the installation process, which involve locating the storage bays and removing the old hard drive.
Locating the Storage Bays
Before you can install an SSD into your computer, you need to locate the storage bay where the existing hard drive is installed. The location of the storage bays can vary depending on the design of your computer. Follow these steps to find the storage bays:
- Refer to the Manual: Consult your computer’s manual or documentation for information on the storage bays’ location. The manual will provide detailed instructions and illustrations specific to your computer model.
- Inspect the Case: Examine the inside of the computer case to identify any visible storage bay slots or brackets. These are typically positioned in the front, middle, or rear of the case.
- Check the Motherboard: Look for connectors on the motherboard labeled “SATA” or “HDD.” These connectors indicate the presence of storage bays nearby.
- Consider External Connections: If your computer has a solid-state drive already installed, it may be connected externally using a USB or eSATA cable. Locate these external connectors to identify the storage bay’s location.
- Research Online: If you are unable to find the storage bay using the above methods, search online forums or video tutorials specific to your computer model. Often, others have encountered the same question and may have shared their experiences and solutions.
Every computer model is unique, so it’s important to take your time and follow the specific guidelines provided by the manufacturer. By successfully locating the storage bays, you will be able to proceed to the next steps of removing the old hard drive and preparing the SSD for installation.
Removing the Old Hard Drive
Before installing an SSD in your computer, you need to remove the old hard drive that is currently installed. Removing the old hard drive involves several steps to ensure a safe and successful removal. Follow these steps to remove the old hard drive:
- Disconnect Cables: Locate the cables connecting the old hard drive to the motherboard and power supply. Carefully unplug these cables, making sure not to damage the connectors.
- Remove Mounting Screws: Identify the screws securing the old hard drive to the storage bay or bracket. Use a screwdriver to carefully remove these screws, keeping them in a safe place for later use.
- Slide Out the Hard Drive: Gently slide the old hard drive out of the storage bay or bracket. Take care not to apply excessive force or bend any connectors in the process.
- Set Aside the Old Hard Drive: Place the old hard drive in an anti-static bag or on a non-conductive surface to protect it from static electricity and physical damage. You may choose to keep it as a backup or repurpose it for other uses.
It’s important to note that the removal process may vary depending on your specific computer model. If you encounter any difficulties or are unsure about any step, consult your computer’s manual or online resources for additional guidance.
With the old hard drive successfully removed, you are now ready to prepare the SSD for installation. In the next steps, you will learn how to prepare the SSD and securely install it in your computer.
Preparing the SSD for Installation
Now that you have removed the old hard drive from your computer, it’s time to prepare the SSD for installation. Properly preparing the SSD ensures a smooth installation process and optimal performance. Follow these steps to prepare the SSD:
- Check Compatibility: Ensure that the SSD you have chosen is compatible with your computer’s form factor and interface. Refer to the manufacturer’s specifications or consult your computer’s manual for compatibility information.
- Inspect the SSD: Examine the SSD for any physical damage or defects. Inspect the connectors and circuit board to ensure they are clean and free from debris.
- Remove Protective Coverings: If your SSD comes with a protective covering or sticker, carefully remove it before installation. These coverings are meant to protect the SSD during shipping and are not designed to remain on the drive during operation.
- Secure the SSD: If your computer’s storage bay requires an SSD mounting bracket, secure the SSD to the bracket using the provided screws. Make sure the SSD is firmly attached to the bracket to prevent any movement or vibrations.
It is important to handle the SSD with care and avoid touching the connectors or circuitry. Static electricity can damage the sensitive components, so make sure to ground yourself properly or wear an anti-static wrist strap during this process.
By properly preparing the SSD, you ensure that it is ready for installation and that it will operate optimally within your computer. With the SSD securely prepared, you can now move on to the next steps of installing the SSD into your computer and connecting it to the motherboard.
Installing the SSD
With the SSD prepared for installation, it’s time to install it into your computer. The installation process may vary slightly depending on your computer model, but the following steps provide a general guide:
- Locate the Storage Bay: Identify the storage bay where the old hard drive was previously installed. This is where you will secure your SSD.
- Align the SSD: Carefully align the SSD with the connectors in the storage bay. Make sure the connectors are properly lined up before proceeding.
- Slide In the SSD: Gently slide the SSD into the storage bay, applying even pressure. Ensure that the SSD is inserted fully into the bay until it is securely in place.
- Secure the SSD: If the storage bay requires screws to secure the SSD, use the provided screws to fasten the SSD to the storage bay. Tighten the screws firmly but not excessively to avoid damaging the SSD or the storage bay.
- Verify the Connection: Double-check that the SSD is properly connected to the connectors in the storage bay. Ensure that the connection is secure and there are no loose cables.
It is essential to handle the SSD with care during the installation process to avoid any damage. Take your time and follow the specific instructions provided by your computer’s manual or manufacturer to ensure a successful installation.
Once the SSD is securely installed, you can continue to the next step of connecting it to the motherboard to ensure proper functionality. The following steps will guide you through this process.
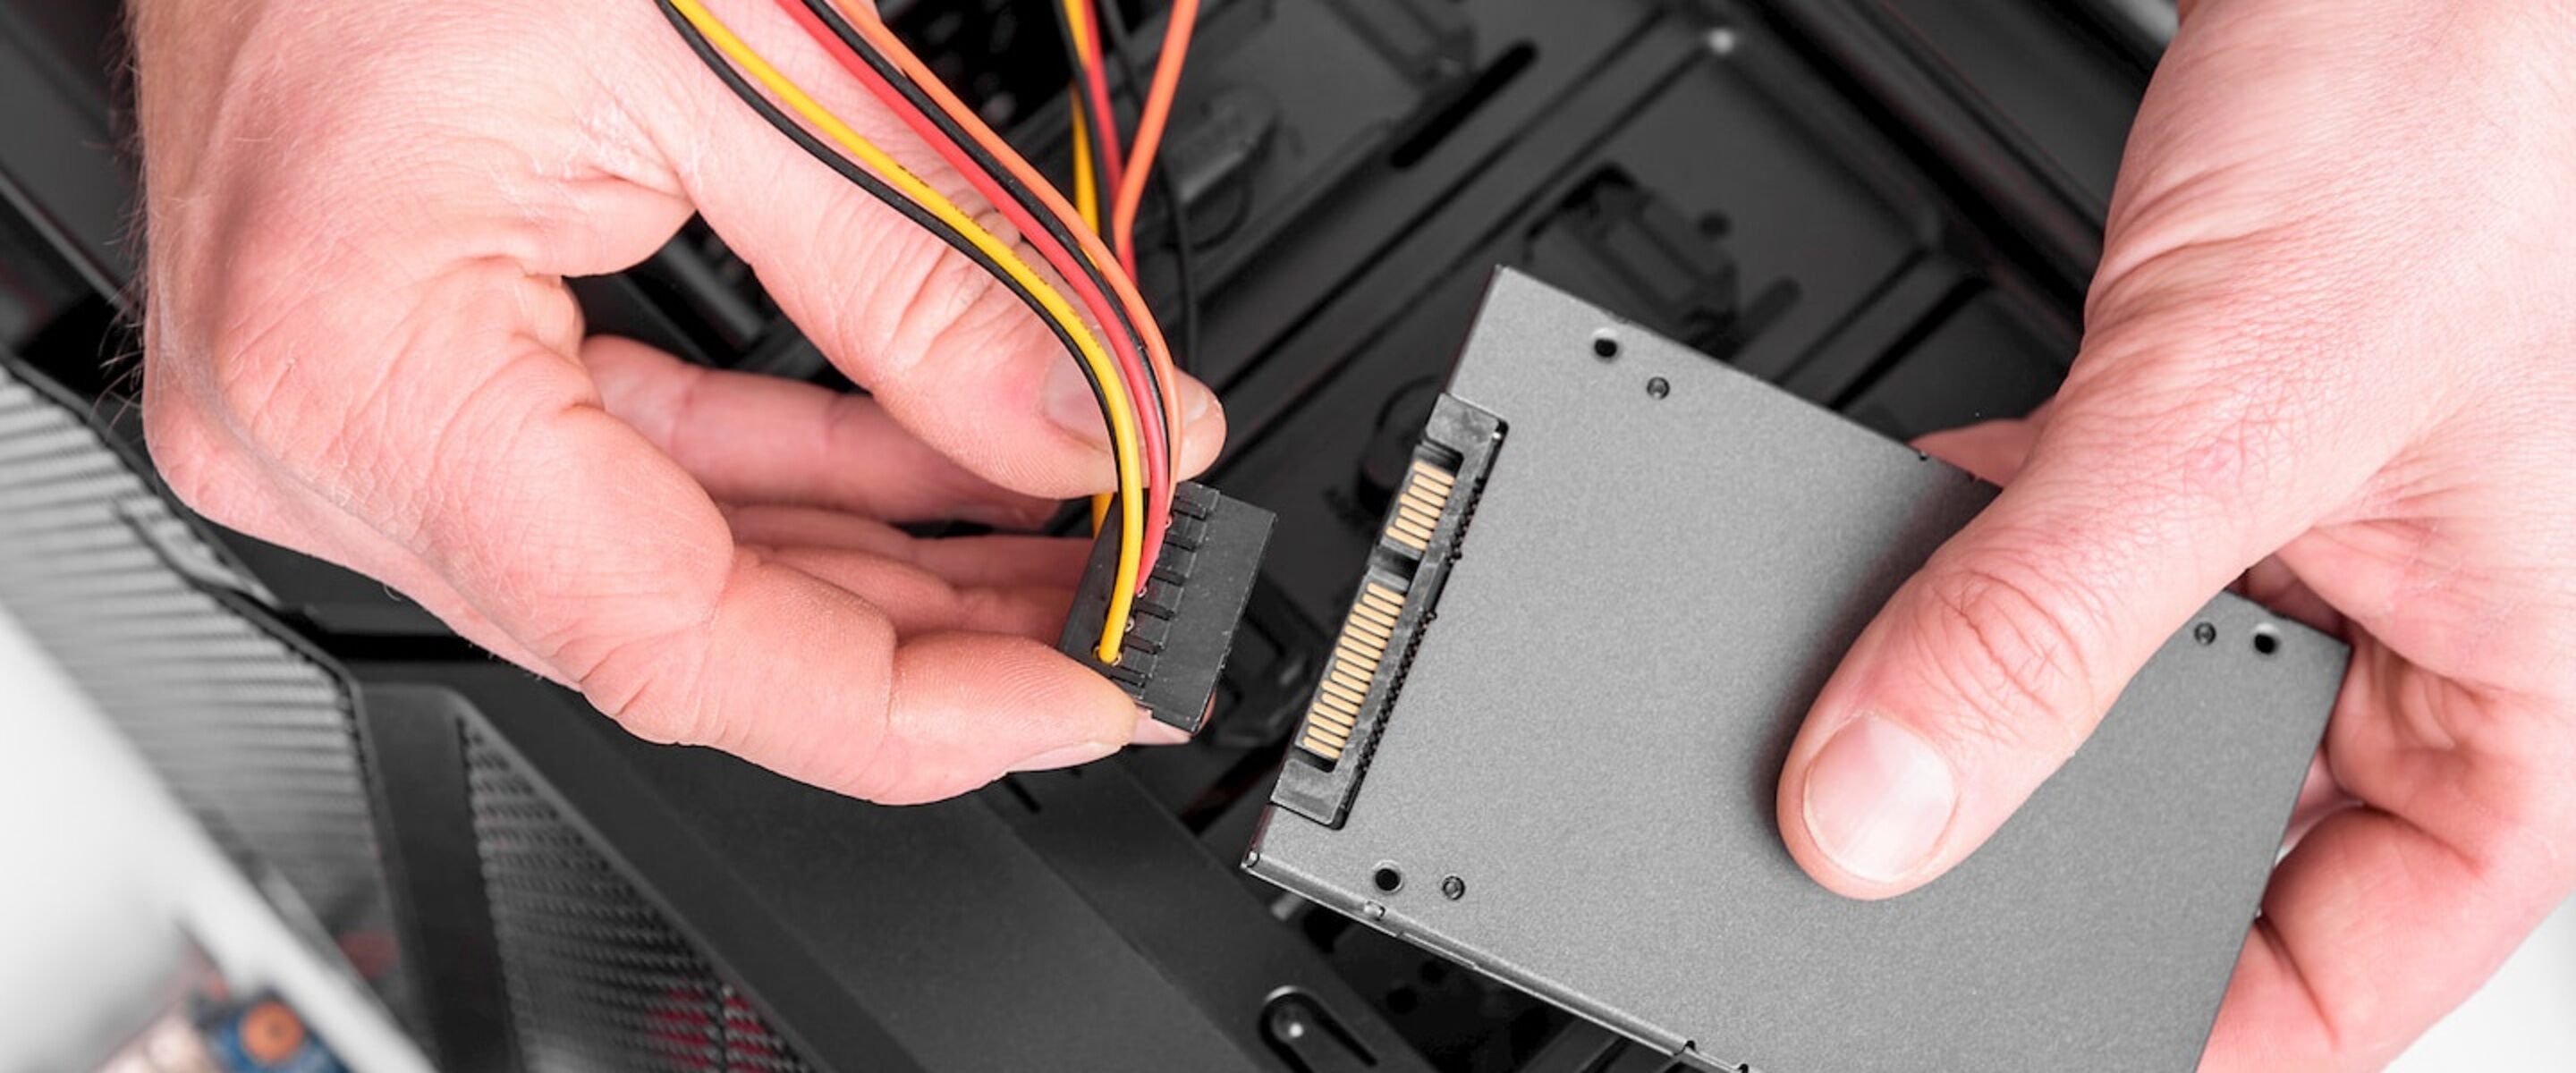
Connecting the SSD to the Motherboard
After successfully installing the SSD into the storage bay, the next step is to connect it to the motherboard. This connection allows the SSD to communicate with the computer and ensures its proper functionality. Follow these steps to connect the SSD to the motherboard:
- Locate the SATA Ports: Identify the SATA ports on your motherboard. These ports are often labeled and can be found near the storage bays.
- Connect the SATA Data Cable: Take one end of the SATA data cable and connect it to the SATA port on the motherboard. Ensure a secure connection by firmly pushing the cable into the port until it clicks into place.
- Connect the Other End to the SSD: Take the other end of the SATA data cable and connect it to the corresponding SATA port on the SSD. Again, make sure the connection is secure by pushing it in until it clicks.
- Connect the SATA Power Cable: Take the SATA power cable and connect it to the power supply unit (PSU). Locate an available SATA power connector and plug it into the corresponding port on the SSD.
- Double-Check Connections: Verify that all connections are secure and properly aligned. Ensure that there are no loose cables and that all connections are snug.
It is important to connect the SSD to the motherboard using the appropriate cables and ports. The SATA data cable allows for data transfer between the SSD and the motherboard, while the SATA power cable provides power to the SSD.
Once the SSD is connected to the motherboard, you can proceed to the next steps of closing your computer and turning it back on. These steps will allow you to configure your computer for the newly installed SSD and transfer your data to it.
Closing Your Computer and Turning it Back On
After successfully installing the SSD and connecting it to the motherboard, it’s time to close your computer and turn it back on. Follow these steps to ensure a smooth transition:
- Secure the Computer Case: Place the computer case cover back on and secure it using the screws or latches. Make sure all the edges align properly before tightening the screws.
- Connect Peripherals: Reconnect any peripherals, such as the monitor, keyboard, and mouse, to your computer.
- Plug in Power: Connect the power cord to the power supply unit (PSU) and plug it back into a power outlet.
- Turn On the Computer: Press the power button on your computer to turn it on. Wait for the computer to boot up.
- Check SSD Detection: Once your computer is on, check if the SSD is being detected by the system. You can do this by checking the BIOS settings or by accessing the storage information in your computer’s operating system.
If the SSD is successfully detected, it means your computer recognizes the new storage device. You can now proceed to configure your computer to fully utilize the benefits of the SSD.
If the SSD is not detected, double-check the connections and make sure they are properly seated. If the issue persists, consult your computer’s manual or seek assistance from technical support.
With your computer successfully turned back on and the SSD recognized, you can continue to the next steps of configuring your computer for the SSD and transferring your data to enjoy the improved performance and faster storage capabilities.
Configuring Your Computer for the SSD
After installing the SSD and ensuring it is recognized by your computer, it’s time to configure your system to fully utilize the benefits of the new storage device. These steps will help you get the most out of your SSD:
- Access the BIOS Settings: Restart your computer and enter the BIOS settings. This is typically done by pressing a key, such as F2 or Delete, during the boot-up process. Consult your computer’s manual for the specific key.
- Change the Boot Order: In the BIOS settings, navigate to the Boot Order or Boot Priority section. Set the SSD as the primary boot device to ensure faster startup times. Save the changes and exit the BIOS.
- Install Operating System (Optional): If the SSD is a new drive and you haven’t installed an operating system yet, you can perform a clean installation on the SSD for optimal performance. Follow the instructions provided by your operating system for installation.
- Update Firmware and Drivers: Check the manufacturer’s website for firmware updates specific to your SSD model. Installing the latest firmware ensures optimal performance and compatibility. Additionally, update any relevant drivers for the SSD.
- Enable TRIM: If you are using a Windows operating system, ensure that TRIM is enabled. TRIM helps maintain the efficiency and longevity of the SSD by optimizing the way data is stored and erased. To enable TRIM, open the command prompt as an administrator, type “fsutil behavior set DisableDeleteNotify 0”, and press Enter.
- Disable Defragmentation: SSDs do not benefit from defragmentation, as their access times are not affected by file fragmentation. Disable automatic defragmentation in your operating system to prevent unnecessary wear on the SSD.
Configuring your computer for the SSD involves optimizing settings and ensuring compatibility to maximize the benefits of the new storage device. By following these steps, you can ensure that your operating system and SSD work seamlessly together, resulting in faster boot times, quicker file transfers, and improved overall performance.
With your computer now configured for the SSD, you are ready to transfer your data from the backup to the SSD. These steps will be covered in the next section, allowing you to fully enjoy the increased speed and reliability of your computer’s storage system.
Transferring Your Data to the SSD
With the SSD properly configured and ready for use, it’s time to transfer your data from the backup to the SSD. Follow these steps to ensure a seamless transfer:
- Connect External Backup Drive: If you backed up your data to an external hard drive or cloud storage, connect the external drive to your computer.
- Copy Files and Folders: Use the file explorer or backup software to copy and paste your files and folders from the backup location to the SSD. Organize the data as desired on the SSD.
- Reinstall Applications: If you performed a clean installation of the operating system on the SSD, reinstall your applications from their original installation files or through official sources such as app stores. Make sure to enter any necessary license keys or account information during the installation process.
- Configure Application Settings: After reinstalling the applications, configure any personalized settings or preferences to match your previous setup.
- Verify Data Integrity: Double-check that all your files and applications have been successfully transferred to the SSD. Open a few files and test the applications to ensure everything is working properly.
During the data transfer process, it is important to prioritize and transfer the most critical files and applications first. This ensures you have immediate access to the items you need most, with the option to transfer additional files at your convenience.
Remember to keep your original backup intact until you are certain that all data has been successfully transferred and verified on the SSD. This acts as an additional safeguard in case any unforeseen issues arise.
With your data successfully transferred to the SSD, you can now enjoy the benefits of faster access times, improved performance, and reliability for your files and applications. Your computer will now operate with enhanced speed and responsiveness, thanks to the new SSD.
Enjoying the Benefits of a Faster Storage Device
Now that you have successfully installed and configured your new SSD, it’s time to enjoy the numerous benefits it brings to your computer’s storage system. Here are some advantages you can expect from using a faster storage device:
- Improved Performance: The faster read and write speeds of an SSD result in quicker boot times, faster application launches, and improved overall system responsiveness. You will experience smoother multitasking and reduced waiting times.
- Faster File Transfers: Transferring files between the SSD and other storage devices such as external hard drives or USB drives is noticeably faster. Large file transfers, backups, and data synchronization tasks become much quicker and more efficient.
- Reduced Loading Times: Games, applications, and documents stored on the SSD load significantly faster. You can expect shorter loading screens and quicker access to your files, allowing for a smoother and more enjoyable computing experience.
- Reliability and Durability: SSDs have no moving parts, making them more resistant to physical damage and less prone to mechanical failure compared to traditional hard drives. This enhances the longevity and reliability of your storage system.
- Energy Efficiency: SSDs are more energy-efficient, consuming less power and generating less heat compared to traditional hard drives. This can lead to longer battery life for laptops and reduced energy costs for desktop computers.
By upgrading to an SSD, you unlock the full potential of your computer’s storage capabilities. Whether you are a gamer seeking faster load times, a professional aiming to boost productivity, or a casual user looking for a smoother computing experience, the benefits of an SSD are significant.
Remember to regularly back up your data to ensure its safety and make the most of the increased speed and reliability offered by your new SSD. Performing regular maintenance, such as keeping your operating system and SSD firmware up to date, will also help maintain optimal performance over time.
Enjoy the enhanced performance, speed, and efficiency of your computer’s storage system with your new SSD. Experience the difference it makes in improving your everyday computing tasks and optimizing your workflow.