
Choosing a Color
When it comes to applying background colors to tables in Word, the first step is choosing the right color. The color you select can have a significant impact on the overall look and feel of your table, so it’s important to consider various factors before making a decision.
Here are some tips to help you choose the perfect color for your table:
- Consider the purpose: Think about the purpose of your table and the message you want to convey. If you’re creating a table for a professional report or document, it’s best to stick with neutral or muted colors that enhance readability and maintain a formal appearance. On the other hand, if you’re designing a table for a creative project or presentation, you have more freedom to experiment with vibrant colors that express your artistic style.
- Match the theme: Align the color scheme of your table with the overall theme of your document or project. This creates a cohesive and visually pleasing presentation. For example, if your document has a warm and earthy color palette, consider using shades of brown or green as the background color for your table.
- Consider accessibility: Accessibility is crucial when choosing colors for your table. Ensure that the background color you select provides sufficient contrast with the font color to guarantee readability for all users, including those with visual impairments. Online color accessibility tools can help you determine the appropriate color combinations based on accessibility guidelines.
- Keep it subtle: While bold and vibrant colors can be eye-catching, they can also distract readers from the actual content of the table. Opt for subtler colors that complement the information without overpowering it. Light pastel shades or muted tones are often a safe choice that maintains a professional and elegant appearance.
- Test it out: Before finalizing the color choice, it’s essential to test how it looks in different viewing environments. View your table on different screens, such as monitors, laptops, and mobile devices, to ensure that the color appears consistent and pleasing across all platforms.
Remember, choosing the right background color for your table sets the tone for the information you are presenting. Take the time to consider the purpose, theme, accessibility, subtlety, and testing of different colors to ensure that your table enhances the overall visual appeal and readability of your document.
Applying Background Color to All Cells
If you want to apply a background color to all cells in a table in Word, there are a few simple steps you can follow. This allows you to create visual consistency and make your table stand out.
Here’s how to apply a background color to all cells in your table:
- Select the entire table by clicking anywhere within it. You should see the Table Tools tab appear at the top of the Word window.
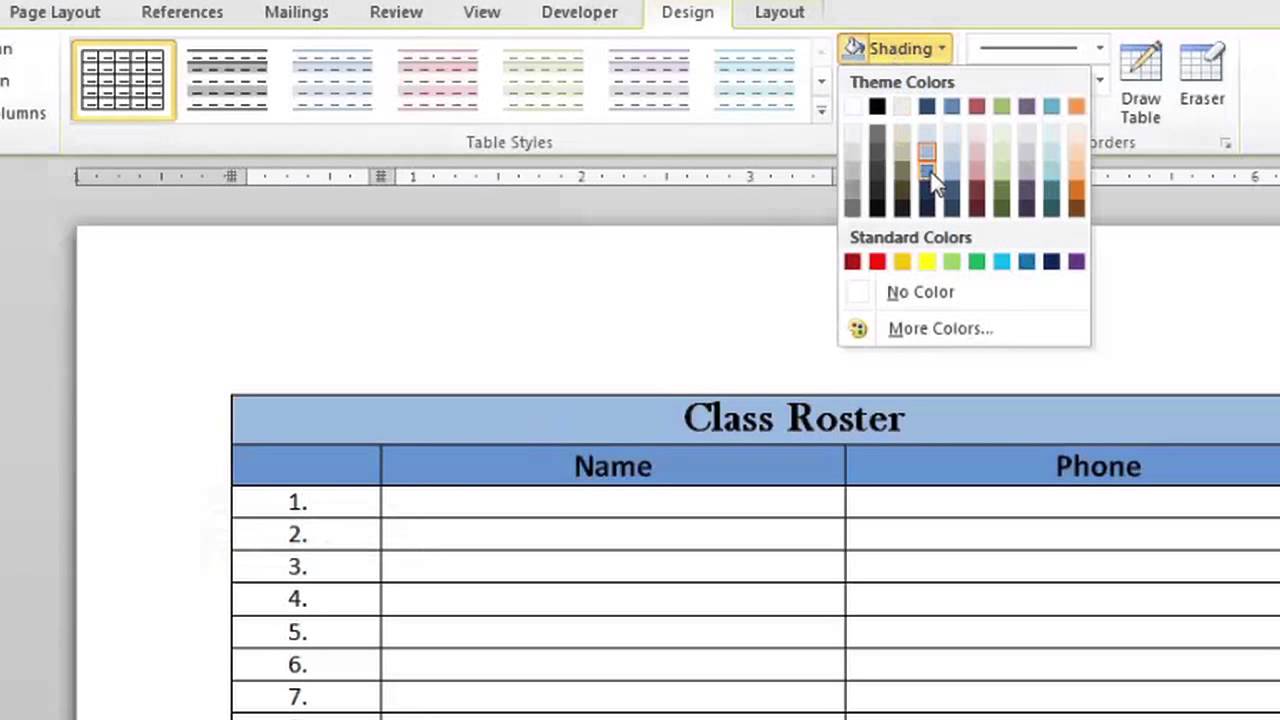
- Navigate to the Design tab under Table Tools. Here, you will find various options for modifying your table’s design. Look for the “Shading” button in the “Table Styles” group.
- Click on the “Shading” button to open the color palette. Choose the color you want to apply as the background color for all cells in the table.
- Once you have selected the desired color, the background color will be instantly applied to all cells in the table.
It’s important to note that applying a background color to all cells will override any existing formatting or individual cell colors. If you have already customized certain cells with different colors, applying the background color to all cells will replace those individual settings.
Additionally, you can further customize the appearance of the table by adjusting the intensity or pattern of the background color. Simply right-click on any cell in the table, click “Table Properties,” and navigate to the “Shading” tab. Here, you can modify the shading options to achieve the desired visual effect.
Applying Background Color to Selected Cells
If you want to apply a background color to selected cells within a table in Word, you have the flexibility to highlight specific data or create visual emphasis. This allows you to make certain information stand out while leaving the rest of the table unaffected.
Here’s how to apply a background color to selected cells in your table:
- Click and drag to select the cells that you want to apply the background color to. You can select multiple cells by holding down the Ctrl key (Command key on Mac) while clicking on individual cells.
- Once you have selected the desired cells, go to the Table Tools tab at the top of the Word window and click on the Design tab.
- Look for the “Shading” button in the “Table Styles” group and click on it. This will open the color palette.
- Select the color you want to apply as the background color for the selected cells from the color palette. The selected cells will instantly be filled with the chosen color.
By applying a background color to selected cells, you can draw attention to specific data or highlight important information. This can be particularly useful when you want to differentiate between different categories, emphasize numerical values, or create a visual hierarchy within the table.
Remember that you can always change or remove the background color from selected cells by following the same steps. Simply select the cells, choose a different color from the palette, or click on the “No Color” option to remove the background color completely.
Applying background color to selected cells provides you with the flexibility to customize your table and enhance its visual appeal. Experiment with different color choices to find the one that best suits your document’s purpose and design aesthetic.
Applying Background Color to Rows or Columns
If you want to apply a background color to entire rows or columns in a table in Word, you can easily do so to enhance the readability and organization of your data. This allows you to visually group related information or emphasize specific sections.
Here’s how to apply a background color to rows or columns in your table:
- Click and drag to select the entire row or column that you want to apply the background color to. To select a row, click on the left edge of the table row. To select a column, click on the top header cell of the desired column.
- Once you have selected the desired row or column, navigate to the Table Tools tab at the top of the Word window. Click on the Design tab.
- Look for the “Shading” button in the “Table Styles” group and click on it to open the color palette.
- Select the color you want to apply as the background color for the selected rows or columns from the color palette. The entire row or column will instantly be filled with the chosen color.
By applying a background color to rows or columns, you can effectively organize and highlight specific sections or categories of data. This can make it easier for readers to navigate and understand the content of your table.
Remember that you can always change or remove the background color from selected rows or columns by following the same steps. Simply select the desired rows or columns, choose a different color from the palette, or click on the “No Color” option to remove the background color completely.
Applying background color to rows or columns provides visual cues and enhances the overall structure and readability of your table. Experiment with different color choices to find the one that best suits your document’s style and improves the presentation of your data.
Removing Background Color from Cells, Rows, or Columns
If you need to remove the background color from cells, rows, or columns in a table in Word, you can easily do so to revert them to their default appearance. This allows you to eliminate any unwanted visual elements or revert back to the original formatting.
Here’s how to remove the background color from cells, rows, or columns in your table:
- Select the cells, rows, or columns from which you want to remove the background color. You can select multiple cells by clicking and dragging, or select entire rows or columns by clicking on their headers.
- Once you have made the selection, go to the Table Tools tab at the top of the Word window and click on the Design tab.
- Look for the “Shading” button in the “Table Styles” group and click on it.
- From the color palette that opens, click on the “No Color” option. This will remove the background color from the selected cells, rows, or columns.
By removing the background color, you can restore the cells, rows, or columns to their default appearance, allowing your table to appear clean and uncluttered.
It’s important to note that removing the background color will revert the selected cells, rows, or columns to their default formatting. This means that any additional formatting or customization you applied will also be removed.
If you want to remove the background color from the entire table, simply select the entire table and follow the same steps mentioned above.
Removing background color from cells, rows, or columns provides you with the flexibility to modify the appearance of your table and revert it back to its original state. It allows you to refine the visual presentation and ensure that the focus remains on the content of your table.
Applying Background Color to Table Borders
If you want to add a unique touch to your table in Word, you can apply a background color to the table borders. This allows you to create a visually appealing design and make your table stand out.
Here’s how to apply a background color to table borders:
- Select the entire table by clicking anywhere within it. The Table Tools tab will appear at the top of the Word window.
- Navigate to the Design tab under Table Tools. Look for the “Borders” button in the “Table Styles” group and click on it.
- In the Borders menu, select “Borders and Shading.” This will open the Borders and Shading dialog box.
- Within the Borders and Shading dialog box, choose the “Shading” tab.
- Select the color you want to apply as the background color for the table borders from the color palette.
- Choose the desired line style and width for the table borders if you want to customize them as well.
- Click “OK” to apply the background color to the table borders. The borders will be instantly filled with the chosen color.
By applying a background color to the table borders, you can create a unique visual effect and enhance the overall presentation of your table. This technique is particularly useful when you want to add a touch of creativity or emphasize the structure of your table.
Remember that you can always modify or remove the background color from the table borders by revisiting the Borders and Shading dialog box and making the necessary adjustments.
Applying a background color to table borders gives your table a distinct and visually appealing appearance. Experiment with different color choices and border styles to find the combination that best suits your document’s design and enhances the overall look of your table.
Creating Gradient Background Color in Tables
If you want to add a stylish and dynamic effect to your table in Word, you can create a gradient background color. This technique allows you to blend multiple colors seamlessly, creating a smooth transition from one shade to another.
Here’s how to create a gradient background color in tables:
- Select the entire table or the cells, rows, or columns on which you want to apply the gradient background color.
- Navigate to the Table Tools tab at the top of the Word window and click on the Design tab.
- In the “Table Styles” group, click on the “Borders” button and select “Borders and Shading.”
- In the Borders and Shading dialog box, choose the “Shading” tab.
- Select the “Fill Effects” button located at the bottom of the dialog box. This will open the Fill Effects dialog box.
- In the Fill Effects dialog box, go to the “Gradient” tab.
- Choose the type of gradient you want to apply, such as linear, radial, or rectangular.
- Select the colors for the gradient by clicking on the color stops and modifying them as desired.
- Adjust the direction or angle of the gradient, if applicable.
- Preview the gradient by clicking on the “Preview” button.
- Click “OK” to apply the gradient background color to the selected cells, rows, or columns.
Creating a gradient background color adds depth and visual interest to your table, making it more visually appealing. It can be especially effective for highlighting important information or creating a modern and sophisticated design.
Remember that you can always modify or remove the gradient background color by accessing the Borders and Shading dialog box and making the necessary adjustments.
Experiment with different types of gradients, color combinations, and directions to find the effect that best suits your document’s style. Creating a gradient background color can take your table presentation to the next level and captivate your audience’s attention.
Applying Opacity to Background Color
If you want to add a subtle or transparent effect to the background color of your table in Word, you can apply opacity. This technique allows you to adjust the transparency level of the background color, creating a unique visual effect and allowing underlying elements to partially shine through.
Here’s how to apply opacity to the background color of your table:
- Select the entire table or the cells, rows, or columns on which you want to apply the opacity to the background color.
- Navigate to the Table Tools tab at the top of the Word window and click on the Design tab.
- In the “Table Styles” group, click on the “Borders” button and select “Borders and Shading.”
- In the Borders and Shading dialog box, choose the “Shading” tab.
- Select the color you want to apply as the background color for the table.
- Below the color palette, you will find a transparency slider or opacity option. Drag the slider or adjust the percentage to achieve the desired level of transparency.
- Preview the opacity effect by observing the changes in the table preview pane.
- Click “OK” to apply the opacity to the background color of the selected cells, rows, or columns.
Applying opacity to the background color allows you to create a subtle or layered effect in your table. It can be particularly useful when you want to highlight specific data or incorporate a more artistic touch to your document.
Remember that you can always adjust or remove the opacity effect by accessing the Borders and Shading dialog box and making the necessary adjustments to the transparency slider or opacity option.
Experiment with different opacity levels to find the perfect balance between visibility and transparency. Applying opacity to the background color of your table adds depth and sophistication, enhancing the overall visual impact of your document.
Adjusting Cell Padding to Enhance Background Color Appearance
Along with applying a background color to cells, adjusting cell padding can significantly enhance the appearance of the background color in your table. Cell padding refers to the spacing between the cell content and the cell borders, and modifying it can help create a more visually balanced and appealing table design.
Here’s how to adjust cell padding to enhance the background color appearance:
- Select the cell or cells for which you want to adjust the padding. You can select multiple cells by clicking and dragging or by holding down the Ctrl key (Command key on Mac) while selecting individual cells.
- Right-click on the selected cell(s) and choose “Table Properties” from the context menu. This will open the Table Properties dialog box.
- In the Table Properties dialog box, navigate to the “Cell” tab.
- Under the “Options” section, find the “Cell Margins” or “Cell Padding” field.
- Adjust the padding values to increase or decrease the spacing between the cell content and the cell borders. You can enter specific values or use the increase/decrease arrows to modify the padding.
- Preview the changes in the table preview pane to observe the effect on the background color appearance.
- Click “OK” to apply the adjusted cell padding to the selected cell(s).
By adjusting the cell padding, you can create a better balance between the background color and the content within the cell. Increasing the cell padding can give the background color more room to be displayed and enhance the overall visual impact of your table.
It’s important to note that adjusting cell padding may also affect the spacing between adjacent cells, so it’s recommended to preview the changes and make necessary adjustments as required.
Experiment with different padding values to find the optimal spacing that enhances the background color appearance. By customizing the cell padding, you can achieve a more polished and aesthetically pleasing look for your table.
Troubleshooting Common Issues with Background Colors in Tables
Applying background colors to tables in Word can sometimes present challenges, but there are solutions to common issues that may arise. By understanding and troubleshooting these issues, you can ensure that your table’s background colors display as intended. Here are some common problems you might encounter:
1. Inconsistent colors: When different cells, rows, or columns have varying background colors, it can disrupt the visual harmony of the table. To solve this issue, select the affected cells and apply the desired background color to create consistency throughout the table.
2. Transparent or faded colors: If the background color appears transparent or faded, check the opacity settings. Adjust the transparency slider or opacity option to achieve the desired color intensity.
3. No color applied: Sometimes, the background color may not apply despite following the correct steps. In this case, try selecting the entire table or the specific cells, rows, or columns again, and reapply the background color.
4. Color bleeding: When adjacent cells have different background colors and the colors appear to bleed into each other, it can create an unappealing visual effect. To resolve this, adjust the cell borders to create a clear separation between cells, preventing the colors from blending together.
5. Incompatible color combinations: Certain color combinations can result in poor readability or create a jarring visual experience. For instance, dark font colors on dark background colors can be difficult to read. Ensure that the background color and font color provide sufficient contrast for optimal legibility.
6. Color distortion on different devices: Background colors may appear differently on various devices or when printed. To minimize this issue, test your table on different screens and adjust the color choices accordingly. It’s also recommended to use web-safe colors or specify colors using hexadecimal codes to ensure consistency across different platforms.
7. Print-related color issues: When printing tables, background colors may not always appear exactly as they do on the screen. To improve print results, consider adjusting the printer settings or using a professional printing service that can accurately reproduce the desired colors.
By troubleshooting these common issues, you can ensure that the background colors in your tables are properly displayed, enhancing the visual appeal and clarity of your documents.