
What is AirPlay?
AirPlay is a feature developed by Apple that allows you to wirelessly stream audio, video, and screen mirroring from your Mac to an Apple TV or other AirPlay-compatible devices. It provides a convenient way to share your media content with a bigger audience, making it perfect for presentations, parties, or simply enjoying your favorite movies and music on a larger screen.
With AirPlay, you can easily stream content from your Mac to a TV or speakers without the need for any physical cables. It uses your Wi-Fi network to establish a connection between your devices, enabling seamless streaming and effortless control of your media.
One of the key benefits of AirPlay is its ability to transmit high-quality content in real-time, ensuring that the audio and video remain synchronized. It supports various media formats and is compatible with a wide range of devices, making it a versatile solution for all your streaming needs.
Aside from streaming media, AirPlay also offers screen mirroring functionality. This means you can mirror your entire Mac screen onto your TV, allowing you to showcase presentations, demo applications, or even play games on a larger display. It’s a great way to enhance collaboration and engage your audience.
Furthermore, AirPlay allows for multi-room audio playback, enabling you to play music simultaneously on multiple AirPlay-enabled speakers throughout your home. This creates a seamless audio experience, allowing you to fill your space with your favorite tunes.
Whether you want to enjoy movies, listen to music, show off your photos, or present slideshows, AirPlay provides a simple and convenient way to connect your Mac to a TV or other compatible devices. It’s a powerful tool that enhances your multimedia experience and brings your content to life in a whole new way.
Requirements for AirPlay
In order to use AirPlay on your Mac and enjoy seamless wireless streaming and screen mirroring, there are a few requirements that need to be met:
- A compatible Mac: Your Mac should be running macOS Mojave 10.14 or later to support AirPlay. While earlier versions of macOS may have limited AirPlay functionality, it is best to ensure you have the latest operating system installed for the best experience.
- An AirPlay-compatible device: You will need an Apple TV (2nd generation or later) or an AirPlay-enabled smart TV or speaker to receive the AirPlay stream. Make sure your device supports AirPlay and is connected to the same Wi-Fi network as your Mac.
- A stable Wi-Fi network: Both your Mac and the AirPlay device should be connected to the same Wi-Fi network. A fast and stable network connection is important to ensure smooth streaming and screen mirroring without interruptions.
- Updated software and firmware: Keep your Mac, Apple TV, and other AirPlay devices up to date with the latest software and firmware updates. This helps ensure compatibility and stability, as new features and bug fixes are often released in updates.
- Proper audio and video connections: If you are using a TV or external speakers, make sure they are properly connected to your Apple TV or AirPlay-enabled device using HDMI or optical cables. Ensure the audio and video output settings on your Mac are correctly configured to send the stream to the desired destination.
It’s important to note that not all Macs support AirPlay. Older models that do not have built-in AirPlay functionality may still be able to use AirPlay with the help of additional hardware, such as an AirPort Express or third-party AirPlay receivers. However, the native support and seamless functionality may vary.
By ensuring that you have a compatible Mac, an AirPlay-compatible device, a stable Wi-Fi network, updated software, and proper audio/video connections, you can create an optimal AirPlay setup and enjoy the benefits of wireless streaming and screen mirroring from your Mac.
How to Check if Your Mac Supports AirPlay
If you’re unsure whether your Mac supports AirPlay, you can quickly check by following these steps:
- Click on the Apple menu in the top-left corner of your screen and select “About This Mac.”
- A window will appear displaying information about your Mac, including the model and operating system version.
- Look for the “Model Name” in the overview. Typically, Macs that support AirPlay will have model names such as MacBook Pro, MacBook Air, iMac, or Mac Pro.
- Next, check if your Mac is running macOS Mojave 10.14 or later. You can find this information under the “Version” or “Software Update” section.
- Additionally, you can also check for specific AirPlay features available on your Mac. Go to the “System Preferences” on your Mac and look for the “Displays” or “Sound” preference pane. If you see options related to AirPlay display mirroring or audio streaming, it’s a sign that your Mac supports AirPlay.
If you have an older Mac model or a version of macOS that doesn’t support AirPlay, there are still alternative methods to connect your Mac to a TV or other external displays for streaming and screen mirroring. You can explore options like using an HDMI cable or third-party devices that offer similar functionality.
It’s worth noting that certain Mac models may have limitations on AirPlay support, such as older models that only support audio streaming or have compatibility issues with certain AirPlay features. Checking the Apple Support website or consulting the user manual for your specific Mac model can provide more detailed information on AirPlay capabilities.
If your Mac is confirmed to support AirPlay, you can proceed to set up AirPlay and enjoy wireless streaming and screen mirroring to compatible devices like Apple TV or AirPlay-enabled smart TVs and speakers.
How to Set Up AirPlay on Your Mac
Setting up AirPlay on your Mac is a straightforward process. Follow these steps to get started:
- Ensure that your Mac and the AirPlay-enabled device (such as Apple TV) are connected to the same Wi-Fi network.
- On your Mac, click on the Apple menu in the top-left corner and select “System Preferences.”
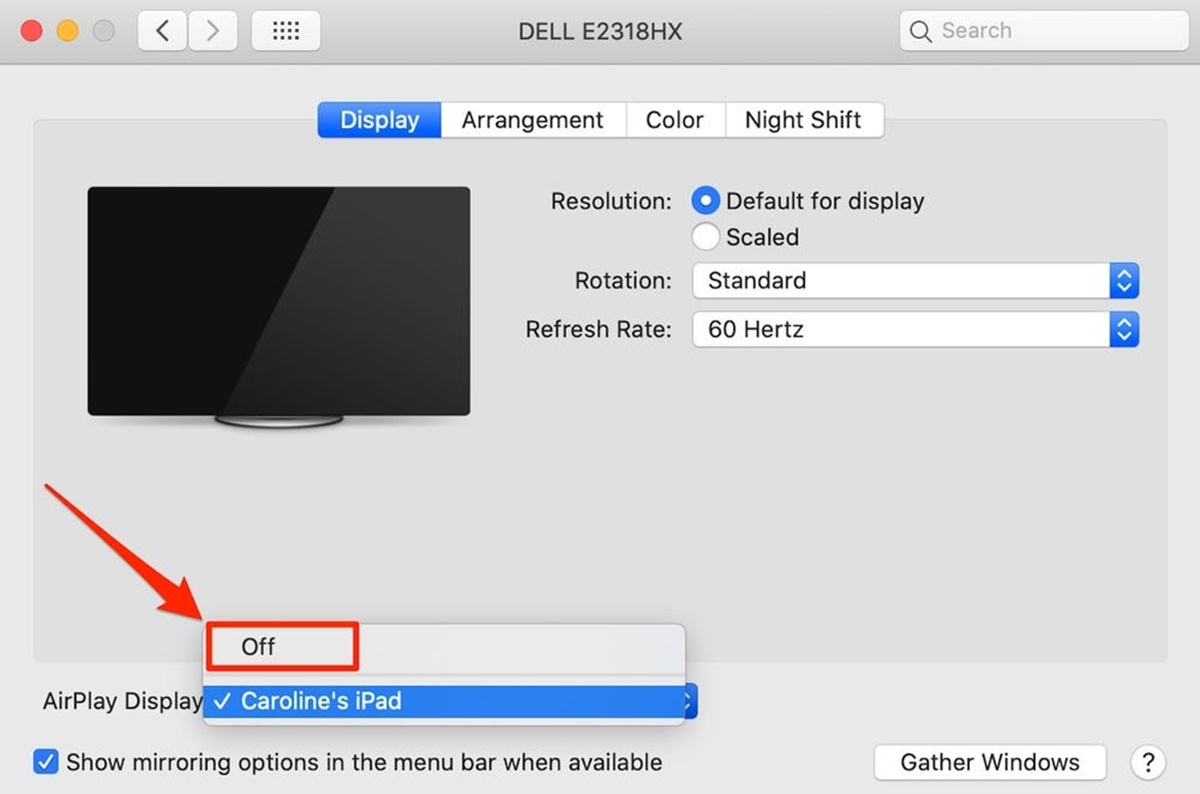
- In the System Preferences window, click on “Displays” or “Sound,” depending on the type of AirPlay connection you want to use.
- In the Displays or Sound preference pane, you will see an option for AirPlay. Click on it to access the AirPlay settings.
- Enable AirPlay by selecting the checkbox that says “Show mirroring options in the menu bar when available” or a similar option. This will add the AirPlay icon to your menu bar for easy access.
- Now, you can adjust the display and audio settings for AirPlay. Choose whether you want to mirror your screen or extend your desktop, and select the appropriate AirPlay device for audio output.
- Once you’ve made your selections, close the preference pane, and you’re ready to start using AirPlay.
With AirPlay set up on your Mac, you can now easily stream audio, video, or mirror your screen to your Apple TV or other AirPlay-enabled devices.
To access the AirPlay menu quickly, look for the AirPlay icon (a rectangle with a triangle at the bottom) in the menu bar on your Mac’s desktop. Click on it to display a dropdown menu with available AirPlay devices. Simply select the one you want to stream to or mirror your screen on, and your Mac will establish a connection.
Remember, the exact steps and options may vary slightly depending on the version of macOS you’re using. Additionally, some third-party apps and media players may have their own AirPlay settings and controls, so be sure to check the documentation or preferences for those specific apps.
Now that you have AirPlay set up on your Mac, you can enjoy the convenience of wireless streaming and screen mirroring to compatible devices and enhance your multimedia experience.
Connecting Your Mac to Your TV using AirPlay
Once you have AirPlay set up on your Mac, you can easily connect it to your TV for wireless streaming and screen mirroring. Here’s how to do it:
- Make sure your Mac and the TV or AirPlay-enabled device are both connected to the same Wi-Fi network.
- On your Mac, click on the AirPlay icon in the menu bar. If the icon is not visible, go to System Preferences > Displays (or Sound) and make sure AirPlay is enabled.
- In the AirPlay dropdown menu, select the name of your TV or AirPlay-enabled device that you want to connect to.
- Your Mac will establish a connection with the TV. If it’s the first time connecting, you may be prompted to enter a passcode displayed on the TV screen to confirm the connection.
- Once the connection is established, you can start streaming or mirroring your Mac’s screen to the TV.
- To stream media content, open the app or media player on your Mac that you want to stream and play the desired content. The audio and video will be wirelessly transmitted to the TV.
- If you want to mirror your entire Mac screen, go to System Preferences > Displays (or Sound), and in the AirPlay tab, select the option to mirror your screen. Your entire desktop will be replicated on the TV.
- To disconnect from the TV, simply click on the AirPlay icon in the menu bar again and select “Turn off AirPlay” or choose “Disconnect” from the AirPlay dropdown menu.
Remember, the availability of AirPlay options and features may depend on the specific model of your TV or AirPlay-enabled device, as well as the version of macOS you are using. Consult the device’s manual or manufacturer’s website for more detailed instructions on connecting and using AirPlay.
Connecting your Mac to your TV using AirPlay provides a convenient and wireless way to enjoy your favorite movies, videos, photos, and more on a larger screen without the hassle of cables.
Experiment with different streaming apps, media players, and screen mirroring options to fully utilize the power of AirPlay and unlock a world of entertainment possibilities.
How to Mirror Your Mac Screen to the TV
If you want to mirror your entire Mac screen to a TV or AirPlay-enabled device, AirPlay makes it easy to do so. Follow these steps to mirror your Mac screen:
- Ensure that your Mac and the TV or AirPlay-enabled device are both connected to the same Wi-Fi network.
- Click on the AirPlay icon in the menu bar on your Mac’s desktop. If you don’t see the icon, go to System Preferences > Displays (or Sound) and enable AirPlay.
- In the AirPlay dropdown menu, select the name of your TV or AirPlay-enabled device.
- A checkmark should appear next to the name of the device, indicating that your Mac’s screen will be mirrored on the TV.
- If your Mac prompts you to enter a passcode, do so by following the instructions on the TV screen.
- Once connected, your entire Mac screen will be mirrored on the TV or AirPlay-enabled device.
- You can now perform any actions on your Mac, and they will be visible on the TV. This includes browsing the internet, using applications, watching videos, or playing games.
- To stop mirroring, simply click on the AirPlay icon again and select “Turn off AirPlay” or choose “Disconnect” from the AirPlay dropdown menu.
Keep in mind that when you mirror your Mac screen, the resolution and aspect ratio may be adjusted to fit the TV or display. This can result in slight letterboxing or pillarboxing effect, so it’s a good idea to optimize your desktop resolution beforehand for the best viewing experience.
If you prefer to mirror specific applications or media content instead of your entire screen, some apps provide their built-in AirPlay functionality. Look for the AirPlay icon within supported apps and select your TV or AirPlay-enabled device from the available options.
With AirPlay screen mirroring, you can enjoy the convenience of sharing your Mac screen with a larger audience, making it ideal for presentations, collaborative work, or simply enhancing your multimedia experience.
How to Extend Your Mac Display to the TV
If you want to extend your Mac’s display to a TV or AirPlay-enabled device, AirPlay offers a convenient way to do so. Follow these steps to extend your Mac display:
- Ensure that your Mac and the TV or AirPlay-enabled device are both connected to the same Wi-Fi network.
- Click on the AirPlay icon in the menu bar on your Mac’s desktop. If you don’t see the icon, go to System Preferences > Displays (or Sound) and enable AirPlay.
- In the AirPlay dropdown menu, select the name of your TV or AirPlay-enabled device.
- If prompted, enter the passcode displayed on the TV screen to establish the connection.
- Once the connection is established, go to System Preferences > Displays (or Sound).
- In the Displays or Sound preference pane, navigate to the “Arrangement” tab.
- Check the box that says “Mirror Displays” to disable screen mirroring.
- You should now see two display icons representing your Mac’s screen and the extended display (TV or AirPlay-enabled device).
- Arrange the display icons to match the physical setup of your Mac and TV. You can drag and position the icons to match the relative positions of your displays.
- Adjust the resolution and other display settings for the extended display to ensure optimal visual quality.
- Click the “Apply” button to save the changes and activate the extended display mode.
Once the display is extended, you can move windows and apps between your Mac’s screen and the TV or AirPlay-enabled display. This allows you to multitask, have additional workspace, or enjoy media on a larger screen while keeping your Mac screen available for other tasks.
Remember that not all apps and content may be optimized for extended displays, and some applications may require you to manually adjust their display settings to make use of the extra screen space.
To disconnect and return to using your Mac’s screen as the primary display, simply click on the AirPlay icon in the menu bar and select “Turn off AirPlay” or choose “Disconnect” from the AirPlay dropdown menu.
By extending your Mac’s display to the TV or AirPlay-enabled device, you can increase productivity, enhance multimedia experiences, and enjoy a larger workspace that can be beneficial for various tasks and activities.
Adjusting Display Preferences while Using AirPlay
While using AirPlay to connect your Mac to a TV or AirPlay-enabled device, you may encounter situations where you need to adjust the display preferences to optimize your viewing experience. Here are some display preferences you can adjust:
- Resolution: To ensure the best visual quality, go to System Preferences > Displays (or Sound) and select the appropriate resolution for the connected display. Choose a resolution that matches the capabilities of your TV or AirPlay-enabled device.
- Aspect Ratio: Adjust the aspect ratio in the display preferences to avoid black bars or distortion on the connected display. Depending on the content and the capabilities of your display, you may need to select options such as “Standard” (4:3) or “Widescreen” (16:9).
- Brightness and Contrast: Calibrate the brightness and contrast settings on both your Mac and the connected display to achieve the desired visual balance. Use the controls on the display itself or go to System Preferences > Displays to make adjustments.
- Audio Output: If you’re streaming audio through AirPlay, make sure to select the correct audio output device. Go to System Preferences > Sound and choose the AirPlay-enabled device from the list of available output devices.
- Arrangement: If you’re using extended display mode, you can arrange the position of your Mac screen and the connected display. Go to System Preferences > Displays and go to the “Arrangement” tab. Drag and position the display icons to match the physical setup.
- Underscan/Overscan: Some TVs or displays may show a cropped or zoomed-in image. To fix this, look for the “Underscan” or “Overscan” option in the display settings and adjust it until the entire screen is visible.
- Color Calibration: For accurate color representation, you can calibrate the color settings on your Mac and the connected display. Use built-in calibration tools or third-party software to adjust colors, gamma, and white balance.
By fine-tuning these display preferences, you can customize your viewing experience and ensure optimal visual quality while using AirPlay. Experiment with different settings and configurations until you achieve the desired result.
Keep in mind that some display preferences may be limited by the capabilities of your TV or AirPlay-enabled device. Consult the user manual or manufacturer’s documentation for specific display settings and features available on your device.
Remember to save and apply the changes after adjusting the display preferences to ensure that they take effect. Enjoy your media content with an optimized display setup while using AirPlay!
Troubleshooting AirPlay Connection Issues
While AirPlay is generally a reliable and convenient technology, you might encounter occasional connectivity issues. Here are some troubleshooting steps to help you resolve common AirPlay connection problems:
- Check Network Connection: Ensure that both your Mac and the AirPlay-enabled device are connected to the same Wi-Fi network. A stable and strong network connection is essential for AirPlay to function properly.
- Restart Devices: Power off your Mac, Apple TV, or AirPlay-enabled device, and then turn them back on. This simple step can often resolve minor connectivity issues caused by temporary glitches.
- Update Software: Ensure that your Mac, Apple TV, and other AirPlay-enabled devices have the latest software updates installed. Outdated software can lead to compatibility issues and connection problems.
- Reset Network Settings: Resetting network settings on your Mac or AirPlay-enabled device may resolve connectivity issues. Go to the network settings and choose the option to reset network preferences, and then reconnect to your Wi-Fi network.
- Check Firewall and Security Settings: Adjust the firewall and security settings on your Mac to allow incoming and outgoing connections for AirPlay. Some strict security configurations can block AirPlay connections.
- Distance and Obstacles: Make sure the distance between your Mac and the AirPlay-enabled device is within the recommended range. Additionally, check for any physical obstacles or interference sources, such as walls, electronic devices, or other wireless signals that may disrupt the AirPlay connection.
- Verify AirPlay Device Compatibility: Ensure that the AirPlay-enabled device you are trying to connect to is compatible with AirPlay and meets the necessary requirements. Refer to the device’s documentation or manufacturer’s website for more information.
- Restart Router: If you’re experiencing persistent connectivity issues, try restarting your Wi-Fi router. This can help resolve any router-related problems that may be interfering with the AirPlay connection.
- Use an Ethernet Connection: If possible, connect your Mac and the AirPlay-enabled device using an Ethernet cable. This can provide a more stable and reliable connection compared to Wi-Fi, especially in cases of weak or congested wireless networks.
- Contact Support: If none of the above steps work, check the Apple Support website for specific troubleshooting guides or contact Apple Support for further assistance.
Remember that the specific steps and options may vary depending on the version of macOS you’re using and the AirPlay-enabled devices involved. Consulting the documentation for your specific devices can provide additional troubleshooting solutions.
By troubleshooting and addressing connectivity issues promptly, you can ensure a smooth and uninterrupted AirPlay experience, allowing you to enjoy wireless streaming and screen mirroring effortlessly.
AirPlay Alternatives for Unsupported Devices
If your Mac or other devices do not support AirPlay, you can still enjoy wireless streaming and screen mirroring with the help of alternative solutions. Here are some popular options to consider:
- Chromecast: Google Chromecast is a versatile media streaming device that allows you to cast content from your Mac or other devices to a TV. It supports popular streaming apps and works seamlessly with Google Chrome browser for screen mirroring.
- Roku: Roku streaming devices offer extensive compatibility and functionality. The Roku app, available for Mac and iOS devices, allows you to stream and mirror content to your TV. Additionally, some Roku devices have built-in screen mirroring capabilities.
- Miracast: Miracast is a wireless display standard that enables screen mirroring from your Mac or other devices to Miracast-certified TVs and display devices. You can check if your TV supports Miracast and use compatible apps or third-party adapters for screen mirroring.
- DLNA: DLNA (Digital Living Network Alliance) is a technology that enables sharing media content across devices on the same network. Some TVs and media players support DLNA, allowing you to stream media from your Mac using DLNA-compatible apps like Plex or Kodi.
- Third-Party Apps: Some third-party apps are specifically designed to provide screen mirroring and media streaming capabilities for devices that do not support AirPlay. Examples include Reflector, AirServer, and LonelyScreen, which offer similar features to AirPlay on Mac and Windows platforms.
- HDMI Cable: If you prefer a wired connection, you can use an HDMI cable to connect your Mac directly to your TV. This allows for high-quality audio and video streaming without relying on wireless technology.
When choosing an alternative to AirPlay, consider the specific features you need, the compatibility of your devices, and the user experience you prefer. Some alternatives may require additional hardware, apps, or setup steps, so be sure to research and follow the instructions provided by the respective manufacturers or developers.
It’s important to note that while these alternatives provide similar functionality to AirPlay, they may have their own limitations and compatibility requirements. Make sure to check the specific capabilities of your devices and the supported features of the alternative solution before making your decision.
By exploring these AirPlay alternatives, you can still enjoy the convenience and flexibility of wireless streaming and screen mirroring, even if your devices do not natively support AirPlay.