
Why Time Zones Matter in Gmail
Time zones play a vital role in how we manage our communication and scheduling, including our Gmail accounts. Gmail, being a global email service, takes into account time zones to ensure accurate timestamps, email scheduling, and overall functionality for its users across different regions. Understanding why time zones matter in Gmail can help you effectively manage your emails and avoid any time-related mishaps.
One of the main reasons time zones are important in Gmail is the accuracy of email timestamps. When you receive an email, Gmail records the time it was sent or received based on the time zone settings. This ensures that the email’s timestamp aligns with the actual time it was sent, regardless of the sender’s or recipient’s location.
Time zones are especially crucial when scheduling emails. Gmail allows you to schedule emails to be sent at a specific time in the future. When setting a scheduled email, Gmail considers the time zone in which it should be sent, ensuring it reaches the recipient’s inbox at the designated time, regardless of their location.
Furthermore, time zones play a role in managing the effects of daylight saving time (DST). Daylight saving time adjustments can impact the timing of emails, and Gmail provides options to handle this effectively. By understanding how time zones and DST interact in Gmail, you can ensure that your emails are consistently delivered at the intended time, regardless of any DST changes.
Another aspect affected by time zones in Gmail is email synchronization across different devices and locations. When you access your Gmail account from multiple devices, such as your smartphone, tablet, or computer, Gmail utilizes time zone settings to maintain synchronization. This allows for consistency in the display of email timestamps and ensures that you can seamlessly access your emails from any device, no matter where you are.
It is crucial to consider these factors and the impact of time zones in Gmail to effectively manage your email communication. Whether you’re scheduling emails for work, coordinating with colleagues across time zones, or simply ensuring accurate timestamps, understanding how time zones play a role in Gmail will help streamline your email management process.
How to Change Your Time Zone in Gmail
If you find that your Gmail account’s time zone setting is incorrect or needs to be adjusted due to a change in your location, don’t worry! Changing your time zone in Gmail is a straightforward process that can be done in just a few simple steps. Here’s how you can do it:
Step 1: Log in to your Gmail account
To begin, open your web browser and navigate to the Gmail website. Enter your login credentials to access your Gmail account.
Step 2: Access your Gmail settings
Once you’re logged in, locate and click on the gear icon in the upper-right corner of the Gmail interface. This will open a drop-down menu.
Step 3: Navigate to the ‘General’ tab
From the drop-down menu, select “Settings” to access your Gmail settings. This will take you to the “General” tab, which is where you can make various adjustments to your Gmail account.
Step 4: Find the ‘Time Zone’ section
Scroll down the “General” tab until you find the “Time Zone” section. This is where you can modify your Gmail account’s time zone settings.
Step 5: Choose your desired time zone
Click on the drop-down menu next to the “Time Zone” option and select your preferred time zone from the list. Gmail provides a wide range of time zone options, so choose the one that corresponds to your current location or desired time zone setting.
Step 6: Save changes
After selecting your desired time zone, scroll to the bottom of the page and click on the “Save Changes” button. Gmail will then update your account’s time zone settings accordingly.
That’s it! You have successfully changed your time zone in Gmail. Please note that any timestamps displayed in your emails or scheduling options will now follow the new time zone setting you’ve selected. This ensures that your email communication and scheduled emails align with the correct time zone, making it easier to manage and organize your Gmail account.
Step 1: Log in to your Gmail account
Before you can make any changes to your Gmail account’s time zone settings, you need to log in to your account. Logging in allows you to access the settings and customize them according to your preferences. Here’s how you can log in to your Gmail account:
1. Open your preferred web browser
To get started, open the web browser of your choice on your computer or mobile device. You can use popular browsers like Google Chrome, Mozilla Firefox, Safari, or Microsoft Edge.
2. Go to the Gmail login page
Type “gmail.com” in the address bar of your browser and press Enter. This will take you to the Gmail login page, where you can enter your login credentials to access your account.
3. Enter your email address
In the provided text field on the login page, enter the email address associated with your Gmail account. Make sure to type it correctly to ensure successful login.
4. Enter your password
Below the email address field, enter your Gmail account password. It is important to input your password accurately to gain access to your account. Ensure that your keyboard’s caps lock key is turned off to prevent any capitalization errors.
5. Click on the “Next” button
After entering your password, click on the “Next” button to proceed. Gmail will verify your email address and password combination to ensure a secure login.
6. Complete two-step verification (if enabled)
If you have enabled two-step verification for your Gmail account, you may need to complete an additional security step. This could involve entering a verification code sent to your mobile device or using authentication apps like Google Authenticator.
7. Access your Gmail account
Once you have successfully entered your email address, password, and completed any additional security steps, Gmail will grant you access to your account. You will now be able to view your inbox, compose emails, and make any necessary changes to your Gmail settings, including adjusting your time zone.
Logging in to your Gmail account is the initial and essential step in managing your email settings. It allows you to access the features and customization options that Gmail provides, ensuring you have full control over your email experience.
Step 2: Access your Gmail settings
Once you have successfully logged in to your Gmail account, the next step in changing your time zone is accessing the Gmail settings. This is where you can make various adjustments to your account, including modifying the time zone settings. Here’s how you can access your Gmail settings:
1. Locate the gear icon
After logging in to your Gmail account, look for the gear icon in the top-right corner of the Gmail interface. The gear icon represents the settings menu and allows you to access the customization options for your account. Click on the gear icon to open the drop-down menu.
2. Click on “Settings”
In the drop-down menu, you’ll see a selection of different options. Locate and click on the “Settings” option to proceed to your Gmail settings page. Clicking on this option will open a new tab or a new window, depending on your browser settings.
3. Navigate to the “General” tab
Once you’re on the Gmail settings page, you’ll notice different tabs representing various categories of settings. Look for the “General” tab and click on it to access the general settings options for your Gmail account. This tab is where you can make changes to your time zone settings and other related preferences.
4. Explore the “General” settings
Within the “General” tab, you’ll find a range of options to customize your Gmail experience. Take some time to explore the different settings available and familiarize yourself with the various features and options that Gmail offers. This will allow you to make the most out of your account and tailor it to your specific needs.
5. Save any changes
If you make any modifications to your time zone or other settings, make sure to save your changes before navigating away from the settings page. Look for the “Save Changes” button at the bottom of the page and click on it to ensure that your updated preferences are applied to your Gmail account.
Accessing your Gmail settings is an essential step in customizing your account and ensuring that it aligns with your preferences. By navigating to the settings page, you can easily modify your time zone settings, along with other options, to create an email environment that suits your specific requirements.
Step 3: Navigate to the ‘General’ tab
Once you’ve accessed your Gmail settings, the next step in changing your time zone is to navigate to the “General” tab. This tab contains various customization options for your Gmail account, including the ability to modify your time zone settings. Here’s how you can navigate to the “General” tab:
1. Look for the ‘General’ tab
Within the Gmail settings page, you’ll see several tabs representing different categories of settings. Locate the “General” tab among these options. The tabs are usually displayed horizontally at the top of the settings page. Click on the “General” tab to proceed.
2. Explore the ‘General’ settings
Once you’re on the “General” tab, you’ll find a range of settings that you can customize according to your preferences. These settings cover various aspects of your Gmail account, such as language preferences, inbox display, and of course, time zone settings. Take some time to explore the different options and familiarize yourself with the available choices.
3. Scroll through the settings
As you scroll through the “General” settings, you might notice subcategories or sections within this tab. These sections provide further customization options related to different aspects of your account. Look for the section that specifically relates to time zones or any related settings that may impact your desired time zone configuration.
4. Make necessary adjustments
If you want to change your time zone, locate the relevant setting within the “General” tab. It might be labeled as “Time Zone” or something similar. Click on this setting to access the options available for modifying your time zone.
5. Save any changes
Once you’ve made the necessary adjustments to your time zone settings, scroll to the bottom of the page and look for the “Save Changes” button. Click on this button to ensure that your updated time zone preferences are saved and applied to your Gmail account.
Navigating to the “General” tab in your Gmail settings allows you to access and modify various customization options, including your time zone settings. By familiarizing yourself with the available settings and making the necessary adjustments, you can ensure that your Gmail account reflects the correct time zone for accurate email synchronization, scheduling, and overall management.
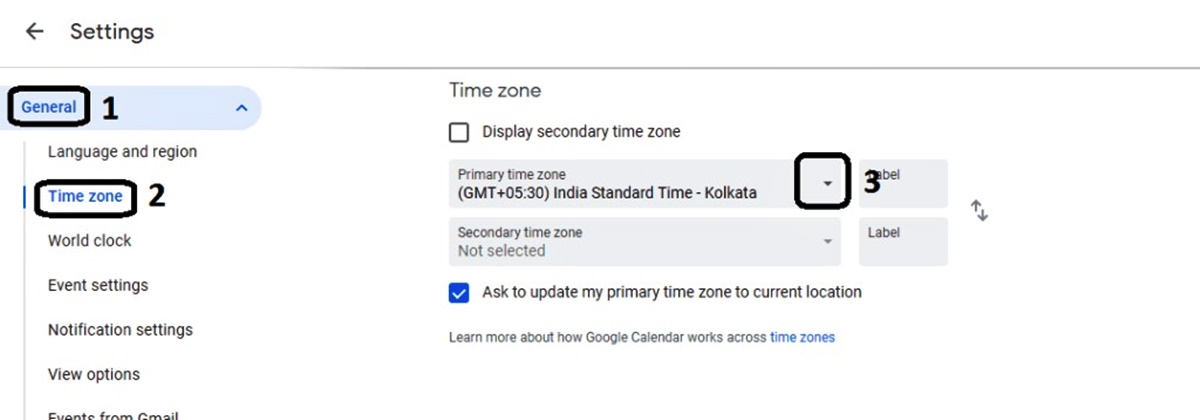
Step 4: Find the ‘Time Zone’ section
After navigating to the “General” tab in your Gmail settings, the next step in changing your time zone is to locate the “Time Zone” section. This is where you can modify your Gmail account’s time zone settings according to your current location or desired time zone. Here’s how you can find the “Time Zone” section:
1. Scroll through the ‘General’ settings
On the “General” tab of your Gmail settings page, scroll down to explore the various customization options available to you. Keep an eye out for any sections or categories that mention time zone-related settings.
2. Look for the ‘Time Zone’ section
Within the “General” settings, you should come across a specific section labeled as “Time Zone.” This section contains the options you need to modify and set your desired time zone in Gmail. It might be located towards the middle or bottom of the “General” settings page.
3. Expand or collapse the ‘Time Zone’ section
Depending on how the settings are organized, the “Time Zone” section might already be expanded and visible, or it could be collapsed. Look for a small arrow or indicator next to the “Time Zone” label. Click on this arrow to expand or collapse the section and reveal or hide the time zone options.
4. Familiarize yourself with the time zone settings
Once you’ve located the “Time Zone” section and expanded it if necessary, take a moment to familiarize yourself with the available options. You should see a drop-down menu or a selection of time zones from which you can choose.
5. Choose your desired time zone
From the available options in the “Time Zone” section, select the time zone that corresponds to your current location or the time zone you wish to set in your Gmail account.
6. Save any changes
After selecting your desired time zone, scroll to the bottom of the page and locate the “Save Changes” button. Click on this button to save your updated time zone settings in Gmail.
By finding the “Time Zone” section within the “General” settings of your Gmail account, you can easily modify and set the appropriate time zone. This ensures that your Gmail account accurately reflects the time zone you’re in or the time zone you prefer for effective email management and scheduling.
Step 5: Choose your desired time zone
After locating the “Time Zone” section within the “General” settings of your Gmail account, the next step in changing your time zone is to choose your desired time zone. This will ensure that your Gmail account accurately reflects the correct time zone for effective email management and scheduling. Here’s how you can choose your desired time zone:
1. Review the available time zone options
Within the “Time Zone” section, you’ll find a drop-down menu or a selection of time zone options available to choose from. Take a moment to review the available options and ensure that you select the correct time zone that corresponds to your current location or the time zone you prefer.
2. Consider your current location or desired time zone
When choosing your desired time zone in Gmail, consider whether you want to set the time zone based on your current location or if you prefer a specific time zone for your email management. It’s important to select the time zone that aligns with your needs, whether it’s the same as your physical location or a different time zone for scheduling purposes, such as when coordinating with contacts in different regions.
3. Select your desired time zone
From the available options in the “Time Zone” section, choose the time zone that best suits your needs. Click on the drop-down menu and scroll through the list of time zones until you find the one you want.
4. Confirm your selection
Once you’ve found your desired time zone in the drop-down menu, click on it to confirm your selection. The chosen time zone will be displayed in the selection box or field next to the “Time Zone” label.
5. Verify correct time zone selection
Before proceeding, double-check that you have selected the correct time zone. Ensure that the chosen time zone accurately reflects your current location or the time zone you wish to set in your Gmail account. This will prevent any confusion or errors related to time zone discrepancies.
6. Save any changes
After choosing your desired time zone, scroll to the bottom of the settings page and locate the “Save Changes” button. Click on this button to save your updated time zone settings in Gmail. Your account’s time zone will now be modified to reflect your selection.
By carefully choosing your desired time zone within the “Time Zone” section of the “General” settings, you can ensure that your Gmail account accurately displays the correct time zone for efficient email management and scheduling. This allows for seamless communication and coordination across different time zones.
Step 6: Save changes
After choosing your desired time zone in the “Time Zone” section of your Gmail account’s “General” settings, the final step in changing your time zone is to save your changes. By saving your updated time zone settings, you ensure that your Gmail account accurately reflects the correct time zone for efficient email management and scheduling. Here’s how you can save your changes:
1. Scroll to the bottom of the settings page
Once you have selected your desired time zone, scroll down to the bottom of the “General” settings page. The “Save Changes” button will be located at the bottom, just below all the settings options.
2. Review your changes
Before proceeding, take a moment to review your changes and ensure that you have selected the correct time zone. Double-check the time zone displayed in the “Time Zone” section to avoid any potential errors or mismatches.
3. Click on the “Save Changes” button
Once you are confident that you have selected the correct time zone and reviewed your changes, click on the “Save Changes” button. This action will initiate the process of saving your updated time zone settings in Gmail.
4. Wait for the changes to be saved
After clicking the “Save Changes” button, give Gmail a few moments to process and save your updated time zone settings. The page may refresh or display a confirmation message once the changes have been successfully saved.
5. Verify the updated time zone
After the changes have been saved, take a moment to verify that your Gmail account now reflects the updated time zone. You can check this by reviewing the time stamps on your emails or by accessing the time zone settings again to ensure they match your selection.
By saving your changes, you finalize the process of changing your time zone in Gmail. This ensures that your Gmail account accurately reflects the correct time zone, allowing for seamless email management, scheduling, and communication across different regions and time zones.
How to Deal with Daylight Saving Time Changes
Daylight Saving Time (DST) changes can potentially affect the timing of your emails in Gmail. To ensure that your Gmail account adjusts seamlessly to DST changes, Gmail provides options to handle these time transitions. Here are some ways you can deal with Daylight Saving Time changes in Gmail:
Option 1: Let Gmail adjust automatically:
Gmail has a built-in feature that automatically adjusts your account’s time zone settings to reflect DST changes. This means that when DST starts or ends in your region, Gmail will automatically update the time zone accordingly. By letting Gmail handle the DST adjustments, you can rest assured that the timing of your emails will be accurate.
Option 2: Manually change your time zone during DST:
If you prefer to have more control over DST adjustments, you can manually change your time zone setting in Gmail during DST transitions. For example, when DST starts and your region moves the clock forward by an hour, you can manually update your time zone setting to the DST-adjusted time zone. Similarly, when DST ends and your region moves the clock back by an hour, you can manually adjust your time zone setting to the standard time zone.
Option 3: Disable automatic DST adjustment in Gmail:
If you do not want Gmail to automatically adjust your time zone during DST changes, you have the option to disable this feature. By disabling automatic DST adjustment, your time zone setting will remain the same throughout the year, regardless of DST transitions. This can be useful if you want to maintain a consistent time zone for scheduling purposes or if your region does not observe DST.
Depending on your preference and the specific requirements of your work or personal schedule, you can choose the option that suits you best. By effectively dealing with DST changes in Gmail, you can ensure that your email communication and scheduling remain accurate and unaffected by these time transitions.
Option 1: Let Gmail adjust automatically
Gmail offers a convenient and reliable feature that automatically adjusts your account’s time zone settings to reflect Daylight Saving Time (DST) changes. By opting for this option, you can rely on Gmail to seamlessly handle the DST adjustments for you. Here’s how you can let Gmail automatically adjust your time zone:
1. Ensure the automatic time zone adjustment setting is enabled:
To let Gmail adjust your time zone automatically, make sure the automatic time zone adjustment setting is enabled. This setting is typically enabled by default, but it’s a good idea to double-check to ensure it’s not manually disabled.
2. Stay connected to the internet during DST transitions:
Gmail requires an internet connection to update your time zone settings during DST transitions. To let Gmail adjust your time zone automatically, make sure you have a stable internet connection during the DST transition period. This will allow Gmail to receive and implement the necessary changes in your account’s time zone settings.
3. Trust Gmail to handle the DST adjustments:
Once you have enabled the automatic time zone adjustment setting and ensured a stable internet connection, you can trust Gmail to handle the DST adjustments seamlessly. Gmail will automatically update your account’s time zone to reflect the current DST status in your region.
4. Verify the updated time zone:
After the DST transition period, take a moment to verify that Gmail has successfully adjusted your time zone. You can do this by reviewing the time stamps on your emails or by accessing the time zone settings in Gmail. The time zone displayed should align with the current DST status in your region.
By allowing Gmail to adjust your time zone automatically during DST changes, you can ensure that your email communication and scheduling remain accurate without any manual intervention. This option provides a hassle-free way to handle DST transitions, saving you time and effort in managing your Gmail account’s time zone settings.
Option 2: Manually change your time zone during DST
If you prefer to have more control over Daylight Saving Time (DST) adjustments in your Gmail account, you can manually change your time zone setting during DST transitions. This option allows you to adjust your time zone according to the DST changes in your region. Here’s how you can manually change your time zone during DST:
1. Keep track of DST transitions:
Stay informed about the specific dates and times when DST starts and ends in your region. This information is typically announced locally or can be found through official government sources or websites.
2. Update your time zone setting:
When DST starts and your region moves the clock forward by an hour, you can manually update your time zone setting in Gmail to reflect the DST-adjusted time zone. For example, if your region transitions from “Eastern Standard Time” to “Eastern Daylight Time,” you would select the corresponding DST-adjusted time zone.
3. Adjust your time zone back to standard time:
When DST ends and your region moves the clock back by an hour, you need to manually adjust your time zone setting in Gmail to the standard time zone. For example, if your region transitions from “Eastern Daylight Time” to “Eastern Standard Time,” you would select the corresponding standard time zone.
4. Consider the impact on scheduling and email delivery:
Keep in mind that manually changing your time zone during DST transitions can impact the scheduling and delivery of your emails. If you have scheduled emails to be sent during or around DST transitions, make sure to adjust the send times accordingly to avoid any timing conflicts.
5. Verify the updated time zone:
After you manually change your time zone during DST transitions, take a moment to verify that your Gmail account now reflects the correct time zone. Review the time stamps on your emails or access the time zone settings in Gmail to ensure that they align with the DST changes in your region.
By opting to manually change your time zone during DST transitions, you can have more precise control over the time settings in your Gmail account. This allows you to accurately reflect the DST changes in your region and ensure that your email scheduling and communication remain in sync with the local time.
Option 3: Disable automatic DST adjustment in Gmail
If you prefer to maintain a consistent time zone setting in your Gmail account without any adjustments for Daylight Saving Time (DST), you have the option to disable the automatic DST adjustment feature. By disabling automatic DST adjustment in Gmail, your time zone setting will remain the same throughout the year, regardless of DST transitions. Here’s how you can disable automatic DST adjustment:
1. Access the Gmail settings:
Log in to your Gmail account and locate the gear icon in the top-right corner of the Gmail interface. Click on the gear icon to open the settings menu.
2. Go to the ‘General’ tab:
In the settings menu, click on the “Settings” option. This will take you to the Gmail settings page with different tabs. Navigate to the “General” tab, which contains various general settings for your Gmail account.
3. Locate the ‘Time Zone’ section:
Scroll down the “General” tab until you reach the “Time Zone” section. This section allows you to modify your time zone settings, including the option to disable automatic DST adjustment.
4. Uncheck the ‘Automatically adjust for daylight saving time’ option:
In the “Time Zone” section, you’ll find a checkbox labeled “Automatically adjust for daylight saving time.” By default, this option is usually checked to enable automatic DST adjustment. To disable it, simply uncheck the box.
5. Save the changes:
After unchecking the “Automatically adjust for daylight saving time” box, scroll to the bottom of the settings page and click on the “Save Changes” button. This will save your updated settings in Gmail and disable the automatic DST adjustment feature.
6. Manually manage time zone changes:
Once you disable the automatic DST adjustment in Gmail, it’s important to be mindful of the DST transitions in your region. You will need to manually adjust your time zone setting during DST starts and ends to reflect the correct local time.
By choosing to disable automatic DST adjustment in Gmail, you can maintain a consistent time zone setting throughout the year. This option is useful if your region does not observe DST or if you prefer to manually manage the time zone changes in your Gmail account to avoid any potential disruptions in email scheduling or communication.
How Time Zones Affect Email Scheduling and Delivery
Time zones play a significant role in email scheduling and delivery, as they ensure that messages are sent and received at the appropriate times across different regions. Understanding how time zones affect email management can help you effectively schedule and coordinate your communications. Here’s how time zones impact email scheduling and delivery:
1. Accurate timestamps:
Time zones ensure that email timestamps accurately reflect the time an email was sent or received. When you receive an email, the timestamp is adjusted according to your time zone, allowing you to see the local time at which the message was sent.
2. Coordinating across different time zones:
When scheduling meetings, calls, or other time-sensitive activities, time zones allow for efficient coordination. By considering the time zones of all participants, you can schedule events that work for everyone, taking into account any time zone differences.
3. Email delivery timing:
Time zones also impact the timing of email delivery. When you send an email, it is delivered to the recipient’s inbox according to the time zone settings in their email client. This ensures that the email arrives at an appropriate time based on the recipient’s local time.
4. Handling international communications:
Time zones are particularly crucial for international communications. By accounting for time zone differences, you can consider the local business hours and avoid contacting someone in the middle of the night or outside their working hours. This fosters respectful and effective global communication.
5. Daylight Saving Time adjustments:
Daylight Saving Time (DST) changes further complicate email scheduling and delivery, as certain regions may observe DST while others do not. It’s essential to consider DST adjustments and any potential impacts on scheduling and delivery during these transitions.
6. Avoiding confusion and missed deadlines:
By understanding time zones and accounting for them in email scheduling and delivery, you can avoid confusion and missed deadlines. This ensures that your communications are timely and that you meet the expectations and deadlines of your recipients.
Overall, time zones form the foundation for efficient email management, allowing for accurate timestamps, coordinated scheduling, and effective international communication. By considering time zones when planning your email activities, you can enhance productivity, avoid miscommunication, and ensure seamless email exchanges across different regions and time zones.
How to Schedule Emails in a Different Time Zone
Scheduling emails in a different time zone can be a valuable tool for managing communication across various regions and accommodating recipients’ local working hours. By understanding how to schedule emails in a different time zone, you can ensure that your messages are sent at the most appropriate times, no matter where your recipients are located. Here’s a step-by-step guide on how to schedule emails in a different time zone:
Step 1: Enable the ‘Schedule send’ feature in Gmail:
First, make sure you have the ‘Schedule send’ feature enabled in your Gmail account. This feature allows you to set a specific time and date for your email to be sent.
Step 2: Compose your email:
Compose your email as you normally would, addressing it to the intended recipients and filling in the subject and content of the message.
Step 3: Choose the desired send time and time zone:
In the email composition window, locate the ‘Schedule send’ option. Click on the down arrow next to it to reveal the scheduling menu. Set the desired date and time for your email to be sent. Additionally, select the time zone that corresponds to your recipients’ local time zone or the time zone you want to target for optimal delivery.
Step 4: Review and schedule the email:
After selecting the desired send time and time zone, review your email to ensure that all information is accurate and that the contents are suitable for the intended recipients. Once you are satisfied, click on the ‘Schedule send’ button to schedule the email for delivery.
By following these steps, you can easily schedule emails in a different time zone. This feature allows you to tailor your communication to the optimal timing for your recipients, increasing the likelihood of your emails being seen and responded to promptly. Whether you are collaborating across time zones, trying to accommodate different working hours, or targeting recipients in specific regions, scheduling emails in a different time zone can greatly enhance your email management and communication effectiveness.
Step 1: Enable ‘Schedule send’ feature in Gmail
Before you can start scheduling emails in a different time zone, you need to ensure that the ‘Schedule send’ feature is enabled in your Gmail account. This feature allows you to specify a specific date and time for your email to be sent, giving you flexibility and control over the timing of your messages. Here’s how you can enable the ‘Schedule send’ feature in Gmail:
1. Access your Gmail settings:
Log in to your Gmail account and locate the gear icon in the top-right corner of the Gmail interface. Click on the gear icon to open the settings menu.
2. Open the ‘See all settings’ option:
In the settings menu, you’ll find various options. Look for and click on the “See all settings” option to access the advanced settings page.
3. Navigate to the ‘General’ tab:
On the advanced settings page, you’ll see different tabs at the top to categorize various settings. Click on the ‘General’ tab to proceed.
4. Locate the ‘Schedule send’ option:
Scroll down the ‘General’ settings until you find the ‘Schedule send’ option. This option allows you to enable or disable the scheduling feature in Gmail.
5. Enable the ‘Schedule send’ feature:
To enable the ‘Schedule send’ feature, click on the checkbox next to the ‘Enable schedule send’ label. This will activate the feature and allow you to schedule the sending of your emails.
6. Save the changes:
After enabling the ‘Schedule send’ feature, scroll to the bottom of the settings page and click on the ‘Save Changes’ button. This will save your updated settings and enable the scheduling feature in your Gmail account.
By completing this step, you have successfully enabled the ‘Schedule send’ feature in Gmail. This feature now allows you to have greater control over the timing of your emails and enables you to schedule messages in a different time zone, ensuring optimal delivery and effective communication with recipients across various regions and time zones.
Step 2: Compose your email
Once you have enabled the ‘Schedule send’ feature in Gmail, the next step in scheduling emails in a different time zone is to compose your message. Composing your email involves creating the content, addressing it to the intended recipients, and crafting the subject line. Here’s how you can compose your email:
1. Open the Gmail compose window:
To begin composing your email, click on the ‘Compose’ button in the top left corner of your Gmail account. This will open a new window or pane where you can draft your message.
2. Enter the recipients:
In the ‘To’ field, enter the email addresses of the recipients to whom you want to send the email. You can type in the addresses manually or use the auto-suggest feature to select from your contacts.
3. Add a relevant subject line:
Compose a concise and informative subject line that accurately represents the content of your email. A well-crafted subject line helps recipients understand the purpose of your message at a glance.
4. Write the body of your email:
In the main content area of the compose window, write the body of your email. Include all the necessary details, messages, or attachments that you want to convey to your recipients. Take your time to ensure that your email is clear, organized, and professional.
5. Revise and proofread:
Before moving on, take a moment to revise and proofread your email. Make sure that the content aligns with your intentions and that there are no typos or errors. Clarity, accuracy, and professionalism are key in effective email communication.
6. Save a draft if needed:
If you need to pause and come back to your email later, you can save it as a draft. Click on the ‘Save draft’ option or the back arrow at the top-left corner of the compose window. This will save your progress, allowing you to resume editing at a later time.
Once you have composed your email, you can proceed to the next step in the process of scheduling it to be sent in a different time zone. Composing your email thoughtfully and strategically ensures that your message effectively communicates your intent to your recipients.
Step 3: Choose the desired send time and time zone
After composing your email, the next step in scheduling emails in a different time zone is to select the desired send time and time zone. This step allows you to specify when and in which time zone you want your email to be delivered. Here’s how you can choose the desired send time and time zone:
1. Locate the ‘Schedule send’ option:
In the email composition window, look for the ‘Schedule send’ option, typically represented by a clock icon. Click on the down arrow or the clock icon to access the scheduling menu.
2. Set the desired date and time:
In the scheduling menu, choose the date and time when you want your email to be sent. You can select the current date and time or choose a future date and time that aligns with your intended delivery time.
3. Select the time zone:
Next, select the time zone that corresponds to the desired delivery location or the recipient’s time zone. You can choose a specific time zone from the dropdown menu that closely matches the recipient’s region.
4. Review the send time and time zone:
Take a moment to review the selected send time and time zone to ensure accuracy. Double-check that the chosen time aligns with your expectations and that the time zone reflects the intended recipients’ local time zone.
5. Adjust as necessary:
If you need to make any changes to the send time or time zone, you can do so by clicking on the scheduling menu again and selecting a different date, time, or time zone. Repeat the review process to ensure your adjustments align with your intentions.
6. Schedule the email:
Once you are satisfied with the selected send time and time zone, click on the ‘Schedule send’ button or a similar button specified in the scheduling menu. This action will schedule your email to be sent at the specified time and in the chosen time zone.
By choosing the desired send time and time zone, you can ensure that your email is delivered at the most appropriate time for your recipients. This step allows for efficient and effective communication across different time zones, ensuring that your messages reach the intended recipients in a timely manner.
Step 4: Review and schedule email
After choosing the desired send time and time zone for your email, the next step in scheduling emails in a different time zone is to review and schedule the email. This step ensures that everything is in order before finalizing and setting the schedule for your message to be sent. Here’s how you can review and schedule your email:
1. Double-check the email content:
Before scheduling, carefully review the content of your email to ensure that it conveys your intended message clearly and accurately. Check for any errors, grammatical issues, or missing information. Make any necessary edits or revisions as needed.
2. Verify the recipient list:
Take a moment to verify that the recipient list is accurate and includes all the intended recipients for your email. Ensure that you have entered the email addresses correctly and that you have included all the necessary recipients for the message.
3. Confirm the subject line:
Review the subject line of your email and ensure that it accurately reflects the content and purpose of your message. A clear and concise subject line helps recipients understand the context of your email and increases the likelihood of it being opened and read promptly.
4. Check the scheduled send time and time zone:
Verify that the scheduled send time and selected time zone align with your intentions for the delivery of your email. Double-check that the chosen time and time zone correspond to the recipient’s local time or the time zone you want to target for optimal delivery.
5. Make any final adjustments:
If you notice any discrepancies or need to make any last-minute changes, you can do so at this stage. Use the options within the scheduling feature to adjust the send time, time zone, or any other settings as necessary to ensure accuracy.
6. Schedule the email:
Once you have reviewed and confirmed all the details, click on the ‘Schedule send’ or a similar button to finalize and schedule your email. This action will set the scheduled send time and time zone as selected, ensuring your email will be sent at the desired time.
By carefully reviewing and scheduling your email, you can ensure that it is sent at the most appropriate time in the desired time zone. This step helps optimize communication and increases the likelihood of your message being received and attended to when it is most convenient for the recipients in different time zones.