Download and Install the Lyft App
If you’re looking for a convenient and reliable way to travel with multiple stops, look no further than the Lyft app. Lyft is a popular ride-hailing service that allows you to easily request a ride from your smartphone. Whether you’re running errands, going on a sightseeing tour, or attending multiple meetings in different locations, Lyft can help you get to your destinations efficiently. To get started, you’ll need to download and install the Lyft app on your mobile device.
To download the Lyft app, follow these simple steps:
- Open the App Store (for iOS devices) or Google Play Store (for Android devices) on your smartphone.
- Search for “Lyft” in the search bar at the top of the screen.
- Tap on the Lyft app when it appears in the search results.
- Click on the “Download” or “Install” button to start the download process.
- Wait for the app to finish downloading and installing on your device.
Once the Lyft app is successfully installed on your mobile device, you’ll be ready to create an account and start using the app to book rides with multiple stops. Having the app on your phone gives you the convenience of requesting a ride whenever and wherever you need it.
Before booking your first ride with multiple stops, it’s a good idea to familiarize yourself with the various features and settings available in the Lyft app. Take some time to explore the different options and customize your ride preferences to ensure a smooth and enjoyable experience when adding multiple stops to your trip.
Now that you have the Lyft app installed, it’s time to open it and log in to your Lyft account. In the next section, we’ll guide you through the process of signing in and getting ready to add multiple stops to your ride.
Open the Lyft App and Log In
Now that you have downloaded and installed the Lyft app, it’s time to open the app and log in to your Lyft account. By logging in, you can access your personalized settings, view your ride history, and easily request rides with multiple stops.
To open the Lyft app and log in, follow these steps:
- Locate the Lyft app on your smartphone’s home screen and tap on it to open.
- On the app’s home screen, you will see the option to log in or create an account. If you already have a Lyft account, tap on the “Log in” button. If you don’t have an account, you can tap on “Sign up” to create a new account.
- If you chose to log in, you will be prompted to enter your registered email address or phone number and your password. Type in the required information and tap on the “Log in” button to proceed.
- If you are logging in for the first time on a new device, you may need to verify your identity by entering a verification code sent to your email or phone number.
- Once you have successfully logged in, you will be redirected to the Lyft app’s home screen, where you can start planning your ride with multiple stops.
Logging in to your Lyft account ensures that your ride history, payment information, and preferences are all readily available to enhance your experience. It also allows you to earn and redeem rewards through the Lyft Rewards program.
If you ever forget your password or need to reset it, you can easily do so from the login screen of the Lyft app. Just tap on the “Forgot your password?” link and follow the instructions provided to reset your password.
Now that you’re logged in to the Lyft app, you’re all set to enter your first destination and begin adding multiple stops to your trip. In the next section, we’ll guide you through the process of entering your initial destination.
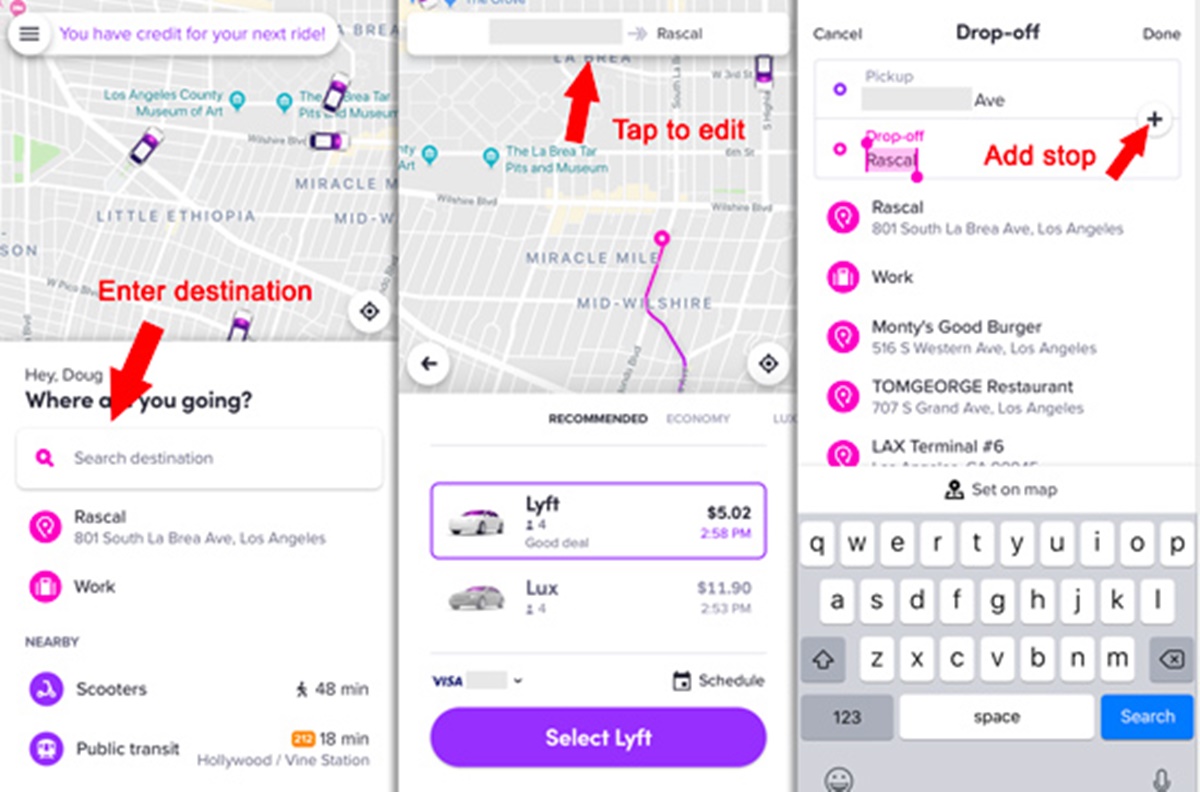
Enter Your First Destination
With the Lyft app open and logged in, it’s time to enter your first destination. By specifying your starting point and desired final destination, Lyft will be able to provide accurate fare estimates and suggest efficient routes to your destinations. Follow these steps to enter your first destination:
- On the Lyft app’s home screen, you will see a “Where to?” search bar at the top. Tap on it to begin entering your first destination.
- Start typing the address or name of your desired destination in the search bar. Lyft will automatically suggest relevant locations as you type to help you find your destination quickly.
- Once you see your desired destination in the search results, tap on it to select it as your first stop.
- In some cases, you may need to provide additional details, such as a specific building or floor number, to ensure accurate drop-off at the destination. Enter any necessary details in the appropriate fields.
- Review the entered address and additional details to ensure accuracy. If everything looks correct, tap on the “Set pickup” or “Set destination” button to confirm your first destination.
Once you have entered your first destination, Lyft will calculate the estimated fare for the trip and provide you with options for different ride types, such as Lyft Standard, Lyft XL, or Lyft Lux. You can choose the ride type that best suits your needs and budget.
Adding multiple stops to your Lyft trip allows you to make detours and pick up/drop off additional passengers or items along the way. So, if you have any additional stops before reaching your final destination, stay tuned for the next section, where we’ll explain how to add extra stops to your trip.
Add Additional Stops to Your Trip
One of the great features of the Lyft app is the ability to add multiple stops to your trip. This is especially useful when you have errands to run or need to pick up or drop off someone along the way. Follow these steps to add additional stops to your Lyft trip:
- After entering your first destination, you will see an option to “Add a stop” or “Add destination” on the app screen. Tap on this option to add another stop to your trip.
- Similar to entering your first destination, start typing the address or name of the additional stop in the search bar. Lyft will provide suggestions as you type to help you find the location faster.
- Once you find the desired additional stop in the search results, tap on it to add it to your trip.
- If needed, provide any additional details for the new stop, such as a specific pickup or drop-off location, and review the entered information.
- Tap on the “Confirm” or “Add stop” button to add the new stop to your trip.
Repeat these steps to add as many additional stops as needed. Lyft allows you to add multiple stops to your trip, making it convenient and efficient for running errands or accommodating multiple passengers.
Once you have added all the necessary stops to your trip, Lyft will adjust the estimated fare and provide you with the updated details. It will also suggest the most efficient route to follow, taking into account all your stops along the way.
Adding additional stops to your Lyft trip is a great way to maximize your time and make multiple stops in a single ride. In the next section, we’ll explain how you can remove stops from your trip if needed.
Remove Stops from Your Trip
If you need to make changes to your planned stops or remove a stop altogether, Lyft makes it easy to modify your trip. Follow these steps to remove stops from your Lyft trip:
- While viewing your trip details in the Lyft app, locate the stop that you want to remove.
- Find the option to edit or remove the stop. This may be represented by an icon, such as an “X” or a trash bin.
- Tap on the edit or remove option for the stop you want to remove.
- You will be prompted to confirm the removal of the stop. Review the information to ensure you are removing the correct stop.
- Confirm the removal by tapping on the “Remove” or “Delete” button.
Once you remove a stop from your Lyft trip, the app will recalculate the estimated fare and adjust the route accordingly. It’s important to note that removing a stop may affect the fare and travel time, so it’s wise to consider these factors before making any changes.
If you need to remove multiple stops, follow the same process for each stop you wish to remove. Lyft allows you to customize your trip to ensure it meets your current needs and preferences.
Remember, Lyft understands that plans can change, and they strive to provide flexibility and convenience to their riders. By giving you the ability to remove stops from your trip, Lyft ensures that you have control over your journey.
Now that you know how to remove stops from your Lyft trip, let’s move on to the next section where we’ll explain how to rearrange the order of your stops.
Rearrange the Order of Stops
Whether you have added multiple stops to your Lyft trip or you simply want to change the order of your planned stops, Lyft allows you to easily rearrange the stops to suit your preferences. Follow these steps to rearrange the order of stops in your Lyft trip:
- While viewing your trip details in the Lyft app, locate the stop that you want to rearrange.
- Find the option to rearrange or edit the stop’s position. This may be represented by an icon, such as arrows or a rearrange button.
- Tap on the rearrange option for the stop you want to move.
- Drag and drop the stop to the desired position within your trip. As you move the stop, the app will update the route and estimated travel time.
- Continue rearranging stops as needed until you are satisfied with the new order.
By following these steps, you have the flexibility to change the order of your stops, ensuring that your Lyft trip is customized to your specific needs and preferences. Whether you want to optimize the route or adjust the sequence of stops, Lyft makes it easy to make those modifications.
It’s important to note that rearranging stops may affect the estimated fare and travel time, as the app will recalculate based on the new order. Take these factors into consideration when rearranging your stops to ensure the most efficient and cost-effective trip.
Once you have finished rearranging the stops in your Lyft trip, the app will update the route and provide you with the updated details, including the estimated fare and travel time. You can review these details before confirming your trip and proceeding to the next step.
Now that you know how to rearrange the order of stops in your Lyft trip, let’s move on to the next section where we’ll explain how to confirm your trip details before starting your ride.
Confirm Your Trip Details
Before starting your ride with multiple stops, it’s essential to double-check and confirm the details of your Lyft trip. By reviewing your trip details, you can ensure that the pickup locations, destinations, and any added stops are accurately reflected in the app. Follow these steps to confirm your trip details:
- While in the Lyft app, navigate to the “Upcoming” or “Scheduled Rides” section, where you will find your trip details.
- Review the pickup location, which is usually set as your current location by default. Make sure it accurately represents your desired pickup point.
- Check the sequence of stops in your trip. Ensure that the order in which stops are listed matches your intended journey.
- Verify the desired destinations and any additional details for each stop. Make sure they correspond to your intended locations and any specific instructions you may have provided.
- Take a moment to review the estimated fare for your trip. Confirm that it falls within your budget and aligns with your expectations.
By carefully reviewing and confirming your trip details, you can minimize the chances of any confusion or inconvenience during your ride. It’s important to ensure that all the necessary stops are included and in the correct order.
If you notice any discrepancies or need to make changes to your trip details, you can make edits or modifications directly from the app. Simply follow the appropriate steps for each aspect you wish to update, such as changing the pickup location, adding or removing stops, or adjusting the order of stops.
Once you have confirmed your trip details and ensured everything aligns with your plans, you’re ready to proceed and enjoy your ride with multiple stops. The Lyft driver will be notified of the stops and follow the route accordingly, making your journey as convenient and efficient as possible.
In the next section, we’ll explore the experience of riding with multiple stops on Lyft and how you can make the most out of your trip.
Enjoy Your Ride with Multiple Stops
With your trip details confirmed, it’s time to sit back, relax, and enjoy your ride with multiple stops on Lyft. Whether you’re running errands, exploring a new city, or attending appointments in different locations, Lyft provides a convenient and comfortable way to navigate your journey. Here are a few tips to ensure a pleasant experience:
- Be ready for your pickup: Make sure you are at the designated pickup location on time so that your driver can easily locate you. Keep your phone handy to receive any updates or communication from your driver.
- Communicate with your driver: If you have any specific instructions or if there are any changes to your stops or route during the ride, communicate them politely with your driver. They will do their best to accommodate your needs.
- Enjoy the amenities: Lyft offers various ride options with different amenities such as spacious seating, charging ports, and premium audio systems. Take advantage of these features to make your ride even more enjoyable.
- Make use of the Lyft app: Throughout your ride, you can use the Lyft app to monitor your trip progress, view your estimated time of arrival, and manage any updates or changes to your stops.
- Tip your driver: It’s customary to tip your Lyft driver as a token of appreciation for their service. The app provides an option for you to add a tip at the end of your ride.
Remember, your Lyft driver is there to provide you with a safe and comfortable ride. Treat them with respect and follow any local laws or regulations during your journey.
As you make your way to your different stops, enjoy the convenience and flexibility that Lyft offers. Whether you’re traveling alone or with others, Lyft allows you to make multiple stops seamlessly, eliminating the need for multiple rides or transfers.
By following these tips and enjoying the ride, you can maximize your experience with Lyft and make your journey with multiple stops a hassle-free and enjoyable one.
Now that you’re equipped with the knowledge of adding multiple stops on Lyft and making the most out of your trip, you’re ready to start planning your next adventure or errand run with ease.