
Why Add an Email to Your Google Calendar
Google Calendar is a powerful tool that helps users organize their schedules and stay on top of their appointments and events. While it is primarily designed for managing time-based activities, such as meetings, birthdays, and reminders, there are times when it can be useful to add an email to your Google Calendar.
Adding an email to your calendar can serve several purposes. For instance, if you receive an important email that contains crucial information related to a specific event or meeting, adding it to your calendar ensures that you have all the relevant details in one place. This eliminates the need to search through your inbox or worry about forgetting important information.
Moreover, by adding an email to your Google Calendar, you can improve your productivity and efficiency. Instead of constantly switching between your email and calendar, you can consolidate your information in one location, allowing for seamless access and easy reference.
Another benefit of adding emails to your Google Calendar is the ability to set reminders. With a simple click, you can choose to be notified of the email at a specific time before the event. This ensures that you don’t miss any important instructions or updates related to the event, helping you stay prepared and organized.
Furthermore, adding emails to your calendar can enhance collaboration and communication within teams. By sharing calendar events with colleagues or project members, you can keep everyone in the loop and ensure that they have access to relevant information. This can be particularly useful for sharing meeting agendas, project updates, or important documents that were sent via email.
Overall, adding an email to your Google Calendar offers convenience, productivity, and improved organization. It simplifies the process of managing your schedule and ensures that important emails and information are easily accessible when you need them. By utilizing this feature, you can streamline your workflow and stay on top of your commitments effortlessly.
Step 1: Accessing Google Calendar
Before you can start adding emails to your Google Calendar, you need to access the calendar itself. Here is a simple guide to help you with that:
- Open a web browser on your computer and navigate to the Google Calendar website. Alternatively, you can access it through the Google Suite by clicking on the “Google Apps” icon in the top-right corner of your screen and selecting “Calendar.”
- If you aren’t already signed in to your Google account, enter your email address and password to log in. If you don’t have a Google account, you can create one by clicking on the “Create account” link.
- Once you’re signed in, you will be redirected to your Google Calendar. Here, you will see your calendar interface with the current month displayed.
- If you prefer to access Google Calendar on your mobile device, you can download the Google Calendar app from the App Store (for iOS devices) or Google Play Store (for Android devices). Once installed, open the app and sign in using your Google account credentials.
Congratulations! You have successfully accessed Google Calendar. Now you can proceed to the next step to begin adding email information to your events.
Step 2: Creating a New Event
Once you have accessed your Google Calendar, you can start creating a new event. Follow these simple steps to create an event:
- On the left-hand side of the calendar interface, locate the date and time slot where you want to add the event. Click on that specific date and time to open the event creation dialog box. Alternatively, you can click on the “+” button at the top left corner of the screen to add a new event.
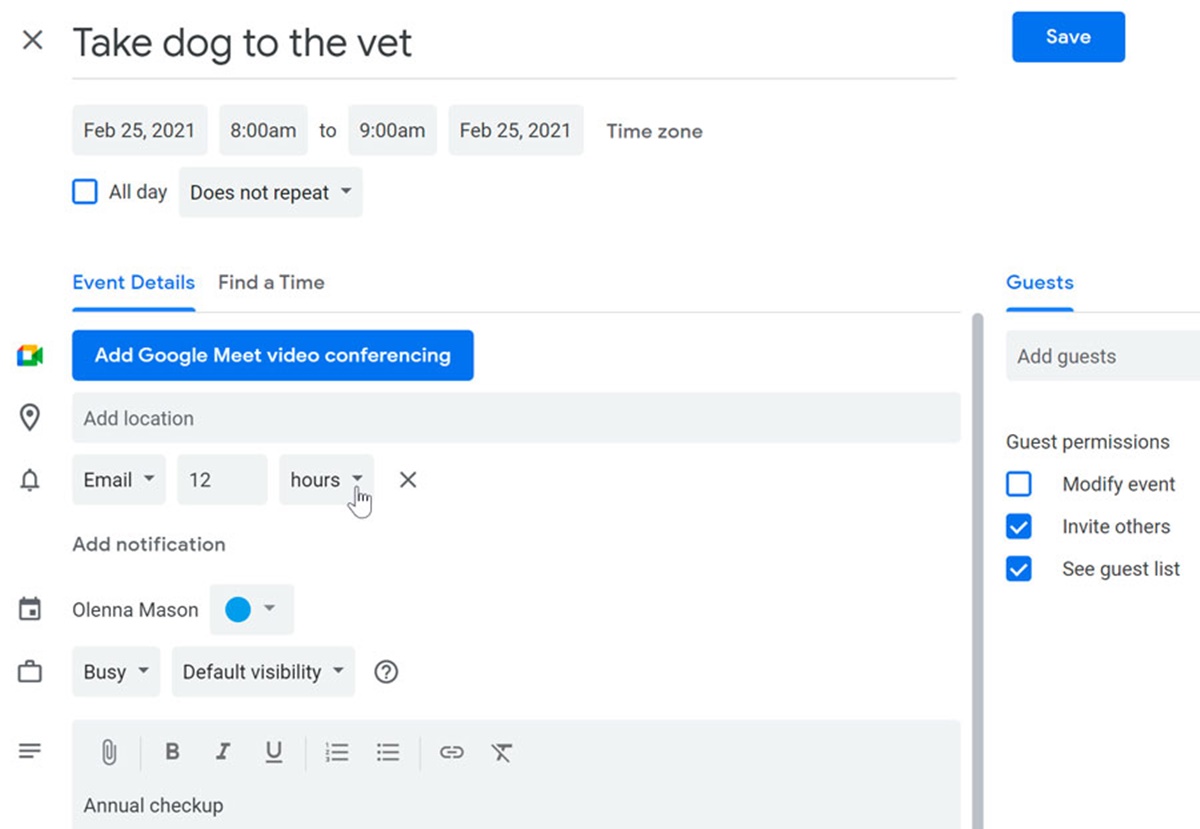
- A pop-up window will appear, allowing you to input the details of your event. Start by providing a concise and descriptive title for your event.
- Next, specify the date and time for the event. You can either select the starting and ending times manually or choose from the preset options, such as “All-day” or “Custom” if your event spans multiple days or has specific time constraints.
- Optionally, you can set a reminder for the event. Click on the “Add notification” dropdown menu and select the desired time frame before the event when you would like to be notified.
- In the “Event details” section, you can enter additional information such as the location, description, and any necessary attachments or links. This is where you can add the email information to your event.
- Now that you have entered the basic event details, click on the “Save” or “Save and close” button to create the event. The event will now be added to your Google Calendar at the specified date and time.
By following these steps, you can easily create a new event and begin the process of adding email information to your events. Proceed to the next step to learn how to incorporate emails into your event details.
Step 3: Adding an Email to the Event
Once you have created a new event in Google Calendar, you can proceed to add an email to the event details. Here’s how you can do it:
- Open the event that you want to add an email to by clicking on it in your Google Calendar.
- In the event details window, locate the section where you can enter additional information, such as the location or description of the event.
- In this section, you can add the email by either typing it manually or pasting it from your clipboard. Make sure to include the full email address, such as example@example.com.
- If you want to add multiple emails to the event, you can separate them with commas.
Adding an email to the event allows you to associate important email information directly with the event itself. This can be particularly useful if there are specific instructions, attachments, or important details that you need to reference during the event.
By including the email in the event details, you ensure that all the necessary information is easily accessible in one place. It eliminates the need to search for emails separately and provides a streamlined experience.
Now that you have successfully added an email to the event, you can save the changes and proceed to the next step to learn how to select the email provider for integration.
Step 4: Selecting the Email Provider
When adding an email to your event in Google Calendar, you have the option to select the email provider for integration. Here’s how you can choose the email provider:
- After adding the email to your event, you will notice a small icon or button next to the email address field.
- Click on this icon or button to open a dropdown menu of available email providers.
- From the dropdown menu, select the email provider that corresponds to the email you added. For example, if the email address belongs to a Gmail account, choose “Gmail” as the email provider.
- If the email provider you want to use is not listed in the dropdown menu, you can choose “Other” or “Custom” option. This will allow you to manually enter the email provider’s name or specify the integration settings.
By selecting the email provider, you enable Google Calendar to integrate with that specific email service. This integration allows for a seamless experience when accessing and interacting with your emails directly within the event details.
Integration with the email provider enhances your productivity by providing quick and easy access to email content related to the event. It eliminates the need to switch between applications or search through your inbox, saving you valuable time and effort.
After selecting the email provider, you can proceed to the next step to grant permission for the integration.
Step 5: Granting Permission
Once you have selected the email provider for integration with your event in Google Calendar, you will need to grant permission for the integration to function properly. Here’s how you can grant permission:
- After selecting the email provider, a prompt will appear asking you to grant permission for Google Calendar to access your email account.
- Read the terms and conditions or permissions requested by Google Calendar to ensure you are comfortable with granting access.
- If you agree to the terms, click on the “Grant permission” or “Allow” button to proceed.
- Depending on the email provider and your device, you may be redirected to a login page where you need to sign in to your email account and authorize the integration.
- Follow the on-screen instructions to complete the permission granting process.
Granting permission to access your email account is necessary for the integration to work seamlessly. It allows Google Calendar to fetch and display the relevant email content within the event details.
Rest assured that Google Calendar adheres to strict security and privacy measures to protect your data. Your email credentials or sensitive information will not be shared with anyone.
After granting permission, you are ready to proceed to the next step and choose the specific email you wish to add to the event.
Step 6: Choosing the Email
After granting permission for Google Calendar to access your email account, you can now choose the specific email that you want to add to the event. Follow these steps to select the email:
- In the event details window, where you added the email address, you will see a button or link labeled “Choose Email” or something similar.
- Click on this button or link to open the email selection interface.
- A list of emails from your integrated email account will be displayed. You can scroll through the list to find the desired email.
- If there are multiple emails associated with the event, you can select multiple emails by checking the checkboxes next to each email.
Choosing the email allows you to specify which email content you want to associate with the event. This is particularly useful if you receive multiple emails related to the event and want to include specific information or instructions in the event details.
By selecting the email, you ensure that the relevant email content is accessible within the event details. This eliminates the need to search through your inbox or switch between applications, providing a seamless and convenient experience.
Once you have chosen the desired email(s), you can proceed to the next step to add the email(s) to the event.
Step 7: Adding Email to Event
With the email selected, you can now add it to the event in Google Calendar. Follow these simple steps to include the email in your event:
- After choosing the email(s) from the selection interface, click on the “Add” or “Insert” button.
- The selected email(s) will now be added to the event details. You may see a preview of the email content or a link to access the email.
- If there are multiple emails added to the event, they will be displayed chronologically or in the order you added them.
- You can click on each email to expand or collapse its content, displaying more or less information as needed.
By adding the email to the event, you ensure that the relevant email content is easily accessible and visible within the event details. This allows you to have all the necessary information in one place, eliminating the need to search for emails separately or navigate through your inbox.
Having the email content directly associated with the event provides a seamless and organized experience. It helps you stay focused on the event itself and ensures that you have all the relevant information readily available.
Now that you have successfully added the email(s) to the event, you can proceed to the next step to learn how to view the email within the event details.
Step 8: Viewing the Email in the Event
Once you have added the email to the event in Google Calendar, you can easily view the email content within the event details. Follow these steps to view the email:
- Open the event in your Google Calendar by clicking on it.
- In the event details, locate the section where the email is displayed.
- If the email is collapsed, click on it to expand and view the email content.
- You will see the email content, including the sender, subject, and message body. Depending on the integration with your email provider, you may also have access to any attachments or links included in the email.
Viewing the email directly within the event details allows for quick and easy access to all the relevant information. You can review the email content without leaving the calendar interface, saving you valuable time and effort.
Having the email readily available within the event details enhances your productivity and organization. It eliminates the need to navigate back and forth between your email application and calendar, providing a seamless experience and keeping you focused on the event itself.
Now that you know how to view the email within the event details, you can proceed to the next step to learn how to remove the email from the event if needed.
Step 9: Removing the Email from the Event
If you need to remove an email from an event in Google Calendar, follow these steps:
- Open the event in Google Calendar that contains the email you want to remove.
- In the event details, locate the section where the email is displayed.
- Click on the “Remove” or “Delete” button next to the email you wish to remove.
- Confirm the action when prompted to remove the email from the event.
By removing the email from the event, you are detaching it from the event details. This means that the email content will no longer be associated with the specific event in Google Calendar.
Removing an email can be useful if the information becomes outdated or if you no longer need it within the context of the event. It helps keep your event details clutter-free and ensures that only relevant and up-to-date information is displayed.
It’s important to note that removing an email from an event does not delete the email itself from your email account. The original email will still be accessible in your inbox or folders as it was before adding it to the event.
Now that you know how to remove an email from an event, you can proceed to the final step to explore some tips and tricks for email integration in Google Calendar.
Step 10: Tips and Tricks for Email Integration in Google Calendar
Now that you are familiar with the process of adding and managing emails in Google Calendar, here are some tips and tricks to enhance your email integration experience:
- Utilize different colors or labels: Assign different colors or labels to events that have associated emails. This visual distinction can help you easily identify which events have email content.
- Create event-specific folders or labels in your email account: Organize your emails related to specific events by creating dedicated folders or labels in your email account. This can streamline your inbox and make it easier to locate event-related emails.
- Set up email filters for event-specific emails: Use email filters to automatically categorize or flag emails from specific senders or with certain keywords. This ensures that relevant emails are easily integrated into your events.
- Sync with multiple email accounts: If you have multiple email accounts, consider syncing them with Google Calendar to include email content from all accounts in your events. This allows for a comprehensive view of all the necessary information.
- Regularly review and update event emails: Periodically review and update the emails associated with your events. Remove any outdated or irrelevant emails to keep the event details up to date and clutter-free.
- Use search functionality: Take advantage of the search functionality within Google Calendar to quickly locate events with specific email content. This can be useful when you need to reference past events or find information related to a particular email.
- Experiment with event templates: Google Calendar offers event templates that can be customized to fit your specific needs. Explore these templates to streamline your event creation process and incorporate email information seamlessly.
- Take advantage of mobile accessibility: Install the Google Calendar app on your mobile device to access and manage your events and associated emails on the go. This ensures that you stay updated and organized, even outside of your computer.
By leveraging these tips and tricks, you can optimize your email integration experience in Google Calendar. It will make managing your schedule and email communication more efficient, organized, and seamless.
With these steps and suggestions, you are now equipped to successfully add and manage emails in Google Calendar. Start integrating your emails into your events, and enjoy the convenience and productivity that this feature offers!