
Choosing the Email Provider
When it comes to adding an email account to Outlook, one of the first steps is to choose the email provider you want to connect with. Outlook supports various email providers, including popular options like Gmail, Yahoo, and Microsoft Exchange. Each provider offers different features and benefits, so it’s important to consider your specific needs before making a decision.
If you already have an email account with a specific provider, it’s typically easier to add that account to Outlook. However, if you’re starting from scratch or want to switch to a different provider, you’ll need to set up a new email account before proceeding with the Outlook configuration.
Gmail is a popular choice and offers a user-friendly interface with robust features. It is widely used for personal email accounts and is also compatible with business accounts. Yahoo is another well-known provider that offers a customizable email experience along with additional services like news, finance, and sports.
Microsoft Exchange is often used for business email accounts as it provides advanced collaboration and communication features. It allows for seamless integration with other Microsoft products like Office 365.
Before making a final decision, it’s important to research and compare the features and limitations of each email provider. Consider factors such as storage capacity, spam filtering, attachment size limits, mobile accessibility, and additional features like calendar integration, contacts management, and task lists.
Additionally, check if the email provider offers IMAP or POP protocols. IMAP allows you to access your email from multiple devices while keeping the messages synced, while POP downloads the email to a specific device, removing it from the server.
Overall, choosing the right email provider is an important step in adding an email account to Outlook. It sets the foundation for a smooth integration and ensures that you have access to the features and functionalities that best suit your needs.
Gathering the Necessary Information
Before you can add an email account to Outlook, it’s important to gather the necessary information about your email account settings. This information will be used during the setup process to configure your account correctly. Here are the key details you’ll need:
- Email address: Your email address is the primary identifier for your account. It typically follows the format of yourname@example.com.
- Password: You’ll need the password associated with your email account to authenticate your access to the account.
- Incoming mail server (IMAP or POP): This is the address of the server where your incoming emails are stored. It can be in the format of imap.example.com or pop.example.com.
- Outgoing mail server (SMTP): This is the address of the server responsible for sending your outgoing emails. It’s usually in the format of smtp.example.com.
- Port numbers: The port numbers determine the specific communication channels through which your email client (Outlook) connects with the email server. The default ports for IMAP, POP, and SMTP are 143, 110, and 25, respectively, but they can vary depending on the email provider.
- Security settings: Some email providers require specific security settings, such as SSL (Secure Sockets Layer) or TLS (Transport Layer Security). These settings ensure the encryption of your communication and enhance the security of your email account.
To gather this information, you can refer to your email provider’s website or contact their support team for assistance. They will provide you with the necessary details specific to your email account. It’s important to ensure the accuracy of the information gathered to prevent any issues during the setup process.
Having the required information ready before starting the setup process will make adding your email account to Outlook a smooth and efficient experience. With these details in hand, you can proceed confidently and avoid any unnecessary delays or errors.
Opening Outlook
Before you can add an email account to Outlook, you’ll need to open the Outlook application on your computer. Here are the steps to do so:
- Locate the Outlook icon on your desktop or in your taskbar. It is usually represented by an envelope with a blue background.
- Double-click on the Outlook icon to launch the application. It may take a few seconds for Outlook to open, depending on the speed of your computer.
- If you don’t have Outlook installed on your computer, you can download and install it from the official Microsoft website. Follow the instructions provided during the installation process to set up Outlook on your computer.
Once Outlook is opened, you’ll see the main interface which includes various sections like Mail, Calendar, Contacts, and Tasks. The specific layout and design of Outlook may vary depending on the version you are using.
If you’re opening Outlook for the first time or if you haven’t set up any accounts yet, the initial setup wizard may open automatically. This wizard will guide you through the process of adding an email account to Outlook. If the wizard does not appear, you can manually access the account setup options by going to the File menu and selecting “Add Account” or “Account Settings” depending on the version of Outlook you are using.
Make sure you have a stable internet connection before proceeding with the setup process. This will ensure that Outlook can communicate with the email servers and complete the configuration successfully.
Opening Outlook is the first step towards adding your email account to the application. Once you have it open, you’ll be ready to proceed with the account setup by following the steps outlined in the subsequent sections.
Adding a New Account
After opening Microsoft Outlook, the next step is to add a new email account. Outlook provides a simple and straightforward process to guide you through this setup. Here’s how to add a new account:
- Go to the File menu in Outlook and select “Add Account.” This will open the account setup window where you can enter your account details.
- In the account setup window, you’ll have two options: “Email Account” or “Manual setup or additional server types.” Choose the “Email Account” option to automatically configure your account settings, or select “Manual setup or additional server types” if you want to manually enter the server details.
- If you selected the “Email Account” option, enter your name, email address, and password in the provided fields. Outlook will attempt to automatically detect and configure the server settings for your account.
- If you opted for the “Manual setup or additional server types” option, you’ll need to choose the type of email account you have, such as POP or IMAP, and provide the necessary server details as discussed in the previous section.
- Once you’ve entered the required information, click on the “Next” button. Outlook will then verify the account settings and establish a connection with the email server.
- If the account setup is successful, you’ll see a confirmation message. Click “Finish” to complete the process, and you’ll be able to access and manage your email messages directly from Outlook.
It’s important to note that the specific steps may vary slightly depending on the version of Outlook you are using. However, Outlook generally follows a similar process for adding new accounts, providing step-by-step instructions to ensure a smooth setup.
If you encounter any issues during the account setup, double-check the information you entered to ensure its accuracy. You may also need to contact your email provider’s support team for assistance or refer to their documentation for any specific instructions related to connecting your account with Outlook.
By adding a new account to Outlook, you’ll be able to consolidate your email management in one convenient location, allowing for easy access and organization of your emails. This integration saves time and streamlines your communication process.
Manually Configuring the Account Settings
If you prefer to have more control over the configuration of your email account in Outlook, you can choose to manually enter the account settings. This allows you to adjust specific parameters to suit your preferences. Here’s how to manually configure the account settings:
- Open Microsoft Outlook and go to the File menu.
- Select “Add Account” to open the account setup window.
- Choose the option “Manual setup or additional server types” and click on the “Next” button.
- Select the type of email account you have. The options are typically “POP or IMAP” or “Exchange.”
- Enter your name and email address in the provided fields.
- Next, you’ll need to enter the incoming and outgoing server details.
- If you have a POP or IMAP account, enter the incoming mail server (IMAP or POP) and the outgoing mail server (SMTP) addresses. These can usually be obtained from your email provider’s documentation or support team.
- Depending on your email provider, you may also need to adjust the server ports and enable encryption (SSL or TLS).
- If you have an Exchange account, you may need to enter your username and domain information to connect to the server.
- After entering all the necessary information, click on the “Next” button.
- Outlook will attempt to connect to the server and verify the settings.
- If the configuration is successful, you’ll see a confirmation message. Click “Finish” to complete the process.
Manually configuring the account settings gives you the flexibility to customize the connection parameters to align with your email provider’s requirements or your personal preferences. It allows you to adjust server ports, encryption settings, and other advanced configurations, if needed.
If you’re unsure about the specific settings for your email account, consult your email provider’s documentation or contact their support team for assistance. They should be able to provide you with the necessary information to complete the manual configuration successfully.
By manually configuring the account settings, you can ensure that Outlook communicates with your email server precisely as you desire, enhancing your email management experience and enabling a seamless integration with your chosen provider.
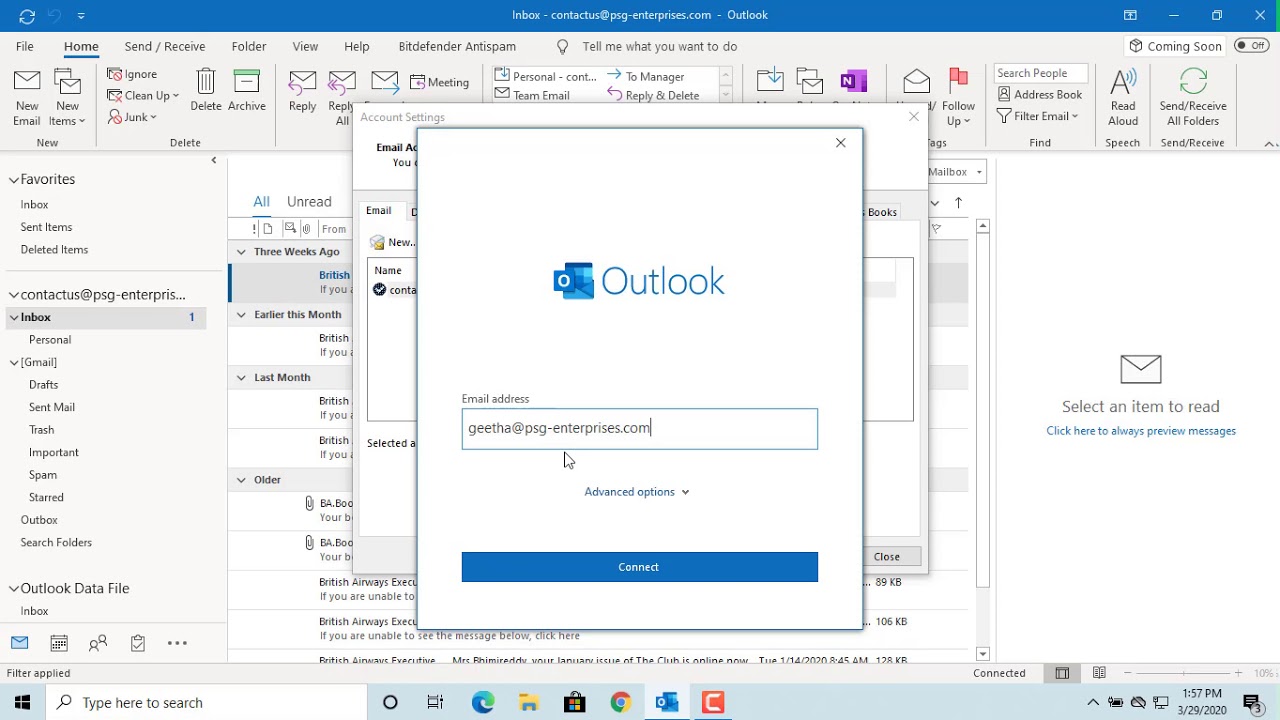
Entering the Email Address and Password
When adding an email account to Outlook, one of the crucial steps is entering the email address and password associated with your account. This information allows Outlook to authenticate your access to the email server and retrieve your messages. Here’s how to enter the email address and password:
- Open Microsoft Outlook and navigate to the File menu.
- Select “Add Account” to open the account setup window.
- In the account setup window, choose the “Email Account” option if you want Outlook to automatically configure the account settings. If you want to manually enter the settings, select “Manual setup or additional server types.”
- Enter your email address in the provided field. Make sure to type it correctly to avoid any potential errors.
- In the next field, enter the password associated with your email account. Double-check the entered password to ensure its accuracy.
- If you are adding a new account or if Outlook cannot automatically configure the settings based on the email address entered, you may need to manually provide the server information as well.
- Once you’ve entered the email address and password, click on the “Next” button to proceed with the account setup process.
- Outlook will attempt to verify the email address and password by connecting to the server and authenticating your access.
- If the email address and password are correct, Outlook will successfully establish the connection and move forward with the configuration process.
- If there is an issue with the entered information, Outlook will prompt an error message, and you may need to verify the accuracy of the email address and password or consult your email provider’s documentation for assistance.
Ensuring the accurate entry of your email address and password is crucial for a successful configuration. Double-check both fields to minimize any potential errors, as incorrect credentials can prevent Outlook from connecting to the email server.
By entering the email address and password correctly, you’ll be on your way to seamlessly integrating your email account with Outlook, enabling efficient management and organization of your messages within the application.
Selecting the Account Type
When setting up an email account in Microsoft Outlook, one of the important steps is selecting the appropriate account type. Outlook supports various types of email accounts, such as POP, IMAP, and Exchange. Each account type has its own unique features and functionalities, so it’s important to choose the one that best suits your needs. Here’s how to select the account type:
- After entering your email address and password in the account setup window, Outlook will attempt to automatically configure the account settings based on the provided information.
- If Outlook successfully detects your account settings, it will display the account type it recommends. This is typically based on the email server associated with your email address.
- If you agree with the recommended account type, such as POP or IMAP, click on the “Next” button to proceed with the configuration process.
- If Outlook is unable to automatically determine the account type or if you prefer to select a different one, you can choose the “Manual setup or additional server types” option in the account setup window.
- In the next screen, you’ll see the different account types that Outlook supports. Typically, the options include “POP or IMAP” and “Exchange.”
- If you have a personal email account or an account hosted by a third-party email provider, you can choose the “POP or IMAP” option. This allows you to access your emails from multiple devices and keeps them synchronized.
- If you have a business email account with Microsoft Exchange or if you’re using Office 365 for your organization, select the “Exchange” option. This provides advanced collaboration and communication features, including shared calendars, contacts, and tasks.
- Once you’ve selected the desired account type, click on the “Next” button to proceed with the account setup.
It’s important to select the correct account type to ensure compatibility with your email provider’s server and to access the appropriate features and functionalities offered by Outlook. Choosing the wrong account type may result in limited functionality or connectivity issues.
Consider your specific needs and consult your email provider’s documentation or support team if you’re unsure about the correct account type for your email account. By selecting the appropriate account type in Outlook, you’ll be able to enjoy a seamless integration and make the most of the email management features available to you.
Entering the Server Information
After selecting the account type in Microsoft Outlook, the next step is to enter the server information for your email account. This includes the incoming and outgoing mail server details, as well as other configuration settings. Here’s how to enter the server information:
- In the account setup window, select the option for manual setup or additional server types.
- Choose the account type that corresponds to your email account, such as POP or IMAP for personal accounts or Exchange for business accounts.
- In the server settings section, you’ll need to enter the incoming mail server (IMAP or POP) and outgoing mail server (SMTP) details.
- If you are using an IMAP or POP account, enter the server addresses provided by your email provider. These addresses are typically in the format of “imap.example.com” or “pop.example.com”.
- Next, enter the corresponding port numbers for the incoming and outgoing servers. These port numbers can vary depending on your email provider, but common choices include 993 for IMAP, 995 for POP, and 587 for SMTP.
- If your email provider requires encryption, such as SSL or TLS, select the appropriate encryption method from the drop-down menu. This ensures a secure connection between Outlook and the email server.
- Depending on your email provider, you may also need to adjust other advanced settings, such as leaving a copy of the messages on the server or removing them after a specific period.
- Once you’ve entered the necessary server information, click on the “Next” button to proceed with the account setup process.
- Outlook will attempt to connect to the email server using the provided settings and verify the configuration.
- If the server information is correct, Outlook will establish a successful connection, and you can proceed with completing the account setup.
- If there is an issue connecting to the server, double-check the entered information and consult your email provider’s documentation or support team for assistance.
Entering the accurate server information is essential for Outlook to connect to your email account and retrieve messages efficiently. Double-check all the details, including server addresses, port numbers, and encryption settings, to ensure a smooth and successful configuration.
By entering the server information correctly, you’ll be able to seamlessly integrate your email account with Outlook and enjoy the benefits of efficient email management.
Testing the Account Settings
After entering the server information in Microsoft Outlook, it’s important to test the account settings to ensure a successful connection to your email server. Testing the account settings allows you to verify the accuracy of the entered information and confirm that Outlook can communicate with the server properly. Here’s how to test the account settings:
- In the account setup window, click on the “Next” button after entering the server information.
- Outlook will attempt to connect to the email server using the provided settings.
- During the testing process, Outlook will typically send a test message to your email account and try to retrieve it.
- If the testing is successful, Outlook will display a message indicating that the account settings are verified and functioning correctly.
- You may also receive a test email in your account’s inbox as part of the verification process.
- If there are any issues with the account settings or the connection to the server, Outlook will prompt an error message or provide additional information on what needs to be corrected.
- In case of an error, double-check the server information, including the server addresses and port numbers, to ensure their accuracy.
- If you’re unsure about any specific configuration settings, consult your email provider’s documentation or reach out to their support team for assistance.
- Make the necessary adjustments according to the guidance provided by Outlook or your email provider, and retry the testing process.
- Repeat the testing until the account settings are successfully verified, ensuring that Outlook can connect to and communicate with the email server without any issues.
Testing the account settings is a crucial step to confirm that Outlook can establish a proper connection with your email server. It helps identify and resolve any configuration errors or connectivity issues, ensuring a smooth email management experience within Outlook.
If you encounter difficulties during the testing process, don’t hesitate to seek assistance from your email provider’s support team or consult their help documentation. By resolving any configuration issues upfront, you can guarantee uninterrupted access to your email account and optimize your productivity through Outlook’s robust features.
Completing the Process
Once you have successfully tested the account settings in Microsoft Outlook, you are ready to complete the process of adding your email account. Completing the process ensures that everything is properly set up and allows you to start managing your emails within Outlook. Here’s how to complete the process:
- If the account settings test was successful, you will see a confirmation message indicating that Outlook has been able to connect to the email server and validate the settings.
- Click on the “Finish” button to complete the setup process.
- Outlook will now finalize the configuration of your email account and integrate it into the application.
- You will be able to access your email messages, folders, and other account features directly from Outlook’s interface.
- Take a moment to explore the various features of Outlook and customize the settings according to your preferences.
- Set up additional email accounts if needed by following the same steps as outlined previously.
- Configure additional options such as email signatures, message rules, and folder organization to optimize your email management experience.
- Ensure that Outlook is set as the default email client on your computer to allow for seamless email integration across applications.
- Regularly check for software updates for Microsoft Outlook to ensure that you have the latest security patches and features.
- If you encounter any issues or have questions about Outlook’s functionality, refer to Microsoft’s documentation or seek support from their customer service.
Completing the process brings your email account fully into Outlook, allowing you to enjoy the convenience of managing all your emails in one centralized location. You’ll be able to benefit from Outlook’s powerful features such as advanced search, email filtering, and integration with calendars and contacts.
Remember to regularly check and maintain your email account within Outlook, archive or delete unnecessary messages, and keep an eye on storage limits to ensure optimal performance.
With the setup process complete, you’re now ready to fully utilize Outlook’s email management capabilities and enhance your productivity in handling your email communications.
Managing Multiple Email Accounts in Outlook
Microsoft Outlook allows you to efficiently manage multiple email accounts within a single interface, streamlining your email communication and organization. Whether you have personal and business accounts or use different email providers, Outlook provides convenient features for managing multiple accounts. Here’s how to effectively manage multiple email accounts in Outlook:
- Open Outlook on your computer and ensure that you have added all the email accounts you want to manage.
- In Outlook, you’ll see a navigation pane on the left side of the screen. This pane displays all the email accounts that are connected to Outlook.
- To switch between accounts, simply click on the desired account name in the navigation pane.
- Each account will have its own set of folders, including Inbox, Sent Items, Drafts, and more. You can expand or collapse the folders for each account to easily navigate between them.
- When composing a new email, Outlook will automatically select the account associated with the folder you are currently in. If you want to send an email from a different account, you can change the “From” field manually before sending.
- You can set up rules and filters to automatically sort incoming emails into their respective folders within each account, making it easier to manage and prioritize your messages.
- You can also create unified inbox folders, combining emails from multiple accounts into a single view. This allows you to see all your emails in one place, regardless of the account they belong to.
- Outlook provides powerful search capabilities that allow you to search for specific emails across multiple accounts. Use keywords, sender names, or other filters to quickly locate the information you need.
- Manage your calendars and contacts across multiple accounts by integrating them into Outlook. Sync your appointments, events, and address books for a comprehensive view of your schedule and contacts.
- Regularly update and sync your email accounts to ensure that Outlook is up to date with the latest messages and changes made on the email server.
- Take advantage of Outlook’s customizable settings to personalize the email management experience according to your preferences. Customize notification options, display settings, and email signature for each account individually.
- If you have multiple accounts with the same email provider, distinguish them by assigning unique display names or colors to easily identify each account in the navigation pane.
With Outlook’s robust features for managing multiple email accounts, you can efficiently organize your email communications, consolidate your inbox, and streamline your productivity. From easily switching between accounts to utilizing powerful search and filtering capabilities, Outlook enables seamless management of all your email accounts in one user-friendly interface.
By implementing effective practices and leveraging Outlook’s capabilities, you can stay organized, respond promptly to important emails, and maintain control over your various email accounts, enhancing your overall efficiency and communication skills.