
What is Safe Senders in Outlook
Safe Senders is a feature in Microsoft Outlook that allows you to specify email addresses or domains that you trust and consider safe. When an email is received from an address or domain listed in the Safe Senders list, Outlook categorizes it as safe and ensures that it doesn’t get flagged as junk or spam.
By adding an address or domain to the Safe Senders list, you are essentially telling Outlook that you want to receive emails from that source without any interference. This is particularly useful when you regularly receive emails from certain senders or domains that sometimes end up in your junk or spam folder.
When an email arrives from a safe sender, it is delivered straight to your inbox, eliminating the need to manually scan through your junk folder for important messages. This feature helps you stay organized and ensures that you never miss out on critical emails from trusted sources.
In addition to keeping your inbox clutter-free, the Safe Senders feature also helps protect you from phishing scams and email fraud. Outlook’s built-in security measures help identify potentially harmful emails, and by adding trusted email addresses or domains to the Safe Senders list, you can further strengthen your email security.
It’s important to note that Safe Senders is a personal setting, meaning it only applies to your Outlook account. The addresses or domains added to your Safe Senders list will not be automatically recognized as safe by other Outlook users. Each user needs to manually add their trusted sources to their own Safe Senders list in order to receive their emails directly to the inbox.
Why Add an Address or Domain to Safe Senders in Outlook
Adding an address or domain to the Safe Senders list in Outlook offers several benefits that enhance your email experience. Here are a few reasons why you should consider utilizing this feature:
- Prevent important emails from being marked as spam: By designating certain senders or domains as safe, you ensure that their emails always bypass the spam filter and land directly in your inbox. This eliminates the possibility of missing critical communications from trusted sources.
- Save time sorting through junk or spam: Safe Senders streamlines your email management by automatically filtering out unwanted messages. Instead of manually checking your junk or spam folders for legitimate emails, adding trusted addresses or domains ensures that you receive important emails directly to your inbox.
- Reduce the risk of missing important communications: When you constantly have to sift through junk or spam emails, there’s a chance you might overlook an essential message. By adding trusted sources to the Safe Senders list, you minimize the risk of important communications getting buried among unwanted messages.
- Enhance email security: Safe Senders provides an additional layer of email security by allowing you to whitelist trusted sources. By doing so, you have greater control over who can send you emails, reducing the likelihood of falling victim to phishing attempts or email scams.
- Customize your email filtering: Safe Senders gives you the flexibility to choose which senders or domains you want to trust. Whether it’s individual email addresses or entire domains, you have the power to decide who can bypass the spam filter and send emails directly to your inbox.
By adding addresses or domains to the Safe Senders list in Outlook, you optimize your email workflow, increase efficiency, and ensure that important messages aren’t erroneously flagged as spam. Taking advantage of this feature provides you with a more seamless and secure email experience overall.
Step-by-Step Guide to Adding an Address or Domain to Safe Senders in Outlook
Adding an address or domain to the Safe Senders list in Outlook is a straightforward process. Follow the steps below to ensure that emails from trusted sources always land in your inbox:
- Open Outlook and access the Safe Senders list:
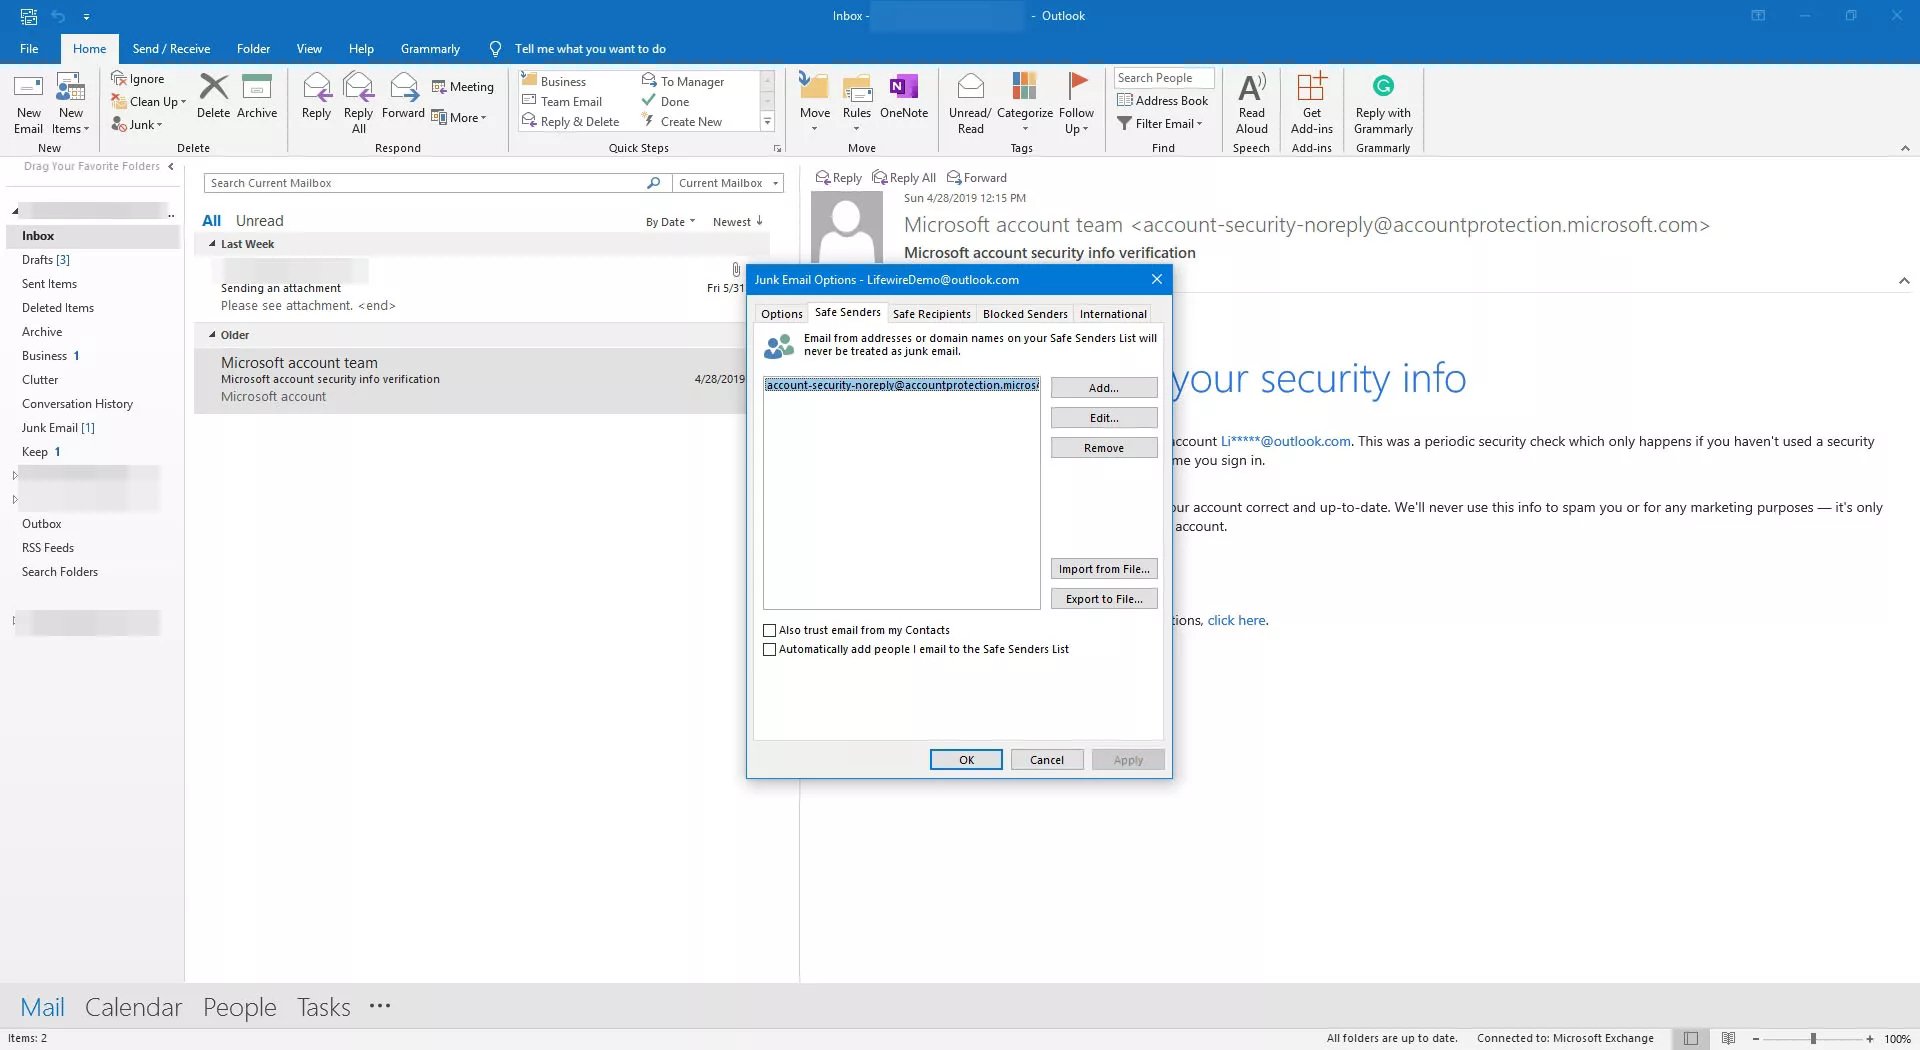
– In Outlook, go to the “Home” tab and click on the “Junk” button in the ribbon.
– From the drop-down menu, select “Junk Email Options”. A new window will appear. - Add a specific email address to the Safe Senders list:
– In the “Junk Email Options” window, navigate to the “Safe Senders” tab.
– Click on the “Add” button and enter the email address you want to add as a safe sender.
– Click “OK” to save the changes. - Add a domain to the Safe Senders list:
– In the “Junk Email Options” window, go to the “Safe Senders” tab.
– Click on the “Add” button and enter the domain name you want to add as a safe sender (e.g., example.com).
– Click “OK” to save the changes. - Remove an address or domain from the Safe Senders list:
– In the “Junk Email Options” window, navigate to the “Safe Senders” tab.
– Select the entry you want to remove from the list.
– Click on the “Remove” button and confirm the deletion. - Edit Safe Senders list in Outlook:
– In the “Junk Email Options” window, go to the “Safe Senders” tab.
– Select the entry you want to edit.
– Click on the “Edit” button to modify the email address or domain.
– Click “OK” to save the changes.
By following these simple steps, you can easily add specific email addresses or entire domains to the Safe Senders list in Outlook. Remember to regularly review and update your Safe Senders list to ensure that it reflects your current trusted sources.
Step 1: Open Outlook and access Safe Senders List
To begin adding an address or domain to the Safe Senders list in Outlook, you need to open the application and access the appropriate settings. Follow these steps to get started:
- Launch Microsoft Outlook on your computer by double-clicking on the icon located on your desktop or by searching for it in the Start Menu.
- Once Outlook is open, navigate to the “Home” tab located at the top of the screen. Click on the “Junk” button in the ribbon. This button typically displays an exclamation mark inside a shield icon, indicating junk or spam settings.
- A drop-down menu will appear. From the options available, select “Junk Email Options”. This will open a new window specifically for managing junk email settings.
- In the “Junk Email Options” window, you will find several tabs at the top. Click on the “Safe Senders” tab to access the list of trusted senders and domains.
- Now that you are in the “Safe Senders” tab, you can view and manage the addresses and domains already added to the Safe Senders list. From here, you can add new entries, remove existing ones, or edit the details of specific entries as needed.
Remember to save your changes after making any modifications to the Safe Senders list in Outlook. This ensures that the trusted senders and domains you add will be recognized by the email client, and their messages will safely bypass the spam filter and arrive in your inbox.
By following these steps, you have successfully opened Outlook and accessed the Safe Senders list, allowing you to manage the trusted sources from which you want to receive emails directly to your inbox. Proceed to the next step to learn how to add specific email addresses to the Safe Senders list in Outlook.
Step 2: Add a specific email address to Safe Senders List
Once you have accessed the Safe Senders list in Outlook, you can easily add a specific email address to ensure that emails from that address always land in your inbox. Follow these steps to add a specific email address to the Safe Senders list:
- In the “Junk Email Options” window, make sure you are in the “Safe Senders” tab.
- Click on the “Add” button located in the middle of the window. This will open a new dialog box where you can enter the email address you want to add.
- In the text field provided, enter the specific email address you want to designate as a safe sender. For example, type “example@example.com”.
- Once you have entered the email address, click “OK” to save the changes. The email address will be added to the Safe Senders list, ensuring that any emails from that address will bypass the spam filter and land directly in your inbox.
- If you need to add additional email addresses, repeat the process by clicking the “Add” button and entering the desired addresses one at a time.
- After adding the desired email addresses, click “OK” to finalize and save the changes to the Safe Senders list.
By following these steps, you can easily add specific email addresses to the Safe Senders list in Outlook. This ensures that emails from trusted sources will always be delivered directly to your inbox, allowing you to stay informed and organized without the risk of missing important communications.
Proceed to the next step to learn how to add a domain to the Safe Senders list in Outlook, which allows you to designate an entire domain as a trusted source for emails.
Step 3: Add a domain to Safe Senders List
In addition to adding specific email addresses, you can also add entire domains to the Safe Senders list in Outlook. This is useful when you want to trust all email addresses associated with a particular domain. Follow these steps to add a domain to the Safe Senders list:
- Ensure that you are in the “Safe Senders” tab within the “Junk Email Options” window, as described in the previous steps.
- Click on the “Add” button located in the middle of the window. This will open a new dialog box where you can enter the domain you want to add.
- In the text field provided, enter the domain name you want to designate as a safe sender. For example, type “example.com”.
- Click “OK” to save the changes. By adding the domain to the Safe Senders list, any email received from any email address associated with that domain will bypass the spam filter and land directly in your inbox.
- If you need to add additional domains, repeat the process by clicking the “Add” button and entering the desired domain names one at a time.
- Once you have finished adding the desired domains, click “OK” to finalize and save the changes to the Safe Senders list.
By following these steps, you can easily add a domain to the Safe Senders list in Outlook. This allows you to trust all email addresses associated with that domain, ensuring that any emails from that domain will always be delivered directly to your inbox, providing a seamless and efficient email experience.
Continue to the next step to learn how to remove an address or domain from the Safe Senders list in Outlook, in case you no longer consider it a trusted source.
Step 4: Remove an address or domain from Safe Senders List
If you no longer consider a specific email address or domain as a trusted source and want to remove it from the Safe Senders list in Outlook, you can easily do so. Follow these steps to remove an address or domain from the Safe Senders list:
- Open the “Junk Email Options” window in Outlook, as described in the previous steps.
- Navigate to the “Safe Senders” tab within the “Junk Email Options” window.
- Scroll through the list of addresses and domains in the Safe Senders list and locate the entry you wish to remove.
- Select the entry you want to remove by clicking on it to highlight it.
- Click on the “Remove” button, which is located right next to the “Add” button in the window. This will remove the selected entry from the Safe Senders list.
- A confirmation prompt will appear asking if you want to remove the selected entry. Click “Yes” to proceed with the removal.
- If you have multiple entries you want to remove, repeat steps 4 to 6 for each entry.
- Once you have removed all the desired addresses or domains, click “OK” to save the changes and exit the “Junk Email Options” window.
By following these steps, you can easily remove unwanted addresses or domains from the Safe Senders list in Outlook. This gives you the flexibility to update your trusted sources and ensures that only emails from the most relevant and trusted senders land directly in your inbox.
Now that you know how to remove addresses or domains from the Safe Senders list, you can proceed to the next step to learn how to edit the Safe Senders list in Outlook and make any necessary changes.
Step 5: Edit Safe Senders List in Outlook
Editing the Safe Senders list in Outlook allows you to make changes to existing addresses or domains, such as modifying the email address or domain itself. Follow these steps to edit the Safe Senders list in Outlook:
- Open the “Junk Email Options” window in Outlook, as described in the previous steps.
- Navigate to the “Safe Senders” tab within the “Junk Email Options” window.
- Scroll through the list of addresses and domains in the Safe Senders list and locate the entry you want to edit.
- Select the entry you want to edit by clicking on it to highlight it.
- Click on the “Edit” button, which is located right next to the “Remove” button in the window. This will open a dialog box where you can make changes to the selected entry.
- Make the necessary modifications to the email address or domain in the provided text field.
- Click “OK” to save the changes you made to the selected entry.
- If you have multiple entries you want to edit, repeat steps 4 to 7 for each entry.
- Once you have finished editing the desired addresses or domains, click “OK” to save the changes and exit the “Junk Email Options” window.
By following these steps, you can easily edit the Safe Senders list in Outlook. This allows you to make modifications to existing entries, ensuring that the list of trusted sources always reflects your current needs and preferences.
Now that you know how to edit the Safe Senders list in Outlook, you can effectively manage and customize your trusted senders and domains, providing a streamlined and personalized email experience.
Tips for Managing Safe Senders List in Outlook
Effectively managing your Safe Senders list in Outlook ensures that you have a streamlined and secure email experience. Here are some tips to help you make the most out of this feature:
- Regularly review and update: Take the time to review your Safe Senders list periodically. Remove any addresses or domains that are no longer relevant or trusted, and add new ones as needed. Keeping your list updated ensures that only the most pertinent sources are designated as safe senders.
- Use caution when adding domains: While adding a domain to the Safe Senders list can be convenient, it is essential to exercise caution. Be sure to only add domains that you trust entirely and expect to receive emails from. Adding too many domains may increase the risk of phishing attempts or unwanted emails slipping through.
- Make use of other Outlook filtering options: In addition to the Safe Senders list, Outlook offers various filtering options. Consider utilizing other features such as blocked senders, phishing protection, and advanced junk email settings to customize your protection and further enhance your email security.
- Avoid overloading the Safe Senders list: While it is important to add trusted addresses and domains, be mindful of overwhelming the Safe Senders list with unnecessary entries. Keep the list concise and focused on those sources that are most important to you to ensure efficient management.
- Be cautious with unknown senders: While the Safe Senders list is effective at ensuring trusted emails land in your inbox, it’s still important to exercise caution with unknown senders. Always be mindful of possible phishing attempts and suspicious email content, even if they are received from a sender on your Safe Senders list.
- Regularly check your junk email folder: Despite having a comprehensive Safe Senders list, it’s a good practice to occasionally check your junk email folder. There’s always a slight chance that some legitimate emails may end up there. This additional step ensures you don’t miss out on any important messages.
- Backup your Safe Senders list: Consider keeping a backup of your Safe Senders list, either by exporting it or taking a screenshot. This precautionary step allows you to easily restore your list in case of accidental deletion or if you ever need to move it to another Outlook account.
By following these tips, you can effectively manage your Safe Senders list in Outlook, optimizing your email experience while ensuring a high level of security and efficiency.