
What is a link on Snapchat and why would you want to add one?
A link on Snapchat allows you to attach a clickable URL to your snap, which viewers can open in a web browser by swiping up on the snap. This feature offers a unique opportunity to share additional information, direct users to external websites, promote products or events, or even drive traffic to your own website or social media profiles.
Adding a link on Snapchat can be extremely useful in various scenarios. Here are a few reasons why you might want to add a link:
1. Promote a blog post or article: If you have written an informative or engaging blog post, you can include a link on Snapchat to drive traffic to your website and increase the visibility of your content.
2. Share an online store or product page: If you’re a business owner or an influencer promoting products, adding a link on Snapchat can lead viewers directly to the online store or specific product pages, making it easier for them to make a purchase.
3. Advertise an event or webinar registration: If you’re organizing an event, workshop, or webinar, you can add a link to the registration page on Snapchat. This way, interested viewers can quickly sign up for the event without having to search for the registration link elsewhere.
4. Provide additional information: Sometimes, the character limit in a snap is not enough to convey all the details. Adding a link can allow you to provide more information, such as instructions, recipes, or even a longer video that complements the snap.
5. Drive traffic to your social media profiles: If you want to increase your followers on Instagram, Twitter, or other social media platforms, you can include links to your profiles on Snapchat. This encourages viewers to connect with you on other platforms as well.
Adding a link on Snapchat is a powerful way to enhance your snaps and engage your audience in a more interactive and dynamic manner. It provides an opportunity to extend the lifespan of your content beyond the snap itself and allows for seamless integration with external platforms. Whether you’re a content creator, business owner, or simply someone who wants to share valuable information, incorporating links on Snapchat can help you achieve your goals.
Step 1: Update your Snapchat app to the latest version
Before you can start adding links to your snaps on Snapchat, it’s important to ensure that you have the latest version of the app installed on your device. Snapchat regularly releases updates to improve functionality, fix bugs, and introduce new features. By keeping your app updated, you’ll have access to the latest tools and enhancements, including the ability to add links to your snaps.
To update the Snapchat app, follow these simple steps:
- Open the App Store (for iPhone) or Play Store (for Android) on your device.
- Search for “Snapchat” in the search bar.
- If there is an update available, you will see an “Update” button next to the Snapchat app.
- Tap on the “Update” button to start the update process.
- Wait for the update to download and install on your device. This may take a few minutes depending on your internet connection.
Once the update is successfully installed, you can proceed to the next steps to start adding links to your snaps on Snapchat. It’s important to note that certain features and updates may vary depending on your device’s operating system and the version of the Snapchat app you have installed. Therefore, it’s advisable to regularly check for updates and keep your app up to date to ensure you have access to the latest features and improvements.
Step 2: Open the app and log in to your account
Once you have updated your Snapchat app to the latest version, you’re ready to start adding links to your snaps. The next step is to open the app and log in to your Snapchat account. Here’s how you can do it:
- Locate the Snapchat app on your device’s home screen or app drawer and tap on it to open.
- If you already have a Snapchat account, enter your username and password in the login screen. If you don’t have an account yet, tap on “Sign Up” to create a new one.
- If you choose to create a new account, follow the prompts to set up your profile, create your username, and add a profile picture.
- Once you’re logged in, you’ll be greeted by the Snapchat camera screen, where you can capture photos or record videos to create snaps.
Logging in to your Snapchat account is essential to access all the features and functions of the app, including the ability to add links to your snaps. Make sure you have a strong internet connection and enter your login credentials accurately to log in successfully. If you encounter any issues while logging in, double-check your username and password, or try resetting your password if necessary.
Now that you’re logged in to your Snapchat account, you’re ready to move on to the next step and start adding links to your snaps. Whether you’re a casual Snapchat user or a business looking to engage with your audience, this feature can be a valuable tool to enhance your snaps and provide additional information to your viewers. Let’s continue to the next step!
Step 3: Create a new snap or select an existing snap to add a link to
Now that you’re logged in to your Snapchat account, it’s time to create a new snap or select an existing snap to which you want to add a link. Whether you want to share a photo, record a video, or upload content from your device’s gallery, Snapchat provides various options to create engaging snaps. Here’s how you can proceed:
- On the Snapchat camera screen, you can tap on the circular shutter button to capture a photo snap. To record a video snap, press and hold the shutter button for the desired duration.
- If you prefer to upload content from your gallery, tap on the small square icon located at the bottom left corner of the camera screen. This will open your device’s gallery, and you can select a photo or video to upload as a snap.
- After capturing a new snap or selecting an existing one, you will be directed to the editing screen. Here, you can use various creative tools and filters to enhance your snap’s appearance.
- Take your time to add any desired stickers, text captions, or doodles to make your snap more visually appealing and engaging. Snapchat offers a wide range of effects and features to customize your snaps.
Creating a captivating snap is essential to catch the attention of your viewers and make your link more compelling. Consider the message you want to convey and the purpose of adding a link to your snap. Whether it’s a fun, informative, or promotional snap, make sure your content is aligned with your goals and audience preferences.
If you’ve already captured or selected a snap that you want to add a link to, be sure to choose a snap that complements the link’s content. The snap should provide relevant context and entice viewers to swipe up and explore the attached link. Making the link and snap cohesive will create a seamless experience for your audience.
Once you’ve created or selected a snap, it’s time to proceed to the next step where we’ll explore how to add a link to your snap on Snapchat. This feature will allow your viewers to access additional information, websites, or any other destination you choose by simply swiping up on your snap. Let’s continue!
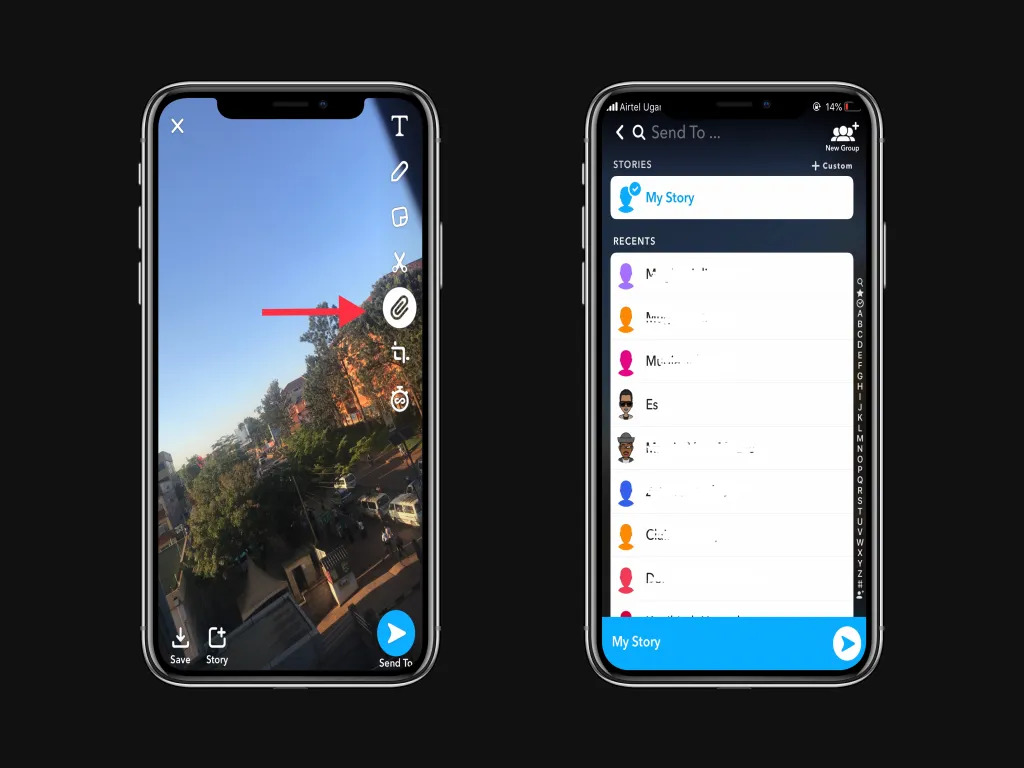
Step 4: Tap on the paperclip icon in the vertical toolbar on the right side of the screen
Once you have created or selected the snap you want to add a link to, it’s time to attach the URL. Snapchat makes it easy to do this by providing a dedicated paperclip icon in the vertical toolbar on the right side of the screen. Follow these steps:
- On the editing screen, locate the vertical toolbar on the right side of the screen.
- Look for the paperclip icon, which represents the ‘Attach Link’ feature. It is typically located towards the toolbar’s bottom.
- Tap on the paperclip icon to open the link attachment interface.
By tapping on the paperclip icon, you are activating the function to attach a link to your snap. Snapchat’s intuitive interface ensures that adding the link is a straightforward and user-friendly process.
Remember, the placement of the paperclip icon may vary slightly depending on the Snapchat app version and any recent updates. However, Snapchat continuously strives to maintain a consistent user experience, so you should have no trouble identifying the paperclip icon in the toolbar.
Now that you’ve successfully tapped on the paperclip icon, you’re ready to proceed to the next step and enter the URL you want to attach to your snap. Adding a URL allows your viewers to easily access the desired destination by simply swiping up on your snap. Let’s explore how to enter the URL and customize the link preview in the upcoming step!
Step 5: Enter the URL you want to link to in the “URL” field
Now that you have opened the link attachment interface by tapping on the paperclip icon, it’s time to enter the URL you want to attach to your snap. Snapchat provides a designated field where you can input the desired URL. Follow these steps:
- In the link attachment interface, you will see a field labeled as “URL” or “Link”. This is where you will enter the URL you want to link to.
- Tap on the URL field to activate the text input. This will prompt the keyboard to appear on your screen.
- Type or paste the full URL of the website or page you want to link to. Make sure to include the “http://” or “https://” protocol for a valid URL.
Take your time to ensure the accuracy of the URL you are entering. A small mistake in the URL can result in a broken link and prevent your viewers from accessing the desired destination. Double-check the spelling, capitalization, and any special characters within the URL to avoid any issues.
It’s important to note that Snapchat supports links to external websites, landing pages, articles, and other verified sources. However, certain URLs may not be suitable or allowed, such as those leading to malicious websites or spam. Ensure that the URL you are linking to complies with Snapchat’s guidelines to avoid any penalties or limitations.
Once you have entered the URL in the designated field, you have successfully attached the link to your snap. However, you can further enhance the link preview and customize its appearance by adding a title or description. We will explore this customization step in the next section. Let’s continue!
Step 6: Customize the preview of the link by adding a title or description
After entering the URL in the “URL” field, Snapchat provides the option to customize the preview of the link by adding a title or description. This allows you to provide additional context and entice viewers to swipe up on your snap. Follow these steps to customize the link preview:
- In the link attachment interface, you will see fields labeled as “Title” and “Description”. These fields are where you can add a title and description for the link preview.
- Tap on the “Title” field to activate the text input. This will prompt the keyboard to appear on your screen.
- Type a concise and attention-grabbing title that summarizes the content of the linked website or page.
- Tap on the “Description” field to activate the text input.
- Add a concise and engaging description that provides more information about the linked content and intrigues your viewers to swipe up.
Customizing the preview of the link is an important step to make your snap more inviting and informative. The title and description should accurately represent the content of the linked website or page, and they should be compelling enough to encourage viewers to take action.
Keep the title and description concise while remaining informative and engaging. Remember that the space available for the preview is limited, so it’s important to capture the essence of the linked content in just a few words. Make use of catchy phrases, keywords, or intriguing statements to pique viewers’ curiosity and entice them to swipe up.
Once you have added the title and description, take a moment to review and ensure they accurately represent the linked content and align with the purpose of your snap. The customized preview will provide your viewers with a glimpse of what to expect when they swipe up on your snap. This further encourages engagement and ensures a seamless user experience.
With the link URL, title, and description customized, you’re almost ready to share your snap with the attached link. However, there are a few more steps to go before your viewers can access the linked content. The next section will guide you through the process of attaching the link to your snap. Let’s proceed!
Step 7: Tap on the “Attach to Snap” button to add the link to your snap
After customizing the preview of the link by adding a title and description, the next step is to attach the link to your snap. Snapchat makes this process simple and user-friendly with the “Attach to Snap” button. Follow these steps:
- In the link attachment interface, review the URL, title, and description you have entered to ensure they are accurate.
- Once you are satisfied with the link preview, tap on the “Attach to Snap” button. This button is usually located at the bottom or in the lower right corner of the screen.
Tapping on the “Attach to Snap” button finalizes the process of adding the link to your snap. By attaching the link, you are creating a seamless connection between your snap and the external content or destination you want to share with your audience.
It’s important to note that once the link is attached, viewers will be able to swipe up on your snap to open the attached URL in a web browser. This allows them to explore the linked content, visit websites, view articles, or engage with other online resources.
Keep in mind that the attachment of the link is irreversible after you tap the “Attach to Snap” button. Therefore, double-check the URL, title and description to ensure they accurately represent the content you want to share. Taking the time for this final review will ensure a seamless and positive experience for your viewers, as well as help you achieve your intended goals.
Once you have successfully attached the link to your snap, you are almost ready to share it with your audience. In the next step, we’ll cover how to send or post your snap with the attached link. Let’s proceed!
Step 8: Send or post your snap with the link attached
Now that you have attached the link to your snap, it’s time to share it with your audience. Whether you want to send the snap directly to specific Snapchat contacts or post it as a story for all your followers to see, Snapchat provides multiple options to distribute your snap with the attached link. Follow these steps:
- In the editing screen, review your snap to ensure that the link attachment is visible and correctly positioned. You should see a preview of the attached link with the title and description you provided.
- If you want to send the snap to specific contacts, tap on the blue send button located at the bottom right corner of the screen. This will take you to the list of your Snapchat contacts.
- Select the contacts you want to send the snap to, or type their usernames in the search bar.
- If you want to post the snap as a story, tap on the blue arrow icon located at the bottom left corner of the screen. This will post the snap to your Snapchat story, where all your followers can view it.
Choose the option that best suits your purpose and audience. Sending the snap directly to specific contacts allows for a more targeted and personalized approach. On the other hand, posting it as a story ensures wider visibility and lets all your followers have access to the snap and the attached link.
Before sending or posting your snap, take a moment to review it one final time. Ensure that the content, visuals, and the attached link accurately represent your message and align with your intended goals. This final quality check will help ensure that your snap delivers the desired impact and provides a positive user experience.
Once you are satisfied with your snap, you can proceed to send it to your chosen contacts or post it as a story. Your audience will then be able to view the snap and easily access the attached link by simply swiping up on the snap.
Congratulations! You have successfully added a link to your snap and shared it with your audience. Now, it’s time to sit back and observe the engagement and interactions that your snap with the attached link generates. Whether it’s driving website traffic, promoting an event, or sharing valuable content, the integration of links on Snapchat can significantly enhance your communication and allow you to achieve your goals. Enjoy the process and explore the possibilities that this feature opens up for you!
Step 9: Viewers can swipe up on your snap to open the link in a web browser
After sending or posting your snap with the attached link, your viewers will have the opportunity to engage with the linked content by simply swiping up on the snap. This action opens the link in a web browser, allowing them to explore the website, view articles, register for events, or interact with other online resources. Here’s how viewers can access the link:
- When your viewers receive your snap or see it in their Snapchat story feed, they will notice a prompt or indicator at the bottom of the screen. This prompt typically includes a text like “Swipe up to see more” or an arrow icon pointing upwards.
- To access the attached link, viewers can swipe up on the snap with either a finger or a thumb. This swipe motion is done from the bottom of the screen towards the top.
- Once viewers swipe up, the Snapchat app will seamlessly transition to a web browser, displaying the linked content in full view.
It’s important to note that the availability of the swipe-up feature depends on the viewer’s Snapchat app version and device compatibility. Some older app versions or devices may not support this feature. Therefore, it’s essential to inform your audience about the swipe-up functionality and encourage them to update their Snapchat app to the latest version if necessary.
Encouraging viewers to swipe up and engage with the link can be done by adding a brief call-to-action in your snap’s caption or verbally mentioning it in any accompanying text or voice messages. By clearly and explicitly instructing your viewers to swipe up, you increase the chances of them taking action and accessing the linked content.
By incorporating the swipe-up action, Snapchat provides a seamless and intuitive way for viewers to access the attached link without interrupting their Snapchat experience. This functionality enhances the interactivity of your snaps and expands the possibilities of sharing additional information, promoting events, or directing traffic to your desired destinations.
With viewers being able to swipe up on your snap and explore the attached link at their convenience, you have successfully utilized the link feature on Snapchat to provide a more comprehensive and engaging experience for your audience. Enjoy tracking the engagement and analyzing the impact that your linked snaps generate to optimize your future strategies and create even more compelling content!
Tips for Adding Links on Snapchat
Adding links on Snapchat can be a powerful tool to enhance your snaps and engage your audience. To make the most out of this feature, here are some tips to keep in mind when adding links on Snapchat:
- Keep it relevant: Ensure that the linked content is relevant to your audience and aligns with the purpose of your snap. Adding a link that provides valuable information, promotes a product or service, or supports your message will generate more interest and engagement.
- Use concise and captivating titles and descriptions: The title and description of your link should be concise yet intriguing enough to capture your viewers’ attention. Use action verbs, keywords, and attention-grabbing phrases to entice viewers to swipe up and explore the attached link.
- Test the link before sharing: Before sending or posting your snap, double-check the attached link to ensure it is working properly. Test it on different devices and browsers to ensure a seamless user experience.
- Consider timing: Consider the timing of your link attachment. If you’re promoting an event or limited-time offer, make sure to attach the link well in advance to give viewers enough time to take action. Additionally, consider the relevance of the linked content to current trends or topics to boost engagement.
- Engage with your audience: Encourage viewers to engage with the link by asking questions, offering incentives, or creating interactive experiences. This can help drive more clicks and foster a deeper connection with your audience.
- Track and analyze performance: Take advantage of Snapchat’s analytics or use third-party tools to track the performance of your linked snaps. By analyzing metrics such as click-through rates and engagement, you can identify what resonates with your audience and refine your strategies accordingly.
- Be mindful of Snapchat’s guidelines: Ensure that the links you attach comply with Snapchat’s guidelines to avoid any penalties or limitations to your account. Avoid linking to malicious websites, spam, or content that violates Snapchat’s terms of service.
- Promote your snap: Once you have shared your snap with the attached link, consider promoting it on other social media platforms or through other marketing channels to increase exposure and reach a wider audience. This can help drive more views and interactions with your linked snaps.
By keeping these tips in mind, you can maximize the impact of the links you add on Snapchat and create a more engaging and interactive experience for your audience. Experiment with different approaches, track performance, and adapt your strategies based on the insights you gather. With creativity and thoughtful execution, the addition of links can significantly enhance your Snapchat presence and help you achieve your goals.