
Benefits of Adding a Digital Signature to Word
Adding a digital signature to your Word documents brings a multitude of benefits. Whether you’re a professional in a corporate setting or an individual working on critical documents, digital signatures provide a higher level of security and authenticity. Here are some key advantages of incorporating digital signatures into your Word files:
1. Enhances Document Integrity: Digital signatures protect the integrity of your documents by ensuring that they haven’t been tampered with since the signature was added. This prevents unauthorized modifications, keeping your content intact and trustworthy.
2. Increases Document Security: Unlike traditional paper-based signatures, digital signatures are harder to forge. They use advanced cryptographic algorithms to create unique identifiers tied to the signer’s identity, making it nearly impossible for anyone to replicate or impersonate the signature.
3. Saves Time and Effort: With digital signatures, there’s no need to print, sign, and scan documents. You can sign electronically within Word, eliminating the hassle of physical paperwork. This saves valuable time and streamlines your workflow.
4. Streamlines Approval Processes: Digital signatures allow for faster approval processes, especially in collaborative settings. Multiple stakeholders can sign a document electronically, reducing the need for physical meetings or sending documents back and forth. This expedites decision-making and improves productivity.
5. Enhances Legitimacy and Trust: Digital signatures provide an undeniable proof of authenticity, instilling confidence in the recipient that the document was genuinely signed by the indicated party. This is particularly important for legal, financial, or sensitive documents.
6. Simplifies Compliance: If you’re working in an industry that requires compliance with specific regulations, such as HIPAA or GDPR, adding digital signatures to your Word documents can help you meet these requirements. Digital signatures offer a secure and traceable way of demonstrating document consent and compliance.
7. Cost-effective and Environmentally Friendly: By transitioning to digital signatures, you can significantly reduce the consumption of paper, ink, and other physical resources associated with traditional signatures. This contributes to a greener, more sustainable approach while also reducing expenses related to printing and storage.
Overall, adding a digital signature to your Word documents offers a range of benefits, including document integrity, increased security, time savings, streamlined processes, enhanced legitimacy, compliance support, and environmental advantages. Take advantage of the built-in features in Word to start incorporating digital signatures into your workflow today!
How to Prepare a Document for Digital Signature
Before adding a digital signature to your Word document, it’s important to ensure that the document is properly prepared. Follow these steps to prepare your document for a digital signature:
1. Verify Document Accuracy: Thoroughly review the content of your document to ensure that it is accurate and complete. Make any necessary edits or updates before proceeding with the digital signature process. It’s crucial to have the correct information in the document before adding the signature.
2. Remove Unwanted Content: Eliminate any unnecessary or confidential information from the document. This could include personal data, irrelevant sections, or private notes. By removing such content, you can maintain the privacy and security of the document.
3. Check Formatting and Styling: Pay attention to the formatting and styling of your document. Verify that fonts, sizes, and alignments are consistent throughout the document. This ensures that the final version of your document looks professional and presentable when it is signed.
4. Set Signature Placement: Determine where the digital signature will be placed within the document. Consider leaving ample space for the signature, ensuring that it doesn’t interfere with other content. It is recommended to use the built-in Signature Line feature in Word, which automatically sets the appropriate space for the signature.
5. Validate Document Structure: Double-check the structure and organization of your document. Ensure that headings, paragraphs, and sections are clearly defined and easy to navigate. This improves the overall readability and accessibility of the document, even after the digital signature has been added.
6. Save a Backup Copy: It’s always a good idea to create a backup copy of your document before adding a digital signature. This ensures that you have a separate, untouched version of the document in case any issues arise during the signature process. Saving a backup provides peace of mind and protects against accidental errors.
By following these steps, you can prepare your Word document effectively for a digital signature. Taking the time to review and refine your document will result in a professional and secure final product. Once your document is ready, you can proceed to add a digital signature using the built-in features in Word or by utilizing a certificate or smart card.
Adding a Digital Signature Using the Built-in Signature Line Feature
Microsoft Word provides a convenient built-in feature called Signature Line that allows you to add a digital signature to your document. Follow these steps to use the Signature Line feature:
1. Open the Document: Launch Microsoft Word and open the document you want to add a digital signature to. Make sure the document is prepared and ready for the signature, as outlined in the previous section.
2. Place the Cursor: Position your cursor where you want the signature line to appear in the document. This is typically at the end of the document or at a designated place for signatures such as contracts or agreements.
3. Access the Signature Line: Go to the “Insert” tab in the Word ribbon and click on the “Signature Line” button in the “Text” group. This will open a dialog box for adding a signature line to the document.
4. Fill in Signature Details: In the Signature Setup dialog box, enter the relevant details for the signature. This includes the name of the signer, the signer’s title, and any additional instructions or information for the signer.
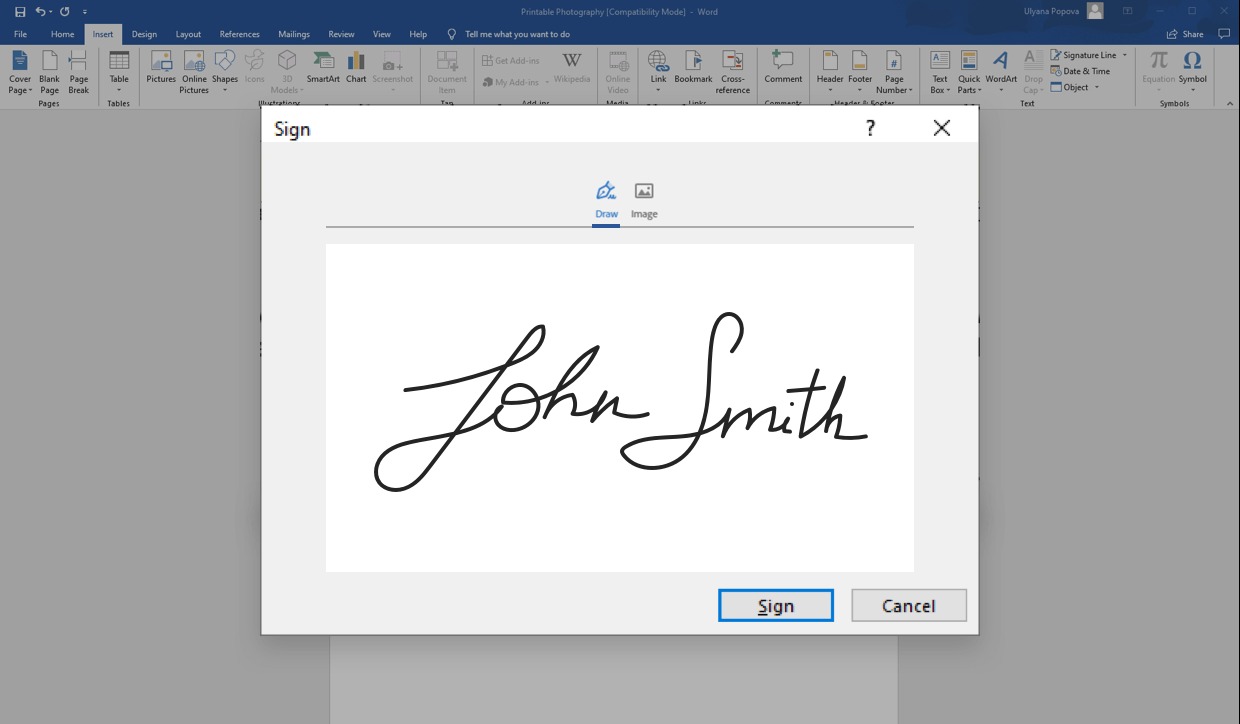
5. Add Signature Image (Optional): If desired, you can include an image of the signer’s signature. To do this, check the “Allow the signer to add comments in the Sign dialog box” box in the Signature Setup dialog box. This will prompt the signer to insert their signature as an image when they sign the document.
6. Save and Distribute the Document: Once you have configured the signature details, click on the “OK” button in the Signature Setup dialog box. Save the document to apply the signature line. You can now distribute the document to the intended signer for their digital signature.
7. Sign the Document: The signer can open the document, place their cursor on the signature line, and click on the “Sign” button that appears. This will prompt them to digitally sign the document using their personal digital ID or certificate.
8. Verify the Digital Signature: Once the document is signed, you can verify the digital signature by right-clicking on the signature line and selecting “Signature Details.” This will display information about the signer and the validity of the digital signature.
By utilizing the built-in Signature Line feature in Microsoft Word, you can easily incorporate digital signatures into your documents. This streamlined process enhances the security and legitimacy of your files, providing a reliable way to sign and validate important documents.
Adding a Digital Signature Using a Certificate or Smart Card
In addition to the built-in Signature Line feature, Microsoft Word allows you to add a digital signature using a certificate or smart card. This method offers an additional layer of security and flexibility. Follow these steps to add a digital signature using a certificate or smart card:
1. Install Digital Certificate: Ensure that the required digital certificate is installed on the computer. If you haven’t obtained a digital certificate yet, you can obtain one from a trusted certificate authority or your organization’s IT department.
2. Open the Document: Launch Microsoft Word and open the document you want to digitally sign. Make sure the document is properly prepared for the signature, as outlined in the earlier instructions.
3. Place the Cursor: Position the cursor in the location where you want to insert the digital signature within the document. Typically, this is at the end of the document or in a designated signature area.
4. Access the Signature Option: Open the “File” menu and select the “Options” tab. Within the “Options” dialog box, select “Trust Center” on the left-hand side, and then click on the “Trust Center Settings” button on the right-hand side.
5. Configure Trust Center Settings: In the Trust Center dialog box that appears, select “Macro Settings” on the left and ensure that the setting “Disable all macros without notification” is selected. Next, select “Digital Signatures” on the left and click on the “Choose” button to select the desired certificate or smart card for the signature.
6. Sign the Document: With the appropriate certificate or smart card selected, click on the “Sign” button within the “Digital Signatures” dialog box. Follow the on-screen instructions to apply your digital signature to the document.
7. Verify the Digital Signature: After signing the document, you can validate the digital signature’s authenticity by right-clicking on the signature and selecting “Signature Details.” This will display information about the signer and confirm the validity of the digital signature.
By using a digital certificate or smart card to add the digital signature, you ensure a higher level of security and authentication. This method is particularly useful for individuals and organizations that require stringent security measures for their documents.
How to Create a Digital Signature Line from Scratch
If you need to create a digital signature line from scratch in Microsoft Word, follow these steps:
1. Open a New Document: Launch Microsoft Word and open a new blank document where you want to create the digital signature line.
2. Insert a Text Box: Go to the “Insert” tab in the Word ribbon and click on the “Text Box” button in the “Text” group. Choose the type of text box you want to insert, such as a simple text box or one with a specific format.
3. Customize the Text Box: Once the text box is inserted, you can customize its appearance by adjusting the size, position, and formatting. Right-click on the text box and select “Format Shape” to modify its properties, such as border style and fill color.
4. Add Signature Line Text: Click inside the text box and enter the text for the signature line. This can include the name of the signer, the date, and any other relevant information. You may also want to include a statement indicating the purpose of the signature, such as “I certify that the content above is true and accurate.”
5. Format the Signature Line: Highlight the text that represents the signature line, and go to the “Home” tab in the Word ribbon. Format the selected text by adjusting the font, size, and alignment to match your desired signature style.
6. Insert a Line: To create a visual representation of the signature line, go to the “Insert” tab in the Word ribbon, click on the “Shapes” button in the “Illustrations” group, and choose a straight line shape. Draw the line underneath the signature line text to complete the visual representation.
7. Save the Document: Save the document with the digital signature line in a location of your choice. It is recommended to save the document as a template if you plan to reuse the signature line in future documents.
8. Distribute the Document: Share the document with others who need to sign it. They can digitally sign the document by clicking on the signature line text and following the appropriate digital signature process, whether it’s using the built-in Signature Line feature or a certificate or smart card.
Creating a digital signature line from scratch allows you to have full control over the design and placement of the signature line within your Word document. This method is ideal when you want a customized signature line that suits your specific needs and preferences.
Verifying the Authenticity of a Digital Signature
When working with digitally signed Word documents, it’s essential to verify the authenticity of the digital signature. Verifying the digital signature ensures that the document has not been tampered with and confirms the identity of the signer. Here’s how you can verify the authenticity of a digital signature:
1. Open the Document: Launch Microsoft Word and open the document that contains the digital signature you want to verify. Make sure the document is accessible and properly formatted.
2. Locate the Signature: Locate the digital signature within the document. This is usually represented by a signature line or an icon indicating that the document has been signed digitally.
3. Right-Click on the Signature: Right-click on the digital signature to display a context menu. Choose the option that allows you to inspect or view the signature details. This may vary depending on the version of Microsoft Word you are using.
4. Check Signature Details: A dialog box or panel will appear displaying the details of the digital signature. Pay attention to information such as the signer’s name, the certificate issuer, and the signing time. Verify that the details match the expected information.
5. Verify the Validity of the Signature: Within the signature details, there should be an indication of the signature’s validity. This could be displayed as “Valid” or “Invalid” based on the verification process. If the signature is invalid, it may indicate that the document has been altered or that the signature is not from a trusted source.
6. Examine Certificate Details: To gather more information about the signer and their certificate, click on a link or button within the signature details panel that allows you to view the certificate. This will display additional information, such as the certificate’s expiration date and the certificate authority.
7. Cross-Check Certificate Details: To ensure the credibility of the certificate, compare its details to the trusted information you have about the signer or the organization they belong to. Verify that the certificate is issued by a recognized and trusted certificate authority.
8. Consider Additional Verification: In some cases, you may want to perform further verification by contacting the signer directly, especially if the document contains sensitive or high-risk information. Confirming the authenticity of the signature with the signer can provide an extra level of assurance.
By following these steps, you can verify the authenticity of a digital signature in a Word document. This process strengthens the trust and reliability of the signed document, ensuring that it has not been altered and that the signer’s identity is valid and trustworthy.
Troubleshooting Common Issues with Digital Signatures
While digital signatures are a reliable way to authenticate and secure documents in Microsoft Word, there can be occasional issues that arise. Understanding and troubleshooting these common issues can help ensure successful implementation of digital signatures. Here are some common problems you may encounter and possible solutions:
1. Invalid or Expired Certificate: If you receive an error stating that the digital signature is invalid or expired, it could indicate an issue with the signer’s certificate. To resolve this, ask the signer to check the validity and expiration date of their certificate and obtain a new one if necessary.
2. Certificate Chain Issues: When verifying a digital signature, if you receive an error related to a certificate chain, it means that one or more certificates in the chain are not recognized as trustworthy. This can be resolved by ensuring that all certificates in the chain are from trusted certificate authorities and are properly installed on the system.
3. Document Modifications: If you make changes to a digitally signed document after it has been signed, it can invalidate the signature. To avoid this, ensure that the document is finalized and reviewed before applying the digital signature. If changes are necessary, it may require resigning the document.
4. Document Compatibility: Digital signatures may encounter compatibility issues when opening documents on different versions or platforms of Microsoft Word. To minimize this, ensure that all parties involved are using compatible versions of Word and have the necessary plugins or updates installed to support digital signatures.
5. Revoked Certificate: If a signer’s certificate has been revoked, the digital signature using that certificate will be invalid. Check the certificate’s status and, if revoked, request the signer to obtain a new valid certificate and re-sign the document.
6. Signature Placement: Sometimes, the signature line or image may not be correctly placed within the document, causing issues with the visual presentation or alignment of the signature. Double-check the layout and formatting of the signature area and adjust as needed to ensure proper placement.
7. Signature Verification Failure: If the verification process fails consistently, ensure that you are using trusted digital certificates and that your system’s security settings are properly configured. Consider seeking technical assistance or consulting the documentation provided by your certificate authority or IT department for troubleshooting guidance.
8. Signature Tampering: If you suspect that a digitally signed document may have been tampered with or altered, take appropriate measures to investigate the issue and rectify the situation. This may involve checking the document’s version history, confirming the document’s checksum, or contacting the signer to verify the integrity of the document.
By being aware of these common issues and implementing the suggested solutions, you can effectively troubleshoot problems that may arise when working with digital signatures in Microsoft Word. This will help you ensure the integrity, security, and authenticity of your digitally signed documents.
Tips for Using Digital Signatures in Word Effectively
When utilizing digital signatures in Microsoft Word, there are several tips and best practices that can enhance your experience and ensure the integrity of your documents. Here are some valuable tips for using digital signatures in Word effectively:
1. Educate Signers: Clearly communicate the purpose and benefits of digital signatures to the individuals who will be signing the documents. Provide instructions on how to sign digitally and address any concerns or questions they may have. This will help ensure smooth adoption and cooperation.
2. Protect Your Private Key: Safeguard the private key associated with your digital signature. It is crucial to keep this key confidential and secure to prevent unauthorized use of your signature. Store the key in a secure location and avoid sharing it with others.
3. Regularly Update Certificates: Keep track of the expiration dates for your digital certificates and ensure they are renewed before they expire. Renewing certificates in a timely manner prevents any disruption in the validity of your digital signature.
4. Choose a Reliable Certificate Authority: When obtaining a digital certificate, select a trusted and reputable certificate authority. Verify the authority’s credentials and reputation to ensure the validity and acceptance of your digital signature.
5. Audit Document Versions: Maintain a detailed record of revisions and versions of digitally signed documents. This allows you to track any changes made to a document and ensures you have a clear record of each signed version for future reference and legal purposes.
6. Combine Encryption with Digital Signatures: For an added layer of protection, consider encrypting your digitally signed Word documents. Encryption ensures that the contents of your document remain confidential and secure, even if the file is intercepted or accessed by unauthorized individuals.
7. Regularly Backup Signed Documents: Create backups of your digitally signed documents to prevent data loss or accidental deletion. Store these backups in a secure location, preferably in multiple locations, such as cloud storage or external drives.
8. Keep Software Updated: Ensure that your version of Microsoft Word and any associated plugins or extensions are up to date. Regularly check for updates or patches released by Microsoft to address any security vulnerabilities or compatibility issues related to digital signatures.
9. Verify Signatures Before Acting: Before trusting the content or instructions of a digitally signed document, always verify the authenticity and validity of the digital signature. Confirm that the signer’s identity, certificate, and signature details match your expectations.
10. Train and Support Users: Provide training and ongoing support to users who will be working with digitally signed documents. Help them understand the process, troubleshoot any issues, and ensure they have the necessary tools and knowledge to work effectively with digital signatures in Word.
By implementing these tips, you can optimize the use of digital signatures in Word, enhance document security, and maintain the integrity of your digitally signed documents.
How to Add Multiple Digital Signatures to a Word Document
There are situations where you may need to add multiple digital signatures to a single Word document, especially in collaborative or approval workflows. Microsoft Word offers a seamless process for adding multiple digital signatures. Here’s how you can do it:
1. Prepare the Document: Ensure that the document is properly formatted and reviewed before adding multiple digital signatures. Make any necessary edits or changes to the content before proceeding with the signature process.
2. Place Signature Lines: Identify the locations within the document where you want each signature to appear. Go to the desired locations and insert signature lines using the built-in Signature Line feature. Follow the steps outlined in the “Adding a Digital Signature Using the Built-in Signature Line Feature” section to insert signature lines for each signer.
3. Customize Signature Details: For each signature line, you can customize the details specific to each signer. Right-click on each signature line and choose “Properties” to modify the signer’s name, title, or any additional instructions or notes. This helps provide clarity to the signers about their role or responsibilities.
4. Distribute the Document: Share the document with each intended signer in the collaborative workflow. Each signer can digitally sign their respective signature line by following the specific digital signature process, such as using their digital ID or certificate.
5. Track Signature Progress: As the document circulates among the signers, keep track of the signature progress. You can monitor the status of each signature line by right-clicking on it and selecting “Signature Details.” This will allow you to check the validity and identity of each signer.
6. Verify All Signatures: Once all intended signers have added their digital signatures, it’s essential to verify the authenticity and validity of each signature. Right-click on each signature line and select “Signature Details” to review the signer’s details and confirm that each signature is valid.
7. Save and Protect the Document: After all signatures are successfully added and verified, save the document to preserve the integrity of the digital signatures. Consider enabling password protection or other security measures to prevent any unauthorized changes.
8. Archive the Document: It is recommended to maintain a record of the digitally signed document for future reference or compliance purposes. Create an archive by saving a copy of the document in a secure, long-term storage location.
By following these steps, you can easily add multiple digital signatures to a Word document. This enables effective collaboration and approval processes while ensuring the authenticity and integrity of the signed document.
Best Practices for Digital Signatures in Word
When working with digital signatures in Microsoft Word, following best practices enhances the security, reliability, and effectiveness of your signed documents. Here are some essential best practices to consider:
1. Use Trusted Certificates: Obtain digital certificates from trusted and reputable certificate authorities. Ensure that the certificates are valid and recognized by common trust anchors. This ensures the authenticity and integrity of your digital signatures.
2. Protect Private Keys: Safeguard the private keys associated with your digital certificates. Store them securely, preferably in hardware tokens or secure key storage devices. Avoid sharing private keys and use strong passwords or passphrase protection to prevent unauthorized access.
3. Verify Signer Identity: Before relying on a digital signature, verify the identity of the signer. Verify the signer’s credentials, such as name, job title, or organization, to ensure that the signer is authorized to sign the document.
4. Educate Signers: Provide comprehensive training to all signers on the proper use and importance of digital signatures. Educate them about the legal implications, security measures, and responsibilities associated with digitally signing documents.
5. Regularly Update Certificates: Keep track of certificate expiration dates and renew them promptly to avoid any interruptions in the validity of your digital signatures. Maintain up-to-date certificates to maintain trust in your signed documents.
6. Review Documents Before Signing: Thoroughly review the content, formatting, and accuracy of the document before applying your digital signature. Ensure that the document reflects your intention and that all information is correct.
7. Keep Software Updated: Regularly update your version of Microsoft Word and associated software to benefit from the latest security patches and enhancements. This helps safeguard against any vulnerabilities that could potentially compromise the integrity of your digitally signed documents.
8. Monitor Signature Status: Regularly check the status of your digital signatures within Word. Verify that all signatures are valid and have not been tampered with. The ability to view signature details and validate the signatures provides assurance that the document remains intact.
9. Safeguard Signed Documents: Protect digitally signed documents from unauthorized access or modifications. Implement appropriate security measures such as encryption, password protection, and secure storage to maintain the integrity and confidentiality of signed documents.
10. Follow Legal and Regulatory Requirements: Be aware of the legal and regulatory requirements surrounding digital signatures in your jurisdiction or industry. Ensure compliance with applicable laws and standards to maintain the legal validity of your digitally signed documents.
By adhering to these best practices, you can maximize the value and reliability of digital signatures in Microsoft Word. This fosters trust in the authenticity and integrity of your digitally signed documents and protects against potential risks.