
Connect your phone to a computer using a USB cable
To access files on your phone without internet, one of the simplest methods is to connect your phone to a computer using a USB cable. This allows you to transfer files between your phone and computer quickly and easily. Here’s how you can do it:
1. Start by connecting your phone to your computer using a USB cable. Depending on the type of phone you have, you may need a specific cable such as a USB-C or Micro USB cable.
2. Once the connection is established, your phone should prompt you to choose the type of USB connection. Select “File Transfer” or “Transfer files” option.
3. On your computer, open a file explorer window (such as Windows Explorer on Windows or Finder on Mac) to access your phone’s storage. You should see your phone listed as a connected device.
4. Double-click on your phone’s icon to open it and navigate through the folders to find the files you want to access. You can transfer files to and from your phone by dragging and dropping them between the phone’s storage and your computer.
5. Once you have finished transferring files, safely disconnect your phone from the computer by ejecting it using the appropriate method. This helps prevent any data loss or corruption.
Connecting your phone to a computer via USB cable allows for a reliable and secure file transfer option. It is especially useful when you need to transfer large files or a large number of files quickly. This method does not require an internet connection, making it ideal for situations where Wi-Fi or mobile data is not available or convenient.
Make sure to use a good quality USB cable to ensure a stable connection and minimize transfer errors. Additionally, keep your phone unlocked and the screen on while connected to your computer to avoid any interruptions during the file transfer process.
Use a file manager app on your phone
Another way to access files on your phone without internet is by using a file manager app. These apps provide a user-friendly interface that allows you to navigate through your phone’s storage and manage your files effectively. Follow these steps to use a file manager app:
1. Start by downloading a file manager app from your phone’s app store. There are several options available, such as File Manager, Astro File Manager, or ES File Explorer.
2. Once the app is installed, open it to access your phone’s storage. You will see various folders representing different types of files, such as images, videos, documents, and downloads.
3. Tap on the folder that contains the files you want to access. You can browse through the folder structure by tapping on the folders or using the back button.
4. Within each folder, you will see the files it contains. Tap on a file to open it or perform actions such as copying, moving, renaming, or deleting.
5. To transfer files from your phone to another device, such as a computer or another phone, select the files you want to transfer and use the app’s sharing or sending options. This can usually be done via Bluetooth, Wi-Fi Direct, or by creating a shareable link.
Using a file manager app gives you more control over your files and allows for easier organization and management. You can quickly locate specific files, create new folders, and perform various file operations directly from the app.
Remember to grant the necessary permissions to the file manager app to access your phone’s storage. Additionally, be cautious when deleting or moving files, as some actions may be irreversible.
File manager apps are versatile and can be used in various situations, providing you with a convenient method to access and manage files on your phone without relying on an internet connection.
Transfer files using Bluetooth
If you don’t have internet access, another method to access files on your phone is by using Bluetooth. Bluetooth enables wireless communication between devices within close proximity, allowing you to transfer files easily. Here’s how you can transfer files using Bluetooth:
1. Ensure that Bluetooth is enabled on both your phone and the device to which you want to transfer files. You can usually find the Bluetooth settings in the “Settings” or “Connections” menu on your phone.
2. On your phone, open the file manager or gallery app and locate the file you want to transfer. Long-press on the file to select it.
3. Tap on the sharing or send option, which may appear as a share icon or three dots, depending on your phone and app. Look for options such as “Share via Bluetooth” or “Send using Bluetooth.”
4. Your phone will start scanning for nearby Bluetooth devices. Once the recipient device is detected, select it from the list of available devices.
5. On the recipient device, a prompt may appear asking for permission to receive the file. Accept the incoming file transfer request.
6. The file transfer will begin, and a progress bar may appear on both devices to indicate the transfer status. The time taken for the transfer will depend on the file size and the Bluetooth version on your devices.
7. Once the transfer is complete, you can access the transferred file on the recipient device by checking the default storage location or the Bluetooth received files folder.
Bluetooth file transfer is a convenient method for transferring files between devices without internet access. It is useful for sharing various file types, including photos, videos, documents, and more.
Remember that Bluetooth has a limited range, typically around 30 feet (10 meters). Make sure both devices are within proximity for a successful file transfer. Also, depending on the Bluetooth versions and devices involved, the transfer speed may vary.
Using Bluetooth to transfer files saves mobile data and does not require a Wi-Fi network. However, it may not be suitable for transferring large files due to potentially slower transfer speeds compared to other methods like USB or Wi-Fi Direct.
Use Wi-Fi Direct to transfer files
If you’re looking for a fast and convenient way to access files on your phone without internet, Wi-Fi Direct can be a great option. Wi-Fi Direct allows you to establish a direct connection between two devices, enabling file transfer without the need for a Wi-Fi network. Here’s how you can use Wi-Fi Direct to transfer files:
1. On your phone, go to the “Settings” menu and look for the Wi-Fi settings. Ensure that Wi-Fi is turned on.
2. Scroll through the Wi-Fi settings and locate the option for Wi-Fi Direct. Tap on it to enable Wi-Fi Direct on your phone.
3. On the recipient device, also enable Wi-Fi Direct by accessing its Wi-Fi settings. The method for enabling Wi-Fi Direct may vary depending on the device.
4. Once Wi-Fi Direct is enabled on both devices, your phone will start scanning for nearby devices. It will display a list of available devices that support Wi-Fi Direct.
5. Select the recipient device from the list on your phone to establish a connection. This will send a connection request to the recipient device.
6. On the recipient device, accept the connection request. The devices will then pair and establish a direct Wi-Fi connection.
7. Once the connection is established, you can start transferring files. Open the file manager or gallery app on your phone and select the files you want to transfer.
8. Look for the sharing or send option, which may appear as a share icon or three dots. Tap on it and choose the Wi-Fi Direct option to send the selected files.
9. On the recipient device, a prompt will appear asking whether to accept the incoming file transfer. Accept the request to start receiving the files.
10. The file transfer will commence, and you can monitor the progress on both devices. The time taken for the transfer depends on the file size and the Wi-Fi Direct capabilities of the devices.
Using Wi-Fi Direct for file transfer offers faster speeds compared to Bluetooth and does not require an internet connection. It’s ideal for transferring large files such as videos, music, or documents.
Remember that both devices need to support Wi-Fi Direct for this method to work. Some older devices or operating systems may not be compatible with Wi-Fi Direct.
Wi-Fi Direct is a convenient way to transfer files between devices without relying on an internet connection. It provides a secure and direct connection, allowing for fast and reliable file transfers.
Access files using a cloud storage service
If you want to access files on your phone without internet, using a cloud storage service can be a convenient solution. Cloud storage services allow you to store and sync files across multiple devices, making them accessible from anywhere, even without an internet connection. Here’s how you can access files using a cloud storage service:
1. Install a cloud storage app on your phone from the app store. Popular options include Google Drive, Dropbox, and OneDrive. Sign in to your cloud storage account or create a new one if you don’t have an account already.
2. Upload the files you want to access to your cloud storage account. This can be done through the app by selecting the files from your phone’s storage or camera roll, and then choosing the upload option.
3. Once the files are uploaded, they will be synced to your cloud storage account. This means they are stored in the cloud and can be accessed from any device with the cloud storage app installed.
4. Open the cloud storage app on your phone and navigate to the files you want to access. You can browse through folders and view or download the files directly to your phone.
5. If you want to make files available offline, you can enable the offline access feature in the cloud storage app. This will download the selected files to your phone’s storage, allowing you to access them even without an internet connection.
6. To upload or sync new files, make changes to existing files, or delete files, perform the respective actions within the cloud storage app. Any changes made will be reflected across all devices connected to your cloud storage account.
Using a cloud storage service provides a convenient way to access files on your phone without relying on an internet connection. It also offers the advantage of backing up your files securely and accessing them from any device with the cloud storage app installed.
Keep in mind that accessing files through a cloud storage service requires an internet connection initially to upload and sync the files. Once the files are synced, you can access them offline as long as you’ve made them available offline within the cloud storage app.
Make sure to manage your storage space in the cloud storage account, as it may have limitations depending on the specific service and plan you’re using. Regularly check and remove any unused or unnecessary files to free up space and optimize your storage.
Connect a USB flash drive to your phone
If you’re looking to access files on your phone without internet, connecting a USB flash drive can provide a simple and direct solution. By utilizing an OTG (On-The-Go) cable or adapter, you can connect a USB flash drive directly to your phone and access the files stored on it. Here’s how you can connect a USB flash drive to your phone:
1. Start by checking if your phone supports OTG functionality. Most modern Android phones support OTG, but it’s always a good idea to verify this in the phone’s specifications or consult the manufacturer’s website.
2. Purchase an OTG cable or adapter that is compatible with your phone’s charging port. OTG cables typically have a micro USB or USB-C female connector on one end and a USB-A male connector on the other end.
3. Connect one end of the OTG cable or adapter to your phone’s charging port.
4. Connect the USB flash drive to the USB-A male connector on the OTG cable or adapter.
5. Once the USB flash drive is connected, your phone should recognize it automatically. You may receive a notification indicating that a USB device has been connected.
6. Open the file manager app on your phone to access the files on the USB flash drive. You can browse through the folders and open or transfer files as needed.
7. Safely eject the USB flash drive from your phone when you’re finished accessing the files. This helps prevent data corruption and ensures that the files are not in use.
Connecting a USB flash drive to your phone provides a convenient method to access files stored on the drive directly. It allows you to view and transfer files without the need for an internet connection or the hassle of uploading them to another device or cloud storage service.
Make sure to use a high-quality OTG cable or adapter to ensure a stable and reliable connection. Some phones may require additional configuration or settings to enable OTG functionality, so check your phone’s settings or consult the user manual for more information.
Keep in mind that not all phones support USB flash drives with large storage capacities or specific file systems, so it’s recommended to check the phone’s specifications or user manual for any restrictions or limitations.
Use an OTG adapter to connect external storage devices
If you want to access files on your phone without internet, using an OTG (On-The-Go) adapter can provide you with the ability to connect various external storage devices. An OTG adapter allows you to connect devices such as external hard drives, SD cards, or even cameras directly to your phone. This enables you to access and transfer files stored on these devices. Here’s how you can use an OTG adapter to connect external storage devices:
1. Check if your phone supports OTG functionality. Most newer Android phones support OTG, but it’s always best to verify this in your phone’s specifications or consult the manufacturer’s website.
2. Purchase an OTG adapter that is compatible with your phone’s charging port. OTG adapters typically have a micro USB or USB-C female connector on one end and a USB-A female or other specialized connectors on the other end, depending on the device you want to connect.
3. Connect one end of the OTG adapter to your phone’s charging port.
4. Connect the external storage device or accessory to the appropriate connector on the OTG adapter. For example, you can connect a USB flash drive to the USB-A connector or insert an SD card into the SD card slot.
5. Once the external storage device is connected, your phone should recognize it automatically. A notification may appear indicating that a USB device has been connected, or the files may appear in the file manager app.
6. Open the file manager app on your phone to access the files on the external storage device. You can browse through the folders, open files, or transfer them to your phone’s internal storage or other connected storage devices.
7. When you’re finished accessing the files, safely disconnect the external storage device from the OTG adapter. This helps prevent data corruption and ensures that the files are not in use.
Using an OTG adapter allows you to expand the storage capabilities of your phone and gives you the flexibility to connect a variety of external storage devices. It’s a convenient option for accessing files on the go without the need for an internet connection.
Make sure to use a high-quality OTG adapter that is compatible with your phone’s charging port. Additionally, keep in mind that some devices may require specific apps or settings to be configured in order to access the files properly. Refer to the device’s user manual or online support resources for more information.
Note that not all external storage devices may be compatible with your phone, depending on factors such as storage capacity, file system compatibility, or power requirements. It’s always a good idea to check your phone’s specifications and ensure compatibility before connecting external storage devices via an OTG adapter.
Set up a personal Wi-Fi hotspot on your phone
If you need to access files on your phone without an internet connection, setting up a personal Wi-Fi hotspot on your phone can provide a solution. By turning your phone into a Wi-Fi hotspot, you can connect other devices to it and access files stored on your phone from those devices. Here’s how you can set up a personal Wi-Fi hotspot on your phone:
1. Open the “Settings” menu on your phone and look for the “Hotspot” or “Tethering” option. The location of this option may vary depending on the phone model and operating system.
2. Tap on the “Hotspot” or “Tethering” option to access the hotspot settings.
3. Enable the Wi-Fi hotspot feature by switching it on. You may need to configure the hotspot settings, such as the network name (SSID) and password, depending on your phone’s capabilities.
4. Once the hotspot is enabled, other devices such as laptops, tablets, or other phones can connect to your phone’s Wi-Fi network. They can do this by selecting your phone’s network name (SSID) from the list of available Wi-Fi networks and entering the password if prompted.
5. Once a device is connected to your phone’s hotspot, it will be able to access files stored on your phone. Open the file manager app on the connected device and browse through the folders to locate and view the files.
6. You can transfer files between your phone and the connected device by using the file manager app or other file transfer methods such as Bluetooth, email, or a cloud storage service.
7. When you’re finished using the hotspot, remember to disable it to conserve battery life and prevent unauthorized access.
Setting up a personal Wi-Fi hotspot on your phone allows you to create a local network where other devices can connect and access files without requiring an internet connection. It’s a useful feature for situations where you need to share files or work on multiple devices in an offline environment.
Keep in mind that using the hotspot feature can consume your phone’s battery and potentially incur additional data usage if connected devices access the internet through your phone. Make sure you have an adequate data plan and monitor your phone’s battery level while using the hotspot.
Some mobile carriers may limit or charge additional fees for using the hotspot feature. It’s advisable to check with your carrier to ensure you have the necessary hotspot functionality and understand any associated costs or limitations.
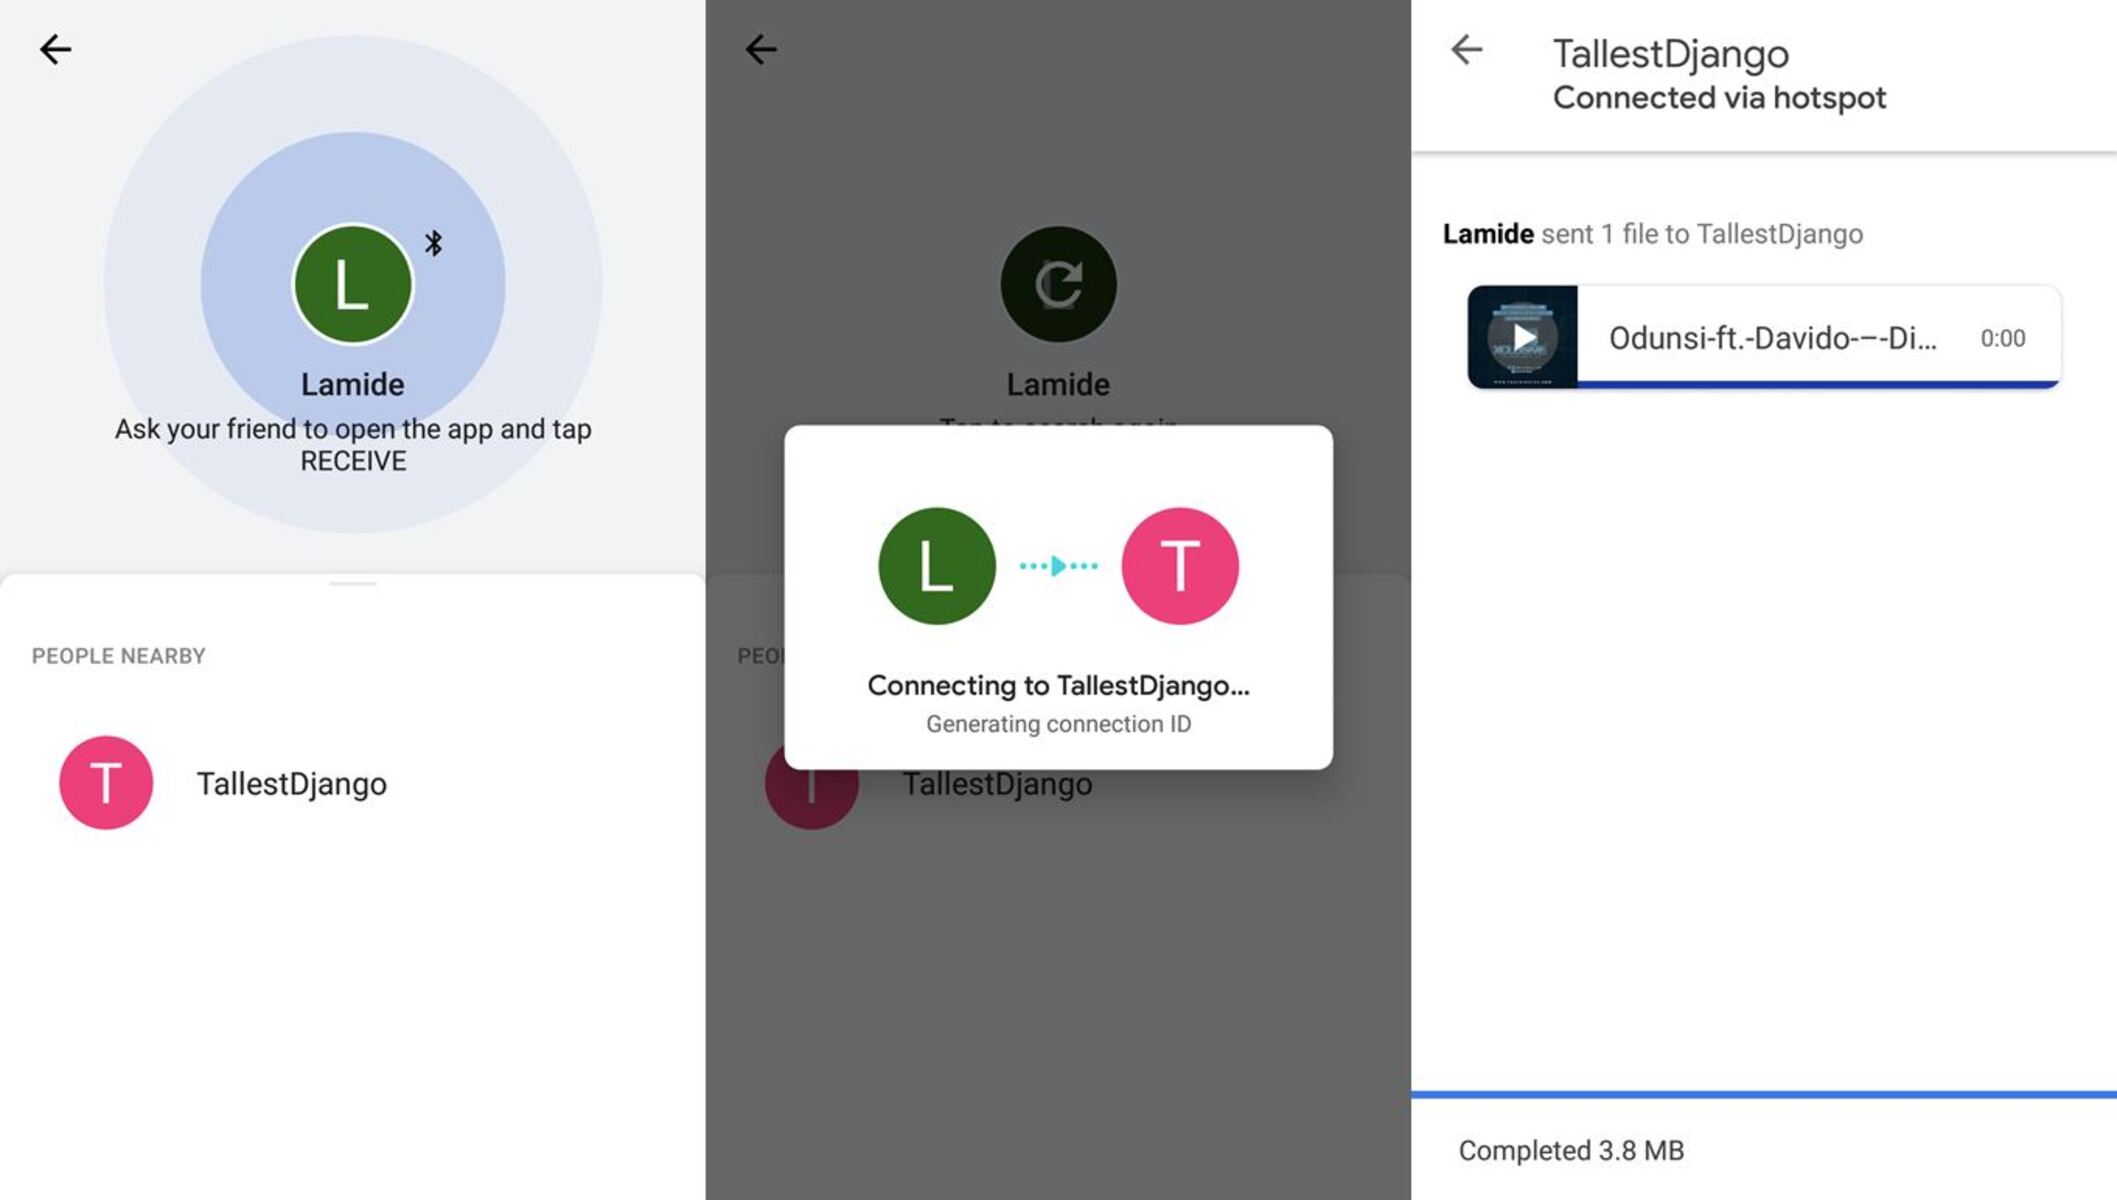
Use a file transfer app to transfer files between devices
When you need to access files on your phone without an internet connection, using a file transfer app can be a convenient solution. File transfer apps allow you to transfer files between devices wirelessly, making it easy to access and share files between your phone and other devices. Here’s how you can use a file transfer app to transfer files:
1. Install a file transfer app on both your phone and the device you want to transfer files to. Choose a reliable and reputable file transfer app, such as Send Anywhere, Xender, or SHAREit.
2. Open the file transfer app on your phone and grant any necessary permissions, such as access to your phone’s storage.
3. In the file transfer app on your phone, navigate to the files you want to transfer. You can usually browse through folders or use a search function to find specific files.
4. Select the files you want to transfer by tapping on them. You may also have the option to select multiple files or an entire folder.
5. Look for the sharing or sending option within the file transfer app. This may appear as a share icon or three dots. Tap on it to initiate the file transfer process.
6. The file transfer app will generate a unique code, QR code, or a link to establish a connection between your phone and the receiving device.
7. On the receiving device, open the file transfer app and choose the option to receive files. Enter the provided code, scan the QR code, or click on the link to establish the connection.
8. Once the connection is established, the file transfer will begin. The progress may be displayed on both devices, and you’ll be notified when the transfer is complete.
File transfer apps utilize Wi-Fi or Bluetooth technology to establish a direct connection between your phone and the receiving device. This allows for faster and more efficient file transfers compared to traditional methods like email or cloud storage.
Some file transfer apps also offer additional features such as cross-platform compatibility, support for large file sizes, and file encryption for added security.
Ensure that both devices are connected to the same Wi-Fi network or have Bluetooth enabled for successful file transfers. Keep in mind that the transfer speed may vary depending on factors such as the file size, network conditions, and the capabilities of the devices.
Using a file transfer app provides a seamless and efficient way to transfer files between your phone and other devices without an internet connection. It’s ideal for situations where you need to quickly share files or collaborate on projects across multiple devices.
Access files using a file transfer protocol (FTP) app
If you are looking to access files on your phone without an internet connection, utilizing a File Transfer Protocol (FTP) app can be a reliable and efficient solution. FTP allows you to securely access and transfer files between devices over a local network connection. Here’s how you can access files using an FTP app:
1. Install an FTP app on your phone from the app store. There are several FTP client apps available, such as FileZilla, AndFTP, or FTP Manager.
2. Open the FTP app and configure the FTP connection. Enter the FTP server details, including the server address, username, password, and port number. These details are typically provided by the FTP server administrator or your network administrator.
3. Once the FTP connection is established, the app will display the file directory of the FTP server. You can browse through the folders to locate the files you want to access.
4. Tap on the files to view or download them. Depending on the FTP app, you may also have options to upload files to the FTP server or perform file management tasks such as renaming or deleting files.
5. To transfer files between your phone and the FTP server, use the upload and download options within the FTP app. This allows you to transfer files in both directions seamlessly.
6. Remember to disconnect from the FTP server when you are finished accessing or transferring files to ensure the security of your connection.
Using an FTP app provides a reliable and secure method to access files on your phone without an internet connection. It is particularly useful when you have a local network set up or need to access files on an FTP server within your workplace or home network.
Keep in mind that FTP connections require the FTP server to be configured and accessible within your network. Additionally, make sure you have the necessary credentials and permissions to access the FTP server.
Some FTP apps may offer additional features such as FTP over SSH (SFTP) for enhanced security or the ability to save FTP connection details for quick access.
Ensure that your phone and the FTP server are connected to the same local network or have a direct network connection between them. This can be done through Wi-Fi or Ethernet connectivity.
Using an FTP app allows you to access and transfer files easily between devices without relying on an internet connection. It provides a versatile and efficient file management solution for both personal and professional use.