
Why change the battery on a Nest Thermostat?
The Nest Thermostat is a popular and innovative device that allows you to control your home’s heating and cooling system with ease. It uses a rechargeable lithium-ion battery to power its operations. While the battery life of a Nest Thermostat can last for several years, there may come a time when you need to change the battery.
Changing the battery on your Nest Thermostat is essential to ensure that it continues to work optimally and provide you with accurate temperature control. A low or dying battery can lead to various issues, such as an unresponsive thermostat, inaccurate temperature readings, or even a complete shutdown of the device.
Regularly replacing the battery is crucial for maintaining the functionality and reliability of your Nest Thermostat. It guarantees that the device remains operational, preventing any interruptions in controlling your home’s climate.
Additionally, changing the battery allows you to take advantage of any firmware updates that Nest may release. These updates not only enhance the performance of the thermostat but also improve its energy efficiency and introduce new features.
It’s important to note that the lifespan of the battery can vary depending on several factors, such as usage patterns, temperature settings, the frequency of adjustments made, and the ambient conditions in which the thermostat is installed.
In the following sections, we will guide you through the process of changing the battery on your Nest Thermostat. We will also provide tips to maximize battery life, ensuring that your thermostat continues to operate smoothly and efficiently.
Understanding the battery life of your Nest Thermostat
Before delving into the process of changing the battery on your Nest Thermostat, it’s essential to understand the battery life of this innovative device. The battery in a Nest Thermostat is designed to last for years, providing you with long-lasting and reliable operation.
The battery life of a Nest Thermostat can vary depending on several factors. One of the primary factors that impacts battery life is the frequency of adjustments made to the thermostat settings. The more often you modify the temperature or make changes to the schedule, the faster the battery may discharge.
Another factor that affects the battery life is the usage patterns of the thermostat. If you have a busy household where the thermostat is frequently being accessed and adjusted, the battery may drain more quickly than in a less active environment.
Additionally, extreme temperatures can have an impact on the battery life of your Nest Thermostat. If your home is subjected to excessively high or low temperatures, the battery may drain faster to power the thermostat’s functioning in these conditions.
It’s also worth noting that the battery life estimation displayed on the Nest Thermostat is an approximation and may not always be completely accurate. The estimation is based on factors such as the current battery level, recent energy usage, and historical patterns. If you notice significant deviations from the estimated battery life, it may indicate that the battery needs changing.
Overall, the battery life of a Nest Thermostat is designed to be reliable and long-lasting. However, it’s important to be aware of the factors that can impact its lifespan and be prepared to change the battery when necessary. In the next section, we will discuss the signs that indicate your Nest Thermostat’s battery needs changing.
Signs that your Nest Thermostat battery needs changing
While the battery life of a Nest Thermostat can last for years, there are certain signs that indicate the need to change the battery. Recognizing these signs ensures that your thermostat continues to function optimally and provides accurate temperature control.
The first sign to watch out for is a low battery warning displayed on the Nest Thermostat. When the battery level is low, you will receive a notification on the thermostat’s screen, indicating the need for a battery replacement. It’s essential to address this warning promptly to avoid any disruptions in the thermostat’s operation.
An unresponsive thermostat is another indication that the battery needs changing. If you notice that the thermostat is not responding to your touch or not displaying any information on the screen, it could be due to a depleted battery. In such cases, replacing the battery often resolves the issue and restores functionality to the device.
Inaccurate temperature readings can also be a sign that the battery in your Nest Thermostat needs changing. If you observe significant differences between the displayed temperature and the actual room temperature, it could indicate a dying battery. Replacing the battery should rectify any inaccuracies and ensure precise temperature control.
Additionally, if your Nest Thermostat suddenly shuts down and becomes non-operational, it’s highly likely that the battery has drained completely and requires replacement. In such cases, installing a new battery will bring the thermostat back to life and allow you to resume control over your home’s climate.
It’s important to note that if you experience any of these signs, it’s recommended to go through the process of changing the battery, even if the estimated battery life has not reached its end. Trusting the indicators and addressing the battery replacement promptly prevents any unforeseen disruptions in the functioning of your Nest Thermostat.
In the next section, we will guide you through the steps to prepare for changing the battery in your Nest Thermostat.
Steps to prepare for changing the battery
Before proceeding with the battery replacement process on your Nest Thermostat, it’s important to take a few preparatory steps to ensure a smooth and hassle-free experience. These steps will help you to safely remove the thermostat from its base and access the battery compartment.
The first step is to turn off the power to your HVAC system. This can be done by switching off the breaker that supplies electricity to your heating and cooling system. It’s crucial to disconnect the power to prevent any electrical shocks or risk of damage during the battery replacement process.
Once the power is turned off, you can proceed to remove the Nest Thermostat from its base. Gently pull the thermostat towards you to detach it from the baseplate. Be careful not to apply excessive force as it may cause damage to the thermostat or the baseplate.
After removing the thermostat, carefully place it on a stable surface nearby. This will give you easy access to the battery compartment and allow you to safely handle the battery replacement process.
Before opening the battery compartment, it’s a good practice to have a replacement battery on hand. Ensure that you have the appropriate battery model recommended for your specific Nest Thermostat. Having the right battery ready will help you complete the replacement process without any delays.
It’s also advisable to clean the area around the battery compartment before opening it. Use a soft, dry cloth to remove any dust or debris that may have accumulated. Keeping the compartment clean will prevent any contamination or interference with the battery.
With these preparatory steps completed, you are now ready to proceed with the actual battery replacement process. In the next sections, we will guide you through the specific steps to remove the Nest Thermostat from its base and access the battery compartment.
How to remove the Nest Thermostat from its base
When it’s time to change the battery on your Nest Thermostat, you’ll need to remove it from its base. Follow these steps to safely detach the thermostat:
- Locate the thermostat on your wall. It should be mounted on a rectangular baseplate.
- Gently pull the thermostat towards you from the bottom to detach it from the baseplate. The thermostat is designed to slide off easily.
- As you pull the thermostat, you may notice a slight resistance due to the connectors on the base. This is normal and indicates a secure connection.
- Continue pulling until the thermostat is completely free from the baseplate.
- Place the removed thermostat on a stable surface nearby, ensuring that it remains safe and undamaged during the battery replacement process.
Note: If you have difficulty removing the thermostat, make sure that the power to your HVAC system is turned off. Additionally, check if there are any screws or clips holding the thermostat in place, and release them as necessary.
Once you have successfully removed the Nest Thermostat from its base, you can proceed to the next step of accessing the battery compartment. In the following section, we will guide you through locating the battery compartment on your Nest Thermostat.
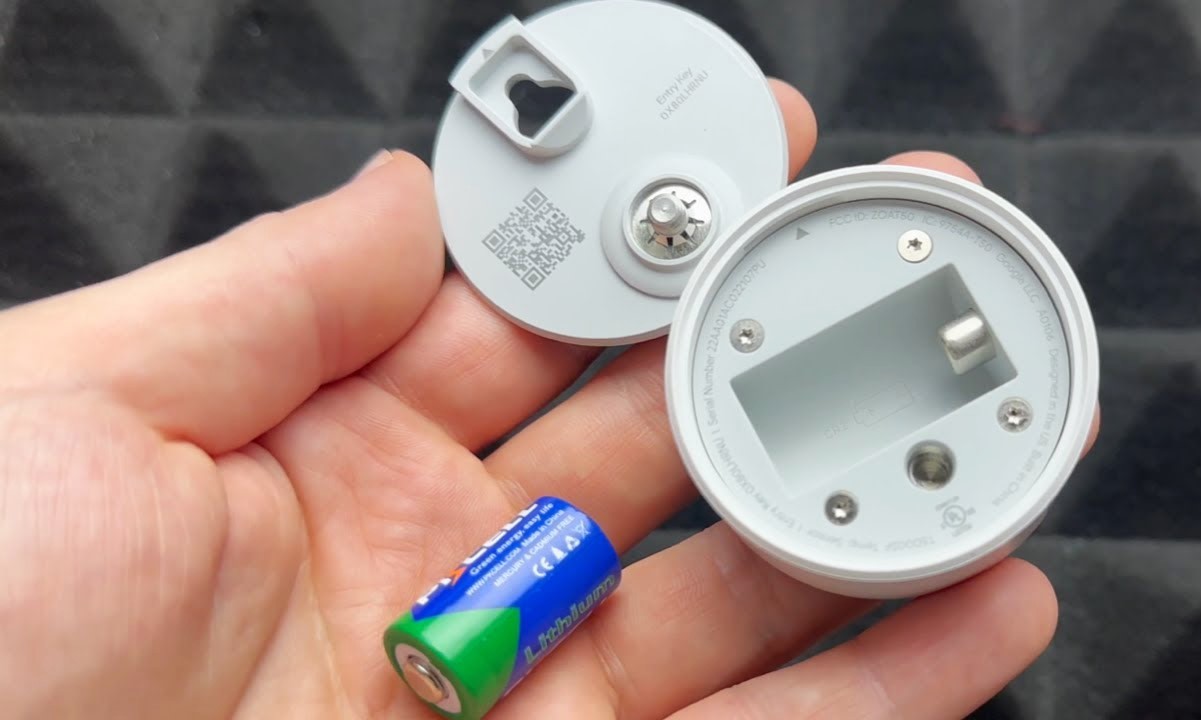
Locating the battery compartment on your Nest Thermostat
After removing the Nest Thermostat from its base, the next step is to locate the battery compartment. The battery compartment is where you will find the old battery and insert the new one. Follow these steps to find the battery compartment:
- Take a closer look at the back of the detached Nest Thermostat.
- You’ll notice a small rectangular compartment towards the edge or bottom of the thermostat.
- This compartment houses the battery and is specifically designed for easy access during battery replacement.
- Identify the latch or slide mechanism that secures the battery compartment. It may be a small switch or a sliding cover.
- Depending on the model of your Nest Thermostat, you may need to press a release button or slide the cover to open the battery compartment.
Once you have located the battery compartment and familiarized yourself with the method of opening it, you are now ready to remove the old battery and prepare for inserting the new one. The next section will guide you through the process of removing the old battery from the compartment.
Removing the old battery from the compartment
Now that you have located the battery compartment on your Nest Thermostat, it’s time to remove the old battery. Follow these steps to safely remove the old battery from the compartment:
- Ensure that you have a clear view and access to the battery compartment.
- If there is a latch or cover securing the compartment, follow the instructions provided to open it.
- Once the compartment is open, you should see the old battery inside. Take note of its orientation and how it is positioned in the compartment.
- Gently press on the battery to loosen it from its connection points. Be cautious not to apply too much force to avoid damaging the battery or the compartment.
- Once the battery is loosened, carefully lift it out of the compartment. Handle the battery by its edges to ensure a secure grip and prevent any accidental drops or damage.
- Set the old battery aside in a safe place for proper disposal or recycling, as per your local regulations.
It’s important to note that the old battery may still have some charge left and should be handled with care. Avoid touching the battery terminals to minimize any risk of electrical shock or injury.
With the old battery successfully removed, you are now ready to proceed with selecting and inserting a new battery into the compartment. In the next section, we will guide you through the process of choosing the right battery for your Nest Thermostat.
Choosing the right battery for your Nest Thermostat
When it comes to selecting a new battery for your Nest Thermostat, it’s important to choose the right one to ensure optimal performance and compatibility. Follow these guidelines to select the appropriate battery:
- Check the documentation that came with your Nest Thermostat. Look for the specific battery model recommended by the manufacturer. This information can usually be found in the user manual or on the Nest website.
- If you don’t have access to the documentation, you can still determine the correct battery type by examining the old battery. Note down its model number or any identifying information printed on the battery label.
- Take note of the battery’s voltage requirement. Most Nest Thermostats typically require a 3.7V lithium-ion battery. Ensure that the replacement battery you choose matches this voltage specification.
- Consider the battery capacity and longevity. Look for a battery that offers sufficient capacity to power your Nest Thermostat for an extended period of time. It’s best to choose a battery with a reputable brand known for durability and reliable performance.
- Check for any additional features or specifications mentioned for the battery. Some batteries may offer enhanced energy efficiency or extended cycle life, which can be beneficial in maximizing the battery’s longevity.
It’s recommended to purchase a new battery from a reliable source, such as an official Nest retailer or a trusted electronics store, to ensure that you receive a genuine and high-quality product.
Once you have acquired the right battery for your Nest Thermostat, you are ready to proceed with inserting it into the battery compartment, which will be discussed in the next section.
Inserting the new battery into the compartment
Now that you have chosen the right battery for your Nest Thermostat, it’s time to insert the new battery into the battery compartment. Follow these steps to safely and properly install the new battery:
- Ensure that the battery compartment is open and ready for the new battery.
- Take the new battery and carefully examine it to ensure there are no visible defects or damage.
- Pay attention to the markings on the battery indicating the correct orientation for insertion. Align the battery in accordance with these markings.
- Hold the new battery by its edges and position it into the battery compartment. Gently press down on the battery to firmly seat it in its designated position.
- Ensure that the battery is properly aligned and securely seated in the compartment to establish a stable connection.
- If there is a latch or cover for the battery compartment, close it securely according to the manufacturer’s instructions. This will protect the battery and ensure proper functioning of the thermostat.
It’s important to note that lithium-ion batteries can be sensitive to extreme temperatures. Ensure that the thermostat is not exposed to excessive heat or cold during the battery replacement process. Extreme temperatures can impact the battery’s performance and lifespan.
With the new battery successfully inserted into the battery compartment, you can now proceed to reattach your Nest Thermostat to its base. The steps involved will be discussed in the next section.
Reattaching your Nest Thermostat to its base
After successfully replacing the battery in your Nest Thermostat, it’s time to reattach it to its base. Follow these steps to securely reattach the thermostat:
- Pick up the Nest Thermostat and position it near its baseplate.
- Align the connectors on the back of the thermostat with the corresponding connectors on the baseplate.
- Gently slide the thermostat onto the baseplate, ensuring that it is properly aligned and securely attached.
- Apply slight pressure to make sure the thermostat is firmly seated on the baseplate. You should feel a slight click or snug fit when it’s properly attached.
- Confirm that the thermostat is securely reattached by gently tugging on it to ensure it does not come loose.
Once you have successfully reattached the Nest Thermostat to its baseplate, you can move on to the next step of verifying the battery installation and checking the functionality of the thermostat.
Please note that during the reattachment process, be mindful of the delicate connectors and components on the thermostat to avoid any damage. Take your time and exercise caution to ensure a secure and proper fit.
In the next section, we will guide you through the essential steps to verify the battery installation and ensure the functionality of your Nest Thermostat.
Verifying battery installation and functionality
After replacing the battery and reattaching your Nest Thermostat to its base, it’s important to verify the battery installation and ensure the functionality of the thermostat. Follow these steps to confirm that everything is in order:
- Make sure that the power to your HVAC system is turned on. Restore power by switching on the breaker that supplies electricity to your heating and cooling system.
- Observe the screen of your Nest Thermostat. You should see the display light up, indicating that it has power.
- Check for any battery-related notifications or warnings on the thermostat’s screen. If the battery replacement was successful, these notifications should no longer appear.
- Verify that the temperature readings displayed on the thermostat are accurate and correspond to the actual room temperature.
- Interact with the thermostat by adjusting the temperature settings and observing the thermostat’s response. It should be responsive and update the temperature accordingly.
- Test out the various features and functions of your Nest Thermostat to ensure that it operates as intended.
If you notice any issues or abnormalities during the verification process, double-check the battery installation to ensure it is properly aligned and securely seated in the compartment. If the problem persists, consult the troubleshooting guide provided by Nest or consider contacting their customer support for assistance.
Additionally, take this opportunity to set up any desired customization or preferences on your Nest Thermostat, such as establishing a schedule or connecting it to your smart home system.
With the battery successfully installed, verified, and the thermostat functioning properly, you can now enjoy the accurate temperature control and energy-efficient operation of your Nest Thermostat.
In the next section, we will provide you with tips for maximizing battery life on your Nest Thermostat, allowing you to extend the time between battery replacements.
Tips for maximizing battery life on your Nest Thermostat
To maximize the battery life of your Nest Thermostat and prolong the time between battery replacements, follow these helpful tips:
- Optimize your temperature settings: Set your thermostat to energy-saving temperatures when you’re away or asleep. Adjusting the temperature by a few degrees can significantly reduce battery usage.
- Utilize the scheduling feature: Take advantage of the scheduling feature on your Nest Thermostat to automatically adjust the temperature throughout the day. This reduces the need for frequent manual adjustments and conserves battery life.
- Take advantage of the built-in sensors: The Nest Thermostat has built-in occupancy and motion sensors that can detect if your home is empty. It will automatically adjust the temperature to an energy-saving mode, further reducing battery usage.
- Keep your thermostat away from direct sunlight: Placing your Nest Thermostat in direct sunlight can cause it to work harder to maintain accurate temperature readings, potentially draining the battery faster. Find a shaded location for optimal performance.
- Ensure a strong Wi-Fi connection: A stable and strong Wi-Fi connection is essential for your Nest Thermostat to function properly. Weak or intermittent Wi-Fi signals can lead to increased battery usage as the thermostat tries to maintain connectivity.
- Regularly clean the thermostat and its surroundings: Dust, debris, and other particles can accumulate on the thermostat and its sensors, affecting its performance and causing the battery to work harder. Clean the thermostat and its surroundings periodically to ensure optimal functionality.
- Check for firmware updates: Periodically check for firmware updates from the Nest app or website. These updates often include performance improvements and energy-saving features that can enhance the battery life of your thermostat.
By implementing these tips, you can extend the battery life of your Nest Thermostat and enjoy uninterrupted temperature control and energy efficiency.
In the following section, we will address some frequently asked questions about changing the battery on a Nest Thermostat.
Frequently asked questions about changing the battery on a Nest Thermostat
Here are some common questions that users often have about changing the battery on a Nest Thermostat:
- How often do I need to change the battery on my Nest Thermostat?
The battery life of a Nest Thermostat can last for several years. The actual frequency of battery replacement depends on factors such as usage patterns, temperature settings, and the ambient conditions in which the thermostat is installed. - What happens if I don’t change the battery on my Nest Thermostat?
If you don’t change the battery when it is low or depleted, your Nest Thermostat may become unresponsive, display inaccurate temperature readings, or even shut down completely. Changing the battery is crucial to ensure the thermostat’s optimal functionality. - Can I use any type of battery for my Nest Thermostat?
It’s important to use the specific battery model recommended by the manufacturer for your Nest Thermostat. Using the wrong type of battery or a battery with different specifications can lead to performance issues or even damage the device. - Can I change the battery while my Nest Thermostat is connected to Wi-Fi?
Yes, you can change the battery on your Nest Thermostat even if it is connected to Wi-Fi. However, it’s advisable to turn off the power to your HVAC system as a precautionary measure before starting the battery replacement process. - Do I need to reset or reprogram my Nest Thermostat after changing the battery?
Generally, you do not need to reset or reprogram your Nest Thermostat after changing the battery. Once the new battery is inserted and the thermostat is reattached to its base, it should resume normal operation. However, it’s always a good idea to double-check your thermostat’s settings to ensure they are as desired. - Can I use rechargeable batteries in my Nest Thermostat?
It is not recommended to use rechargeable batteries in your Nest Thermostat. Nest Thermostats are designed to work with primary lithium-ion batteries. Rechargeable batteries may have different voltage outputs and could cause performance issues or damage the thermostat.
By addressing these frequently asked questions, we hope to provide clarity and guidance on the process of changing the battery on a Nest Thermostat.
With these helpful insights, you can confidently navigate the battery replacement process and ensure the continued functionality and performance of your Nest Thermostat.