
Setting up Jira Automation
Jira Automation is a powerful tool that allows you to automate repetitive tasks, streamline workflows, and improve overall efficiency in your Jira projects. By setting up automation rules, you can save time and effort by automating actions based on specific triggers and conditions.
To get started with Jira Automation, follow these steps:
- Accessing the Automation menu: Log in to your Jira instance and navigate to the project where you want to set up automation. On the left-hand sidebar, click on the “Apps” menu, and then select “Automation.”
- Creating a new rule: Once you are in the Automation menu, click on the “Create Rule” button to start creating a new automation rule.
- Choosing the trigger: The trigger determines what event or action will initiate the automation rule. Jira Automation provides a wide range of triggers, such as issue creation, status changes, comment additions, and more. Select the trigger that best suits your needs.
- Defining the conditions: Conditions determine when the automation rule should be executed. You can set conditions based on issue fields, issue types, project roles, and more. Specify the conditions that must be met for the rule to run.
- Configuring the actions: Actions are the tasks that will be performed when the automation rule is triggered. You can choose from a variety of actions, such as assigning issues to specific users, updating fields, sending notifications, and creating sub-tasks. Configure the actions according to your requirements.
- Setting up advanced options: Jira Automation offers additional advanced options, such as time delays, loops, and conditional branching. Use these options to add complexity and flexibility to your automation rules.
- Testing and validating: Before activating the rule, it’s important to thoroughly test and validate it. Create test scenarios and ensure that the automation rule behaves as expected. Make any necessary adjustments until you are satisfied with the results.
- Troubleshooting: If you encounter any issues during the setup process, refer to the Jira Automation documentation or seek support from Atlassian community forums. Troubleshooting common problems can help you quickly resolve any issues you may face.
By following these steps, you can successfully set up Jira Automation and start automating tasks in your Jira projects. Automation can greatly enhance productivity, reduce manual effort, and improve overall efficiency.
Creating a new rule in Jira Automation
Jira Automation allows you to create custom rules to automate various actions in your Jira projects. With a few simple steps, you can set up a new rule and define its triggers, conditions, and actions.
Follow these steps to create a new rule in Jira Automation:
- Accessing the Automation menu: Login to your Jira instance and navigate to the project where you want to create the rule. On the left-hand sidebar, click on the “Apps” menu, and then select “Automation.”
- Creating a new rule: In the Automation menu, click on the “Create Rule” button to initiate the rule creation process.
- Choosing a trigger: Select the trigger for your rule. Triggers define the event or action that will initiate the automation. You can choose from various triggers like issue creation, status change, comment addition, and more.
- Defining the conditions: Specify the conditions under which the rule should run. Conditions help determine if the automation actions should be triggered or not. You can set conditions based on issue fields, issue types, project roles, and more.
- Configuring the actions: Determine the actions that the rule should perform when triggered. Actions in Jira Automation can include assigning issues to specific users, updating fields, creating sub-tasks, sending notifications, and more.
- Setting up advanced options: Jira Automation offers advanced options like time delays, loops, and conditional branching to add further complexity and flexibility to your rule. Use these options if your automation requires more intricate logic.
- Testing and validating the rule: Before activating the rule, it is crucial to test and validate it thoroughly. Create test scenarios and ensure that the rule behaves as expected. Make any necessary adjustments until you are satisfied with the results.
- Troubleshooting: If you encounter any issues while creating the rule, refer to the Jira Automation documentation or seek support from the Atlassian community forums. Troubleshooting common problems can help you resolve any issues and get your rule up and running smoothly.
By following these steps, you can create a new rule in Jira Automation and unleash the power of automation in your project. Automation rules can save time, streamline processes, and improve overall productivity. Start automating today!
Choosing the trigger for the rule
When setting up a rule in Jira Automation, choosing the right trigger is crucial as it determines what event or action will initiate the automation. With a wide range of triggers available, you can create rules that respond to specific events and automate actions accordingly.
Here are some common triggers you can choose from when creating a rule in Jira Automation:
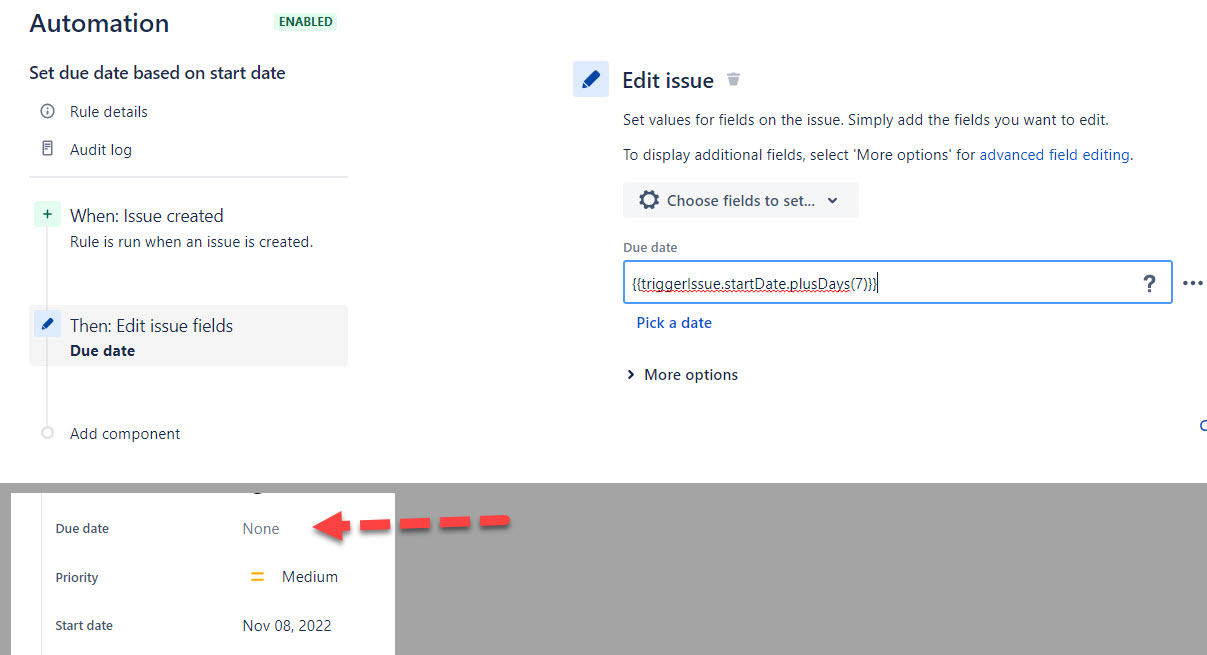
- Issue created: This trigger activates the rule whenever a new issue is created in your Jira project. It is useful for automating actions like assigning the issue to a specific user or sending notifications to relevant stakeholders.
- Issue updated: This trigger fires the rule when an existing issue is updated. It allows you to automate actions like changing the issue status, updating custom fields, or adding comments based on specific criteria.
- Status transitioned: This trigger is triggered when an issue’s status changes. It enables you to automate actions based on specific status transitions, such as assigning tasks to different team members or updating related issues.
- Comment added: This trigger is activated whenever a new comment is added to an issue. It can be used to automate actions like sending notifications to relevant users or updating the issue based on the comment content.
- Field value changed: This trigger fires the rule when a specific field’s value is changed. It allows you to automate actions based on field value changes, such as updating other fields, triggering workflows, or notifying users.
- Scheduled: This trigger enables you to automate actions at a specific date and time. It can be useful for tasks like sending weekly reports or performing regular system maintenance.
When selecting a trigger, consider the specific needs of your project and the actions you want to automate. Evaluate the different triggers available and choose the one that best aligns with your workflow and desired automation outcomes.
Remember, triggers can be combined with conditions and actions to create powerful automation rules. Experiment with different combinations to achieve the desired automation results and streamline your processes.
By carefully choosing the trigger for your rule in Jira Automation, you can initiate automation based on specific events and improve efficiency in your project.
Defining the conditions for the rule to run
In Jira Automation, conditions specify when an automation rule should be executed. By defining conditions, you can control the flow of automation and ensure that the rule only runs when specific criteria are met. This helps you tailor the automation to suit your project’s requirements.
Here are some ways to define conditions for your rule:
- Issue fields: Conditions based on issue fields allow you to set specific criteria that must be met for the rule to run. For example, you can create a condition that triggers the automation only when the priority field is set to “High” or when a custom field meets certain criteria.
- Issue types: Conditions based on issue types enable you to run automation based on the type of issue. This can be useful when you want different actions to be triggered for different types of issues. For instance, you can define a condition that executes the automation only for “Bug” or “Feature” issue types.
- Project roles: Conditions based on project roles allow you to restrict the automation rule to specific project roles. This ensures that the rule runs only when certain users with specific roles perform actions. For example, you can define a condition that triggers the automation only when an issue is updated by a project lead.
- Date and time: Conditions based on date and time enable you to schedule the automation to run at specific times or during specific time intervals. This is particularly useful for actions that need to be automated on a recurring basis or during specific timeframes.
- External triggers: Jira Automation also allows you to define conditions based on external triggers, such as webhooks or incoming email. This enables you to trigger automation based on external events integrated with Jira.
When defining conditions, it’s important to consider the specific requirements of your project and the desired automation outcomes. By carefully selecting and combining different conditions, you can create rules that are triggered only when the predefined criteria are met.
Experiment with different condition combinations to create powerful and precise automation rules that enhance your project’s efficiency and productivity.
Configuring the actions to perform
In Jira Automation, configuring the actions is a crucial step in setting up your automation rule. Actions determine the tasks that will be performed when the rule is triggered. By choosing and configuring the appropriate actions, you can streamline your workflows and save time on repetitive manual tasks.
Here are some common actions you can configure in Jira Automation:
- Assigning issues: You can automatically assign issues to specific users or teams when the rule is triggered. This ensures that the right people are responsible for handling each task.
- Updating fields: Automation allows you to update fields in issues based on specific criteria. For example, you can automatically update the status field to “In Progress” when an issue is transitioned to a specific status.
- Creating sub-tasks: Automation can create sub-tasks for issues based on predefined conditions. This is useful for breaking down larger tasks into smaller, more manageable sub-tasks.
- Sending notifications: Automation enables you to send notifications to relevant stakeholders when specific events occur. This ensures that everyone stays informed about changes and updates in the project.
- Transitioning issues: You can automate the transition of issues from one status to another based on predefined conditions. For example, when certain conditions are met, you can automatically transition an issue from “Open” to “Resolved.”
- Creating linked issues: Automation allows you to create linked issues when specific conditions are met. This can be useful when you need to create related issues or initiate follow-up tasks.
- Adding comments: You can automate the addition of comments to issues based on specific events or conditions. This helps in providing updates or additional information related to the issue.
When configuring actions, consider the specific requirements and workflows of your project. Choose actions that align with your desired outcomes and automate tasks that can save significant time and effort.
Combine multiple actions and adjust their configurations to create complex and highly efficient automation rules that enhance the productivity and effectiveness of your Jira projects.
Setting up advanced options for the rule
In Jira Automation, advanced options give you additional flexibility and control over the execution of your automation rule. These options allow you to add complexity to your rules and customize their behavior based on specific conditions and requirements.
Here are some advanced options you can set up for your automation rule:
- Time delays: You can introduce time delays between actions within your rule. This is particularly useful when you want to create a pause between two tasks or schedule actions at specific intervals.
- Loops: Automation rules can be set to loop and repeat a series of actions. This is helpful when you need to perform a task multiple times or iterate through a set of issues to apply the same actions.
- Conditional branching: With conditional branching, you can define different paths for your automation rule based on specific conditions. This allows you to customize the actions taken based on various scenarios.
- Parallel actions: Automation rules can be designed to execute multiple actions in parallel. This is beneficial when you have independent tasks that can run simultaneously, improving overall efficiency.
- Exception handling: You can set up exception handling to handle potential errors or unexpected situations within your automation rule. This helps ensure that the rule continues to run smoothly even if an issue arises.
- Event triggers: Jira Automation supports event triggers from external sources, such as webhooks or incoming email. This enables you to integrate external events into your automation workflow, allowing for more comprehensive automation capabilities.
By leveraging these advanced options, you can create sophisticated automation rules that cater to your specific project needs. They enable you to design complex workflows, handle edge cases, and add dynamic behavior to your automation.
However, it is essential to use advanced options judiciously and test thoroughly to ensure that your automation rule behaves as expected. Carefully consider the logic, dependencies, and potential impacts of each option to achieve the desired outcomes.
Experiment with different combinations of advanced options to maximize the effectiveness and efficiency of your automation rules.
Testing and validating the rule
Testing and validating your automation rule in Jira ensures that it functions as intended and produces the desired results. By thoroughly testing the rule before activating it, you can identify and resolve any issues or unexpected behaviors, ensuring a smooth automation process.
Follow these steps to test and validate your rule:
- Create test scenarios: Develop test scenarios that cover various situations and conditions that your automation rule should handle. These scenarios should include a range of triggers, conditions, and expected actions.
- Activate the rule in a test environment: Apply the automation rule to a test project or a test instance of Jira. This allows you to evaluate its behavior without impacting the live environment.
- Trigger the rule: Initiate the events or actions specified in your test scenarios to trigger the automation rule. This could involve creating issues, updating fields, or performing other relevant actions.
- Verify the actions: Check if the rule performs the expected actions based on the defined triggers and conditions. Ensure that issues are assigned correctly, fields are updated as intended, notifications are sent, and other actions are executed accurately.
- Review the rule logs: Examine the rule logs or audit trail to track the execution of the rule and verify that each step was performed correctly. The logs will help identify any errors, skipped actions, or unexpected behaviors.
- Adjust and iterate: If the rule does not produce the desired outcomes or encounters issues, make the necessary adjustments to its configuration. Update triggers, conditions, or actions as needed and repeat the testing process until the rule consistently behaves as expected.
It is important to invest sufficient time and effort in testing and validating your automation rule to ensure its accuracy and reliability. By thoroughly testing the rule and addressing any issues upfront, you can avoid potential problems and ensure a seamless automation experience for your team and project.
Remember that testing is an iterative process. Continue to refine and improve your automation rule based on test results to achieve optimal performance and efficiency.
Troubleshooting common issues in Jira Automation
While working with Jira Automation, you may encounter certain issues or challenges that can affect the functionality and effectiveness of your automation rules. Understanding common issues and knowing how to troubleshoot them will help you address problems and maintain a smooth automation workflow.
Here are some common issues that you may encounter in Jira Automation, along with troubleshooting steps:
- Rule not triggering: If your rule is not triggering as expected, verify that the trigger conditions are correctly configured. Ensure that the conditions are met for the rule to initiate. Check if there are any conflicts with other automation rules that might be preventing the desired trigger action.
- Actions not performing: If the actions specified in your rule are not executing correctly, review the configuration of the actions. Check if the necessary permissions are assigned to the rule executor to perform the actions. Confirm that any required custom fields or values are correctly set up.
- Incorrect data in actions: If the actions are updating the wrong fields or using incorrect data, double-check the configuration of the actions. Review the field mappings and ensure that the data used in the actions aligns with the intended outcome and the expected field values.
- Rule errors: If your automation rule encounters errors or displays unexpected behaviors, review the rule logs or error messages to identify the specific issue. Look for any missing or conflicting configurations in the rule, and carefully validate the conditions and actions to ensure they are accurately defined.
- Performance issues: If you experience performance issues or slow automation execution, consider the complexity of your automation rules. Simplify and optimize the rules by minimizing unnecessary conditions, actions, and dependencies. Additionally, evaluate the server resources and capacity to ensure they can handle the automation load.
- Integration problems: In cases where your automation involves integrations with other tools or third-party systems, verify that the integrations are correctly configured and operational. Test the integration connections and ensure the necessary credentials and permissions are provided.
When troubleshooting issues, refer to the Jira Automation documentation for specific error messages or contact the Atlassian community forums for assistance. These resources provide valuable insights and guidance from experienced users and Atlassian experts.
Remember to test any changes or troubleshooting steps in a controlled environment to avoid impacting your live Jira projects. Regular monitoring, testing, and proactive troubleshooting will help maintain optimal performance and reliability in your Jira Automation setup.